Step 1. Cut the clutter and remove silence first
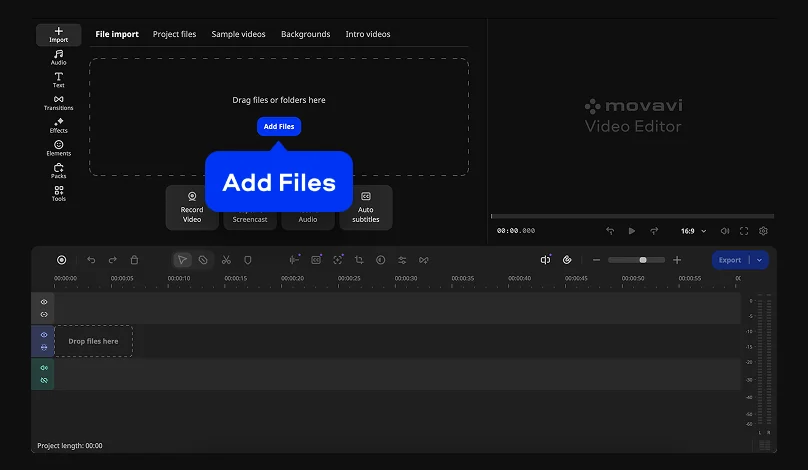
Click Add Files to import your video clip, and drag it onto the Timeline.

To quickly clean up your audio, import your clip into Movavi Video Editor, open the audio track, and run AI Audio Noise Removal.
That's the ground this guide covers, all of it done with the one-click AI tools in Movavi Video Editor. The editor is built for beginners and everyday creators, and it handles the fiddly audio work for you, so the first pass already comes back clean.

Follow that sequence and you sidestep the slip nearly every beginner makes: scrubbing noise off a track they've already amplified, then wondering why the voice comes back thin and metallic.
Let's take the steps one at a time.
Click Add Files to import your video clip, and drag it onto the Timeline.
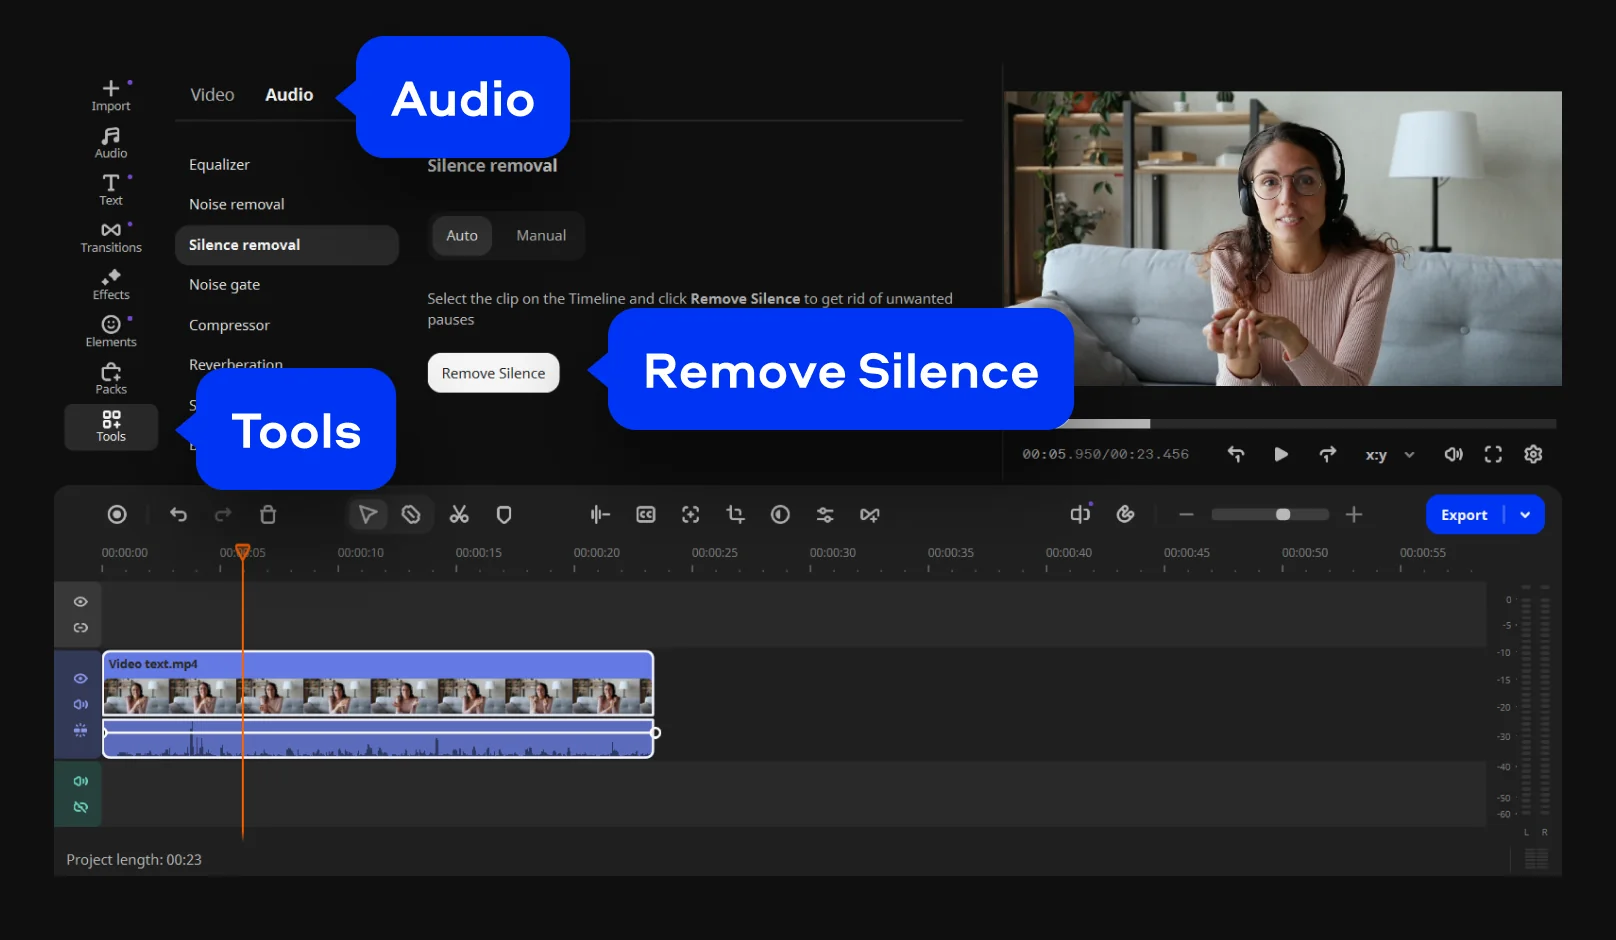
Then in Tools open Silence Removal. It reads the audio, flags stretches that fall under a set volume threshold, and removes them. Two controls are worth knowing:
1) Pause length sets how long a silence has to run before it counts. Longer keeps natural breathing room; shorter gives you a tight, punchy edit.
2) Volume threshold decides how quiet a moment has to be to register as "silence." Adjust it when the tool trims too hard or leaves gaps behind.
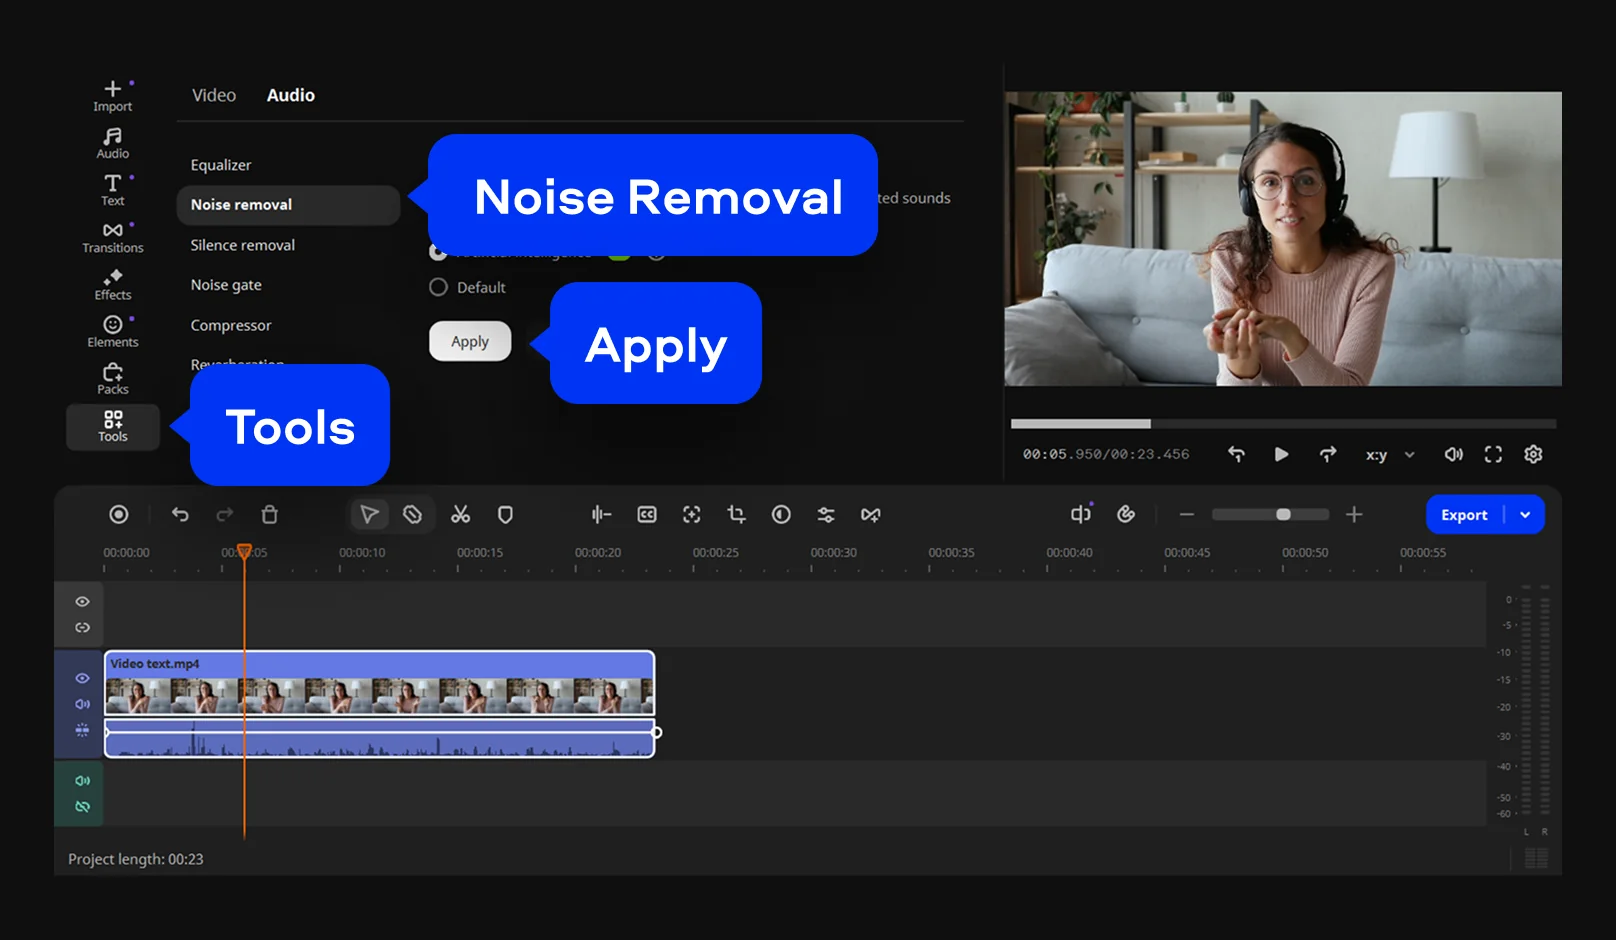
This is the step most people came for, so let's be precise. How do you remove background noise from audio in one click? Select the clip on the Timeline, open Audio in Tools, and apply AI Audio Noise Removal.
Background noise comes in two shapes, and one is harder to kill than the other:
1) Static noise holds steady – an AC unit, a fridge compressor, the low whir of a computer fan, wind that won't let up. Constant sounds are the easy case.
2) Dynamic noise arrives out of nowhere: a door slamming, a dog barking two rooms over, a mouse click, a chair creak. Plain frequency filters struggle here, because there's no single steady tone to subtract.
This is the trap. Push noise removal too hard and the voice goes hollow. It happens because at full strength the processing starts biting into the voice itself, not just the noise around it. Restraint fixes it. Don't run noise removal at 100%. To keep a voice sounding like a voice, hold the strength in the sweet spot, roughly 50–70%, and only go higher when the noise genuinely demands it.
Trust your ears over the meter, but give your ears a fair chance. Listen back on headphones instead of laptop speakers, which mask the very hiss and hum you're after. Run a quick A/B: play a few seconds with the tool on, then off, and listen for two things. Is the background genuinely quieter? And, more to the point, does the voice still read as the voice – natural, warm – or has it gone thin and glassy? If it's the second, you've overdone it, so bring the strength back down. Pay extra attention to the loud moments, since that's where over-processing shows up first. This ten-second habit is what keeps clean audio from tipping into the telltale "AI scrubbed this" sound.

Now make the loudness make sense. Set each clip's volume so speech lands at a steady, comfortable level, then bring music and effects down so they support the voice instead of fighting it. Movavi Video Editor lets you set volume per clip on the timeline, so a quietly recorded segment and a loud one can be matched to the same level, and viewers never have to ride their own volume knob.
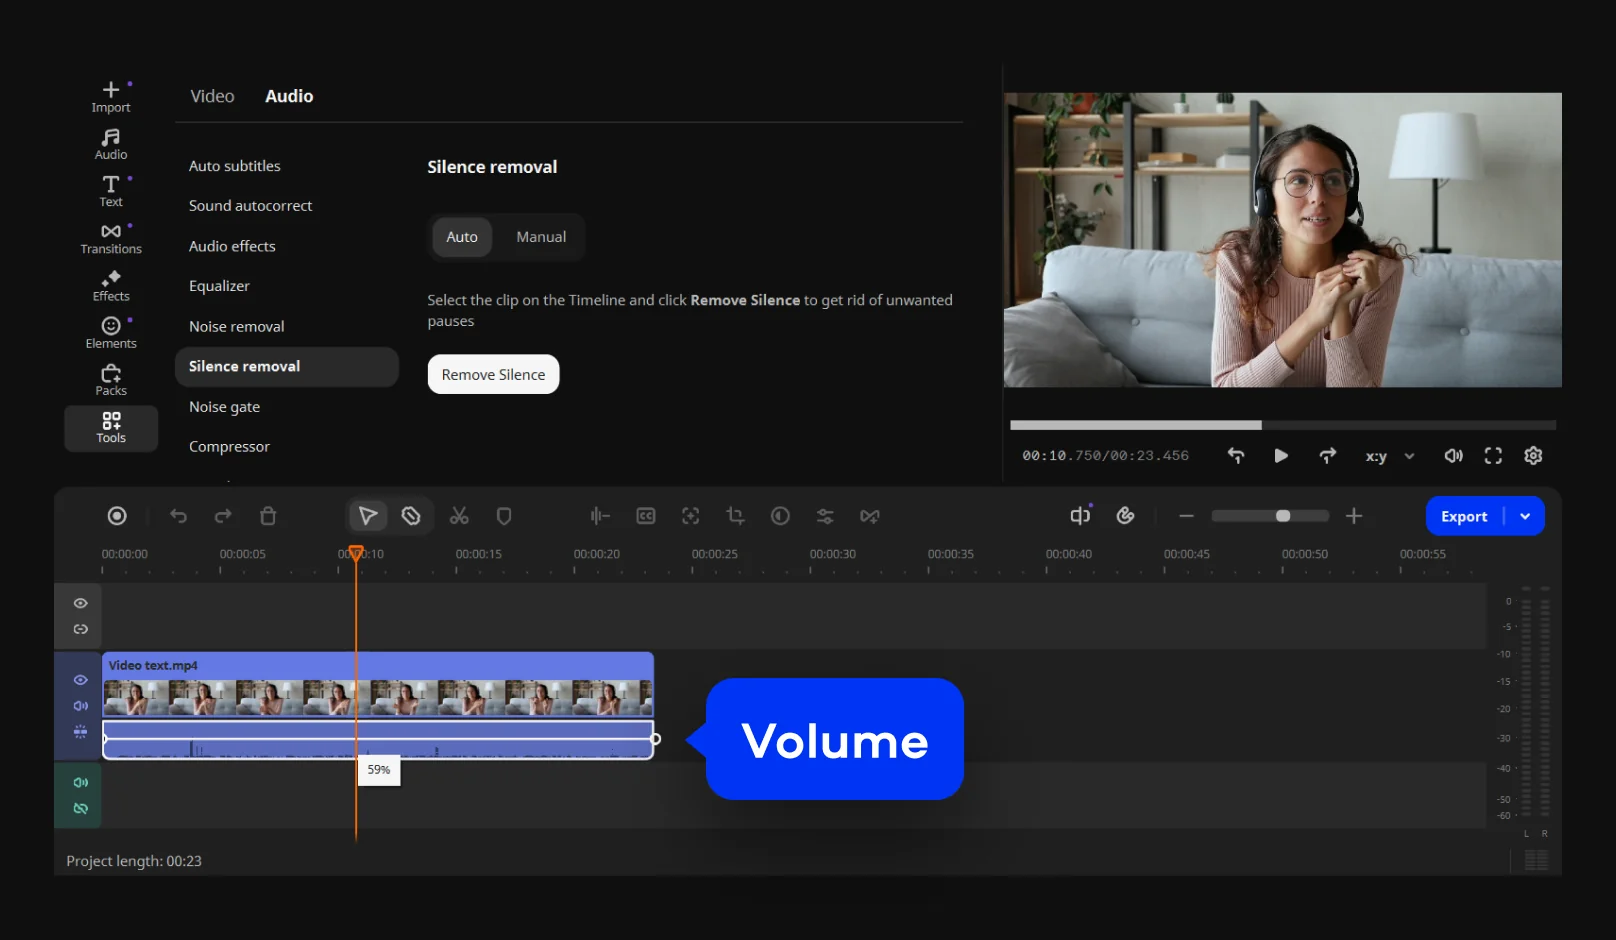
A viewer should set their volume once at the start and forget it. A few practical moves:
1) Bring a too-quiet voice up until it's clearly out front in the mix. This is where cleaning first pays off – you're lifting a clean voice, not a voice-plus-hum.
2) Pull background music down until it's felt more than heard under the words. Rule of thumb: if you catch yourself listening to the music instead of the speaker, it's too loud.
3) Match clip to clip. Recorded across two sessions? Set them to the same speaking level so cuts don't lurch from whisper to shout.
If the voice is clean and steady but simply too low across the whole clip, raise the level until it sits comfortably present without peaking into distortion. Keep an ear on the loudest spots – a laugh, a clap – so nothing crackles.
Clean track, level track. This last pass is what carries it from "fine" to "sounds like a real channel." How do you fix popping Ps, rumble, and muffled low-end?
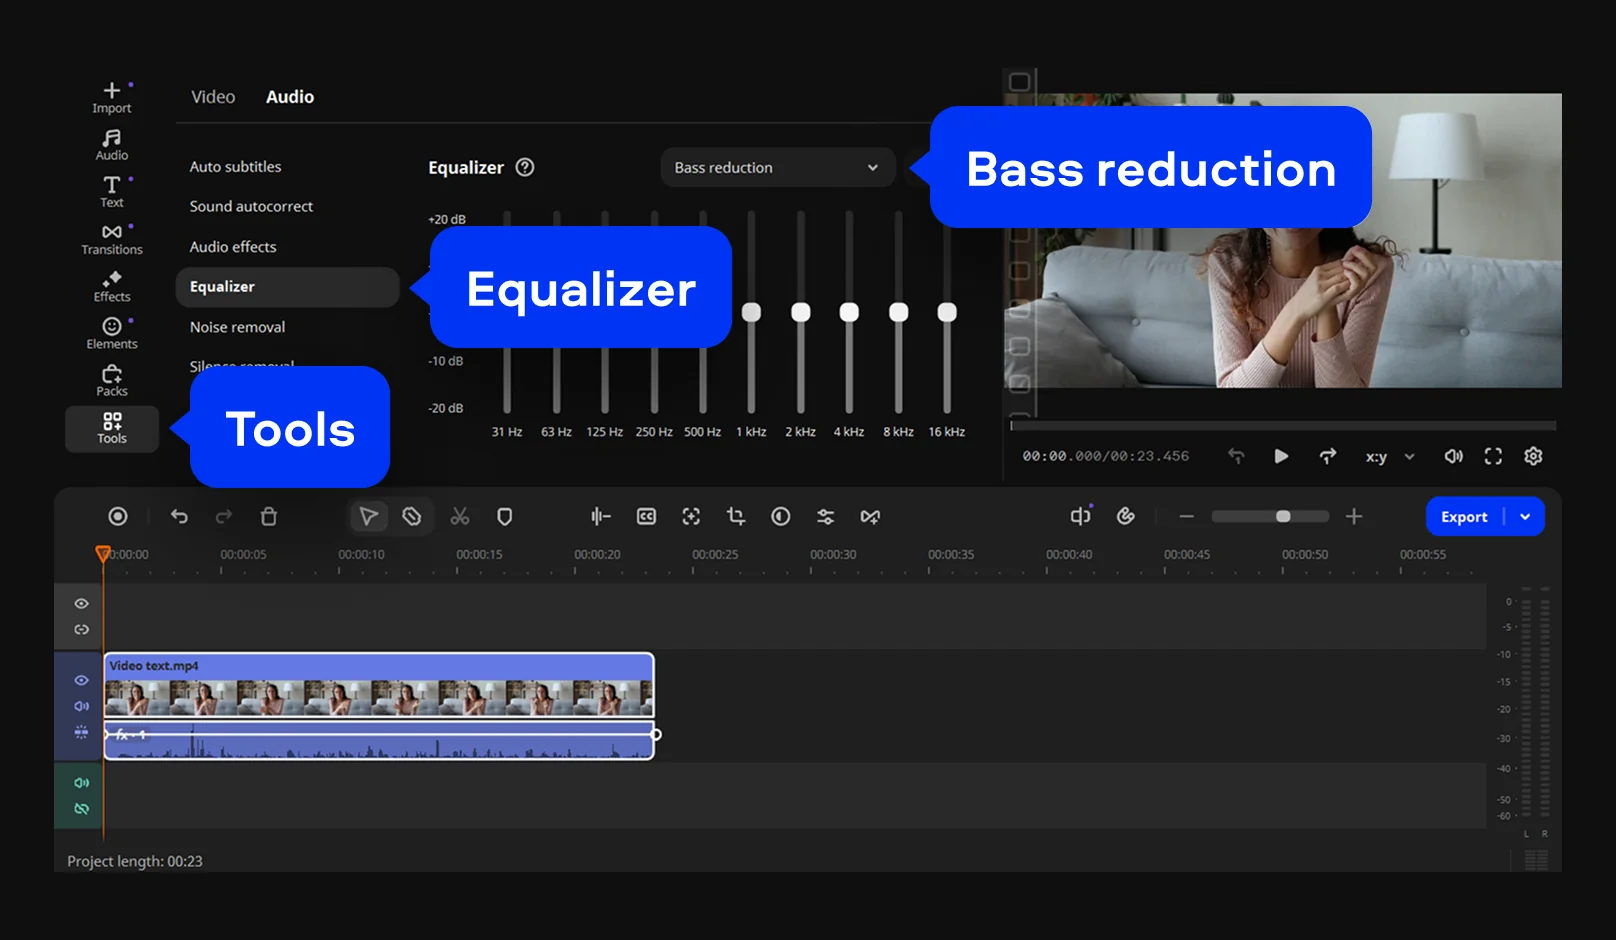
Table bumps, heavy breaths landing on the mic, popping "P" and "B" sounds – they all live down in the low frequencies, that boomy, muffled rumble under your voice. Roll off the very bottom of the range and it clears, and speech reads tighter and more present right away. A low-cut (bass-reduction) setting handles it in one move, with no frequency slider to touch by hand.These low-end problems are sneaky, because they don't always register as "noise." They just make everything feel thick and closed-in. Cutting the rumble is often the single biggest upgrade a beginner voice track gets.
For tone, a quick voice-clarity or auto-correct pass can balance the sound so the voice sits forward and even, and you never have to learn what "3 kHz" means. Apply it, listen, go by ear: keep it if it sounds clearer and more natural, back off if it turns harsh. A few quick wins for the usual voice gremlins:
1) Plosive pops: low-cut / bass reduction, plus angling the mic slightly off-axis next time you record.
2) Boomy, muffled voice: reduce the low end. You're removing mud, not warmth. Thin, distant voice: nudge presence up gently, and do it after leveling, not before.
Most tutorials skip past this, so let's say it plainly: audio cleanup is a chain, and doing the steps out of sequence changes the result you walk away with.
Turn up or normalize the volume first, and the noise floor rises right along with it. The quiet hiss and hum sitting under your voice gets louder too, which makes it much harder to peel off later. "Begin by cleaning the track before you increase the level and what you're amplifying is already clear.
Here's the running order:
Fair to ask before you install anything, and it matters, because AI Audio Noise Removal isn't in every tier. Does the free version of Movavi Video Editor remove noise? You can download Movavi Video Editor free from the official website and try the tools, though the free version comes with the usual limits: exports cap at 60 seconds, output quality and codec options are reduced, and there's a watermark. AI noise removal is a full-version feature. The free download never expires, so it's a real way to test the workflow before you commit.
Here's how the tiers line up for audio cleanup specifically:
So if audio noise removal is what brought you here, the full version is the tier that carries it without restrictions. Movavi Video Editor runs on a flexible, modular license: you begin from free access and add the tools, features, or effect packs you actually use, so the bill tracks your work and budget.
How do I try it, and how do I cancel if it's not for me? You can run the full version on a trial period, commonly 7 or 30 days, with every feature open and no watermark. Cancel before the trial ends and nothing is charged; once it expires, cancellation simply drops the app back to the free version. Straightforward, no games.
A bit of context on why this setup is safe to trust: Movavi Video Editor is used by 70M+ people across 190+ countries, and it ships 15+ updates a year. Recent releases added AI motion tracking, AI subtitles in 100+ languages, and auto silence removal, while 2026 brings AI crop and AI video denoise. This is software that keeps picking up tools, not one that shipped once and went quiet.
System check: Movavi Video Editor runs on Windows 10 and 11 (64-bit) and macOS 12.0 or higher. On the audio side it handles MP3, WAV, AAC, and FLAC for both import and export, so whatever your mic or recorder produced, you can bring it in and get it back out.
Straight talk, since overpromising helps no one: cleanup tools reduce problems, they don't rewrite physics.
A voice recorded in a bare, echoey room still carries some of that reverb after processing, because noise removal targets background sound, not the echo bouncing off hard walls. Audio recorded so loud it already distorted – meaning it clipped – can't be un-clipped, since the information is gone. And a hard wind gust straight into a bare phone mic can be reduced, but a gust that buried the voice completely leaves less to work with.
The pattern holds: the cleaner the recording going in, the cleaner it comes out. A few cheap habits beat any slider – a $20 foam windscreen, recording a step away from the fan, draping a blanket over a hard-surfaced room. Treat the AI tools as the finish, not the whole job. On a decent recording they hand you a clean, clear, publish-ready voice; on a rough one, they get you a real improvement, honestly.
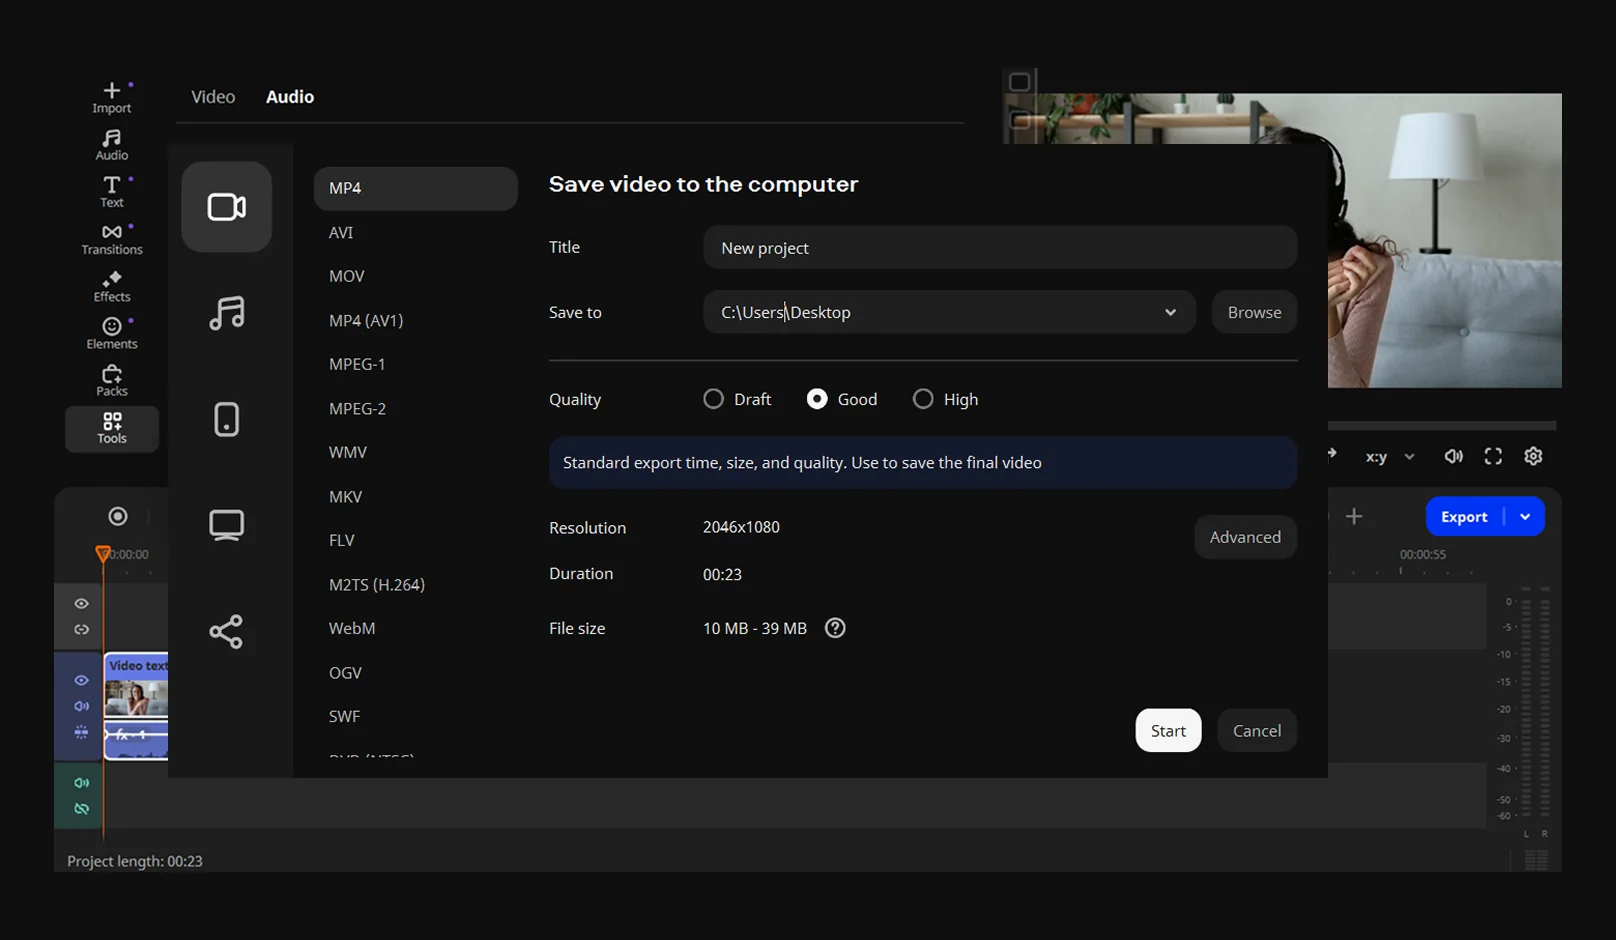
Download Movavi Video Editor free and you can test AI Audio Noise Removal inside the app, but exporting with it applied needs the full version. The free download is a no-expiry way to run the whole four-step workflow and hear the result before you commit. AI noise removal itself is a full-version feature.
Yes. AI Audio Noise Removal runs on its own from one click: the algorithm finds the voice and lowers the background around it (traffic, wind, hums), clearing up to 95% of noise across high, mid, and low pitches. There are no frequencies or presets to set by hand; you apply it and, if it needs it, adjust the strength.
Keep the noise-removal strength moderate, around 50–70% rather than maxed to 100%. Over-processing is what causes that hollow, metallic "underwater" voice. Clean the audio before you raise the volume, and check the result on headphones so any distortion shows up before export.
Done right, no. The point is higher perceived quality, since a clear voice reads as more professional than one that's hiss-free but muffled. Quality only slips when noise removal gets pushed too far and starts affecting the voice. Use a moderate setting and clean before amplifying, and the voice stays natural.
Yes. The Movavi App for iOS is a mobile video and photo editor with templates and trending effects for social reels. For the full AI audio noise removal and leveling workflow in this guide, the desktop Movavi Video Editor is the tool to reach for.
Cancel before the trial period ends (commonly 7 or 30 days) and nothing is charged; cancellation returns the app to the free version once the trial expires. Every feature stays open during the trial itself.
Cancel before the trial period ends (commonly 7 or 30 days) and nothing is charged; cancellation returns the app to the free version once the trial expires. Every feature stays open during the trial itself.
Audio noise is background sound – the hums, hiss, and chatter you remove with AI Audio Noise Removal. Video noise is visual grain in the picture, common in low light, which you remove with AI Video Denoise. They're separate one-click tools, and a dim, noisy clip may need both.