Step 1. Download and install the Movavi video splitter
Download an installation file for a PC or Mac computer and follow the on-screen instructions to finish the installation process.

Try Movavi Video Editor to put two videos side by side:
Add videos to Movavi Video Editor.
Transfer a video to an overlay track.
Create the desired type of a split-screen video.
Save your clip.
By clicking the download button, you're downloading a free version of the program.*

A split-screen video puts multiple videos on one screen at once, side by side, or split into a small grid. You'll see this style on YouTube and social media, from reaction videos to before-and-after clips and tutorials. The editing process is simple: add your footage, select the suitable layout, and export your finished video. In this detailed guide for beginners, you’ll learn how to make a split-screen video in Movavi Video Editor, in just a few simple steps.
Download an installation file for a PC or Mac computer and follow the on-screen instructions to finish the installation process.
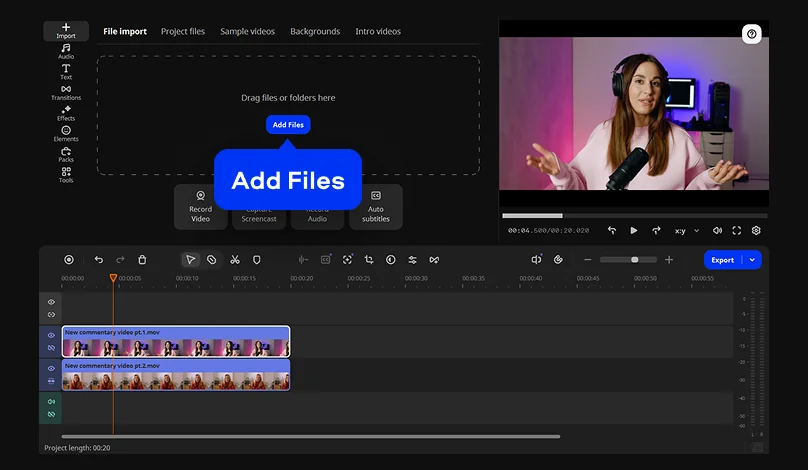
Click Add Files to upload the video files you want to combine. Drag each video clip onto the timeline at the bottom part of the program window. Both of your videos will be added to the main track. Move one of the clips from the main track and set it directly above it.
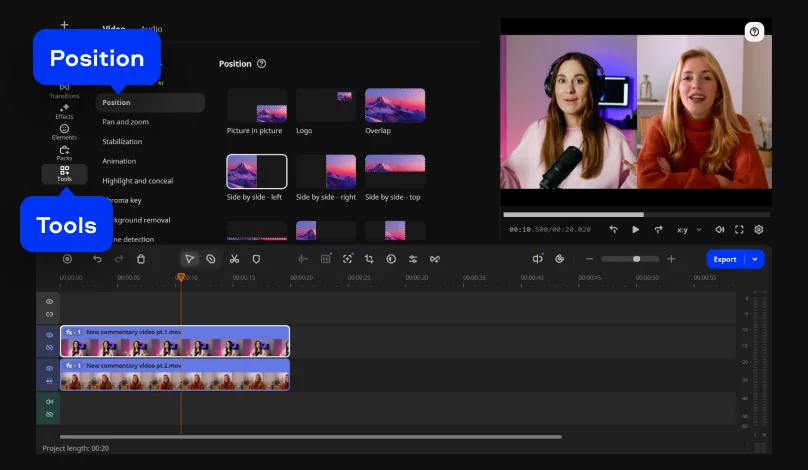
Open the Tools tab and click Position. Choose one of the Side by side layouts. A talking-head reaction video usually works best as two even halves. A tutorial paired with a product demo often works better as one large main shot with a smaller clip added in the corner.
The same tool also has Picture-in-picture, Logo, and Overlap modes, in case a layered look fits your video better.
After you’ve selected the layout, resize and reposition videos by dragging the edges of each clip in the preview window until the layout looks right.
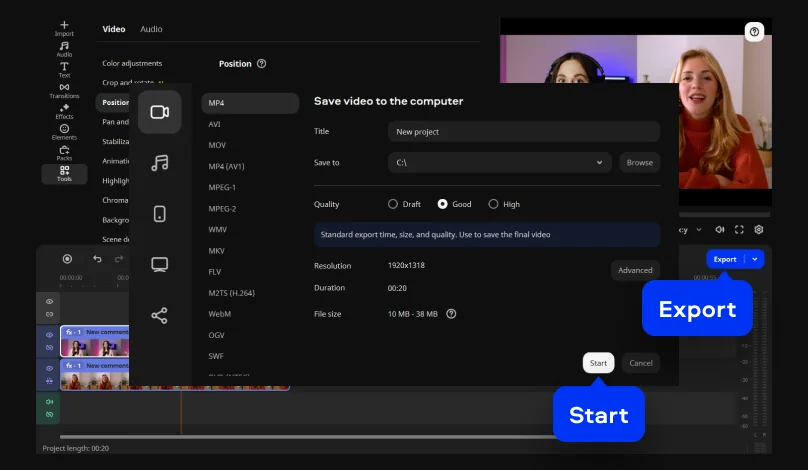
Hit the Export button, choose the output format and resolution, and specify the destination folder. If you're posting a YouTube video or uploading to another social media platform, choose MP4 – it's the format most sites support. Finally, hit the Start button.
Match the brightness and color
Match the brightness and color of both videos so the split doesn't look mismatched. If one footage looks warmer or darker than the other, use the color presets to even them out fast. Or you can also adjust tone, contrast, and saturation manually if the presets don't quite match. The whole process only takes a few minutes to fix, and it makes both clips look like they were shot together.
Manage the audio
Two open mics can cause an echo, so mute or turn down whichever side isn't talking, then use normalization to bring both tracks to a similar volume. If the volume needs to change more than once in a clip, don't just set one flat level. Use a volume curve instead, so you can draw the ups and downs in yourself.
Keep the audio synced
Link each audio track to its video clip early on. That way the sound stays with the right side of the screen even after you trim or drag a clip somewhere else. It saves you from re-syncing everything manually after every edit.
Label each side of the screen
Add a quick title over each clip so viewers know who's who, or which side is before and which is after. Keep the text short enough to read at a glance, since each clip has less room than a full-screen video would. A simple label at the start of the clip is usually enough. You don't need it to stay on screen the whole time.
*The free version of Movavi Video Editor may have the following restrictions depending on the build: watermark on exported clips, 60-second video or 1/2 audio length limit, and/or some advanced features unavailable when exporting videos.

Yes. The free version of split-screen video editor is a full download from the official site, and you can build and preview a split-screen video with it. Exports are limited to 60 seconds and carry a watermark; the full version removes both restrictions.
Yes, you can use Movavi Video Editor on platforms, including Windows 10 and 11 (64-bit) and macOS 12.0 or later with a native support on Apple's M-series chips.
Yes. Once the app is downloaded and installed, editing and exporting all happen locally, without an active internet connection.
Yes. You can use the Trio layout in Movavi Video Editor. The layout option arranges up to three clips in the same frame at once. This works well for group reactions or multi-angle recordings.
You can import video files in popular formats, including MP4, MOV, AVI, MKV, and WMV. For export, choose MP4, since it’s the most compatible option for uploading to YouTube or other platforms. Other formats and quality settings are available as well depending on where you plan to use your video.



1.5M+ users already subscribed to our newsletter