Step 1. Download and open Movavi Video Editor
Grab the free version from the official Movavi website and install it on Windows 10 or 11, or macOS 12.0 and later.

Movavi Video Editor is an intuitive video editor with one-click AI tools and hundreds of drag-and-drop effects.
A first-time editor can add a clean Instagram or TikTok handle to a talking-head vlog on their very first try, no manual required.
To add social media icons to your video in Movavi Video Editor, import a transparent PNG logo (or grab a ready-made icon from the built-in titles and stickers), drop it onto the track above your main clip, then drag it into a corner and set how long it stays on screen.
The whole thing takes a few clicks, works on Windows and Mac, and needs zero animation experience. Below, we'll walk through every method, plus placement, timing, and the honest truth about making icons clickable.
Three things: your video, an icon file, and Movavi Video Editor installed on your PC or Mac. The icon file is the part people get wrong, so let's start there.
A social media icon is just a small logo. It might be your platform's badge (Instagram, YouTube, TikTok, X) or your own channel avatar. For it to sit cleanly over your footage with no ugly box around it, the file needs a transparent background, which means a PNG, not a JPG.
Here's the difference in one line:
Movavi Video Editor imports PNG, JPEG, BMP, and static GIF files. Use PNG with a transparent background and the "box around the logo" problem disappears before it starts. Got only a JPG on a plain white background? That white will show, so track down a proper transparent PNG version instead.
System check: Movavi Video Editor runs on Windows 10 and 11 (64-bit) and macOS 12.0 or higher. It's a desktop app, so you're working on a full timeline with room to position things precisely, not squinting at a phone screen.
Grab the free version from the official Movavi website and install it on Windows 10 or 11, or macOS 12.0 and later.
Click Add Files to import your video clip, and drag it onto the Timeline.
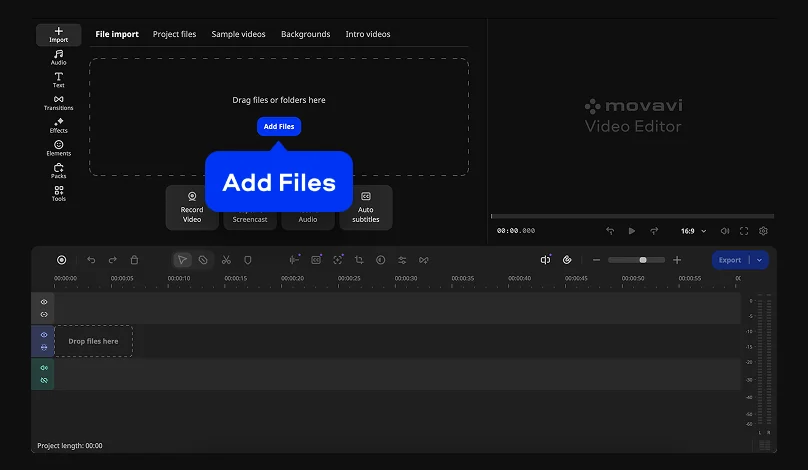
Go to Text in the left menu, select Vlogging and style and drag your chosen icon onto the Timeline.

Double-click the preset on the timeline to edit the text and add your channel name or nickname. Click Apply to save the result.

Click Export, pick your format, and click Start.

Want more range than the built-in set? The optional Movavi Effects subscription adds 10,000+ creative effects across themes like blogs, social media, business, family, and holidays, plus stickers, overlays, titles, frames, and 1,500+ music tracks. Every effect from that collection previews directly on your own footage for free, and you can even save a version with a watermark before you decide to buy. So you can test a follow badge on your actual video and see if it lands before spending anything.
For an SMM manager staging a product promo, this means the brand's Instagram and TikTok handles can go on screen in a couple of minutes, in a style that matches the campaign. No design software, no waiting on the design team.
Place social media icons inside the "safe zone," away from the edges where platform buttons, captions, and the video title sit. On horizontal video (YouTube), keep icons out of the bottom strip where the timebar and controls appear. On vertical video (Shorts, Reels, TikTok), keep them clear of the right-side action buttons and the lower caption area.
The single most common mistake is dropping the icon into the very corner or the bottom, then watching the platform's own interface swallow it. The like button, the "follow" prompt, the creator handle, the progress bar all live near the edges.
Here's a quick placement guide by format:
Shot horizontal but need a vertical version for Shorts or TikTok? Movavi's auto-tracked cropping reframes the footage and keeps your main subject centered as it converts to vertical. In internal testing comparisons with other video editors, this AI cropping delivered smoother, more precise tracking in 7 out of 10 cases. Reframe first, then place your icon. That way you're positioning it against the final aspect ratio instead of guessing.
Show a social media icon for roughly 3 to 6 seconds: long enough to read, short enough to stay out of the way. Bring it in during the first 10–15 seconds as an early reminder, then again near the end alongside your closing call to action.
A logo that flashes for one second gets missed. One that camps in the corner for the entire video stops registering and starts to annoy. The middle ground is a short, deliberate appearance tied to something you're saying.
Use the Blade tool for frame-accurate cuts when you want the icon to pop in and out at an exact moment. And if you're building a dedicated outro card, you can accelerate long footage up to 100x to compress a slow segment into a quick end sequence.
A static logo in the corner can look pasted-on. Three features in Movavi Video Editor give it a bit of life.
1. Add movement with the animation tool. The full version's animation feature lets you have the icon slide or fade into view instead of just snapping on. A gentle fade reads as intentional and matches how most channels handle their corner bug.
2. Add a sound cue. Editors almost always tuck a short sound (a soft pop or click) under the moment an icon appears, because it pulls the eye. Movavi Video Editor includes a selection of copyright-free music tracks and sounds, so you can drop one in without licensing worries.
3. Lock it to a moving subject with AI motion tracking. Want a handle to follow you around the frame instead of sitting in a fixed corner? AI motion tracking attaches graphics (an image, a video, or your icon) directly to a moving object and keeps them locked to it through the scene, all from a single click. For a walking-and-talking vlog, that keeps your handle glued next to you the whole way.
Using a pre-made animated "subscribe button" clip that comes on a green background? Movavi Video Editor's chroma key removes that green so the animation blends onto your footage. AI video denoise can also clean up a grainy green-screen source for a cleaner key. (Chroma key and animation are full-version features, covered under versions below.)
The full version's animation feature lets you have the icon slide or fade into view instead of just snapping on. A gentle fade reads as intentional and matches how most channels handle their corner bug.

Editors almost always tuck a short sound (a soft pop or click) under the moment an icon appears, because it pulls the eye. Movavi Video Editor includes a selection of copyright-free music tracks and sounds, so you can drop one in without licensing worries.

Want a handle to follow you around the frame instead of sitting in a fixed corner? AI motion tracking attaches graphics (an image, a video, or your icon) directly to a moving object and keeps them locked to it through the scene, all from a single click. For a walking-and-talking vlog, that keeps your handle glued next to you the whole way.

Using a pre-made animated "subscribe button" clip that comes on a green background? Movavi Video Editor's chroma key removes that green so the animation blends onto your footage. AI video denoise can also clean up a grainy green-screen source for a cleaner key. (Chroma key and animation are full-version features, covered under versions below.)
No. A social media icon baked into the video image is not clickable, because the video frame is just pixels and can't respond to a click. No video editor, Movavi or otherwise, can make a pixel inside the footage act like a link. To make the icon do something, you pair the on-screen visual with a clickable element that lives on the hosting platform.
This trips people up, so let's be clear about what actually drives the click:
So the winning combo works in two parts. The icon you add in Movavi Video Editor makes viewers aware you're on that platform and visually reinforces the ask. Meanwhile the platform's native card, end screen, link sticker, or description link does the actual clicking. Your handle on screen plus your handle in the description covers both halves: viewers notice you, and they have a way to reach you.
Range matters more than theory, so here's the same feature doing very different jobs:
Same set of tools, three completely different videos. That's the point. You're not locked into one look.
You can also match the icon to the moment. Running a graduation-season series in May? A themed follow badge in your school colors fits the mood better than a generic corner logo. Posting a holiday recap in December? A seasonal sticker next to your handle reads as "made for right now" instead of pulled from a template. The occasion sets the style; the placement and timing rules stay the same.
Problem: a black or white box around your logo. Your file is a JPG, or a PNG saved without transparency. Swap it for a transparent PNG (one with a real alpha channel). Movavi Video Editor reads PNG transparency directly, so the box vanishes once the file is right.
Problem: a green halo around an animated subscribe button. That's leftover green from a green-screen clip that didn't key cleanly. Apply chroma key and nudge the tolerance until the halo is gone. If the source clip is grainy, run AI video denoise first for a cleaner edge, then key it. (Both are full-version features.)
You've got the icon on screen, sitting in the safe zone, timed to your call to action. From here, the small stuff is what makes it feel finished: a subtle fade, a quiet pop, a handle that follows you across the frame.
Want fresh takes on outros, handle animations, and follow prompts without starting from a blank timeline? Movavi Ideas publishes new editing tips every week, each with a short step-by-step tutorial, free and made for Movavi Video Editor users. Trusted by 70M+ users across 190+ countries, the software gets 15+ updates a year, so there's usually a new idea waiting the next time you sit down to edit.
Grab a transparent PNG, open your timeline, and give your next video a handle worth following.

A transparent PNG. PNG carries an alpha channel, so only the logo shows and there's no box around it. JPG can't hold transparency and will add a solid background. Movavi Video Editor imports PNG, JPEG, BMP, and static GIF.
No. Movavi Video Editor's built-in titles and stickers let you add a handle or badge without importing anything. Type your @channel as a title in the style you like, and you're set.
Keep it in the safe zone. On vertical video, stay clear of the right-side buttons and bottom caption. On horizontal video, avoid the bottom control strip. Reframe to your final aspect ratio first, then position the icon.
About 3 to 6 seconds. Show it early (first 10–15 seconds) and again near your closing call to action for a second reminder.
Not inside the video image itself, since those pixels aren't clickable. Pair the on-screen icon with a platform-native clickable element: YouTube cards or end screens (Partner Program required for external links), a description link, or an Instagram/TikTok link sticker.
Yes. AI motion tracking locks the icon to a moving subject and keeps it attached through the scene from a single click, so your handle can travel with you instead of sitting in a fixed corner. For a static corner bug you don't need tracking at all. Just position it and set the timing.
Small enough to stay out of the way, large enough to read at a glance. Scale it in the preview window until it reads clearly on a phone screen, since that's where most people will watch. A good rule of thumb: keep it in the same visual weight as an on-screen handle or subscribe prompt, not competing with your main subject.
Windows 10 and 11 (64-bit) and macOS 12.0 or higher.


1.5M+ users already subscribed to our newsletter