How to Edit AVI Files on PC for Beginners

Movavi Video Editor
  • Trim, cut, crop, and straighten tilted frames

  • Remove pauses and dead air with one-click AI

  • Fix shaky footage and clean low-light noise

  • Assemble videos fast using customizable modular templates

By clicking the download button, you're downloading a trial version of the program.*

Edited by
Ben Jacklin
4,798

Your AVI clips can go straight into an AVI video editor without converting. This guide shows how to edit AVI video files on a PC, with vloggers, families with old home videos, and gamers in mind.

Movavi Video Editor is an intuitive video editor with customizable video templates, one-click AI tools, and hundreds of drag-and-drop effects. It’s a desktop app for Windows and macOS, and it opens your AVI clips as they are. Movavi Video Templates is a multi-style library of customizable, pro-looking, modular templates for any kind of video. Swap your clips into its Blocks, short pre-edited segments, like an intro or a countdown, where you drop in your own videos, photos, and text. You can reorder, add, or remove them.

How to edit AVI files in Movavi Video Editor: step by step

The path is short for a vlog, a trip recap, or an unboxing: add the AVI clip, trim it, cut the pauses, export. Time to cut to the chase.

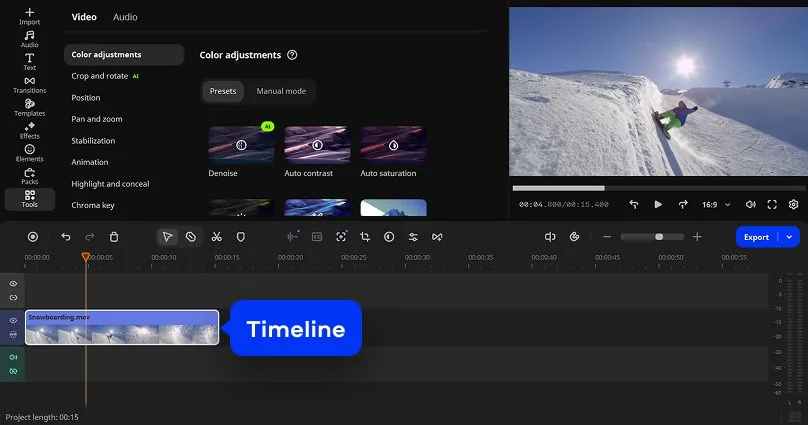
Hover over a clip or move along the timeline and you get an instant preview of the exact frame. Most tools work in a single click, and effects go on with a drag and drop.

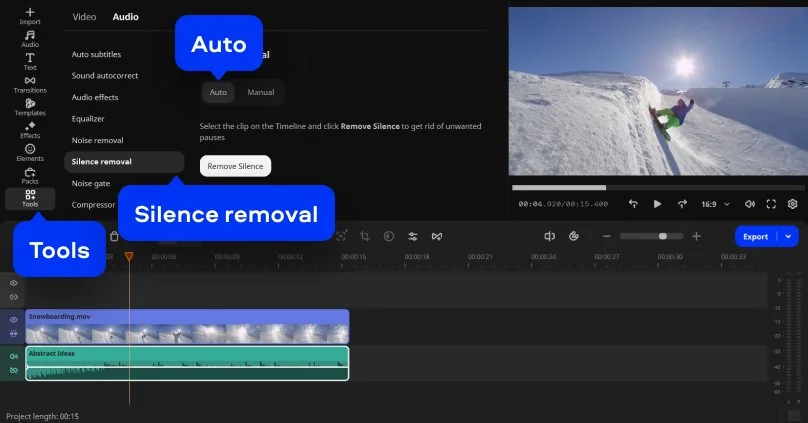
Step 3 is where the AI earns its keep. Silence removal finds the pauses in your talking footage and cuts them. In our internal testing, it accelerated editing by nearly 5 times compared with cutting by hand on the timeline. For a cut in the middle of a clip rather than at its ends, the Blade tool makes frame-level cuts without moving the position marker.

Step 1. Add your AVI files

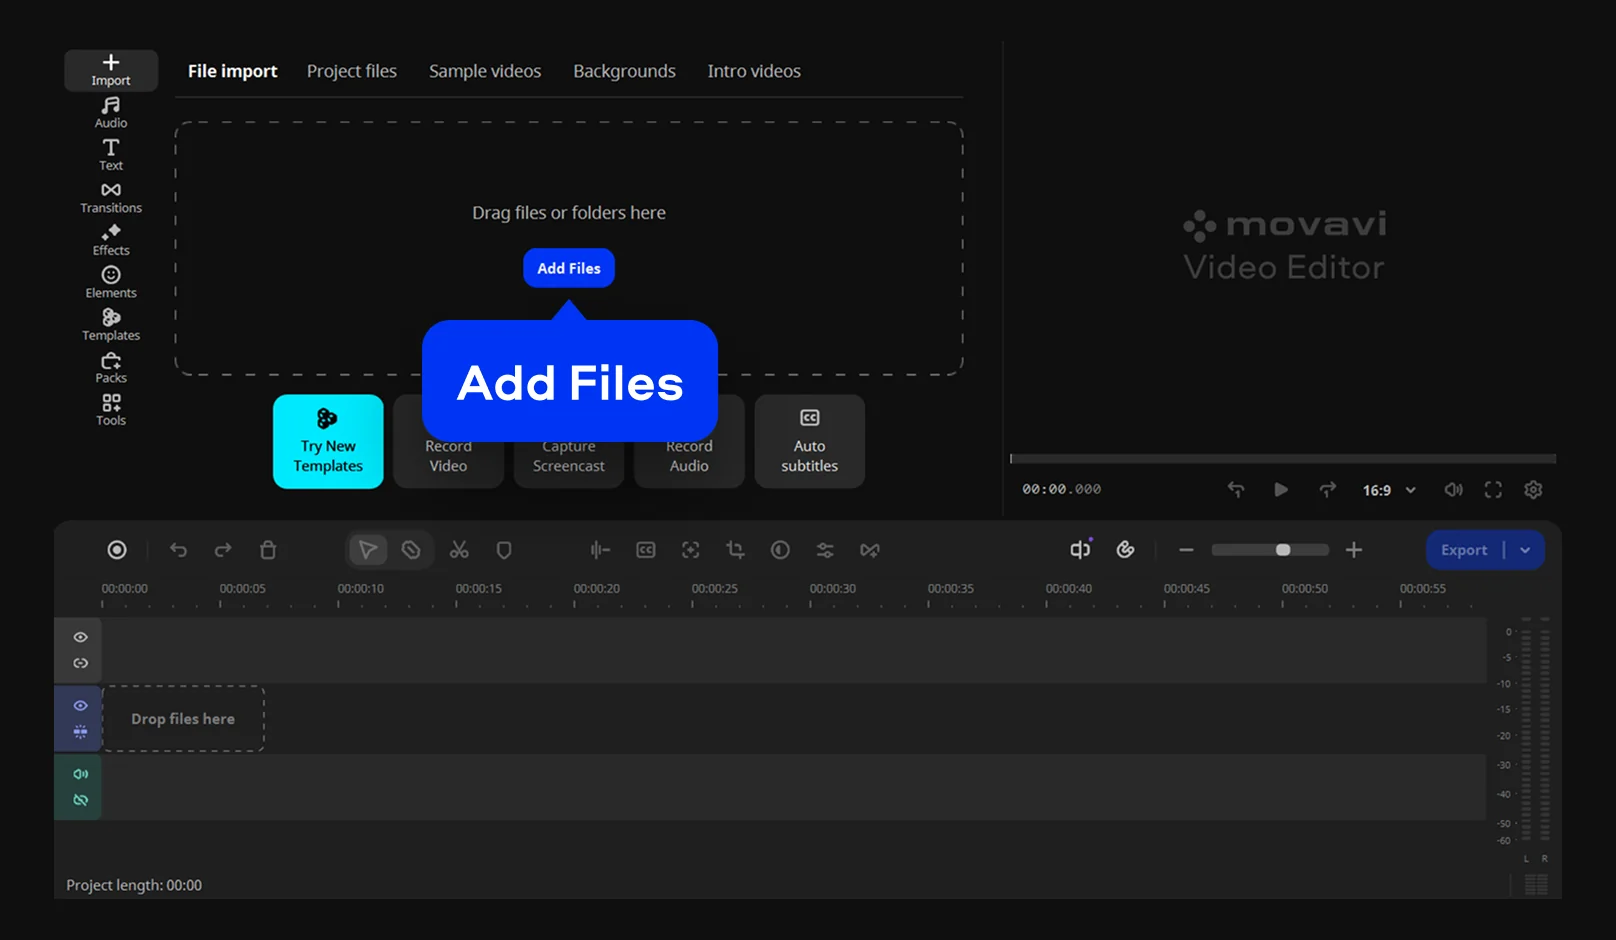
Click Add Files. Select the AVI clips you want to edit. Then place the clips on the timeline in the order you want.

Step 2. Trim the clip

Move the cursor along the timeline to find the first frame you want to keep, and a preview of that exact frame appears. Drag the left edge of the clip to that frame. Next, move the cursor to the last frame you want to keep. Drag the right edge of the clip to that frame.

Step 3. Cut the pauses

Click your clip on the timeline. Open the Tools menu and choose Silence removal. Choose Auto mode. Then start the removal.

Step 4. Export the video

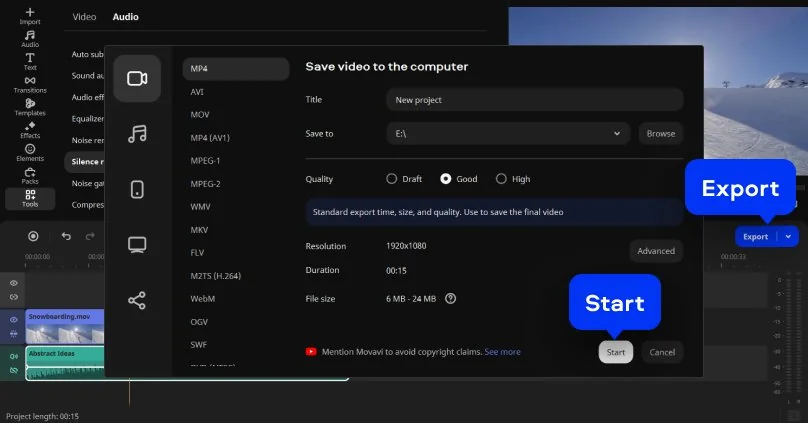
Click Export. Choose the export format. Then click Start.

Quick fixes for AVI clips

A few small tools save a clip that’s almost right:

  • Rotate turns a clip in 90° steps, and a separate slider straightens a tilted horizon.
  • Cropping has a Manual mode where you drag the crop frame. It also removes black bars and fixes mismatched aspect ratios.
  • Fade adds a fade-in or fade-out to a clip and works alongside transitions.
  • Freeze frame holds a moment for 4 seconds by default, and you can change the length.
  • Video speed runs from 0.01x to 100x, with an Original tone option that keeps the pitch steady.

Common mistakes

Importing clips after the template is open. Add your AVI files with Add Files before you choose a template, so every Block can be filled in one pass.

Moving the AVI file mid-project. If you move or rename a clip after adding it, Movavi Video Editor detects and relinks moved or missing files. Autosave also recovers your work if the program closes unexpectedly. To carry an edit to another PC, save a portable project, which stores the project together with all its media.

Exporting without picking a format on purpose. MP4 is the recommended choice for broad compatibility, and AVI is also available as an output format. Match the export to where the video is going. Export for devices has presets for iOS and Android phones and tablets, PlayStation, and Xbox. Direct upload sends the file to YouTube, Vimeo, Google Drive, or TikTok, with title, description, and privacy settings for each platform.

Running silence removal on autopilot. Auto mode is a solid start, and pause length and volume thresholds stay adjustable. If a cut sounds too tight, adjust them and try again.

Treating a test export as the final one. Exports from Movavi Video Editor Free carry a watermark and a length cap, while the full version exports without either. Test every tool in the software on your own AVI clip first, then export from the full version when you’re ready.

Why are AVI files still around

Old camcorder footage, screen recordings, and game captures keep landing in AVI. They stay on drives because nobody deletes a birthday or a boss fight.

Families → digitized home videos

A birthday, a graduation, or a weekend road trip filmed years ago deserves a proper rewatch. AI video denoise clears grain and low-light artifacts while keeping faces, textures, and edges sharp, and it suits archival restoration. Color correction presets adjust tone, contrast, and saturation in a click. Stabilization reduces handheld camera shake. The result is a clip the whole family can play at the next get-together.

Gamers → gameplay clips

A long capture usually holds one great minute. Pre-timeline trimming pulls a short segment out of a long file before it goes into the project, so a highlight edit starts with the good part. The slow motion tool and speed control set the pace, and picture-in-picture keeps a second clip inside the same frame for a game review. The result is a highlight reel built from a single recording.

Teachers and entrepreneurs → old lectures and presentations

A recorded lesson or an internal training video gets a second life with AI Audio Noise Removal, auto subtitles, and volume normalization, which smooths loud and quiet stretches. The Highlight and Conceal mask can blur a part of the frame you don’t want on screen. The result is a recording a new class or a new hire can follow.

Make your AVI footage look pro with Templates

A template saves the assembly work. It’s a ready-made project and it arrives with music, transitions, and text already set. Block types vary, for example an intro, a countdown, a quick cut, or an animated collage.

Say you have AVI clips from a weekend trip and want a travel video with some structure. Click Add Files and select the clips first. Open the Templates tab, choose a template that fits the trip, and drop it onto the timeline. Then double-click a Block on the timeline, or open Clip settings, and replace the placeholder with your own clip or photo. Go Block by Block, then reorder, add, swap, or delete Blocks until the length fits. Retype the Block text last.

Nothing is locked. You can keep the template’s music or replace it, and keep, swap, remove, or add transitions and effects. Trimming, silence removal, and subtitles come after the Blocks are filled, because they work on the filled timeline. Finish with Export, then Start.

Several templates come with the full version of Movavi Video Editor at no extra charge. The whole library of templates and Blocks needs the separate Movavi Templates subscription.

Movavi Ideas

Once the footage is trimmed and the template is filled, the video might still want a twist. Open Movavi Ideas, a hub of simple, eye-catching editing ideas that’s published weekly and free to access. Each idea has a step-by-step tutorial that takes under a minute to follow. Themes include vlogs, short vertical clips, business videos, holidays, family videos, and memes, so an AVI clip from last summer can find a fresh format.

Pick one AVI clip, click Add Files, and try one idea this week. A new one will be waiting after that.

Movavi Video Editor
Create awesome videos easily

*The free version of Movavi Video Editor may have the following restrictions depending on the build: watermark on exported clips, 60-second video or 1/2 audio length limit, and/or some advanced features unavailable when exporting videos.

Frequently asked questions

How do I edit an AVI video file?

Open it in Movavi Video Editor with Add Files, trim it on the timeline, and finish with Export and Start. Reverse is worth knowing: it plays a clip backward, video, audio, or both, and combines with speed changes for a rewind effect.

How can I convert an AVI file to MP4 on Windows?

Add the AVI with Add Files, click Export, choose MP4 as the format, and click Start. If you only need a conversion with no editing, Movavi Video Converter converts video, audio, and image files across multiple formats at high speed.

How do I edit an already existing video?

The same way. Add the file with Add Files; MP4, MOV, AVI, MKV, and WMV all open. Save the project as a .mepj file, and you can reopen or rename the edit later.

What program will open an AVI file?

Movavi Video Editor opens AVI files and lets you edit them in the same place. It also reads audio in MP3, WAV, and FLAC and images in JPEG, PNG, BMP, and static GIF, so one project can mix all three.

Have questions?
If you can’t find the answer to your question, please feel free to contact our Support Team.
Join us for discounts, editing tips, and content ideas

1.5M+ users already subscribed to our newsletter

By signing up, I agree to receive marketing emails from Movavi and agree to Movavi's Privacy Policy.