How to Add Text to a Video: A Complete Guide [2026] 

Reviews, vlogs, tutorials – for bloggers, YouTubers, and creators, text covers whatever your voice can't. It flashes guest names, saves swallowed lines, and lets muted viewers follow along. Here's how to add text to a video without wasting an extra hour. 

Bring your clip into Movavi Video Editor, open Titles, and drag a style onto the track above your footage. Type your text, then adjust the font, color, and size to match your channel. A few clicks get it done, whether it's your first edit or your hundredth.

Edited by
Ben Jacklin
32,458

How to add text over a video 

Step 1. Bring in your footage

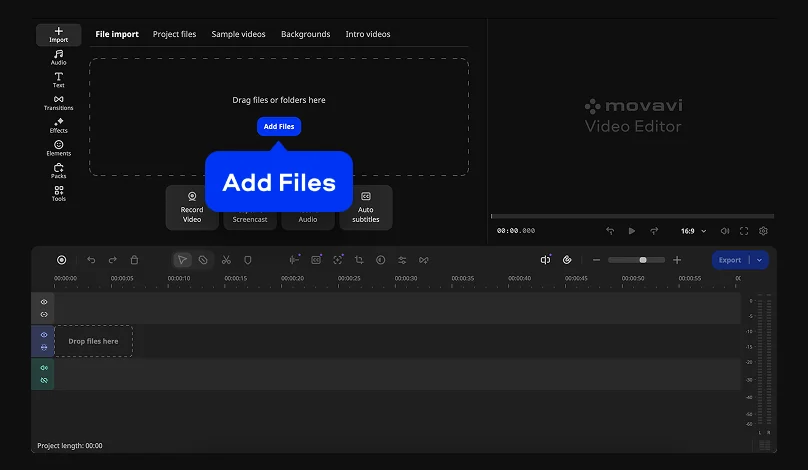
Click Add Files and select the video you want to edit from your device. Movavi Video Editor reads standard formats – MP4, MOV, AVI, MKV, WMV – so footage straight off a phone or webcam usually drops in with no conversion needed.

Step 2. Add text

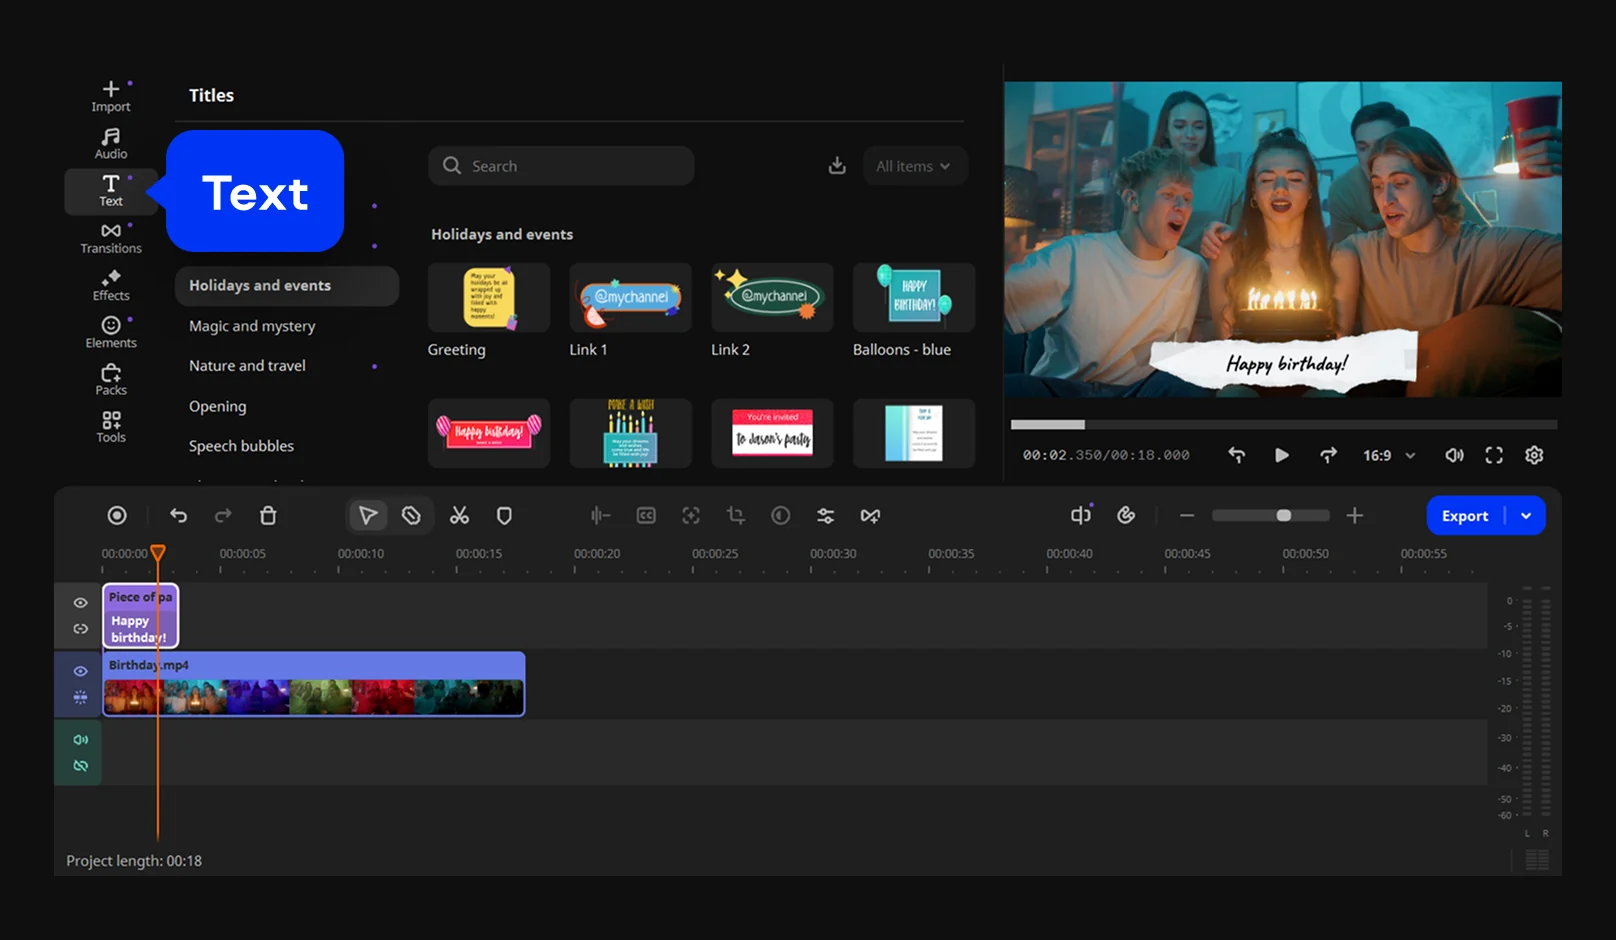
Open the Text tab, choose the style you like, and drag it to the timeline. Enter the text you want to place on the video. Text displays as a separate layer that can be freely moved and positioned anywhere in the scene. 

Step 3. Customize the text

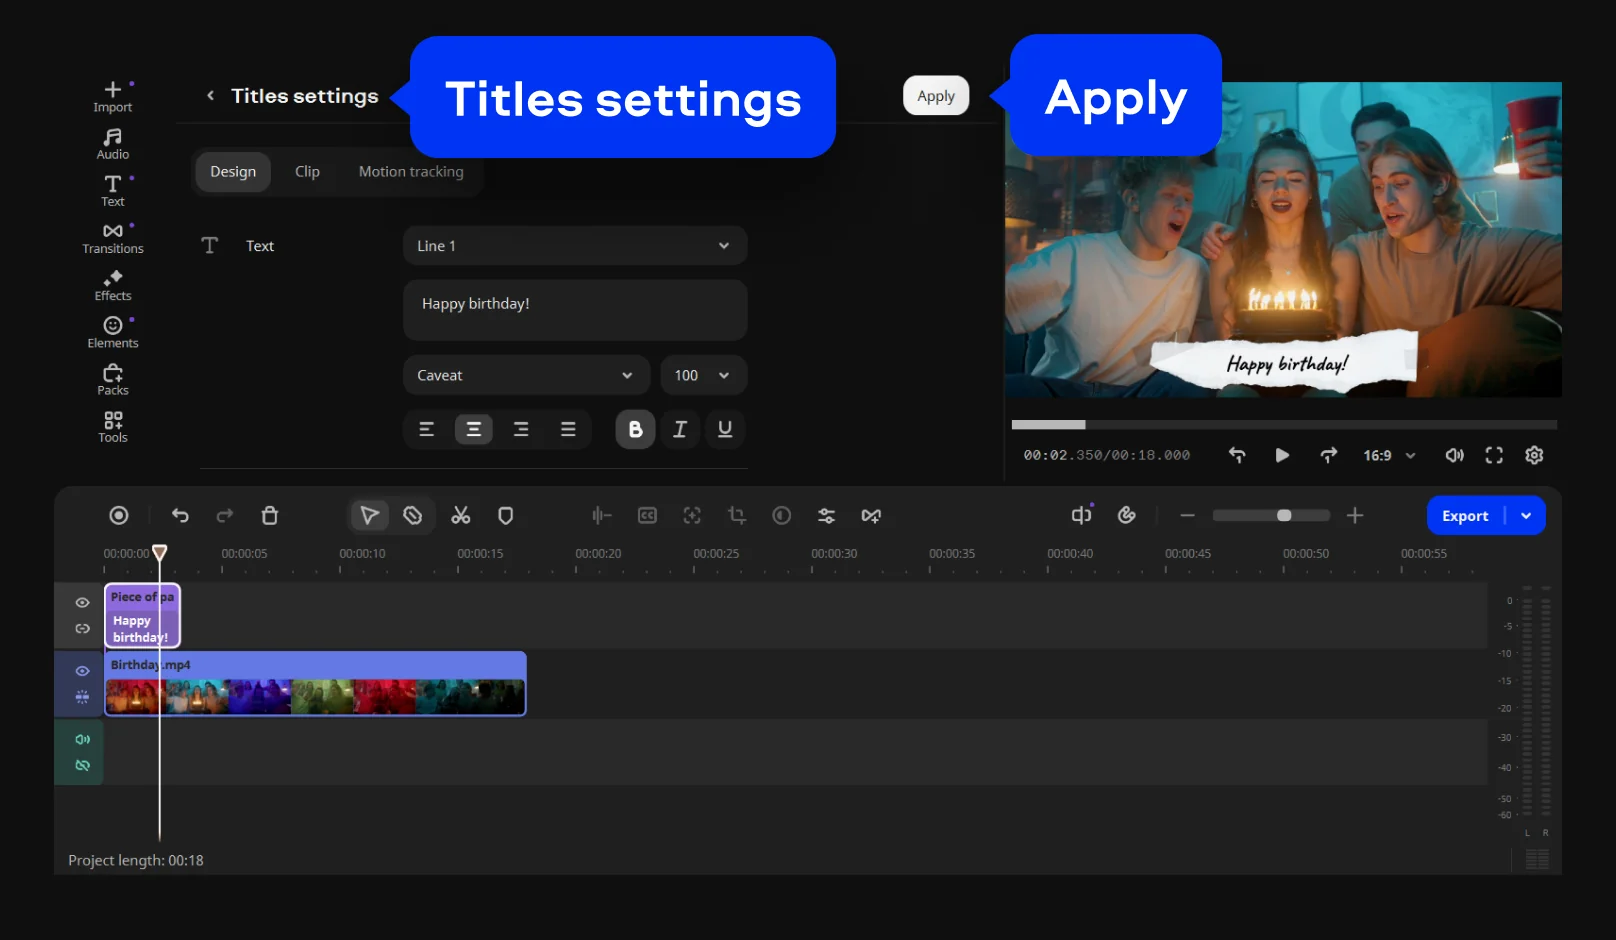
Font, color, size, outline, background – all from the title's own settings. You can fine-tune placement and appearance so the text stays readable without distracting from the footage. Once you're done, just click Apply to save your changes.  

Step 4. Export the video

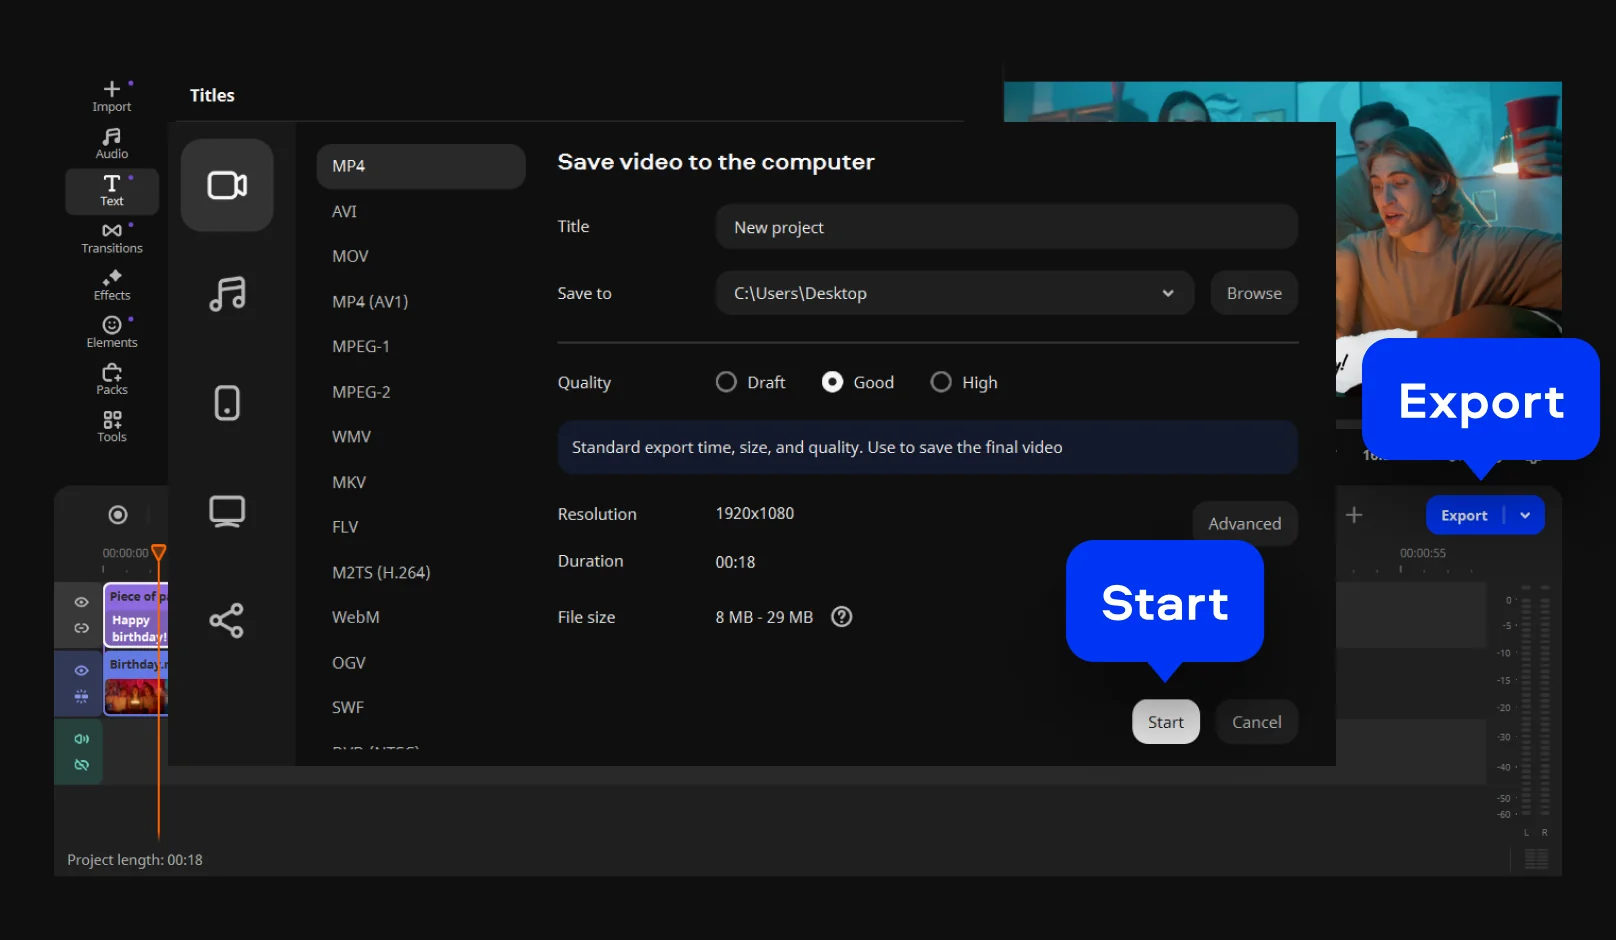
Click Export, adjust your settings (such as format and resolution), and click Start to finish.

Choosing the best font, color, and size for your text

No font works for every channel – a gaming highlight reel and a cooking tutorial have no business looking alike. What actually matters is picking on purpose, instead of leaving whatever's already selected.

  • Font: Choose something that reads instantly. If your channel already has a visual identity – a thumbnail font, a logo color – carry it into your titles so people recognize your video before your voice even kicks in.
  • Color: Go for contrast against whatever's behind you. Light lettering on a pale wall vanishes; a dark outline solves that in one step.
  • Size: Bigger reads better on a phone screen, and that's where most of your audience is watching anyway. Save the smaller sizing for secondary details, and go big on anything you actually need seen.

Every one of these controls sits in the same title settings panel – font, color, size, outline, background – so there's no menu-hunting involved.

Where to place your text (And how long to keep it there) 

On talking-head footage, placement actually matters – there's a face on screen fighting for the viewer's attention. A name tag typically belongs in a lower third, clear of your face and hands. A reaction word can go wherever the frame has room. A title card at the very start can claim the whole screen, since nothing's competing with it yet.

Timing works the same way – leave a caption on screen long enough for a silent read-through twice before it's gone. Because title clips live on their own track, dragging the edges shorter or longer never touches the footage beneath them. If a name tag blinks past too quickly on your first export, that's a two-second fix, not a re-edit. 

Text overlays vs. Auto subtitles for talking-head videos

Titles and auto subtitles aren't solving the same problem, and most talking-head creators reach for both eventually.

Titles cover the text you write by hand – a name, a title card, a quick note, a countdown before you start speaking. You choose the placement, the timing, the wording.

Auto Subtitles cover everything you say out loud. Speech becomes on-screen text automatically, at a claimed 99%+ accuracy across 100+ recognized languages, pulled from a library of 60+ subtitle designs. If the AI mishears a word, fix the line in the Phrases panel – restyle it alone or across the whole project, then export it as a standalone SRT file for any platform that handles its own captions. There's also a real-time word-highlighting option that syncs to your voice, the same effect you've likely noticed on short-form video, minus the hours of manual timing.

This is a case where AI earns its keep for a real reason – one tool doing one tedious job well. Manually transcribing a full talking-head video eats up time most people just don't have. 

More ways to customize: Motion tracking, watermarks, and countdown titles 

With the basics down, a few more tools are worth having on your radar:

  • Motion tracking on titles. Titles can track a fixed point on screen or use precise and AI-automatic tracking to follow objects moving through the frame.
  • Text watermarks. To display a channel name or handle in the corner of a video, text can be set with customized position, size, opacity, and duration – complete with motion-tracking to follow movement. 
  • Countdown titles. A dedicated timer/countdown title type takes care of the classic "3-2-1, we're live" intro, no building it from scratch required.
  • Batch-apply for series. Running the same title style across a whole episode's clips? Apply one effect to several selected clips in one move instead of repeating the same steps clip by clip.

Titles are just one corner of a bigger drag-and-drop library built for more than text – hundreds of transitions, filters, and overlays ship with the program as standard, and Movavi Effects adds 10,000+ more effects plus 1,500+ music tracks whenever you're ready to expand beyond that. 

Free download for PC and Mac

Movavi Video Editor downloads free for PC (Windows 10 and 11, 64-bit) and Mac (macOS 12.0 or higher, with native support for Apple M1 and newer chips). Install it once and edit offline afterward – no browser tab needed just to add a title or trim a clip. It's already in use by 70M+ people across 190+ countries, with 25+ updates a year bringing in tools like these.

Version

Text tools included

Export

Free

Titles, auto subtitles, auto crop, silence removal – all testable in the app

60-second cap, mandatory watermark, limited codec support, lower output quality

Lite

Core editing tools, titles, auto subtitles, auto crop, silence removal, all built-in effects

Small watermark on export; some features (like AI noise removal and chroma key) are limited

Full

Everything, including all one-click AI tools

No watermark, no export limits

There's a tier for whatever your budget looks like: test titles and auto subtitles for free on your own footage, then step up to Lite or the full version once you want watermark-free exports.

Extra effects and the full Movavi Templates library sit as separate add-ons, so you're only paying for what you actually use.

If titles and captions are already part of your routine, Movavi Ideas is worth a look next – a free, weekly-updated tutorial hub built for Movavi Video Editor users, with new step-by-step tricks covering this kind of on-screen text and plenty more.

Frequently asked questions

Can I add text to a video for free? 

Yes. Movavi Video Editor's free version opens up titles, auto subtitles, and every other core tool on your own footage. Exports carry a watermark and a 60-second cap in the free tier; upgrading clears both restrictions. 

What file formats can I use?  

It imports the standard formats – video (MP4, MOV, AVI, MKV, WMV), audio (MP3, WAV, FLAC), and images (JPEG, PNG, BMP, static GIF) – so footage from a phone, webcam, or screen recorder usually works straight away, no conversion needed. 

Does it work on both Windows and Mac?

Yes – Windows 10 and 11 (64-bit) and macOS 12.0 or higher, including native support for Apple M1 and newer Mac chips. 

Do I need an internet connection to add text to my videos?

No. After installation, all editing – titles included – happens offline.

Can I change the font, color, or size after I've already added text?

Yes, any time you like. A title's settings stay editable for as long as it sits on the timeline, so changing the look never means redoing the clip.

What's the difference between a title and auto subtitles?

A title is text you write and place by hand – a name, a title card, a note. Auto subtitles transcribe whatever you say automatically, and any line can be edited afterward if something needs fixing.

Have questions?
If you can’t find the answer to your question, please feel free to contact our Support Team.
Join us for discounts, editing tips, and content ideas

1.5M+ users already subscribed to our newsletter

By signing up, I agree to receive marketing emails from Movavi and agree to Movavi's Privacy Policy.