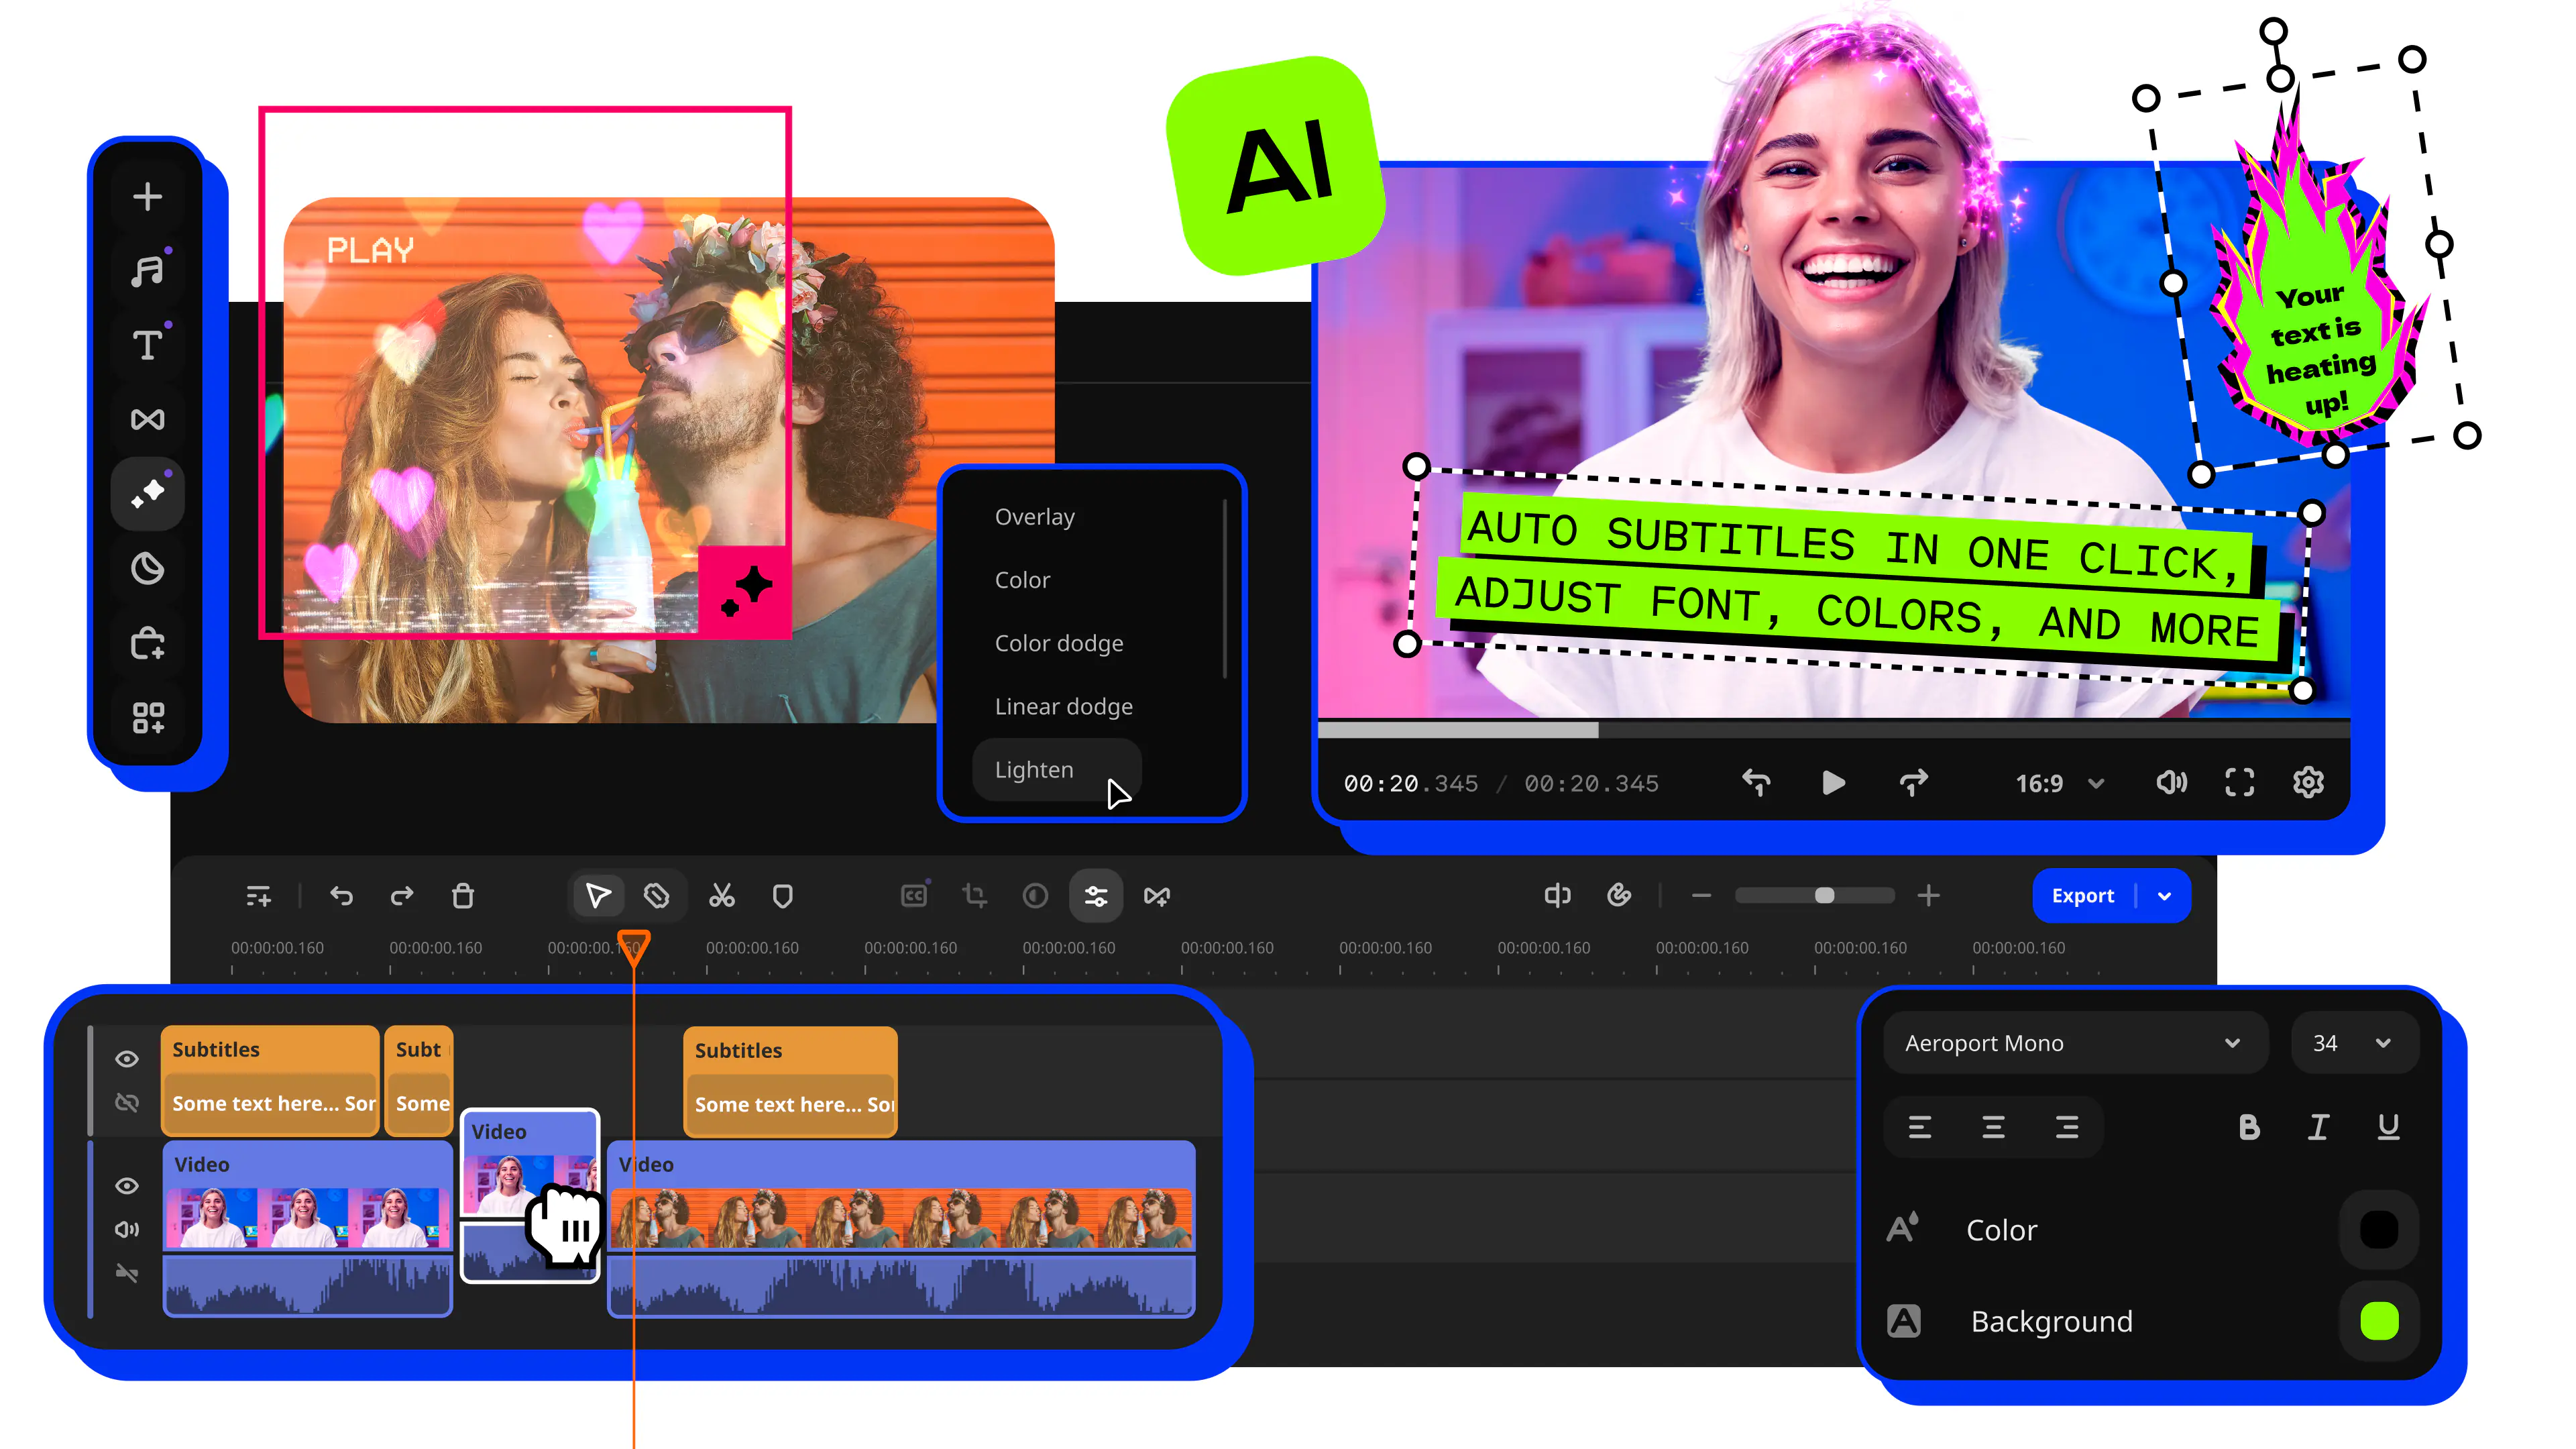

How to Quickly Edit and Compress a Video in MP4 Format for YouTube

Use Movavi Video Editor!

  • NEW: Adjustable video templates for any vibe – made of Blocks

  • NEW: Blocks – pre-edited video segments you can customize

  • Fast and easy editing: cut, crop, adjust colors and speed

  • Auto subtitles, noise removal, hundreds of effects, and more

By clicking the download button, you're downloading a trial version of the program.*

Edited by
Ben Jacklin
6,046

Trimming an MP4 and running it through video compression takes one editing session and a handful of export settings. Cut the dead air, export as MP4 with the H.264 codec, and match the bitrate to your resolution. This guide is for you if you film daily routines and travel videos, post game reviews and highlight edits, or record tutorials for YouTube. You’ll end up with a smaller, upload-ready file.

Movavi Video Editor is an intuitive video editor with customizable video templates, one-click AI tools, and hundreds of drag-and-drop effects. It’s a desktop app for Windows and macOS, so a travel vlog can go from raw MP4 to upload-ready file without switching programs. Hover previews show a clip or effect before you apply it, and Movavi Ideas, a free hub with a fresh step-by-step editing tutorial every week, is there when you’re stuck.

Why compress videos before uploading to YouTube

A smaller file uploads faster, takes less storage on your drive, and is simpler to share. YouTube accepts uploads up to 256 GB or 12 hours, whichever is less, so most vlogs fit without trouble. New accounts have a tighter default: videos up to 15 minutes until the Google Account is verified, according to YouTube Help.

Email is where you’ll feel the squeeze first. A personal Gmail account sends attachments up to 25 MB, and anything bigger goes out as a Google Drive link. Whenever you need to compress videos for sharing, the same settings below apply. A lighter file also leaves room on your phone and hard drive for the next shoot, which matters when daily vlogs and game recordings pile up.

How to quickly edit an MP4 video

Say you filmed a weekend trip. The goal: trim the pauses, put the clips in order, add a title and music, and keep the file small.

If you’d rather not start from a blank timeline, use a template. Movavi Video Templates is a multi-style library of customizable, pro-looking, modular templates for any kind of video. Each template is built from Blocks: short pre-edited parts, where you drop in your own videos, photos and text. Editing, music, transitions, and text come pre-set, and you can keep, change, or remove all of it. Several templates are included in the full version of Movavi Video Editor at no extra charge; the whole collection needs a separate Templates subscription.

A talking-head vlog gets a head start from the silence removal tool, which cuts unwanted pauses from the audio automatically. For a game review or highlight edit, the Split button trims dead time between rounds, and hundreds of built-in transitions and titles cover the rest. A lesson on camera needs the intro fumbles trimmed and a title with the topic, and the tutorial is ready for YouTube. Movavi Video Editor Free lets you try the tools, but exports carry a watermark, stop at 60 seconds, and skip 4K. The full version removes those limits.
Step 1. Install Movavi Video Editor

Download and install Movavi Video Editor following the on-screen instructions.

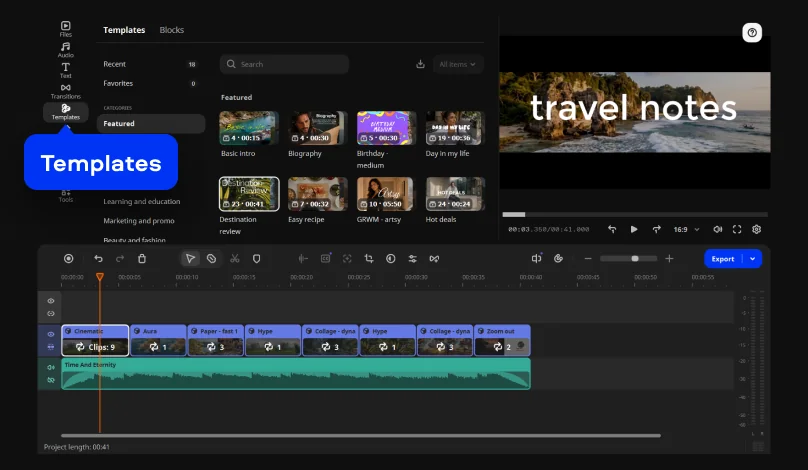
Step 2. Pick a template

Open the Templates tab and choose a template that fits your video. Then drop the template onto the timeline.

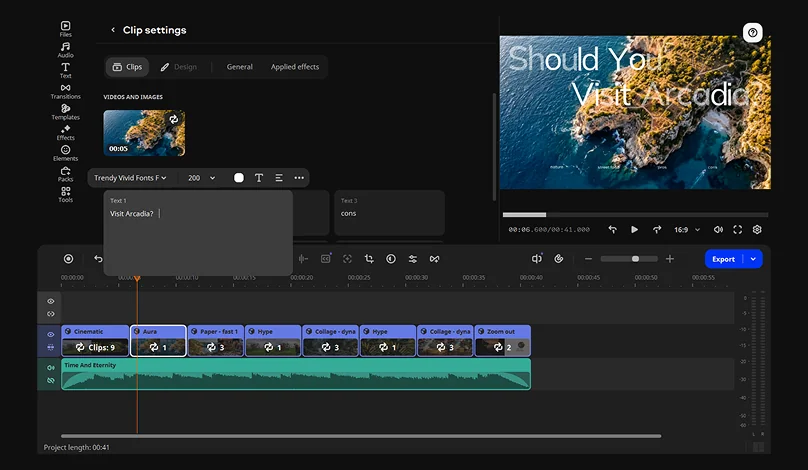
Step 3. Fill the Blocks

Double-click a Block on the timeline and replace the placeholder with your own video file or photo. Then retype the Block text.

Step 4. Trim and cut

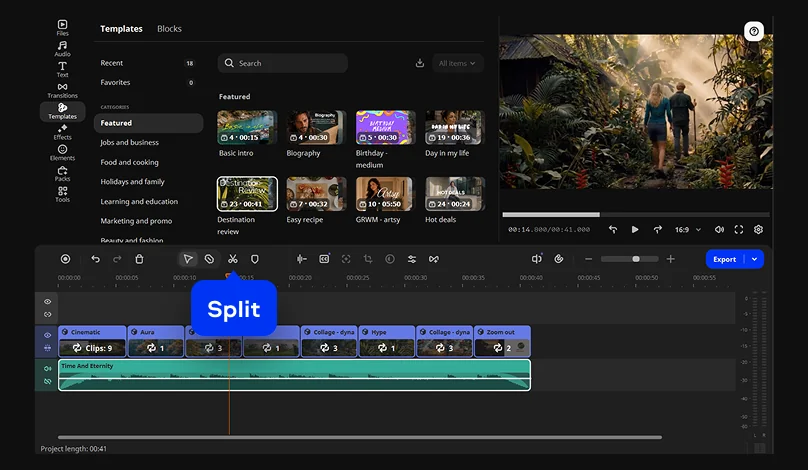
Click your clip on the timeline and move the red position marker to the start of the part you want to remove. Click the Split button, the scissors icon on the toolbar. Next, move the marker to the end of that part and click Split again. Finally, select the unwanted fragment and press Delete.

Step 5. Add text and music

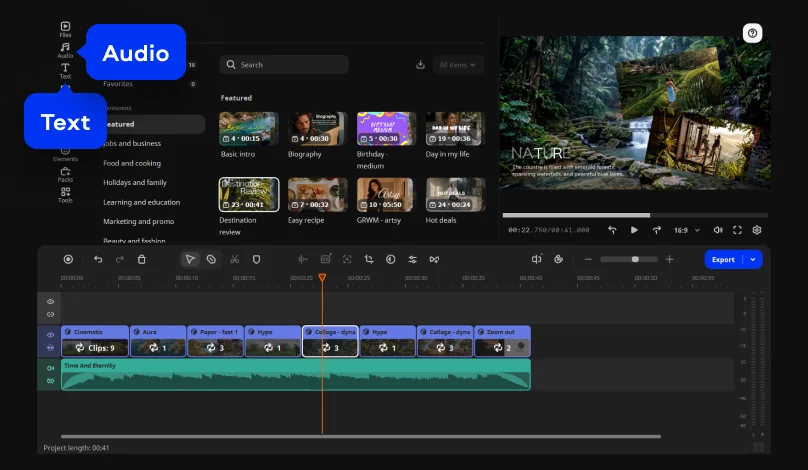
Open the Text tab and drag a title style onto the timeline above your video. Double-click the title and type your text in the preview window. To add music, click Audio, choose a track, and drag it onto the Audio track.

Step 6. Export the video

Play the project in the preview window and watch each cut. Skim the transitions between clips in particular; a cut that felt tight on the timeline can land a beat early on playback.

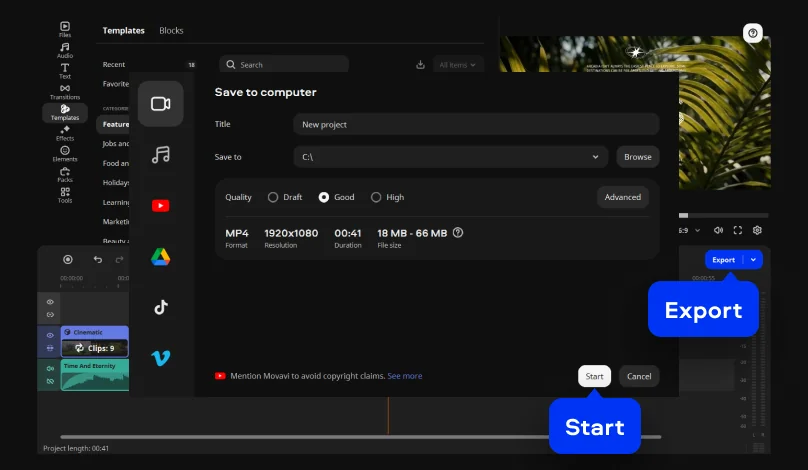
The edit is done. Hit the Export button and select MP4 as the output format. Click the Start button.

How to compress videos for YouTube: the settings that matter

Video compression shrinks a file by discarding detail viewers rarely notice. That’s lossy compression, and it’s what H.264 does. Lossless compression keeps every bit but saves far less space. YouTube Help recommends the MP4 container, the H.264 video codec, and AAC-LC audio.

Five settings shape the result:

  • Resolution. Higher resolution keeps more detail and needs more storage. Dropping a 1080p video to 720p is the quickest way to reduce size.
  • Bitrate. The amount of data per second of video. Lower values shrink the file, and values that are too low cost visible quality.
  • Frame rate. Upload at the frame rate you recorded; YouTube recommends it.
  • Audio. YouTube recommends 384 kbps for stereo and 128 kbps for mono, so there’s little to gain by squeezing the soundtrack.
  • Aspect ratio. The standard on a computer is 16:9. Vertical or square videos still play, because the YouTube player adapts to their size.

YouTube’s recommended SDR video bitrates:

Resolution

24, 25, 30 FPS

48, 50, 60 FPS

4K (2160p)

35–45 Mbps

53–68 Mbps

1080p

8 Mbps

12 Mbps

720p

5 Mbps

7.5 Mbps

Method 1: Export from Movavi Video Editor

This route compresses while it saves, so there is no second program and no second render. Codec availability depends on your operating system.

  1. Click Export and choose MP4 as the format. Then click Advanced.
  2. Set the resolution to match your project, or lower. Keep the frame rate the same as your original footage and choose H.264 in the codec list. Set Bitrate to Custom and enter the value from the table above, then click OK. The expected file size appears in the export window, so you can check it before you save.
  3. Click Start.

Method 2: Free desktop tools

HandBrake is free, open-source software for Mac, Windows, and Linux computers.

  1. Click Open Source and choose your video.
  2. Click Browse, pick a folder, and name the file.
  3. Select MP4 File in the Format dropdown.
  4. Choose H.264 as the video codec.
  5. Enter a bitrate. HandBrake asks for kbps, so 8 Mbps becomes 8000.
  6. Click Start Encode.

VLC also compresses via Media, then Convert / Save, but it doesn’t show your clip’s current bitrate, so you set one by trial and error. On Windows 11, Clipchamp is built in and its free plan exports 1080p without a watermark; large projects can lag or freeze on export.

Method 3: Online compressors

Nothing to download, which suits a short clip when you’re away from your own computer, but each service sets its own limits. FreeConvert takes files up to 1 GB, Online-Convert up to 100 MB, and Clideo exports free with a watermark.

  1. Open the compressor’s website and click Choose Files.
  2. On FreeConvert, click the Cogwheel icon and drag the Target Size slider.
  3. Click Apply Settings, then Compress Now.
  4. Click Download MP4.

Method 4: Mobile apps

Compressing on your phone helps when the footage never touches a computer. Apple’s support page walks through iMovie, which is free on iPhone and exports at a lower resolution. A minute of 1080p video takes roughly 70–105 MB, and the 720 setting brings that down to about 19–27 MB.

  1. Open iMovie, tap Start New Project, then tap Movie.
  2. Tap Media, then Video, tap your clip, and tap Create Movie.
  3. Tap Done, then tap the Share button.
  4. Tap Save or Share Video, then tap Options.
  5. Select a lower resolution, such as 720, and tap Done.
  6. Tap Save Video to keep the file in your photo library.

iMovie sets resolution only, so there’s no bitrate field. For a YouTube upload, keep the 1080p default and use 720 for messages and email. If the file is still too big, trim the clip to make it shorter.

On Android, Samsung phones let you drop the resolution in the Camera app before you record, and a Storage Saver option stores video in the more compact H.265 format. YouTube recommends H.264, so check the format before you upload straight from the phone. Other Android phones have no built-in compressor. Pick a compression app from Google Play, choose a resolution or target size, and tap Compress. The buttons differ from app to app.

Which compression method fits your device and budget?

Method

Platform

Best for

Control over quality

Speed

Price

Movavi Video Editor

Windows, macOS

A travel vlog you’re trimming anyway

Resolution, frame rate, codec, custom bitrate

Compresses while it saves; hardware acceleration (Intel, NVIDIA, AMD) can speed up export on supported PCs

Free version with a watermark, a 60-second cap, and no 4K export; full version from $19.95/month

HandBrake

Windows, macOS, Linux

Gameplay recordings at a fixed bitrate

Codec and bitrate you enter

Runs on your computer, so time grows with video length and hardware

Free, open-source

VLC

Windows, macOS, Linux

A one-off job with a player you already have

Bitrate by trial and error

Runs on your computer and shows no progress bar, so expect a wait

Free

Online compressors

Browser

A short clip, no install

Target file size

Upload and download time add to the wait, so your connection matters

FreeConvert up to 1 GB, Online-Convert up to 100 MB, Clideo free with a watermark

Mobile apps

iOS, Android

Footage that stays on your phone

Resolution in iMovie; varies by app

Runs on the phone, so time grows with clip length

iMovie is free on iPhone; Android apps vary

Sending by email and protecting quality: two quick fixes

Compress a video under the 25 MB email limit

Open the export settings as in Method 1: click Export, choose MP4, and click Advanced. Lower the resolution and the custom bitrate until the expected file size in the export window drops under 25 MB, click OK, and then click Start. Be realistic about length: at 8 Mbps, 25 MB is roughly 25 seconds of video. Longer clips travel better as a Drive link, which Gmail adds on its own for big attachments.

Reduce file size without visible quality loss

No compression is lossless in practice, but you can hide the loss. Keep the resolution at your source and use the bitrate from the table. Export a short test clip first, so you can check the picture before you commit to the full file.

Best export settings for a vlog, a game review, and a tutorial

  • Lifestyle vlog. A 1080p talking-head or travel clip at 30 FPS. Split out the pauses, then export at 8 Mbps. Ten minutes comes to roughly 600 MB before audio.
  • Game review. A 1080p gameplay recording at 60 FPS. Cut the dead time between rounds, then export at 12 Mbps, with the 60 FPS kept as recorded.
  • Tutorial or lecture. A long recording at 30 FPS. After trimming, export at 720p and 5 Mbps; the file stays manageable as long as on-screen text stays readable.

Mistakes to avoid

  • Over-compressing. Pushing bitrate or file size too low makes the picture blurry.
  • Changing the frame rate. Keep the recorded rate.
  • Uploading interlaced footage. YouTube says to deinterlace first; 1080i60 becomes 1080p30.
  • Upscaling. A source below 1920 × 1080 exported at 1080p looks soft. Lower the export resolution instead.

Final checklist before you upload

  • MP4 container, H.264 video, AAC-LC audio
  • Resolution matches the source
  • Bitrate matches the table
  • Frame rate matches the recording
  • Footage is progressive, not interlaced
  • Over 15 minutes? Verify your Google Account first

Trim and compress in one pass with Movavi Video Editor, and your file is ready for the upload page. Next time you film a trip, start from a template: swap your clips into the Blocks and your intro is done before the coffee cools.

Movavi Video Editor
Create awesome videos easily

*The free version of Movavi Video Editor may have the following restrictions depending on the build: watermark on exported clips, 60-second video or 1/2 audio length limit, and/or some advanced features unavailable when exporting videos.

Frequently asked questions

Does YouTube compress videos?

YouTube processes every upload. Its encoding guide says 4K uploads play in 4K only on browsers or devices that support VP9, and that it converts unsupported color spaces to BT.709. Sending a well-encoded file keeps that processing from adding much more.

What is the best format for YouTube?

MP4 with H.264 video and AAC-LC audio. Add a 16:9 aspect ratio for computers, and keep the moov atom at the front of the file (Fast Start) so the video processes correctly.

How do I send a large video by email?

Attach it and let Gmail convert it to a Drive link, or shrink it first with the 25 MB method above. Work and school accounts differ: the Google Workspace administrator sets those limits.

Which bitrate is for 1080p?

8 Mbps at 24, 25, or 30 FPS. YouTube calls these recommendations: it asks for variable bitrate and requires no bitrate limit.

Have questions?
If you can’t find the answer to your question, please feel free to contact our Support Team.
Join us for discounts, editing tips, and content ideas

1.5M+ users already subscribed to our newsletter

By signing up, I agree to receive marketing emails from Movavi and agree to Movavi's Privacy Policy.