How to Make an Intro & Outro for YouTube | Step-by-Step

Use Movavi Video Editor!

  • Trim, cut, crop, and rotate videos
  • Add titles, stickers, and transitions
  • Apply visual effects

By clicking the download button, you're downloading a trial version of the program.*

Edited by
Ben Jacklin
11,245

A YouTube intro is a short 3–5 second clip that opens your video with your channel name, logo, and music. The outro comes at the end, usually the last 5–20 seconds, and stays simple so YouTube's clickable end screen buttons have room to show up. You make both in a video editor, then save them as 1920 × 1080 MP4 files (matching your video's resolution) so you can reuse them in every upload.

Both clips do real work. The opening seconds decide whether someone stays. YouTube Studio's audience retention report even has a dedicated "Intro" key moment that shows how many viewers are still watching after the first 30 seconds. The last few seconds are where the conversions happen, since that's the only spot where the subscribe button and "watch next" suggestions can appear at all.

This guide covers how to design both, then how to create a YouTube intro and outro in Movavi Video Editor, an intuitive video editor with easy AI tools and hundreds of drag-and-drop effects and ready-made templates.

How to create a YouTube intro

The design part usually isn't what slows people down. It's digging through menus just to figure out what a preset actually does before you can decide if you even want it. Movavi Video Editor keeps things simple and fast. Just hover over a title or transition and you'll see it play on your own footage before you commit to using it. Drag it onto the timeline, and it's done.

Here's how to make an intro for YouTube in a few simple steps.

Step 1. Download the software

Grab Movavi Video Editor and run the installer. It's a download for a PC on Windows 10 and 11 and there's a Mac version for macOS 12.0 or higher. Open the program once it’s installed.

Step 2. Drop in a background

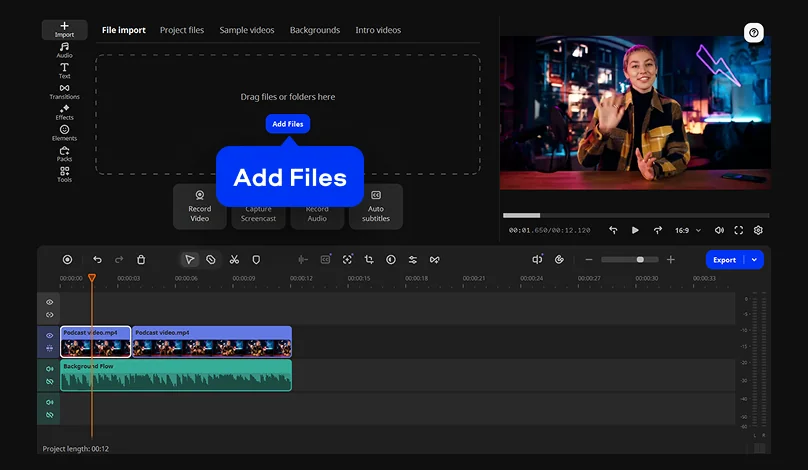
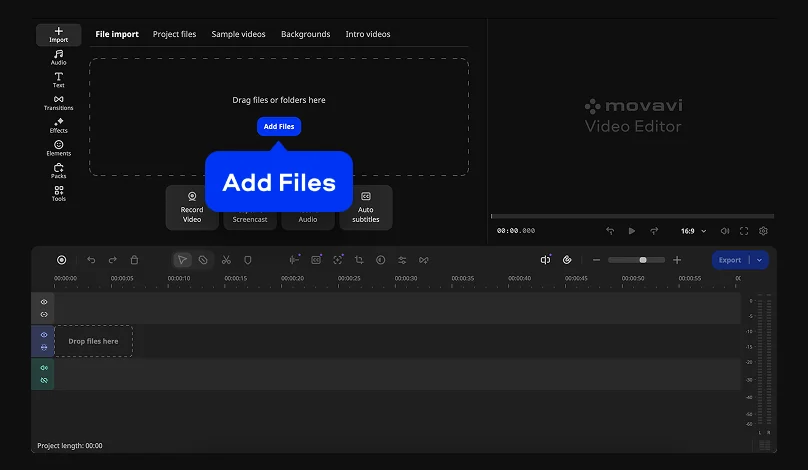
To make a YouTube intro video, click Add Files and select the file you want to use as a background. Move it to the timeline.

Here are three options that all work well: a 2–3 second clip from your own footage, a plain solid color, or something you filmed on green screen. With the green screen option, chroma key swaps out the green background for whatever you want behind you instead. And if you filmed in a messy room instead of using an actual green screen, AI background removal can do the same job without needing the green fabric at all.

Step 3. Add your channel name as an animated title

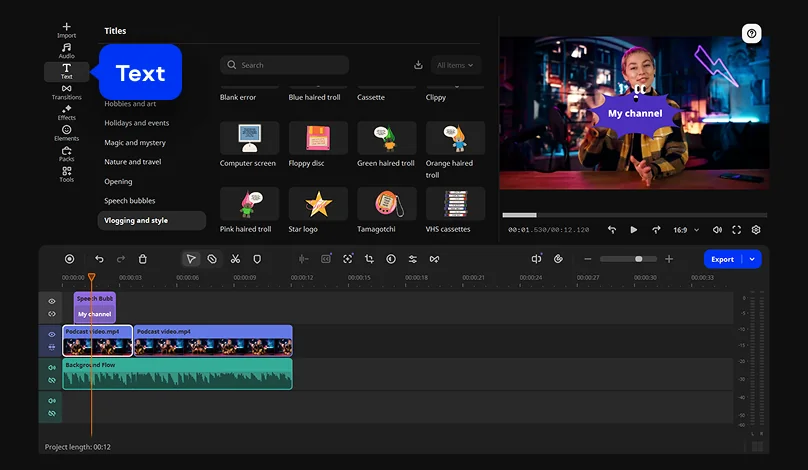
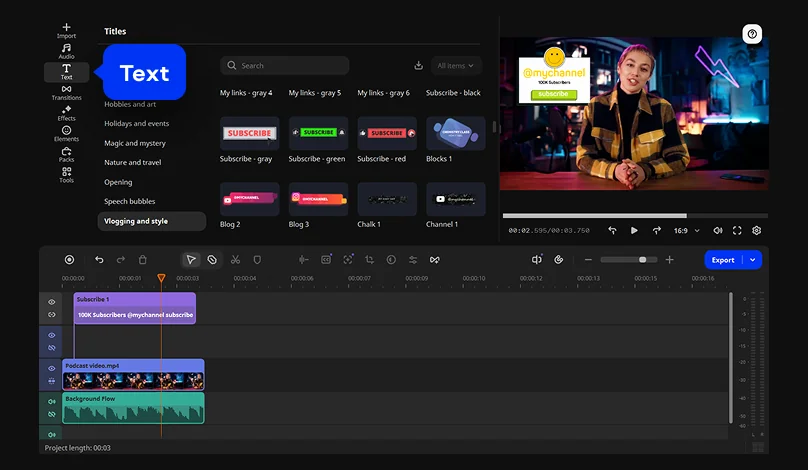
Open the Text tab. Movavi Video Editor includes hundreds of built-in drag-and-drop titles with adjustable text and formatting settings. Drag one title onto the timeline, type your YouTube channel name, and set the font, size, and color to match your thumbnails.

Step 4. Add your logo

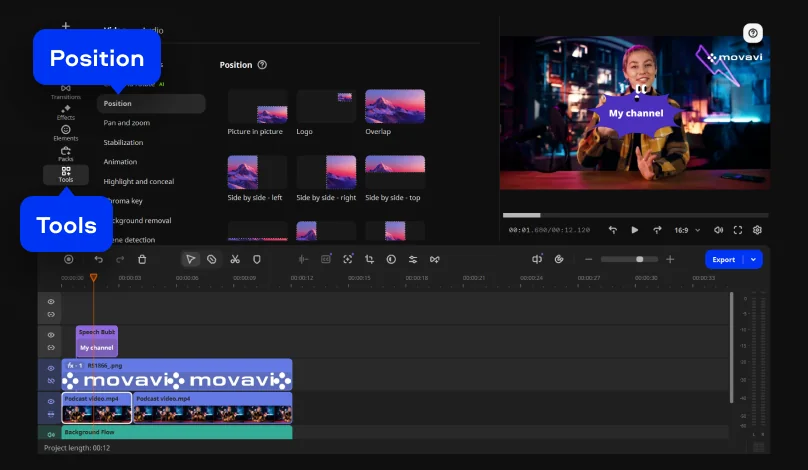
Upload your logo to the program and drop it on the overlay track. Next, open ToolsPosition and select Logo. Scale your picture and position it where it won't clash with the title text.

Step 5. Add music and effects

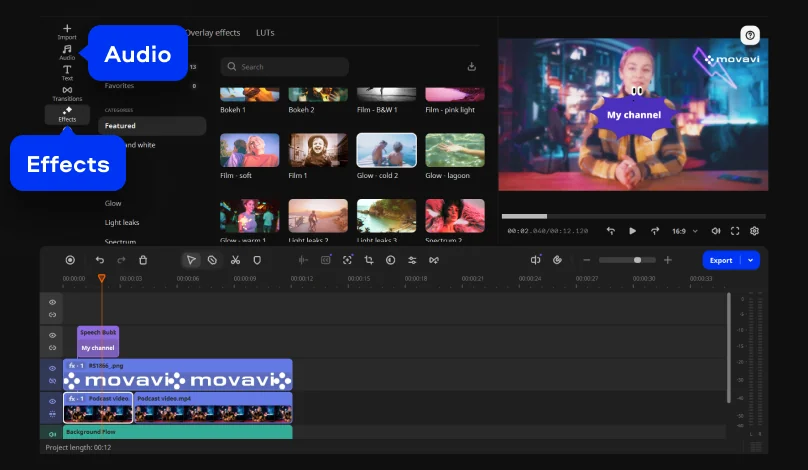
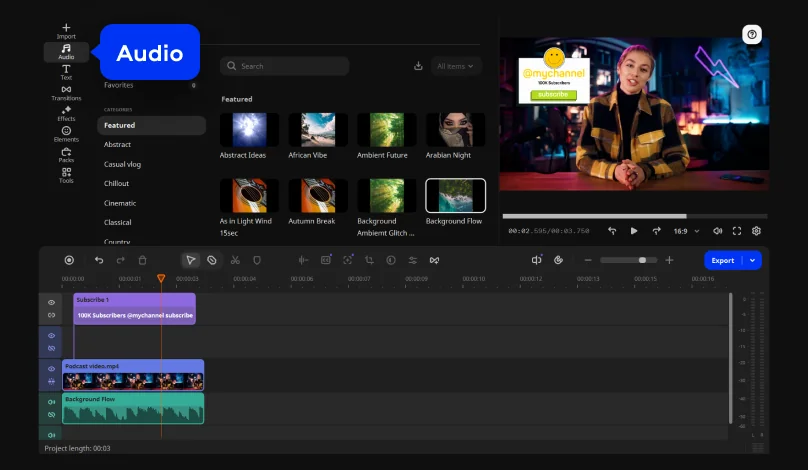
Pick a track from the built-in library in the Audio tab, drag it under the video track, and cut it to the same 3–5 seconds. Fade the ending so it doesn't stop abruptly when the intro cuts to your main video.

Next, add an effect. The program includes lots of filters, including Glitch, Blur, and VHS. Add one filter to create a cool, finished-looking intro.

Step 6. Export the video

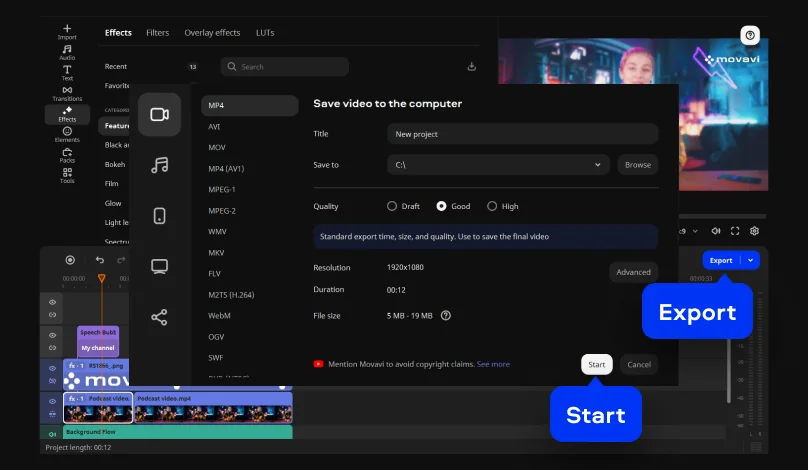
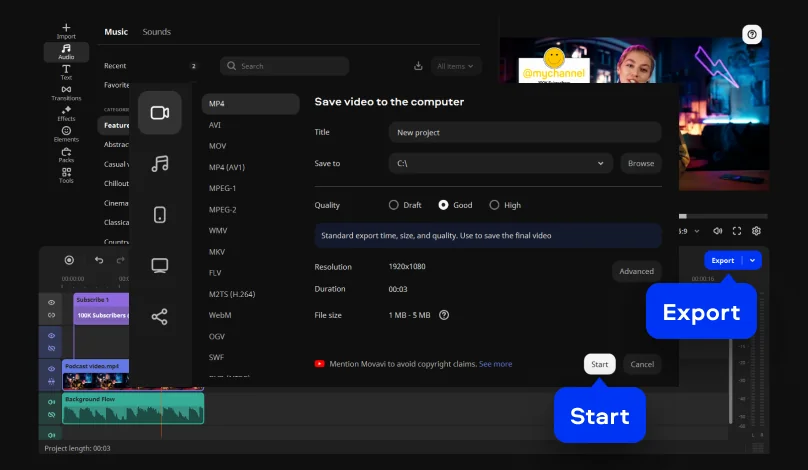
Cut anything past five seconds and click export as MP4. Save that exported file somewhere you'll find it. That single MP4 is now your reusable intro for every video on the channel.

How to make a YouTube outro

Outros are crucial for driving viewer actions at the end of your video. It's the only stretch of video where the subscribe button and the next-video card can show up, so ending on a black frame and a fade-out just wastes twenty seconds. This is where time-saving AI tools come in handy. Outros usually mean talking to a camera, and that means you'll need to clean up the audio too. Here's how to make a YouTube outro with music.

Step 1. Upload your clip

Click the Add Files button to add your video to the YouTube outro maker.

Step 2. Set the video length

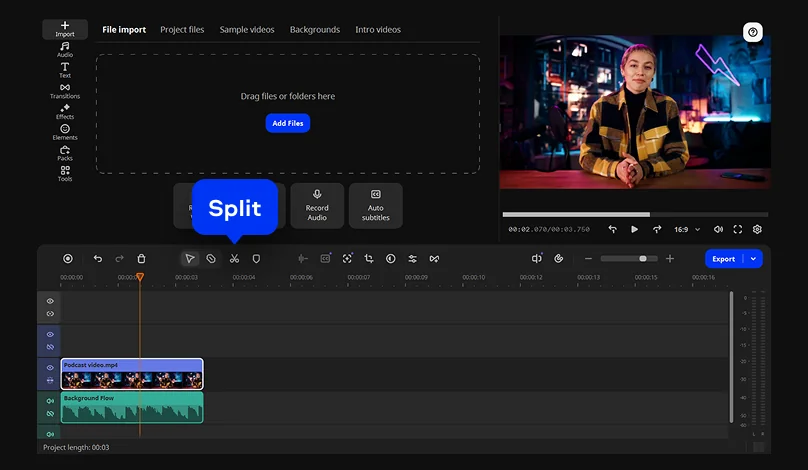
To make an outro for YouTube, use the Split tool and trim your video so it’s set to somewhere between 5 and 20 seconds. YouTube end screens can only be placed in the last 5–20 seconds of a video, so anything past that window sits outside the clickable zone.

Step 3. Clean up the audio

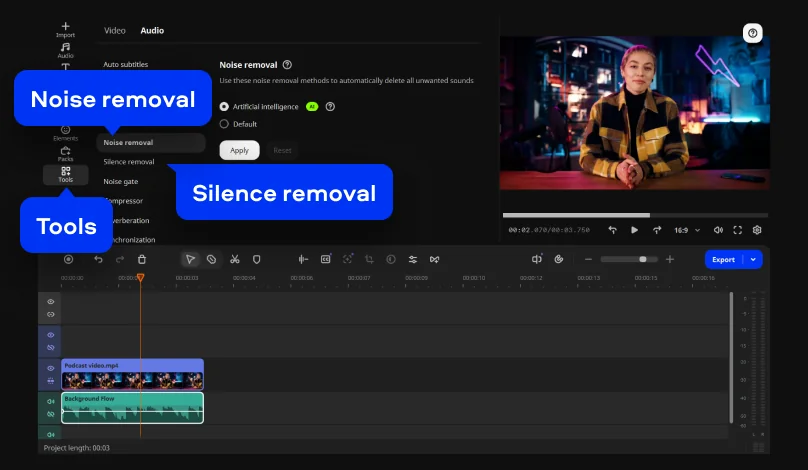
Open ToolsAudio and select Noise removal. AI noise removal clears traffic, wind, and steady hums in one click, cutting the vast majority of ambient noise while keeping your voice sharp. The Silence removal feature detects and cuts pauses automatically.

Step 4. Add titles and graphics

Open the Text tab and add titles: one line of large animated text for the main ask, one smaller static line for your social handles or website. To attach a graphic to a moving object, use AI motion tracking to lock images, videos, or graphics to your subject in one click.

Place your text and graphics on the left and center. Keep the right side and lower-right corner empty. That's where the video, playlist, and subscribe cards will render once you add them in YouTube Studio, and anything you put there will be covered.

Step 5. Add music

Go to the Audio tab and select an audio track. Drop the track onto the timeline, keep it below your voice, and fade it out over the final second.

Step 6. Export the outro

Hit the Export button and save the finished video as MP4. Store the file with your channel assets. From here on, every upload ends with one import and one drag onto the timeline.

How to put the intro and outro together with your main video

Step 1. Import videos

Add the main video, the intro clip, and the outro video to the project.

Step 2. Place all clips in order

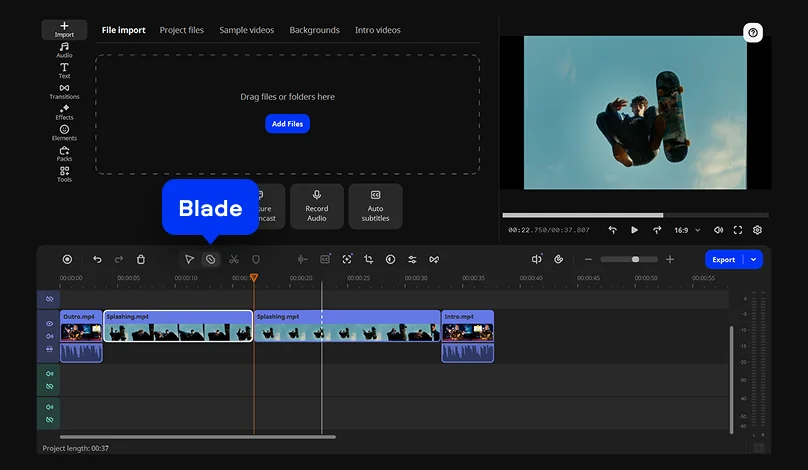
Take the strongest 5–10 seconds of your main footage, cut it with the Blade tool, and move it to the very front. Intro goes second. This hook-first structure grabs attention early and keeps viewers watching.

Step 3. Add transitions

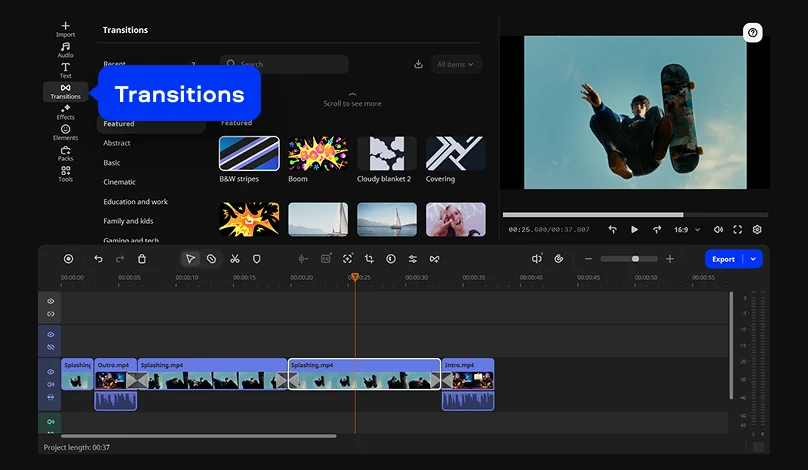
Open the Transitions tab and select one you like. Drag it onto the join between the hook and the intro, and another between the main video and the outro. Set the duration to under a second at each seam.

Step 4. Export the finished movie

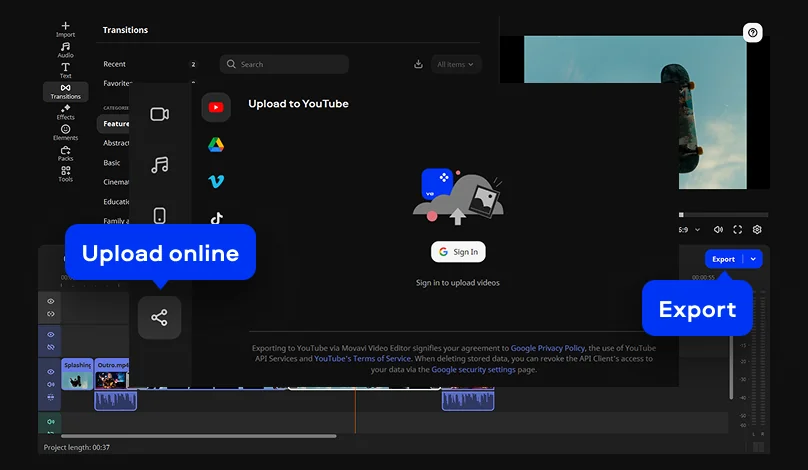
Click Export and open the Upload online tab to upload your video to YouTube right from the program. Add your end screen elements in YouTube Studio under EditorEnd screen, where you can apply a template or place up to four elements individually on a 16:9 video.

How to design an intro and outro for your YouTube channel

Designing your intro

  • Keep it to 3–5 seconds. Ten seconds is the outer limit, and your returning subscribers will skip it anyway.
  • Put the hook first. Professional creators have been recommending this order for years: open with 5–10 seconds of the actual video (the best clip, the result, the question), then cut to the branded intro animation. The logo lands after the viewer has already decided to stay.
  • Show your channel name or logo, plus one simple text animation. A fade or a slide reads cleaner than a spinning 3D badge.
  • Add upbeat music underneath. Use no copyright music tracks and sound effects, so nothing in your opener triggers a copyright claim.

Designing your outro

  • Make it 5–20 seconds. End screens can be added to the last 5–20 seconds of a video, and the video itself has to be at least 25 seconds long to have one.
  • Leave visual space. Reserve the right and lower-right areas of the frame for the subscribe and next-video elements you'll place in YouTube Studio later.
  • Write one clear call to action. "Watch this next" works better than throwing four different asks at people at once.
  • Add your social handles or website as static text. Keep them off to the side, away from where the end screen cards will land.
Movavi Video Editor
Create awesome videos easily

*The free version of Movavi Video Editor may have the following restrictions depending on the build: watermark on exported clips, 60-second video or 1/2 audio length limit, and/or some advanced features unavailable when exporting videos.

Frequently asked questions

How long should a YouTube intro and outro be?

Keep the intro to 3–5 seconds, with 10 seconds as the absolute maximum. The outro should run 5–20 seconds, because that's the exact window where YouTube end screens can be placed. Your video also needs to be at least 25 seconds long for end screens to be available.

Should I put my intro at the very beginning of the video?

Usually not. The hook-first structure works better: open with 5–10 seconds of your actual video, the best clip or the question you're answering, and cut to the branded intro after that. Viewers who clicked your thumbnail are deciding whether they clicked correctly. Give them the answer first, then show the logo animation.

How do I leave space for YouTube end screens in Movavi Video Editor?

Keep the right side and lower-right corner of the frame empty during your final 20 seconds. Place your call-to-action text and social handles on the left or center instead. YouTube allows up to four end screen elements on a standard 16:9 video, and they render on top of your footage, so anything you put underneath them disappears.

Can I save my custom intro in Movavi Video Editor to reuse it later?

Yes, and the simplest method is to export it as a standalone file. Build the intro once, export it as MP4, and store it with your channel assets. Every future project starts by importing that one file and dropping it onto the timeline.

What do YouTubers use to make video intros and outros?

Most beginners and everyday creators use a desktop video editor rather than a browser-based intro maker for YouTube, because the intro, outro, and main video end up in the same project anyway. Most creators use desktop editors like Movavi Video Editor. It includes built-in AI tools such as auto subtitles, AI video denoise, auto-tracked cropping, and silence removal to speed up the process.

Can AI help me create a video intro in Movavi Video Editor?

It helps with the parts that usually take the most time. AI background removal drops you onto a custom background without a green screen. AI audio noise removal cleans a voiceover recorded in a normal room.

Is Movavi Video Editor free, and does it add a watermark to my intros?

The free version gives you the essential tools plus AI features like auto subtitles, auto crop, and silence removal. It includes limits like a 60-second video export cap, reduced output quality, and a watermark. The full version lets you export without a watermark and removes every export restriction, so you get a YouTube intro maker with no watermark.

Have questions?
If you can’t find the answer to your question, please feel free to contact our Support Team.
Join us for discounts, editing tips, and content ideas

1.5M+ users already subscribed to our newsletter

By signing up, I agree to receive marketing emails from Movavi and agree to Movavi's Privacy Policy.