
How to Edit MOV Video into YouTube Highlight Clips

Try Movavi Video Editor!

  1. Import your files into the program.

  2. Mark and cut the best moments.

  3. Add effects, text, and audio.

  4. Save the video and upload it to YouTube.

By clicking the download button, you're downloading a free version of the program.*

Edited by
Ben Jacklin
13,472

To edit an MOV file into highlight videos, import it into a desktop video editor, mark your best moments, cut the rest, and export for YouTube. If you vlog travel days and unboxings, or stream gameplay, you can turn hours of raw footage into a short YouTube highlight that opens on your best moment. Movavi has just the right app for the job.

Movavi Video Editor is an intuitive video editor with customizable video templates, one-click AI tools, and hundreds of drag-and-drop effects. It is a desktop app for Windows and macOS, and it imports QuickTime (.mov) files directly. Highlights are mostly a cutting job: the Blade tool makes frame-accurate cuts that isolate each moment on the timeline, and pre-timeline trimming pulls a short segment out of a long MOV file before it joins the project. A highlight also needs an opening. You can build one using templates and Blocks. Movavi Video Templates is a multi-style library of customizable, pro-looking, modular templates for any kind of video. Each template is built from Blocks: short, pre-edited parts, such as an intro or a countdown, where you drop in your own videos, photos, and text. Several templates come with the full version of Movavi Video Editor at no extra charge.

What you need

  • An MOV file. A phone recording, a camera clip, a stream recording, or a screen capture all count. An MOV file is a QuickTime video, and Movavi Video Editor imports QuickTime (.mov) files.
  • A desktop video editor that opens MOV. This guide uses Movavi Video Editor.
  • A YouTube channel to publish on.

Movavi Video Editor has the following system requirements: Windows 10 or 11 (64-bit) with 4 GB RAM; macOS 12.0 or higher

How to make highlight clips from an MOV video

A highlight video works like a good trailer: an opening that grabs viewers, a middle of strong moments in a sensible order, and an ending that lands. Pick those three before you touch the timeline. For a travel vlog, the opening might be the view from the top of the hike, the middle a lunch stop and a wrong turn, and the ending the walk back at sunset.

Movavi Video Editor is simple and fast by design. Drag-and-drop does the arranging, and hover previews show the exact frame under your cursor. The AI tools handle the tedious parts in one click. Silence removal clears dead air, auto subtitles turn speech into text in 100+ languages, and auto-tracked cropping keeps your subject centered when you go vertical. They all come with the full version, and there is no credit system to count.

New to editing? Movavi Ideas is a free tutorial hub with a new editing idea every week, each with a step-by-step tutorial that takes less than a minute to follow.
Step 1. Import MOV files

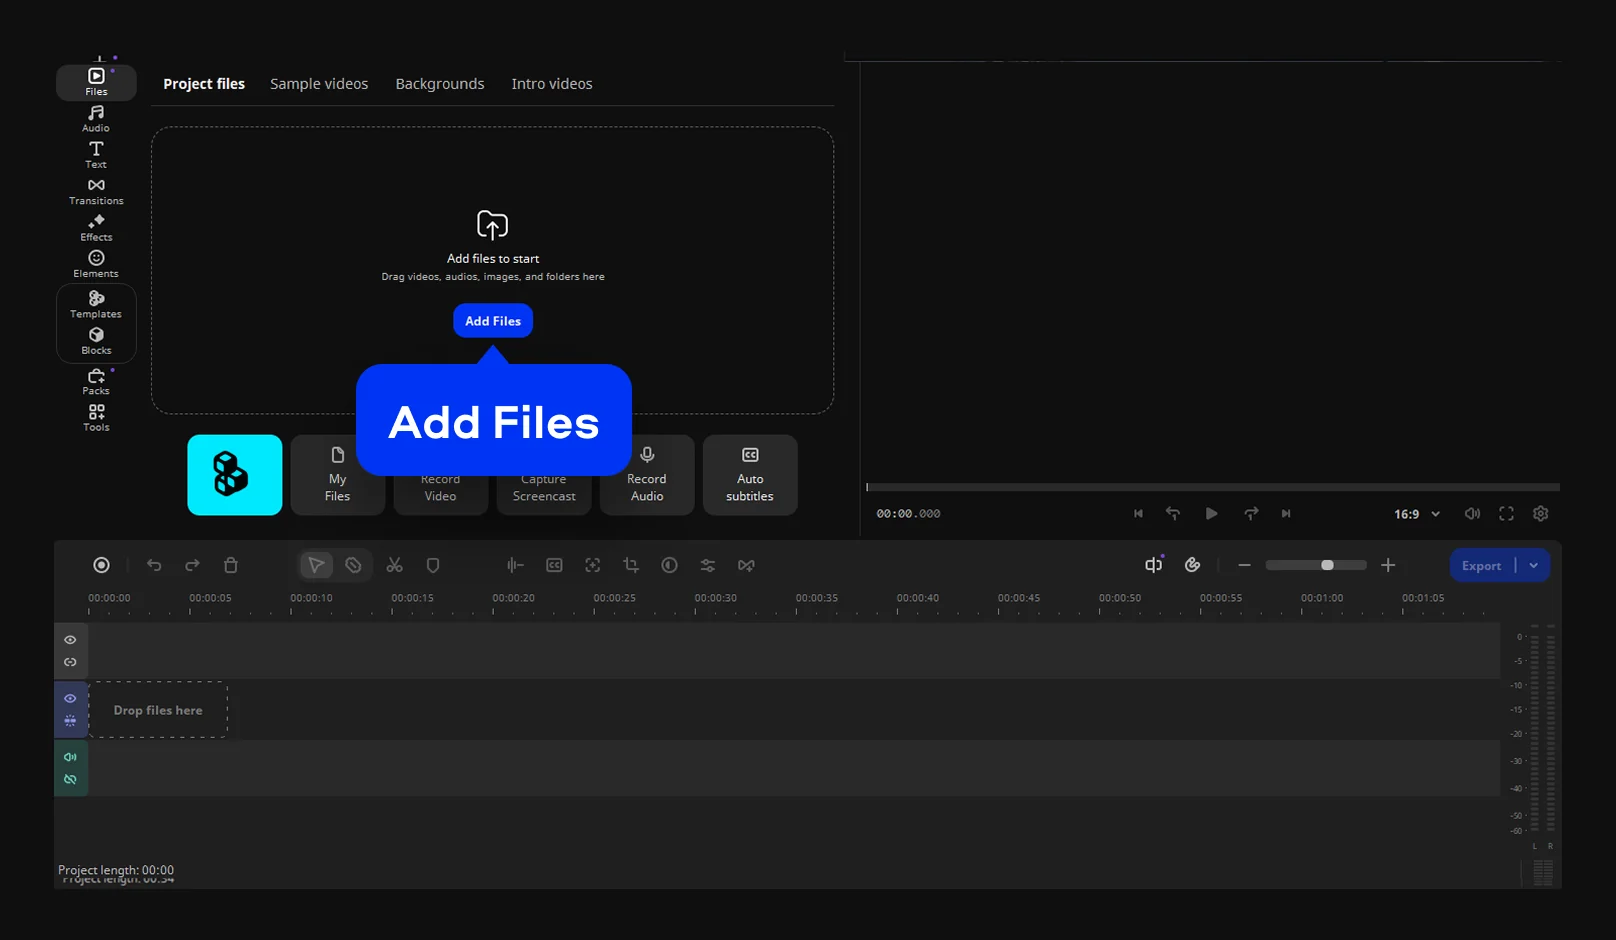
Click Add Files and select your MOV files. Drag the files onto the timeline.

Add MOV videos to create YouTube highlights

Step 2. Find your best moments

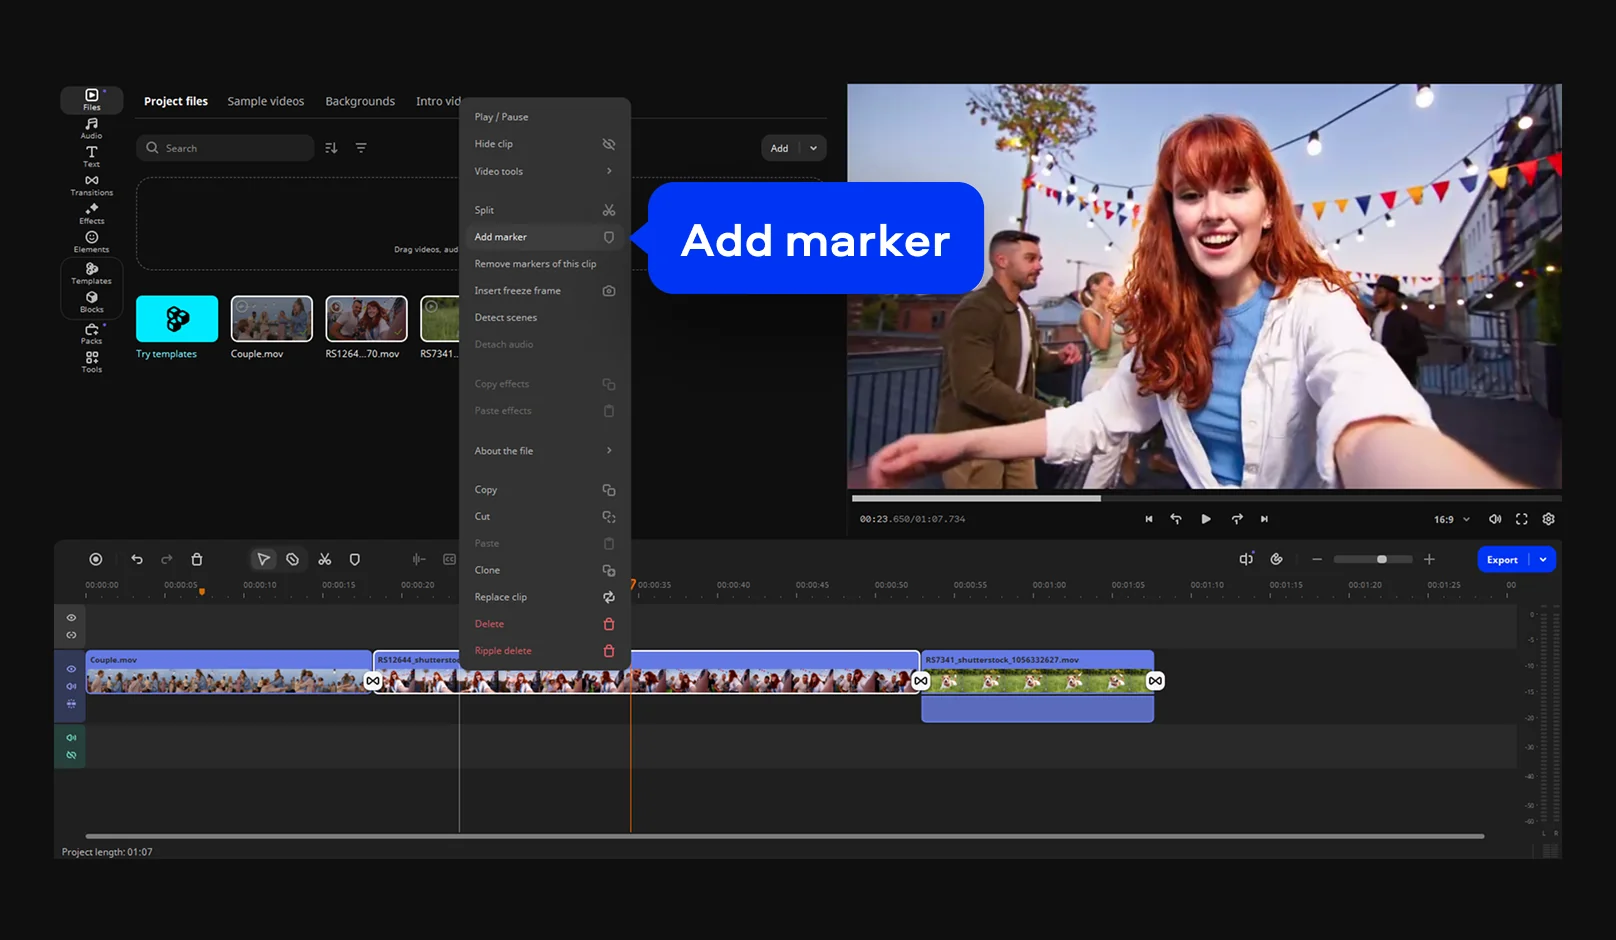
Move your cursor along the timeline, and a preview of the exact frame under the cursor will appear. Add a marker at each moment worth keeping – right-click a clip on the timeline and select Add marker.

Add markers to create a highlight video

Step 3. Cut the moments and clear the dead space

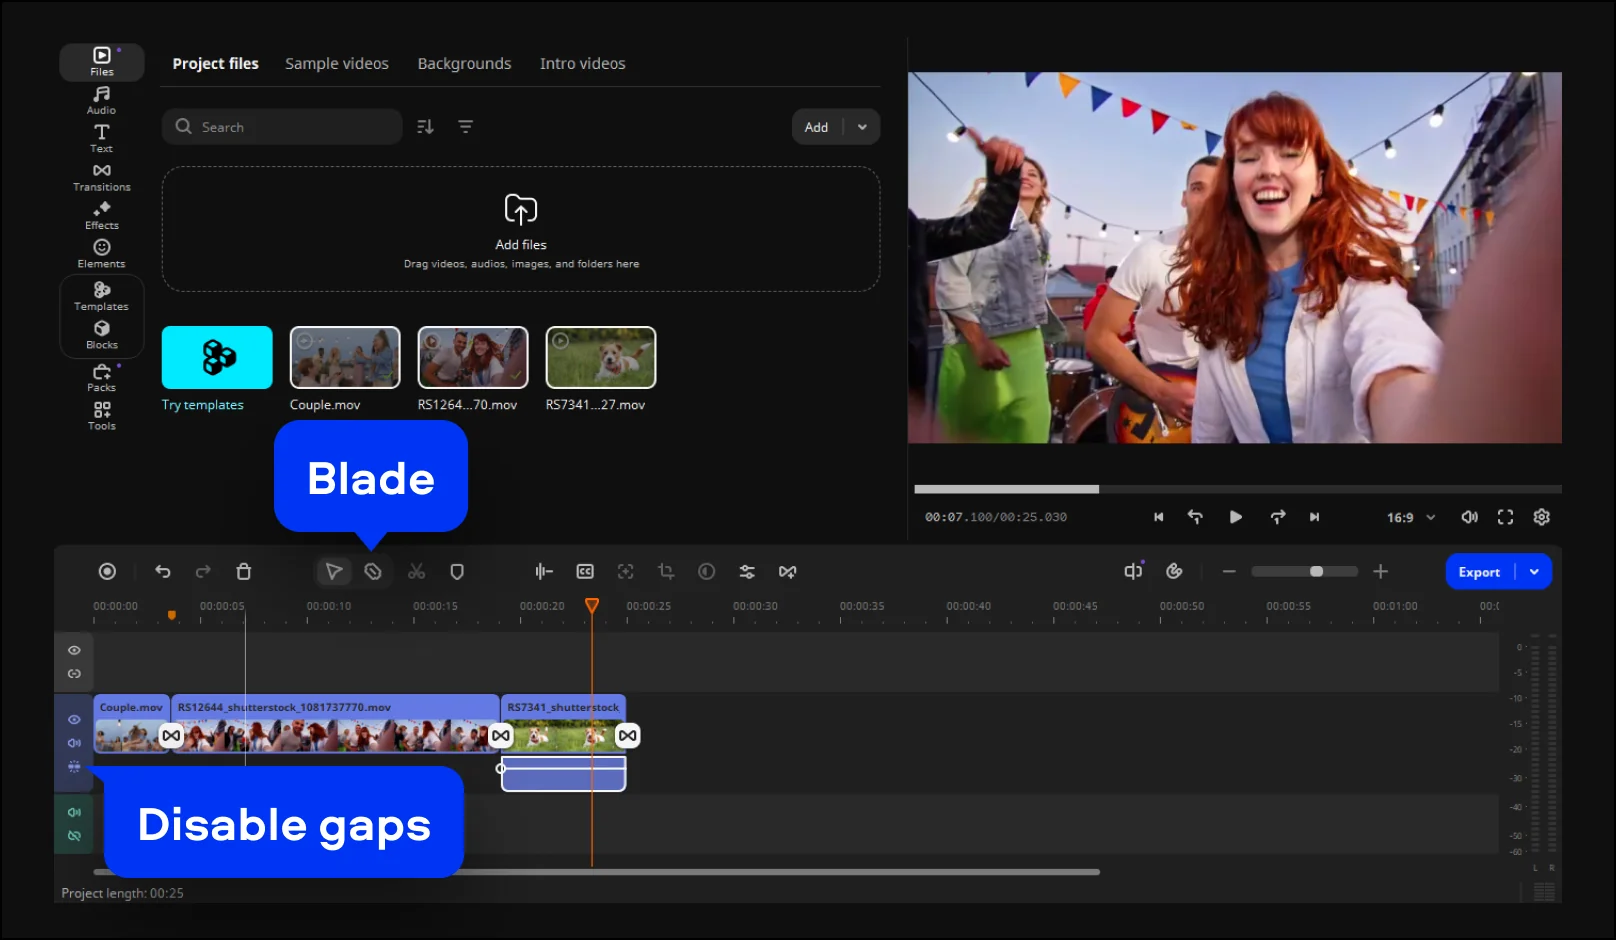
Select the Blade tool. Click the clip at the start and end of each moment. Then delete each piece you don’t need. To remove gaps automatically, click the Disable gaps icon on the left side of the video track. Drag the edge of a clip to trim its start or end.

Use Movavi's Blade tool to cut moments for your highlights video

Step 4. Set the order, the opening, and the ending

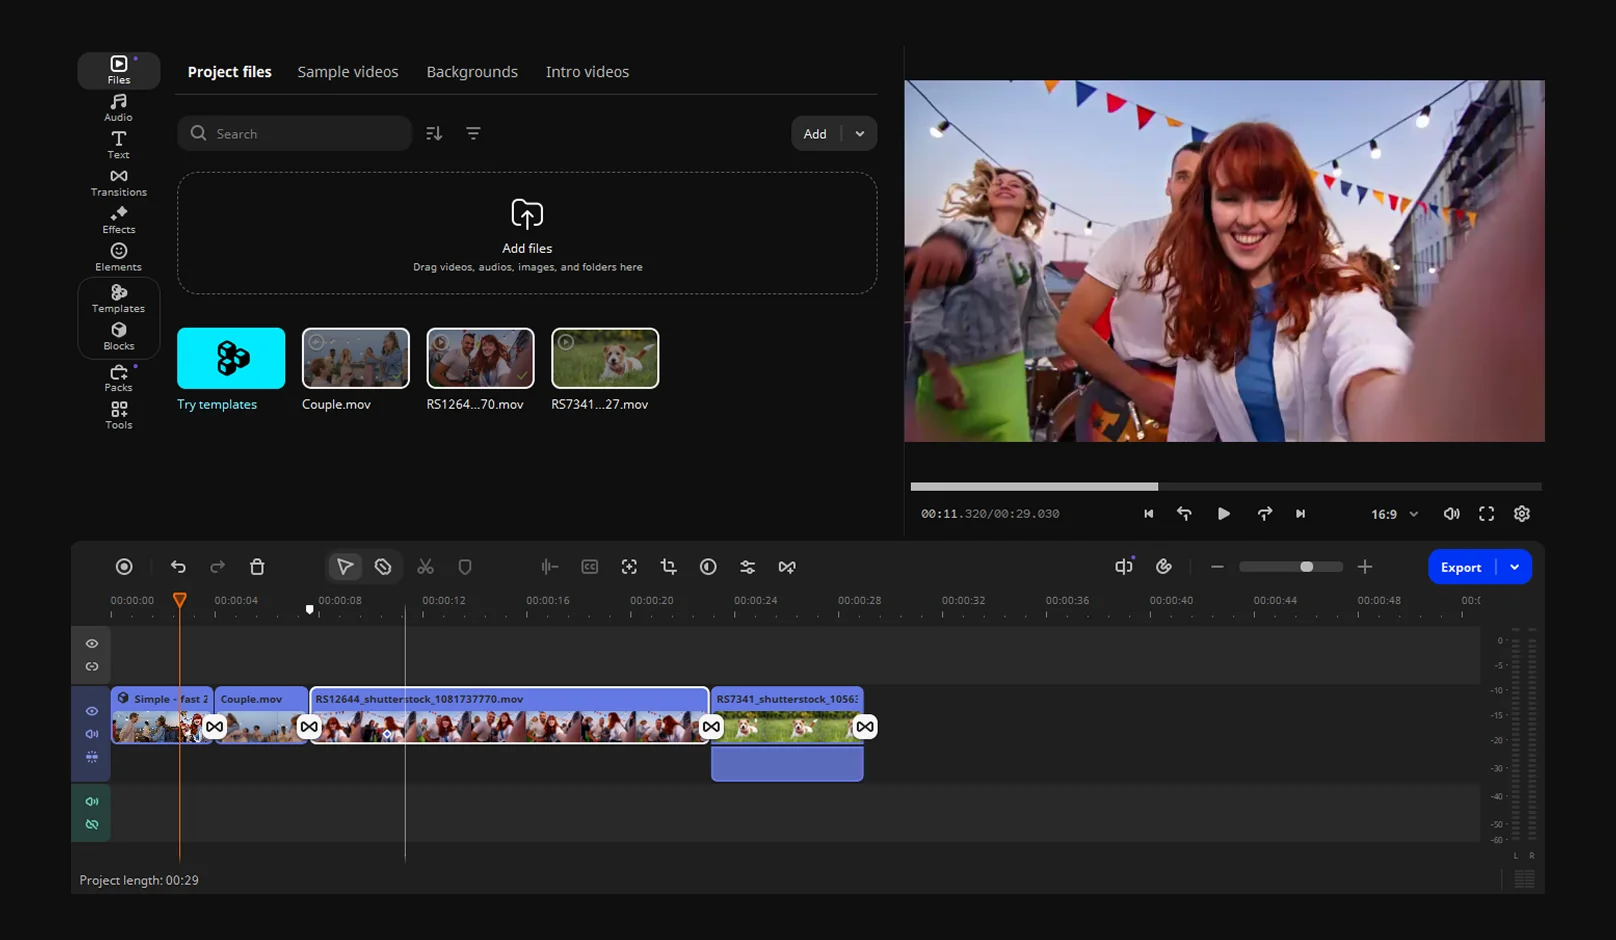
Drag your strongest moment to the start of the timeline, and your closing moment to the end. Place the remaining moments into story order between them. Delete the weakest moment.

Arrange your highlight clips in Movavi Video Editor

Step 5. Add zoom, captions, and sound

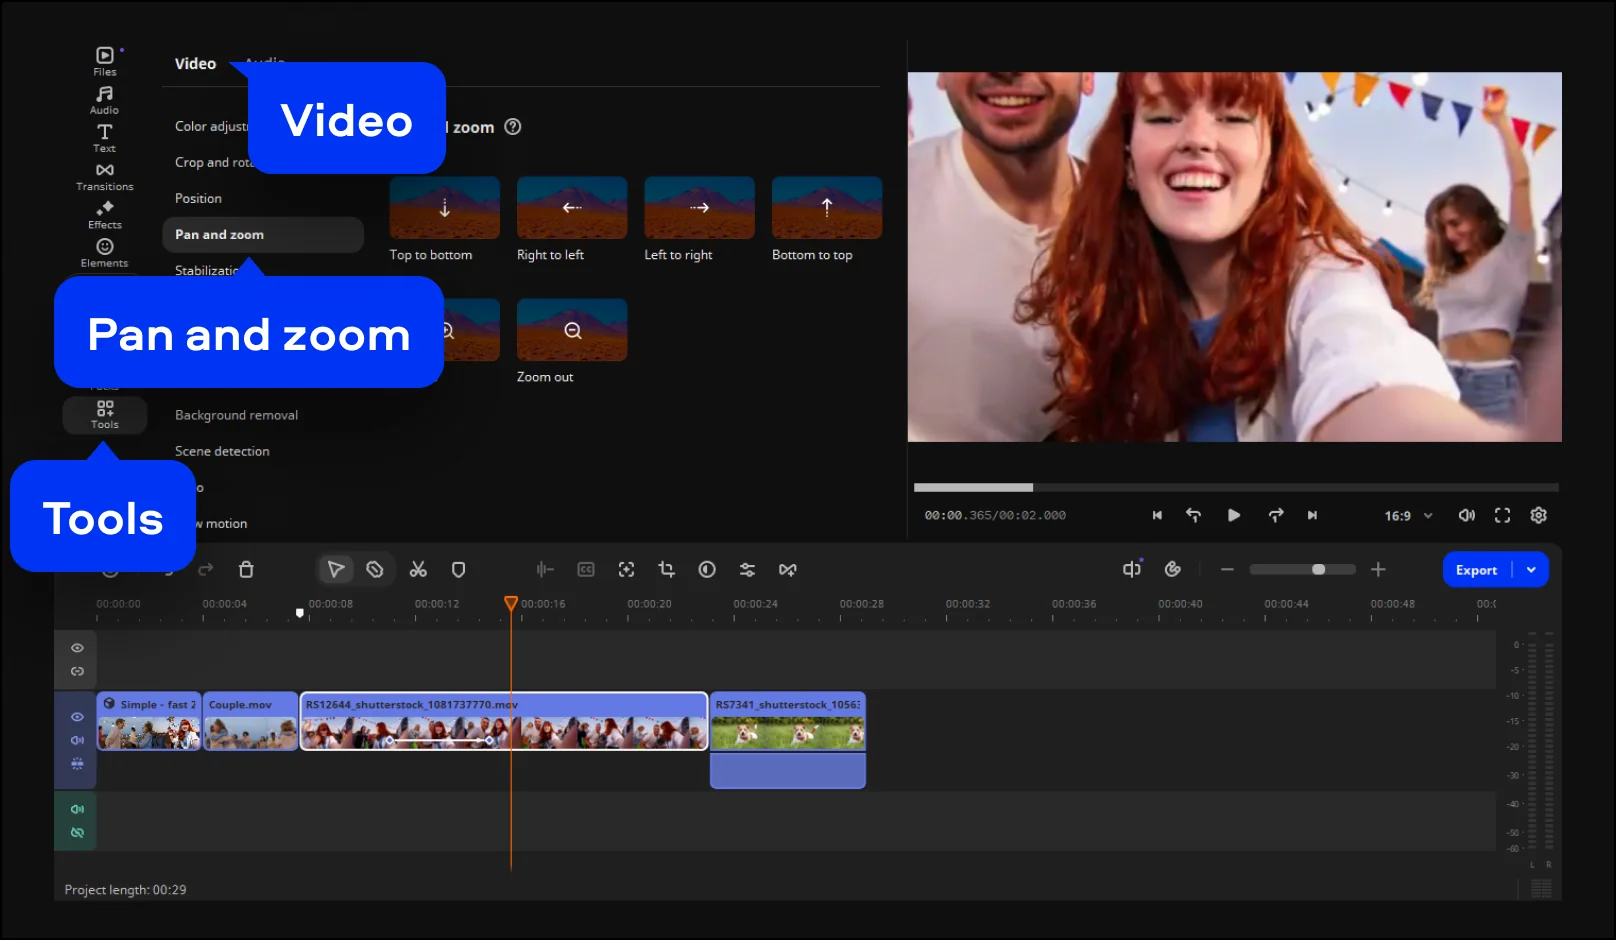
Add camera movement to the moment. Open Tools > Video > Pan and Zoom, select the effect you like, and drag it onto your clip.

Add zoom effect to your highlight clip in Movavi Video Editor

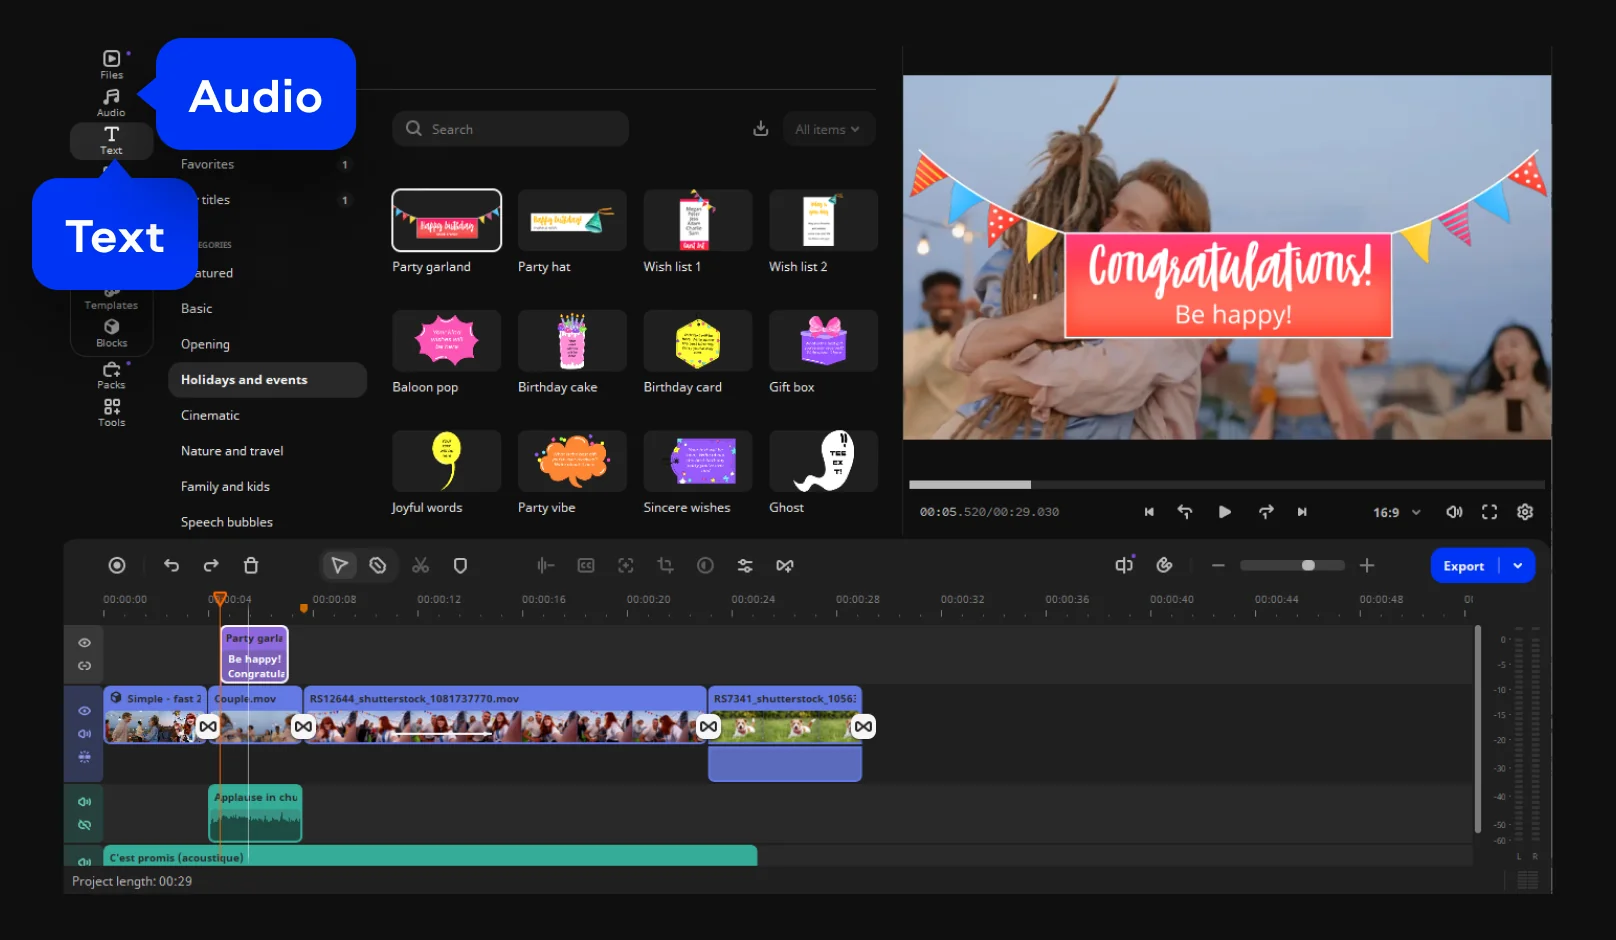
To add captions, go to Text and choose from a variety of titles.

You can also add a sound effect to your video. Open Audio > Sounds and drag a sound from the built-in library onto the timeline.

Add audio and titles to your highlight clip in Movavi Video Editor

Step 6. Export the video

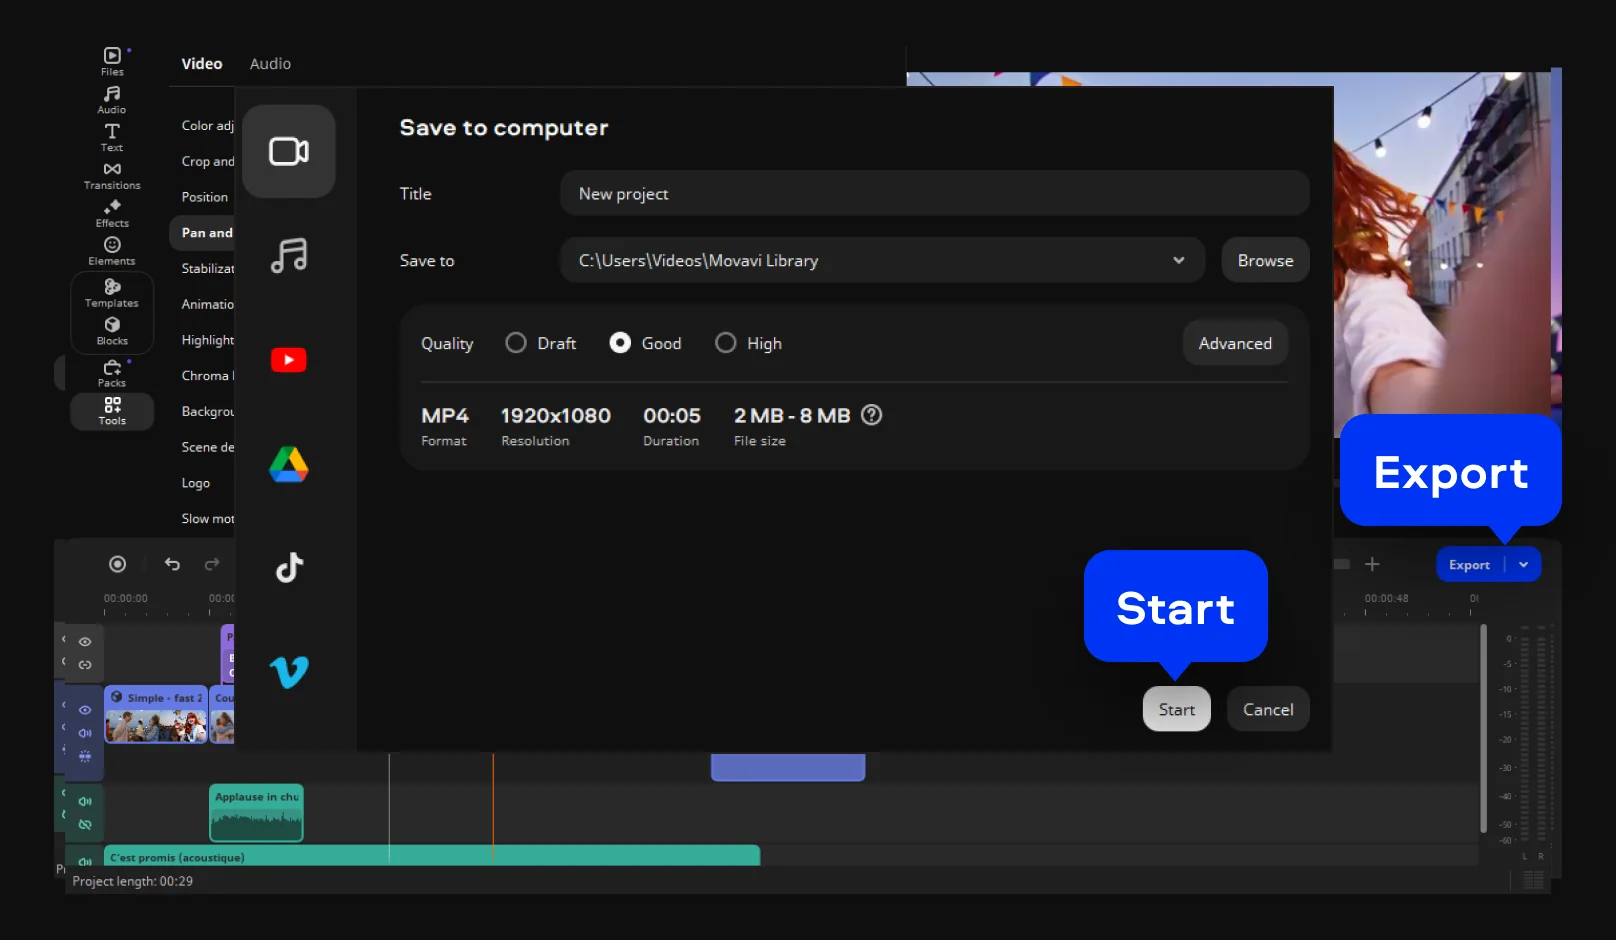
Click Export, choose the output format, and hit Start. This will save the file on your computer.

You can also upload the video straight to YouTube. Pick Upload to YouTube, sign in, and fill in the title, description, and tags. Set the resolution and privacy settings, then hit Upload.

Export your YouTube highlight video from Movavi Video Editor

Can you make highlights in YouTube Studio instead?

Yes, when the YouTube video is already on your channel. In YouTube Studio, go to Content > Videos, open the video, then choose Clips and Shorts > Create clip or Short. You pick a segment by transcript text or by timestamps, preview it, and create a draft. Because the tool starts from a video in your Content list, the video has to be uploaded first.

That route is enough when you want one moment from a video that is already live, such as a single answer from a long stream or one stop from a trip vlog. A desktop editor is the better fit when you want to combine several moments in one video, because you choose their order on the timeline and trim each one. It also fits when you want zoom, captions, and sound effects, or an opening title. And when the long video isn’t online yet, you can edit the original MOV file first and publish the finished highlight afterward.

How do you make vertical highlights for YouTube Shorts?

YouTube categorizes square or vertical videos up to three minutes long as Shorts. That rule applies to videos uploaded on or after October 15, 2024. So vertical highlight clips need two things: a vertical frame and a runtime under that limit.

Cropping is where horizontal footage becomes vertical. In Movavi Video Editor, go to Tools > Video > Crop and rotate. In Auto mode, the AI changes the aspect ratio to the vertical format and adjusts the frame as the video plays, keeping a speaker or a product centered. It suits videos with a moving object, for example, an unboxing where the box moves around in your hands.

Rename the saved project before you crop, so your horizontal highlight stays intact next to the vertical one. Pair the crop with captions: AI Subtitles with Active Word Highlighting syncs each word to the audio in real time, and you can move the subtitles anywhere on the screen.

Scrub the cropped clips before you export. A face, a product label, or a scoreboard that slips out of the frame is the main thing to catch.

Typical mistakes in highlight videos

Each of these has a quick fix with tools you already have.

  • Too long or unfocused. A highlight holds up when every moment earns its place. If you hesitate over a clip, cut it, then trim the start of the clips that stay so each one begins at the action.
  • No context at the start. Open with a title that says what the video is about: the match, the trip, the product.
  • An abrupt ending. Finish on a moment that feels like an ending, then add a fade-out to the last clip so the video closes instead of stopping.
  • Captions covering faces. Subtitles can be moved on the screen, so drop them lower or to the side when they sit on someone’s face.
  • The main detail cut off by the crop. When you crop your footage, make sure the subject stays in the frame.
  • Dead space left in. After you reorder moments, scrub the timeline once more and delete leftover gaps or pauses.
  • A great moment in shaky footage. Stabilization reduces handheld camera shake, and its settings include accuracy, smoothing, and edge cropping.
  • A great moment in low light. AI video denoise removes grain and low-light artifacts while keeping faces, textures, and edges sharp, which suits older mobile footage.
  • A moment that flies by. A freeze frame holds on the instant, and the slow-motion tool stretches a play so viewers can follow what happened.

Try it on your own footage

Download Movavi Video Editor for Windows or Mac, open your MOV file, and cut your first highlight. When it’s live, make the vertical version for Shorts, or plan the next highlight while the footage is fresh. Every creator already has the best moments in the footage; the editor just helps you find them.

Movavi Video Editor
Create awesome videos easily

*The free version of Movavi Video Editor may have the following restrictions depending on the build: watermark on exported clips, 60-second video or 1/2 audio length limit, and/or some advanced features unavailable when exporting videos.

Frequently asked questions

Does MOV need converting before editing?

No. Movavi Video Editor imports MOV files, and the editor can export to .mov (H.264) too, which helps if you want an MOV copy for another app. It also opens MP4, AVI, MKV, and WMV, so footage from another source loads the same way.

Does YouTube accept MOV?

Yes. YouTube’s help page lists MOV among the files it accepts for upload. Movavi Video Editor can also upload straight to YouTube after export, with title, description, privacy, and tag settings. Once a video is on your channel, you can come back to it later and cut new clips from it in YouTube Studio.

How long should a highlight video be?

Long enough to hold every strong moment and not a second longer. It could last from under a minute to 5 minutes. Watch your video from the first second the way a viewer would, and cut out the moments you would skip. If you plan to post a Short, keep the video length under 3 minutes.

How do you cut highlights from a stream recording?

Treat the recording as one long video and follow the same steps, marking each play as you scrub. Hover over the timeline to find the plays you want. If your stream is saved as MKV, the editor opens it too. If you talk over the action, silence removal clears the pauses between your lines, and you can adjust the pause length and the volume threshold. When the stream is already on your channel, Clips and Shorts in YouTube Studio is another option for a single moment.

Why are YouTube’s AI suggestions missing?

According to YouTube’s help page, AI-powered suggestions and outlines in Clips and Shorts are available only in selected countries and languages, and the page lists them. If yours isn’t listed, that explains it.

Have questions?
If you can’t find the answer to your question, please feel free to contact our Support Team.
Join us for discounts, editing tips, and content ideas

1.5M+ users already subscribed to our newsletter

By signing up, I agree to receive marketing emails from Movavi and agree to Movavi's Privacy Policy.