How to Edit a Video

Editing video comes down to five moves: cut filler, sequence highlights, smooth transitions, balance audio, and add text or music. Whether you're a blogger posting daily shorts or a YouTuber growing your channel, tight editing hooks viewers instantly and keeps them from scrolling away.

This step-by-step workflow uses Movavi Video Editor to turn your raw footage into a high-quality export – fast. Built for beginners and everyday creators, Movavi is an intuitive video editor with customizable video templates, one-click AI tools, and hundreds of drag-and-drop effects.  It speeds up the process so you can stop wrestling with software, focus on creating, and deliver impressive videos on your very first try.

Edited by
Ben Jacklin
13,580

Picking your video editing software

There's no shortage of options. CapCut handles quick vertical edits from a phone. iMovie and Final Cut Pro come from Apple and only run on a Mac. Premiere Pro and DaVinci Resolve are built for people cutting feature-length projects with full production teams behind them. None of these are the wrong choice – they're built for different jobs.

For someone editing a vlog, a beauty tutorial, or a music review and trying to get from raw footage to a finished file without a semester of tutorials first, a video editor built specifically for that job is the more practical starting point than a professional suite designed for full production teams. Movavi Video Editor runs on Windows 10 and 11 and macOS 12.0 or later, with native support for Apple M1 and newer chips, and the whole idea behind it is simple and fast by design: a drag-and-drop workspace with instant hover previews, so every step below lives on one screen instead of scattered across a dozen menus.

If your raw material starts life as a screen recording rather than camera footage – a software walkthrough, a slideshow, a gameplay clip you want to turn into highlights – Movavi Screen Recorder handles the screen capture side: full-screen or custom-area video along with system and microphone audio, ready to drop straight into a video editor's timeline like any other clip.


Video editing for beginners: Your step-by-step workflow

Step 1. Import your files

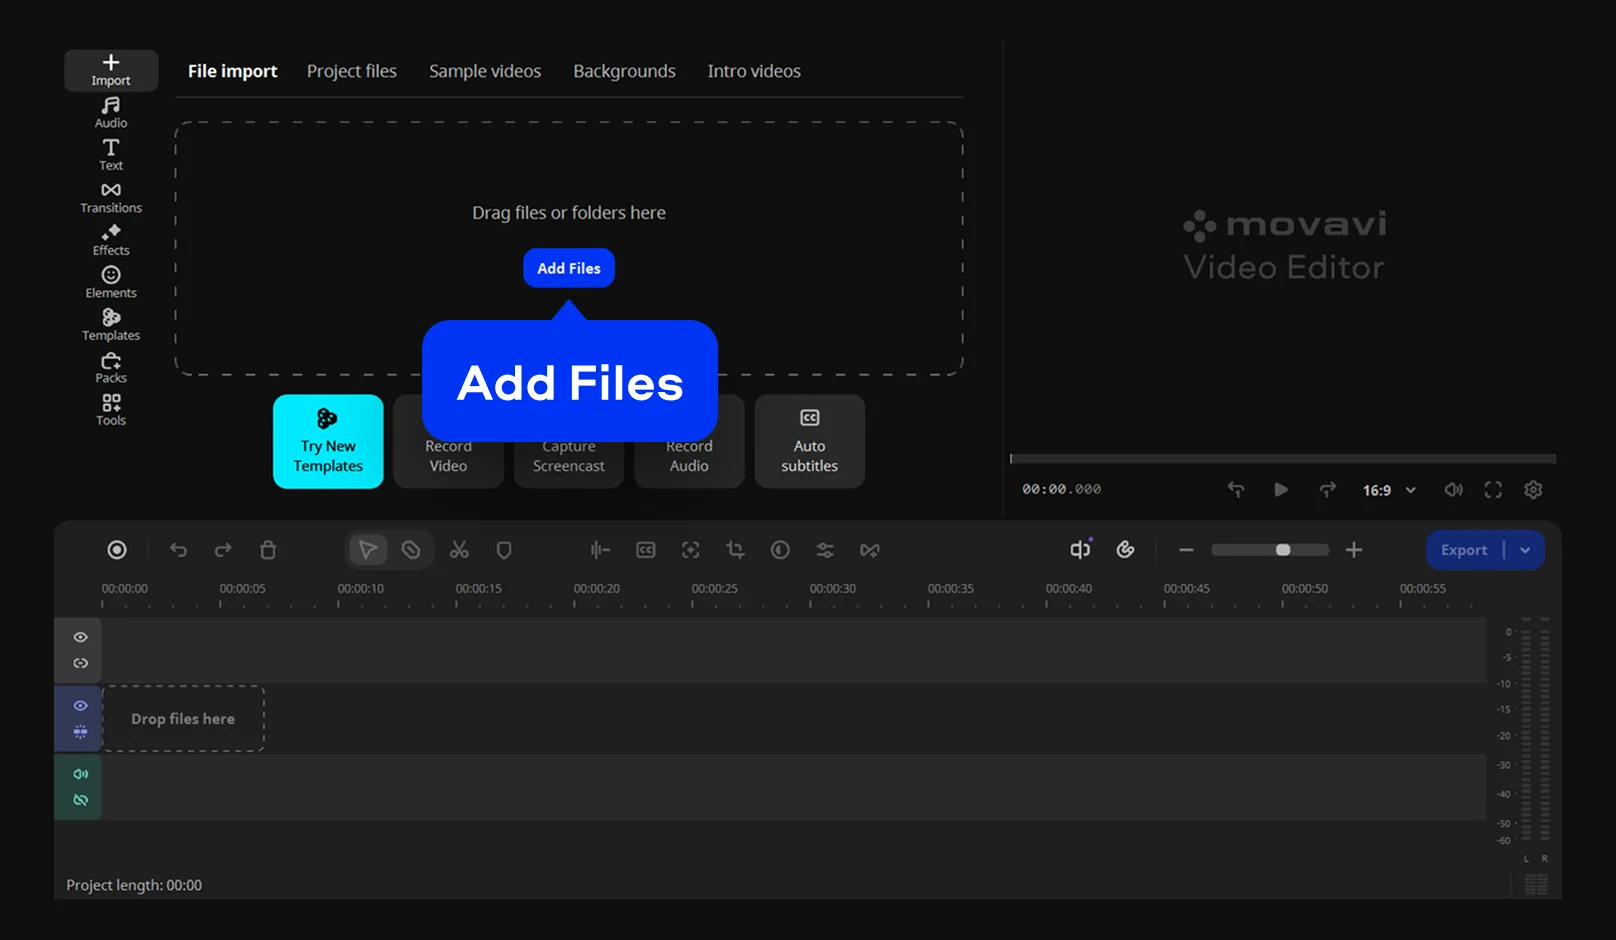
Launch Movavi Video Editor and click Add Files to bring in your footage, or choose from the built-in sample videos and backgrounds if you're still deciding on a shot list. Drag your clips onto the Timeline to start editing.

Movavi keeps your workflow steady, so you can focus on editing without worrying about losing your timeline progress. If a file ever gets moved or renamed on your hard drive, the program flags it and helps you relink it instantly instead of showing a blank thumbnail.

Step 2. Organize and trim clips on the Timeline

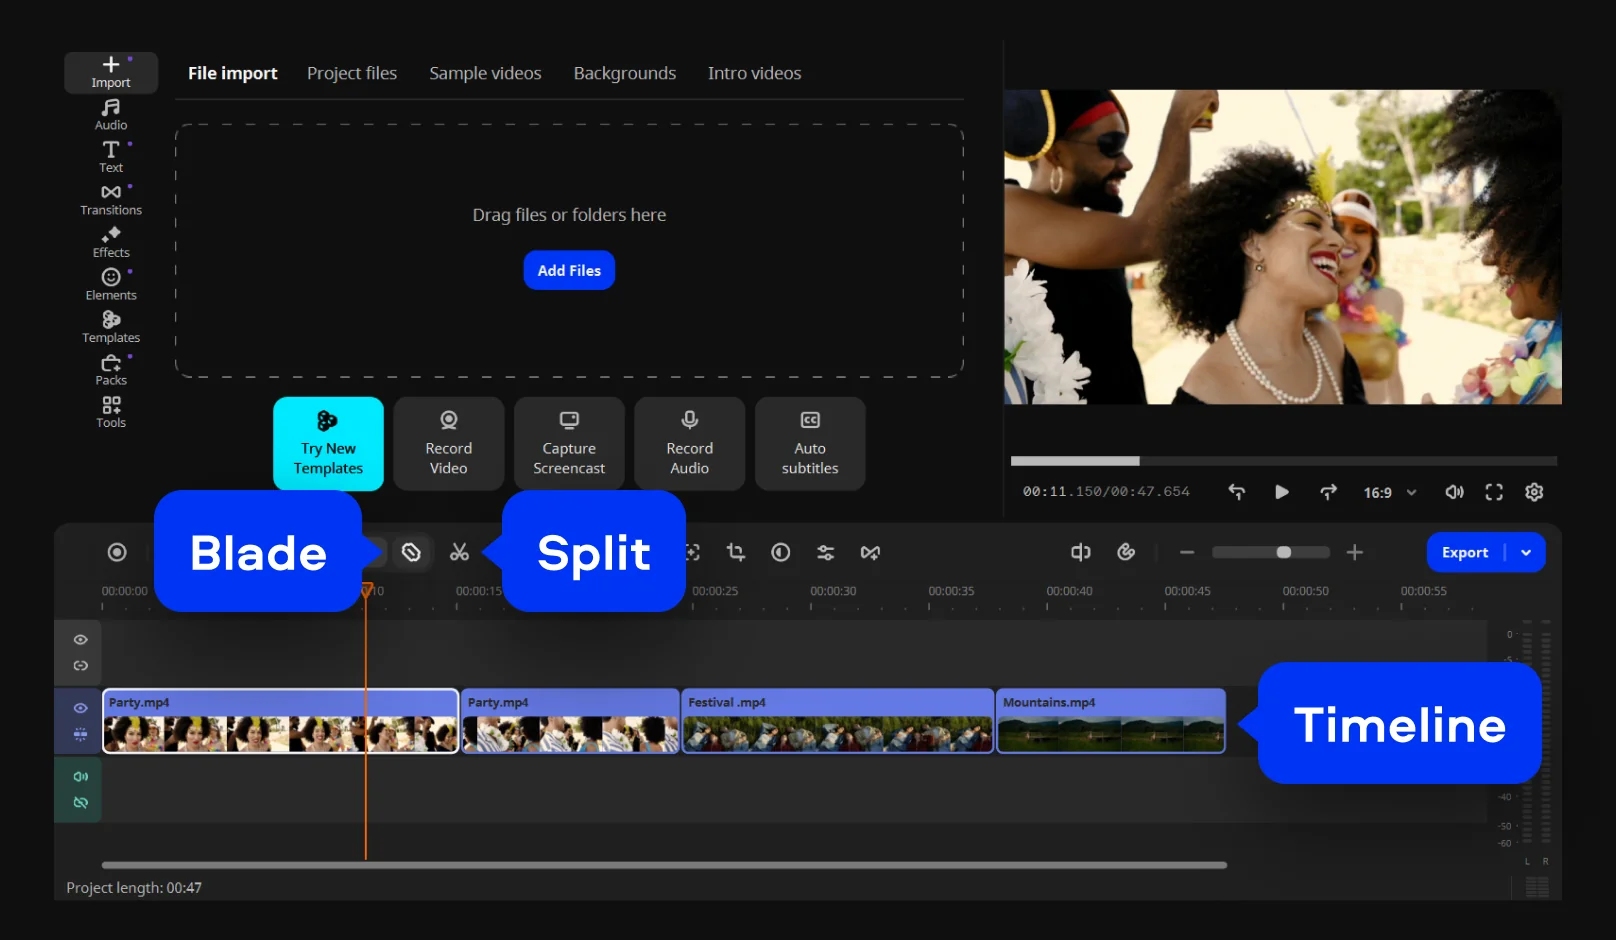
Arrange clips on the Timeline across separate tracks for audio, text, and video to edit each independently. Turn on snapping for automatic alignment, and place markers at key moments.
Move the playhead to unwanted sections and use the Split or Blade tool to cut. Drag clip edges for precise trimming, Shift-click to slice multiple tracks, and delete fragments while closing gaps.

Step 3. Add Transitions

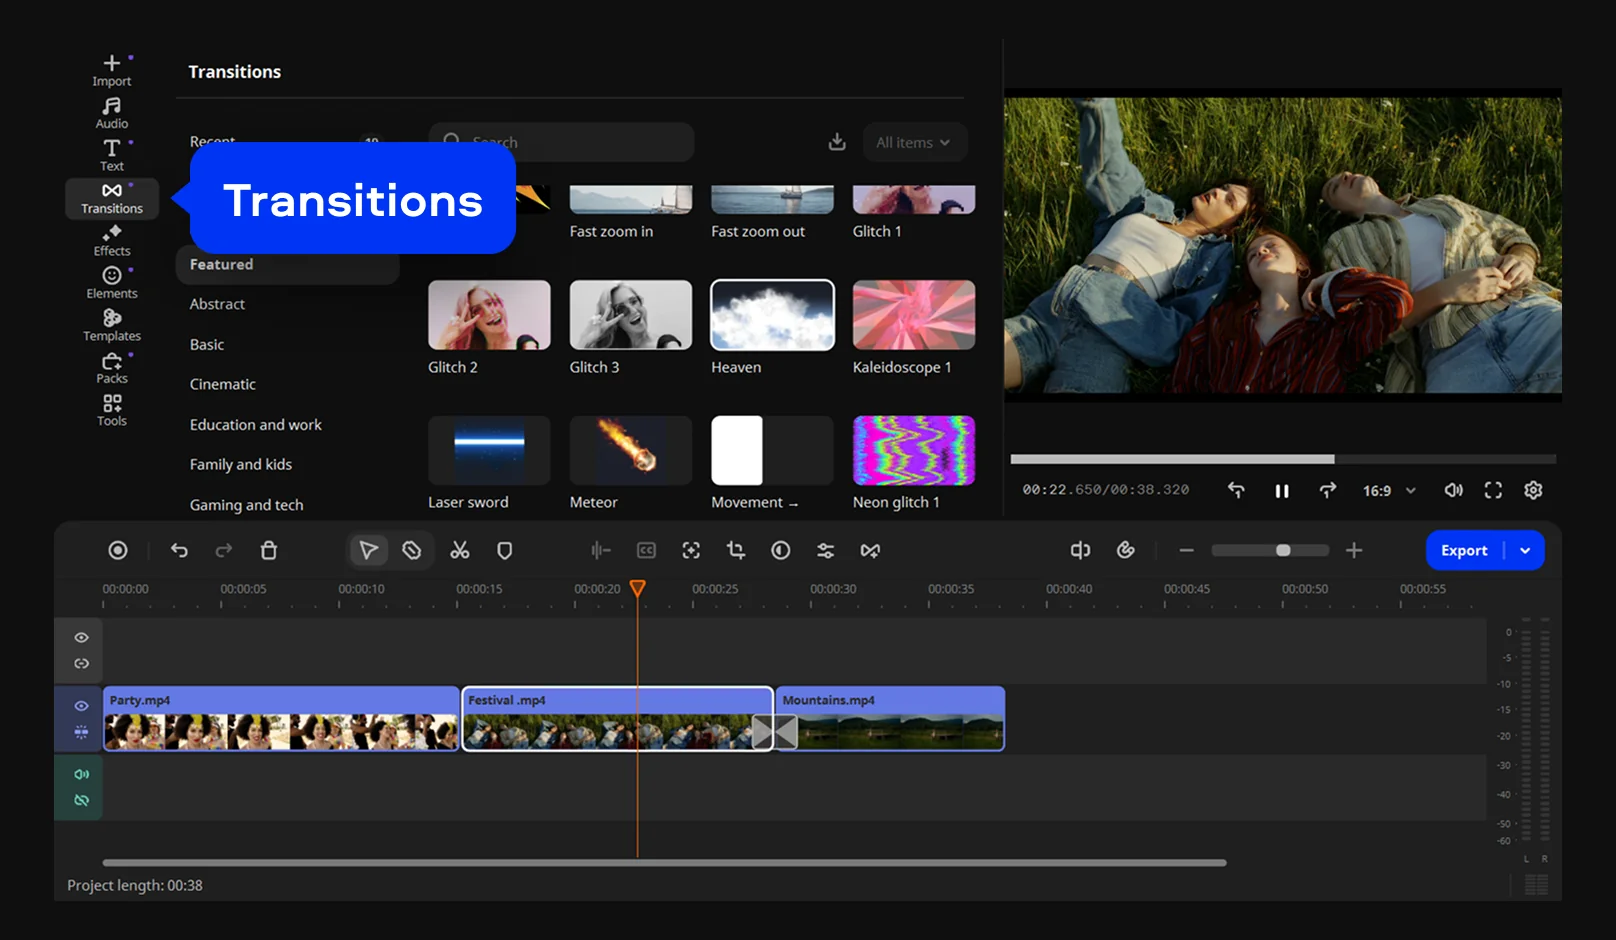
Click the Transitions icon in the left sidebar to browse available styles. Drag your chosen transition – like a fade, dissolve, or wipe – directly between your clips on the timeline to smooth out abrupt cuts. Double-click the transition icon to adjust its duration to taste; you can set it to end on trimmed content, a freeze frame, or a slow-motion beat depending on the vibe.

Movavi Video Editor ships with hundreds of built-in filters, titles, and transitions out of the box. For even more creative options, the Movavi Effects subscription unlocks over 10,000 additional theme-based effects, all of which you can preview directly on your own footage before buying.

Step 4. Color correct your footage

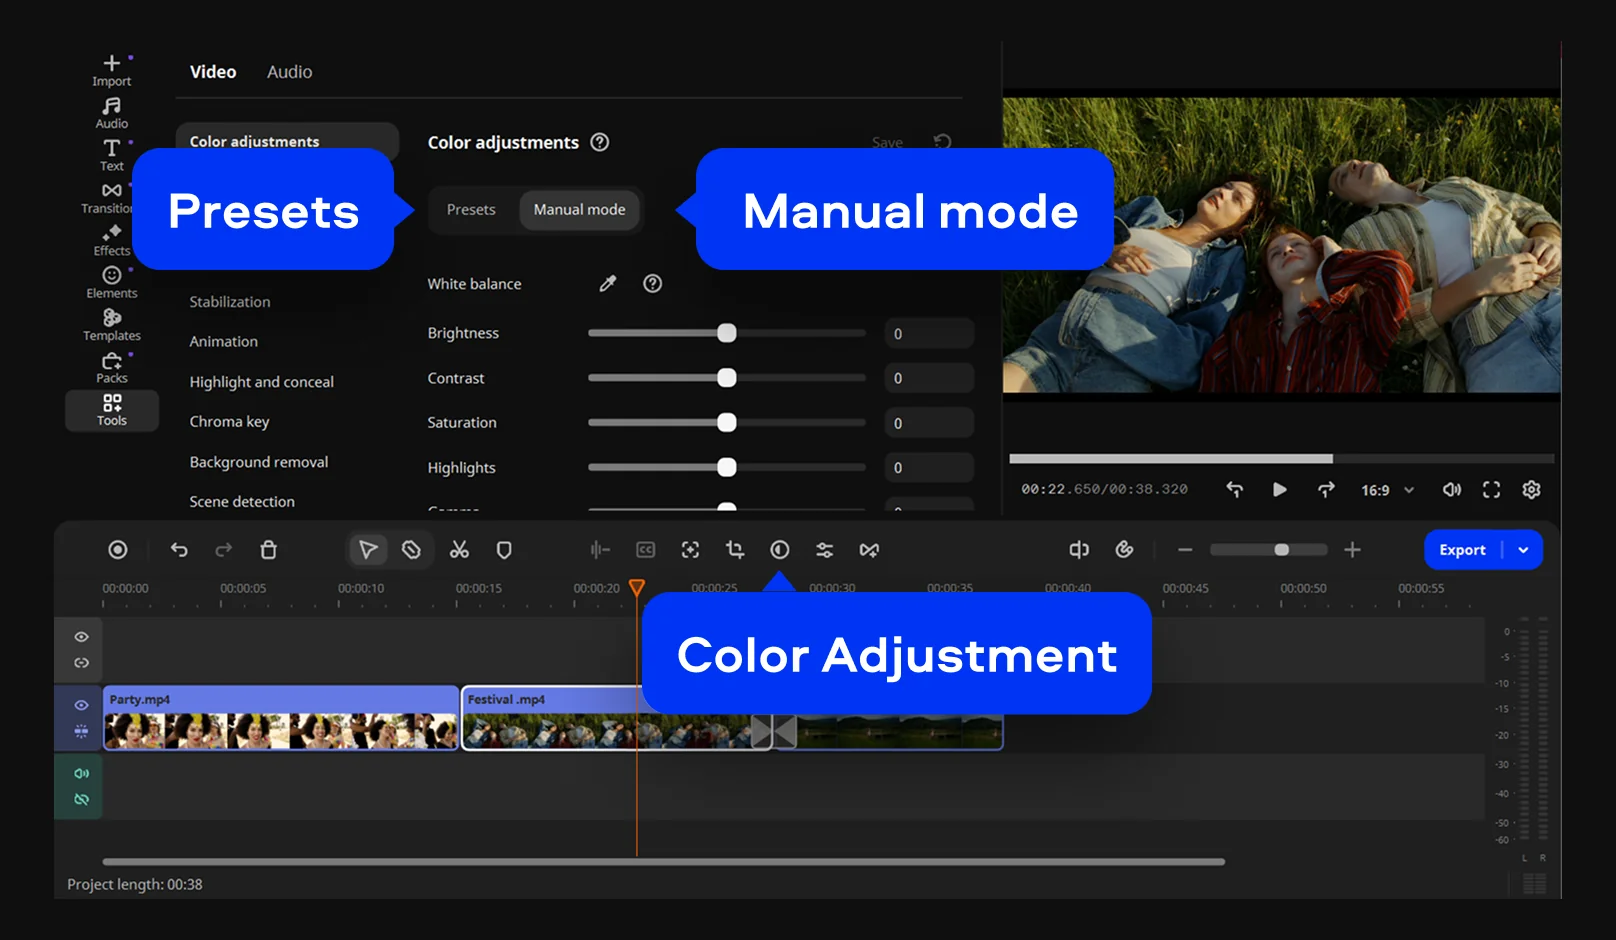
Click the Color adjustments icon on the toolbar (or go to Tools > Color adjustments) to ensure clips shot in different lighting look cohesive. In the Preset tab, you can apply ready-made presets or auto-corrections for an instant fix.

For total control, switch to the Manual mode tab to fine-tune manual settings. Adjust brightness to set the overall exposure, balance contrast with shadows and highlights, and tweak saturation and white balance so your colors look vibrant yet natural.

Step 5. Balance and clean up your audio

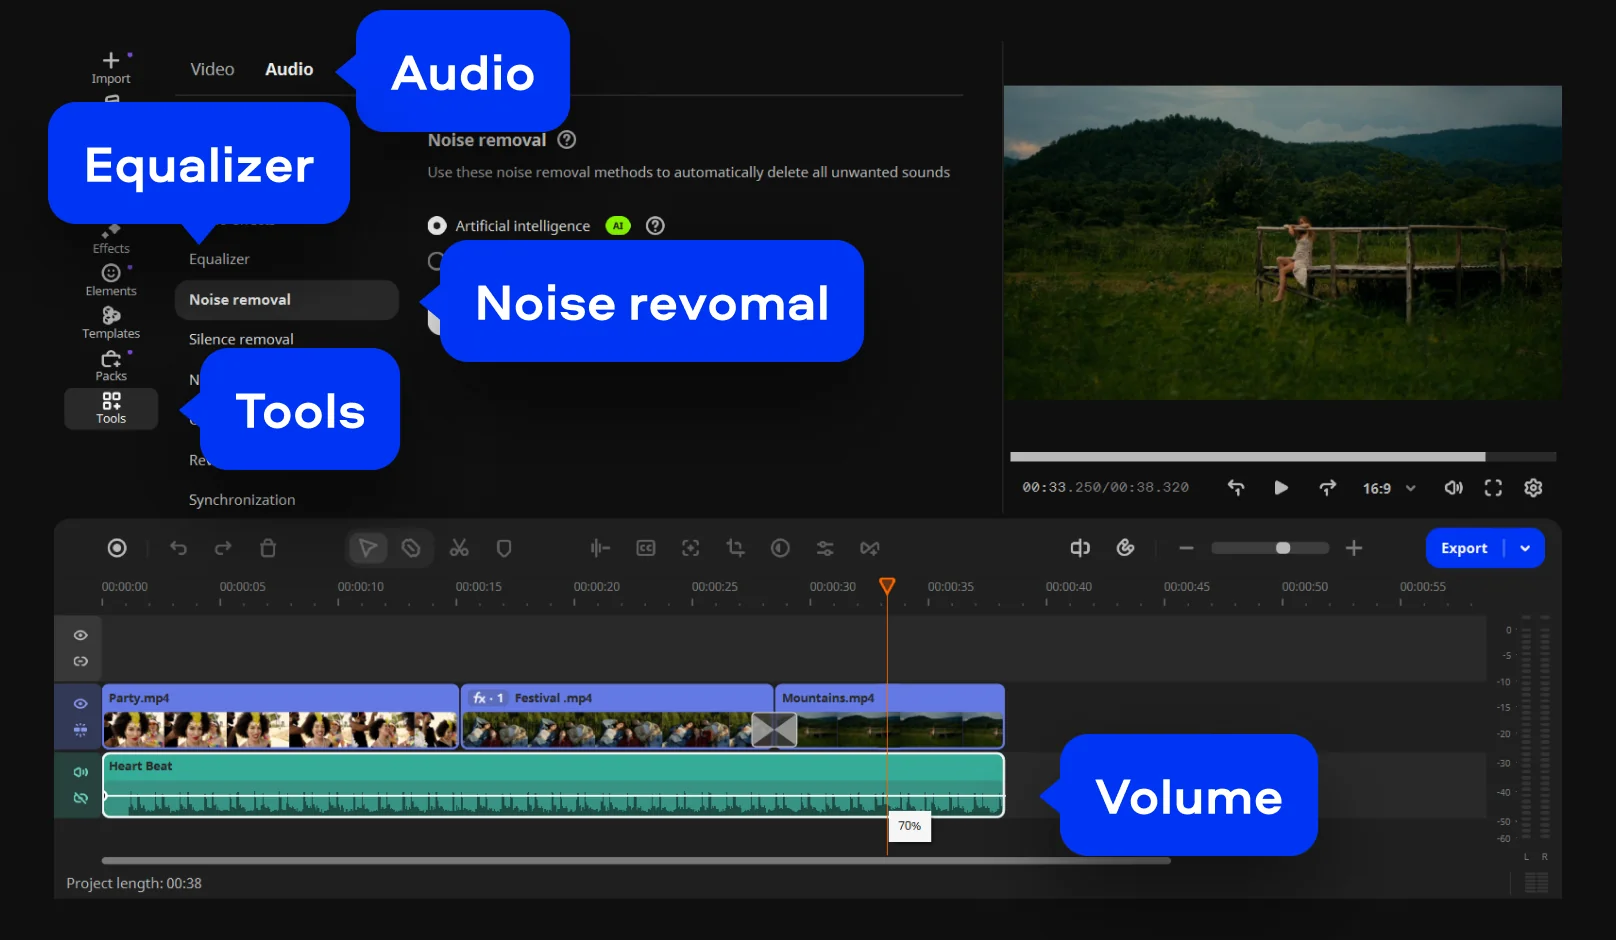
Select your audio track on the timeline and use the volume slider to gradually raise or lower decibel levels – listening in real time to avoid distortion – or add volume points to create custom fade-ins and fade-outs. Start by normalizing clip volumes so viewers don't have to keep adjusting their speakers.

For quick sound cleanup, go to Tools > Audio tab and turn on Noise removal. It clears out background distractions like traffic, wind, and room hums by up to 95% while keeping primary voices crisp and clear.

Use the built-in Equalizer for finer manual control over specific frequency ranges – because viewers forgive shaky footage far more easily than bad sound.

Step 6. Add Titles and Subtitles

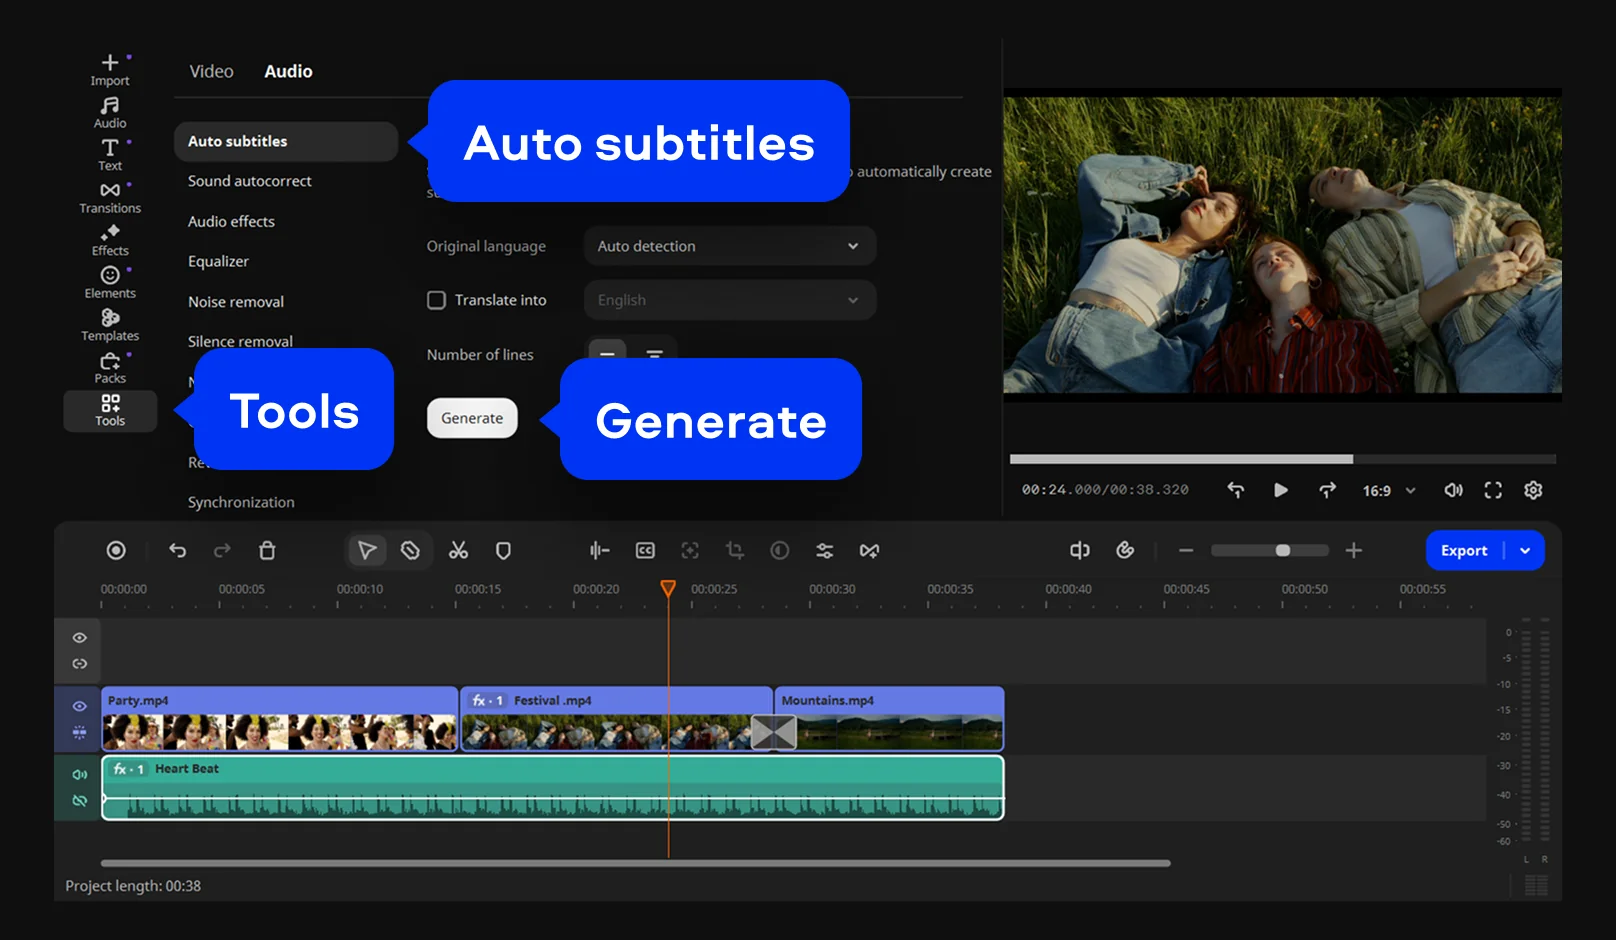
Captions and subtitles aren't optional anymore for social platforms, where most videos are watched with the sound off. Go to Tools and in the Audio tab select Auto Subtitles. Pick your spoken language and click Generate – the AI automatically transcribes speech into text with over 99% accuracy across 100+ languages, complete with active word-highlighting synced to your audio in real time.

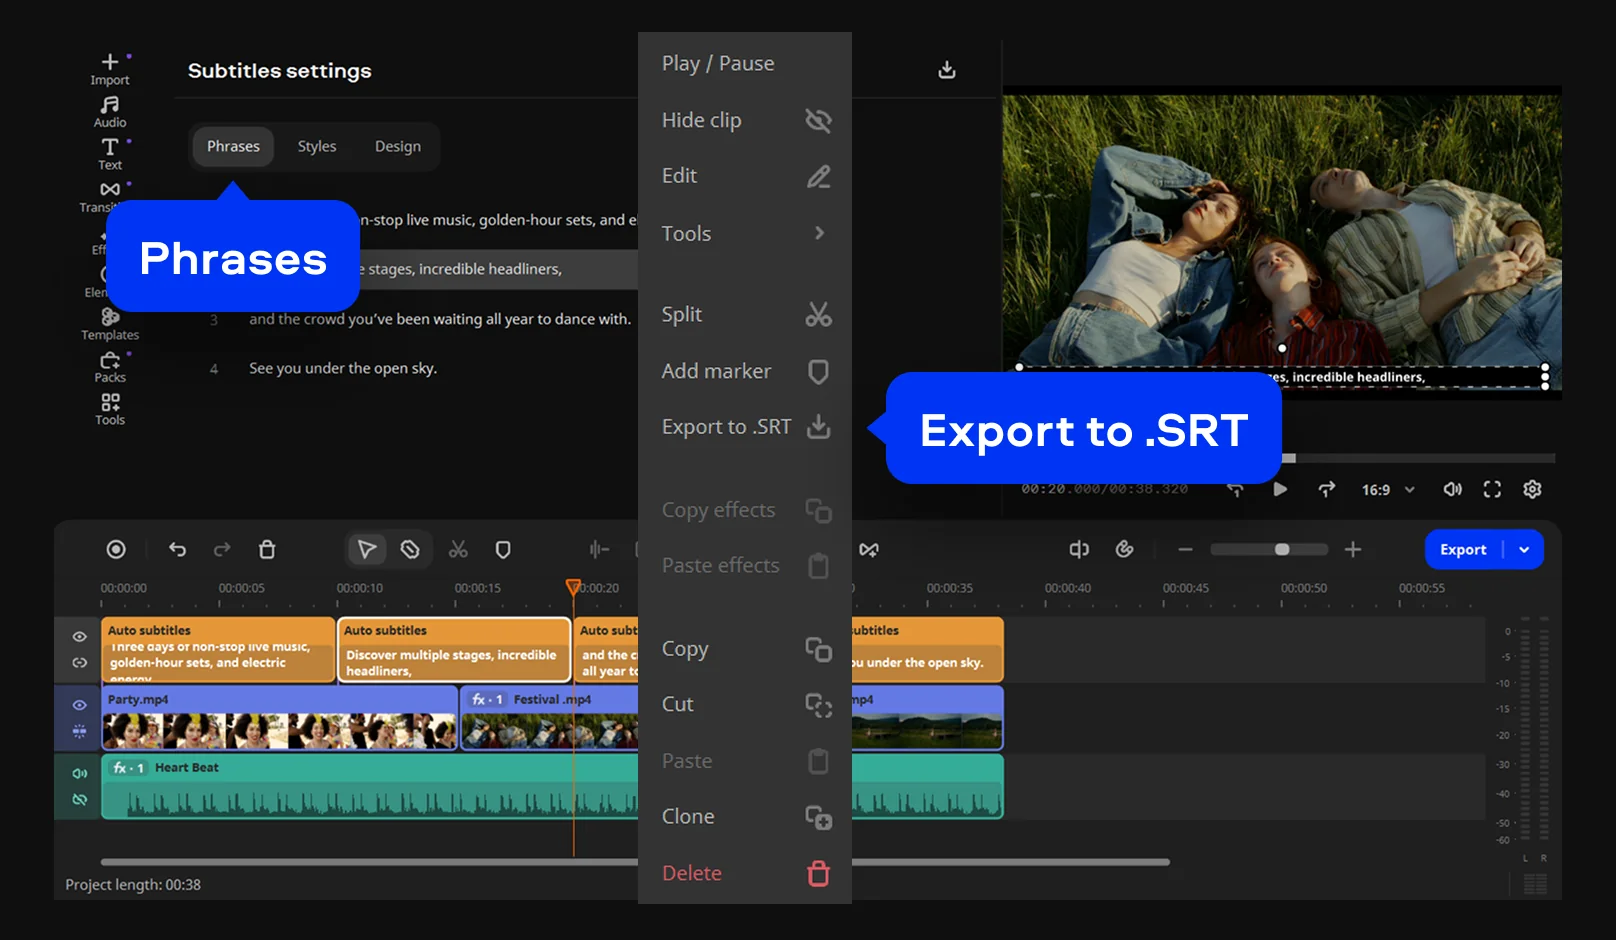
Once generated, edit the wording line by line in the Phrases panel, customize fonts and styles using 60+ design options. Right-click the subtitle track and select export the subtitle track, and select Export to .SRT to save your subtitles as a standalone SRT file to keep silent scrollers engaged and boost your watch time.

Step 7. Apply animations and motion graphics

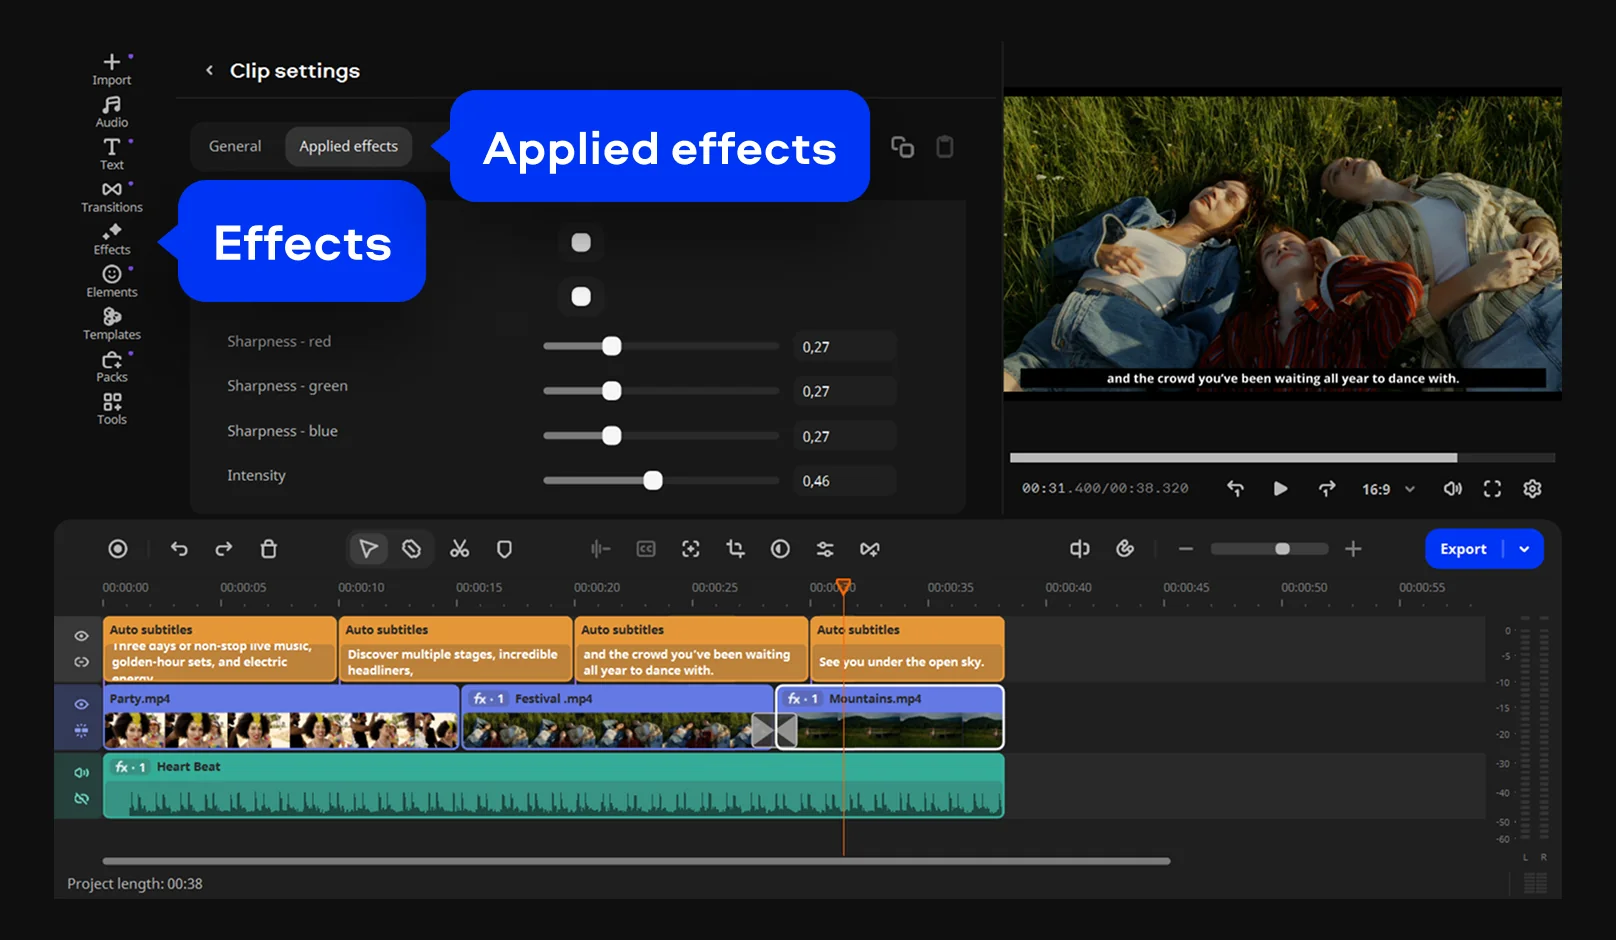
Motion graphics and visual effects draw immediate attention to key details like names, prices, callouts, or visual punchlines. Go to the Effects tab on the left sidebar, choose your desired style, and drag it directly onto your clip. To fine-tune the look, open Clip settings and switch to the Applied effects tab, where you can adjust specific parameters:

  • Intensity: Controls the overall strength and impact of the applied effect.
  • Opacity: Adjusts the transparency layer to blend the effect smoothly with your original footage.
  • Quality: Selects the rendering resolution and precision (e.g., Best) to balance system performance with visual output.
  • And others: For example, Grain, Lens distortion, or Aberration, to enhance your final look.

Step 8. Final touches and export

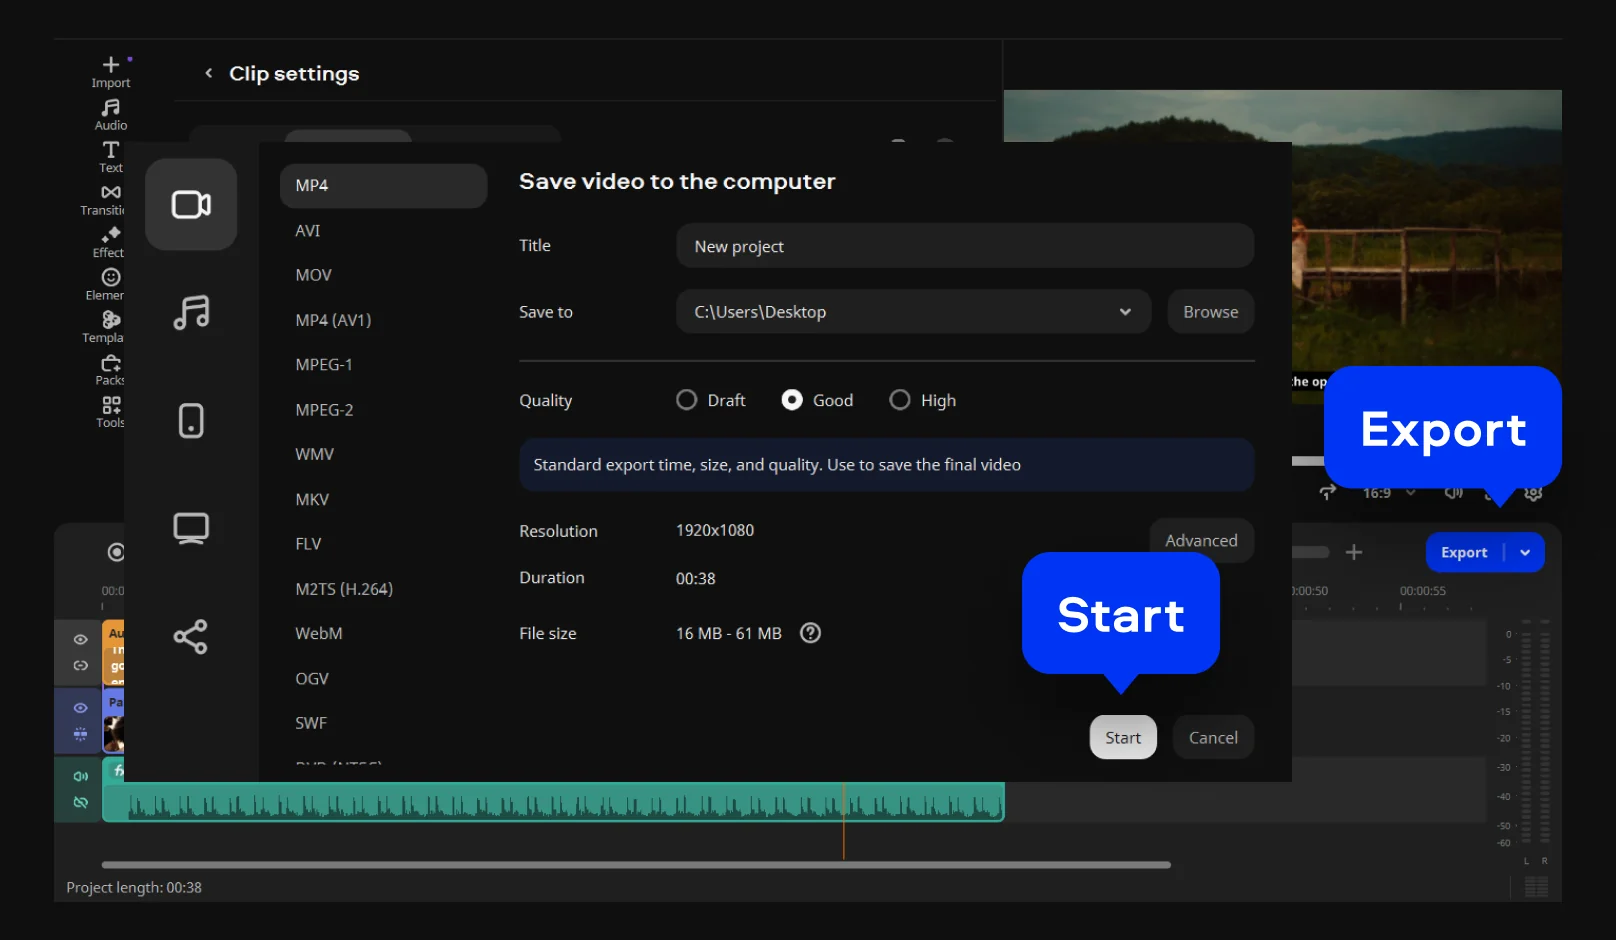
Review your final edit to double-check audio levels, transition timing, and caption sync. Click Export to save your file as an MP4 for broad compatibility, or choose built-in presets tailored for iOS, Android, consoles, and smart TVs. You can also share directly to YouTube, TikTok, Vimeo, or Google Drive with titles, descriptions, and privacy settings configured right on screen. Note that the free trial lets you test all features, but exports include a watermark, reduced quality, and a 60-second limit until you upgrade.

Useful video editing tips

  • Cut on action – end a shot mid-movement rather than on a static frame, and the next clip feels smoother.
  • Keep individual clips short for anything headed to social; three seconds of a static shot feels like ten.
  • Pick one color look and apply it consistently, rather than color correcting each clip in isolation.
  • Mix your audio with headphones on at least once before exporting – speakers hide problems headphones catch.
  • Save a version before you start any major restructuring, so an experiment that doesn't work out is one undo away, not an afternoon away.
  • Watch your edit back with fresh eyes the next day before exporting – cuts that felt fine at 1 a.m. often need one more pass.

Frequently asked questions

How long does it take to edit a video?

It depends entirely on length and complexity, but a five-minute vlog with basic cuts, color, and captions is a realistic single sitting for most beginners once you get familiar with the process. Longer or effects-heavy edits take proportionally more time.

What's the easiest video editor for someone who has never edited before?

Look for a video editor with a drag-and-drop timeline, one-click AI tools for tasks like subtitles and noise removal. Movavi Video Editor was built around exactly that brief.

Do I need special equipment to edit videos?

No – a laptop that meets the software's basic requirements is enough to start. What matters more early on is decent audio and lighting at the point of filming, since no amount of editing fully rescues muddy sound or a badly lit face.

Can I edit videos on a Mac?

Yes. Movavi Video Editor supports macOS 12.0 and later with native support for Apple M1 and newer chips, alongside Windows 10 and 11.

What file format should I export my finished video in?

MP4 is the safest default across social platforms, devices, and video players. Export presets for specific devices, TVs, or direct platform uploads handle the format details automatically.

Is it normal for editing to take longer than filming?

Yes, and it's not a sign you're doing it wrong. A rough cut, a pass for pacing, a pass for color, a pass for audio, and a final review add up quickly even on short videos – it's part of why one-click AI tools exist, to take the repetitive parts off your plate so the time goes into the choices that actually shape the story.

Do I need to edit every video the same way?

No, and trying to apply one rigid process to every project usually slows things down. A 60-second social clip barely needs b-roll or color grading; a longer vlog or review benefits from both. Treat the steps above as a checklist to draw from, not a sequence every video has to complete in full.

Have questions?
If you can’t find the answer to your question, please feel free to contact our Support Team.
Join us for discounts, editing tips, and content ideas

1.5M+ users already subscribed to our newsletter

By signing up, I agree to receive marketing emails from Movavi and agree to Movavi's Privacy Policy.