Here's the step-by-step workflow. Movavi Video Editor works for PC (Windows 10 and 11) and Mac (macOS 12.0 and later).

How to Loop a Video on Windows and Mac: A Complete Guide
In a looped video the final frame is trimmed and placed so that it lands on the first frame again making playback restart without a visible cut. Viewers normally notice two or three replays before they realize the clip has restarted. For talking‑head creators this can add rewatch value to a reaction or a quick tip video and you do not need to film any extra frames.
In this article I discuss how to loop a video, how to keep the seam clean and how to export the result in your preferred format. I will use Movavi Video Editor – software that is built with beginners and everyday creators in mind. It is fast and simple to use making video looping an edit to start with.

Edited by
5,501
What actually makes a loop seamless
The seam betrays itself the second a viewer becomes aware of it. There are three common offenders that show up time and again: you are not in the same position in the frame and in the first frame the level of audio or ambient sound changes at the cut the lighting and composition are not in sync since the clip was assembled from two separate takes.
The process involves adjusting the clip more than any technical fix. Pick a point for looping in which the positioning of your hands, head and mouth match as much as possible in both positions within the clip – opening and closing on an in-between blink, word or gesture will hide the seam a lot better than a clip that starts and ends in a static position.
Loop length and format by platform
All three land on the same vertical frame, which means a single export usually covers Reels, TikTok, and Shorts without a second render.
How to make a loop video with Movavi Video Editor
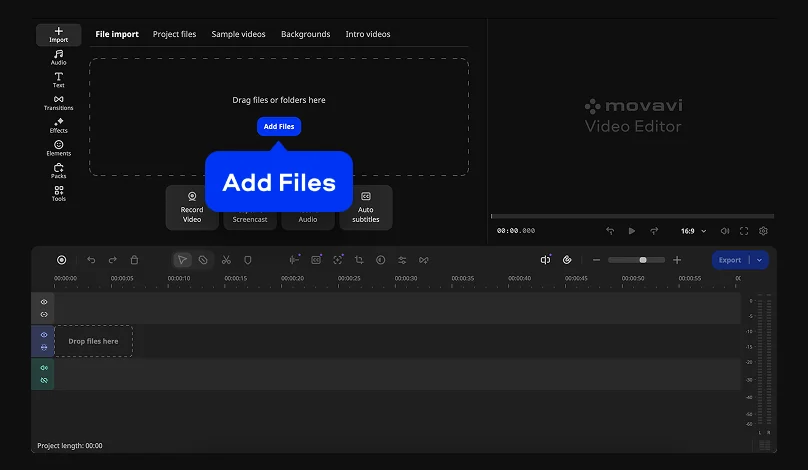
Step 1. Import your video
Launch Movavi Video Editor and import your video file by selecting Add Files.
Step 2. Trim to your loop point
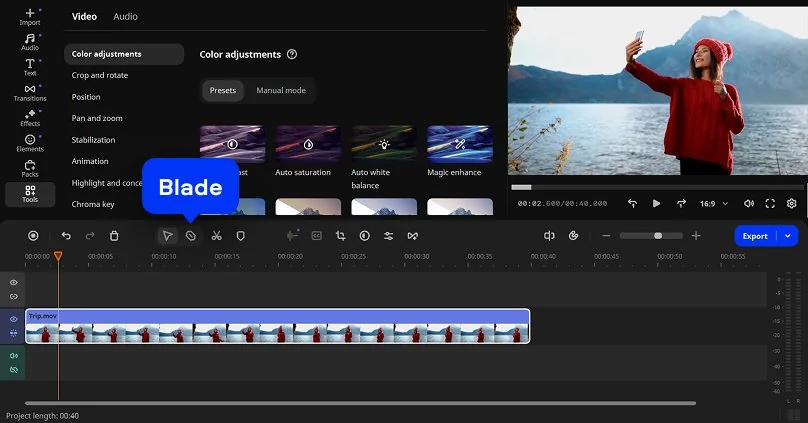
Import the talking-head clip, then use the Blade tool to cut it exactly where your body position repeats. Drag the clip's edges on the Timeline next, trimming off any extra frames at the head or tail until the cut sits on the exact frame you chose.
Step 3. Repeat the clip
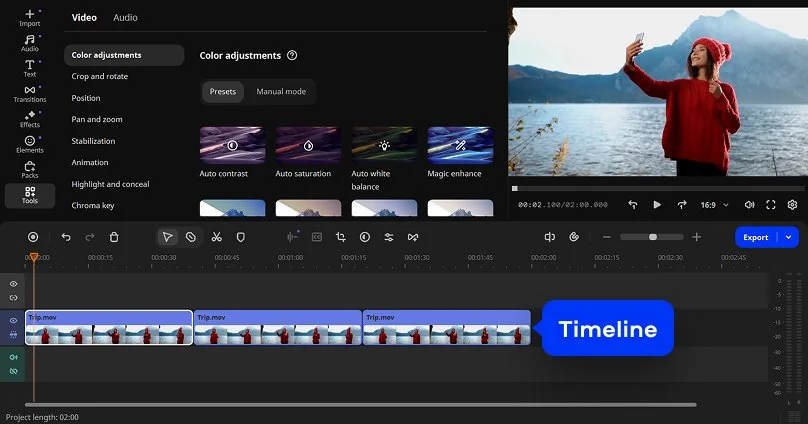
Line up as many copies back-to-back as the platform's length limit allows, with no gap between one copy and the next.
Step 4. Reverse it for a bounce instead of a repeat
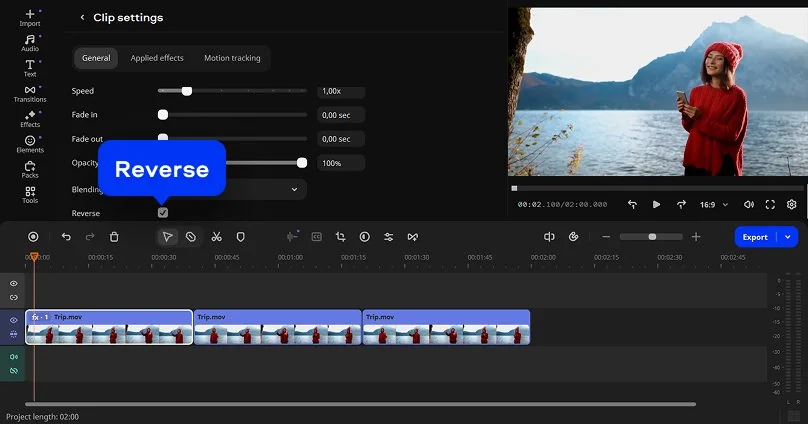
Want a bounce rather than a hard repeat? Duplicate the clip, apply the Reverse option to the copy, and set it directly after the original on the Timeline. The action runs forward, then backward, ending up back on frame one – a boomerang-style loop that never needed a matching start and end pose to begin with.
Step 5. Smooth the seam
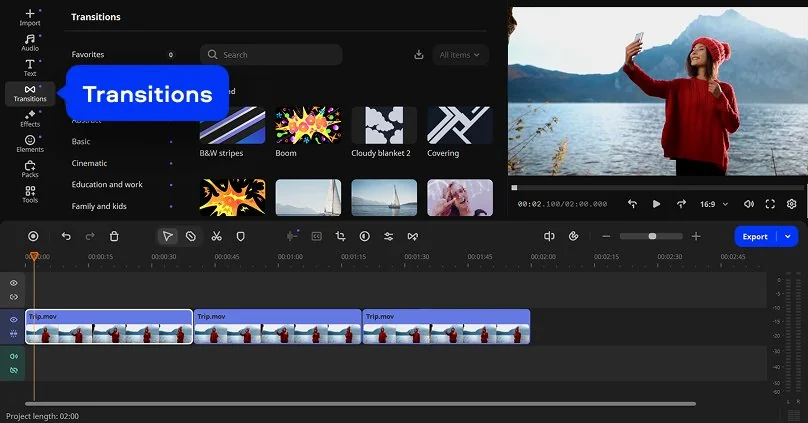
If you still see the cut, drop a short transition between the two copies – a quick cross-dissolve typically covers a small lighting or framing mismatch. Hundreds of transitions and filters sit in Movavi's built-in library, enough range to suit a casual vlog cut on one end and a clean product demo on the other, no extra purchase required.
Step 6. Export
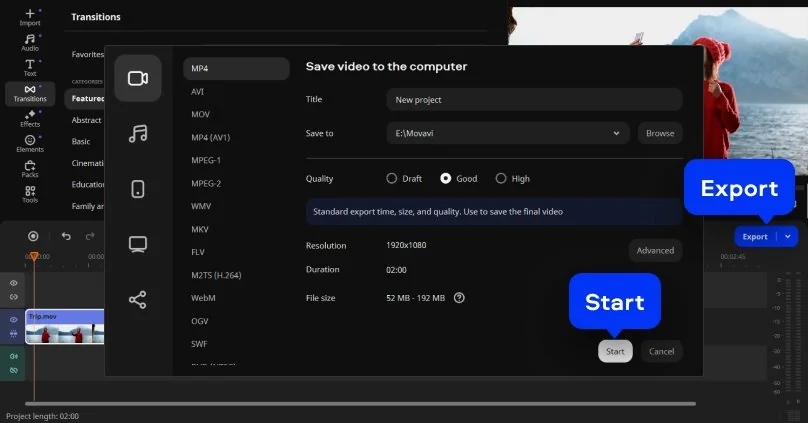
In the Export panel, choose MP4 – TikTok and YouTube both handle it natively, and it's the format Instagram compresses the least. Match the aspect ratio to your target platform using the table above, and double-check the quality setting before rendering: a lower bitrate cuts render time but shows compression artifacts sooner on a fast-moving loop. From inside the program, Movavi Video Editor can export straight to YouTube, so the file skips sitting on your desktop before it goes live.
A few things that keep the replay going
- Keep it short. A viewer's thumb is still on a 3-to-8-second loop by the time it rewatches; a 45-second one rarely gets that chance.
- Match the audio, not just the picture. A rough cut in the sound is more jarring than a rough cut in the picture – fade the last half-second of audio out and the first half-second in, and the seam gets much quieter.
- Skip the forced match. When two takes never quite line up, the reverse method from Step 3 sidesteps the matching problem entirely.
Free download, or a paid tier
The Blade tool, Reverse and the built‑in effects library are all testable in the version of Movavi Video Editor, a genuine free download so nothing above requires spending anything to try first.
Full-version Movavi Video Editor drops the watermark and every export limit, and a separate Movavi Effects subscription adds a deeper library of transitions and music on top for anyone who wants it. More than 70 million people across over 190 countries already use Movavi, so no matter which tier fits your budget, you won't be the first one testing whether this workflow holds up.
Movavi Video Editor
Create awesome videos easily

Frequently asked questions
What is a video looper?
What is a video looper?
A video looper is any tool that repeats a clip end to end so it plays on a continuous cycle instead of stopping after one pass. Movavi Video Editor works as a video looper by letting you trim, repeat, or reverse a clip on the Timeline, then export the result as a normal MP4 rather than a special file type.
What's the best format for a looping video?
What's the best format for a looping video?
H.264-encoded MP4 is the safest bet across Instagram, TikTok, and YouTube – all three compress it least and play it back at full quality on a phone screen.
Can I make a loop video for free?
Can I make a loop video for free?
Yes – the free version lets you test the full workflow, though exported videos will include a watermark and free-tier limits.
Does a seamless loop work for an Instagram Story, or just Reels?
Does a seamless loop work for an Instagram Story, or just Reels?
Both work the same way. A Story loops exactly like a Reel does, whether it's a clean repeat or a reverse-based bounce, since the two share an identical 9:16 frame.
Is Movavi Video Editor available for Mac, or only for Windows?
Is Movavi Video Editor available for Mac, or only for Windows?
Both – it runs on Windows 10 and 11 and on macOS 12.0 and later.
Can I edit a loop offline?
Can I edit a loop offline?
Yes. As a desktop program rather than a browser app, Movavi Video Editor handles both editing and exporting without needing an Internet connection, once it's installed – you'll only need to be online to upload the finished file.
What's the difference between a loop and a boomerang effect?
What's the difference between a loop and a boomerang effect?
A straight loop plays the same clip forward on repeat, with a cut wherever the seam is. A boomerang-style loop, built using the Reverse option, plays forward, then backward, then forward again – the cut point hides better this way, though the runtime runs a bit longer for the same footage.

Have questions?
If you can’t find the answer to your question, please feel free to contact our Support Team.
Join us for discounts, editing tips, and content ideas


1.5M+ users already subscribed to our newsletter