How to Remove a Watermark from Video

Try Movavi Video Editor!

  • Trim, cut, crop, and rotate videos
  • Add titles, stickers, and transitions
  • Apply visual effects

By clicking the download button, you're downloading a free version of the program.*

Edited by
Ben Jacklin
11,955

Here is how to remove a watermark from video clips you own: blur it, crop it out, or cover it with your own logo. The table below shows which method fits which clip, and each one takes a few minutes in Movavi Video Editor. One rule comes first: remove a watermark only from your own videos, or from someone else’s with the rights holder’s permission.

You might need to remove a watermark from video in several cases. For example, your travel vlog still wears last year’s channel logo, or a family clip has the camera’s date stamped in the corner. Movavi will help you out. Movavi Video Editor is an intuitive video editor with customizable video templates, one-click AI tools, and hundreds of drag-and-drop effects. It runs as a desktop app on Windows and macOS, and the free Movavi Ideas hub publishes new step-by-step video ideas every week, so you always have something to edit next.

This guide is for creators who vlog about travel or daily life, for families who film trips and weekends away, and for small brands that post videos on Instagram or Facebook. Drag-and-drop editing and instant hover previews make every tool instantly intuitive, drastically speeding up the editing process so you can spend time creating – not figuring out how the software works. Motion tracking keeps a mask on a moving watermark, and hover previews let you check the result on your own footage.

What you need before you start

  • Movavi Video Editor on a Windows or macOS computer.
  • A video in a format Movavi supports, such as MP4 or MOV.

You can try every method below in Movavi Video Editor’s free version. Free exports carry a Movavi watermark; the full version has no watermark or export limits.

Which method should you pick?

Look at the mark first. Note whether it sits in a corner, whether it moves, and what is behind it. A still mark in a corner suits a crop or a mask, while a mark over a busy background may call for an AI service. The table gives you the short version.

Method

Best for

What changes in your frame

Blur or pixelate

A date stamp or an old corner logo; a moving watermark

Nothing is cut; a soft patch stays where the mark was. For moving watermarks, AI motion tracking will do the job

Crop video

A mark close to an edge

The frame gets smaller and the aspect ratio can change

Cover with your own logo

Swapping an old logo for your current one

Your logo sits on top, so the layout stays the same

How to remove a watermark from video with Movavi Video Editor

Method 1: Remove a watermark from video by blurring it

Picture your travel vlog with last year’s channel logo in the top corner. Highlight and conceal hides it with a mask. You pick the shape, a rectangle or an ellipse, and one of three effects: blur, pixelate, or darken. Blur lets you blur watermark areas and keep the whole frame. A black mask suits the camera date stamp on a family trip video, since it simply blacks the numbers out.

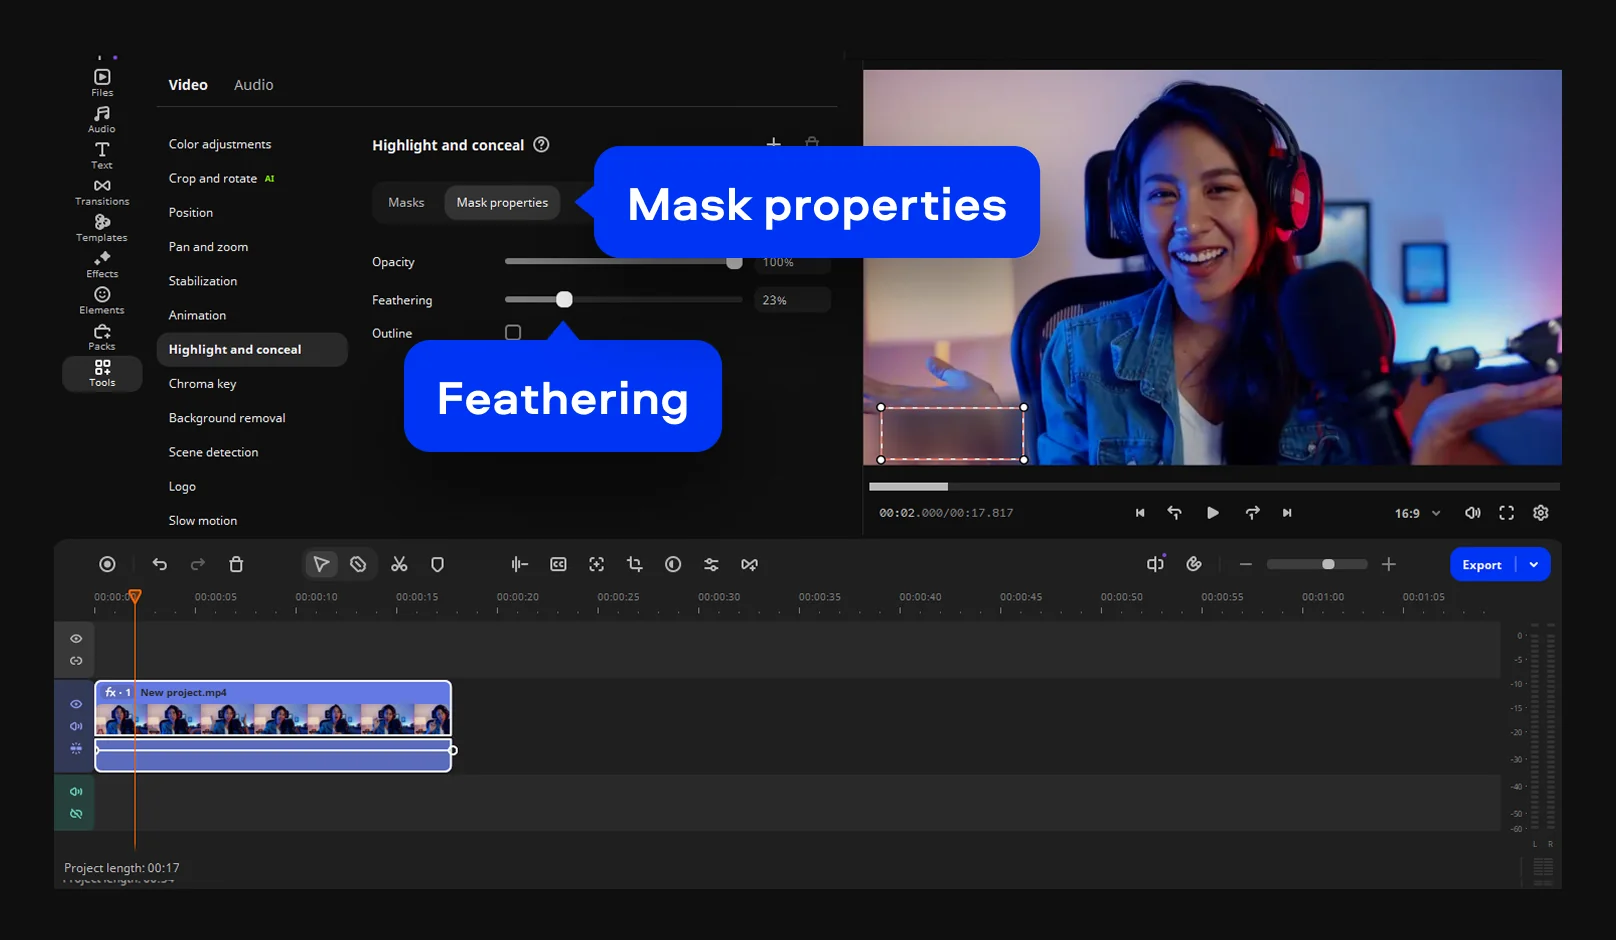
Feathering softens the mask’s edge, so the patch melts into the shot instead of showing a hard box. Opacity makes the mask more transparent, and for pixel masks, Size sets how coarse the squares are.

Step 1. Add your video

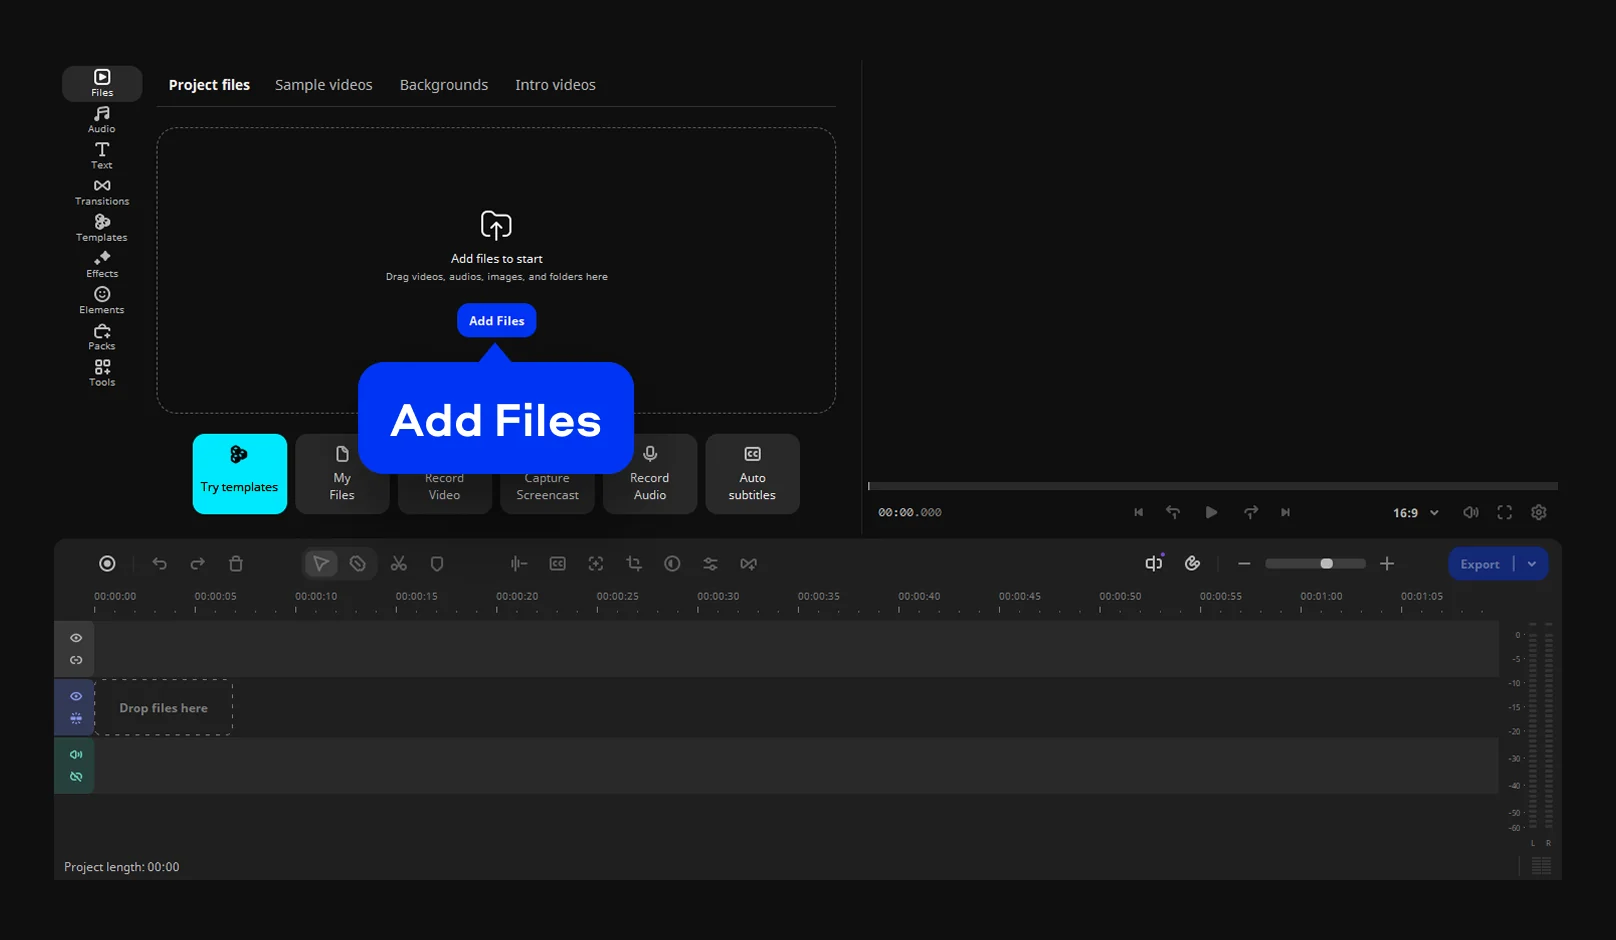
Click Add Files, select your video, and drop the clip onto the timeline.

Step 2. Set up the mask

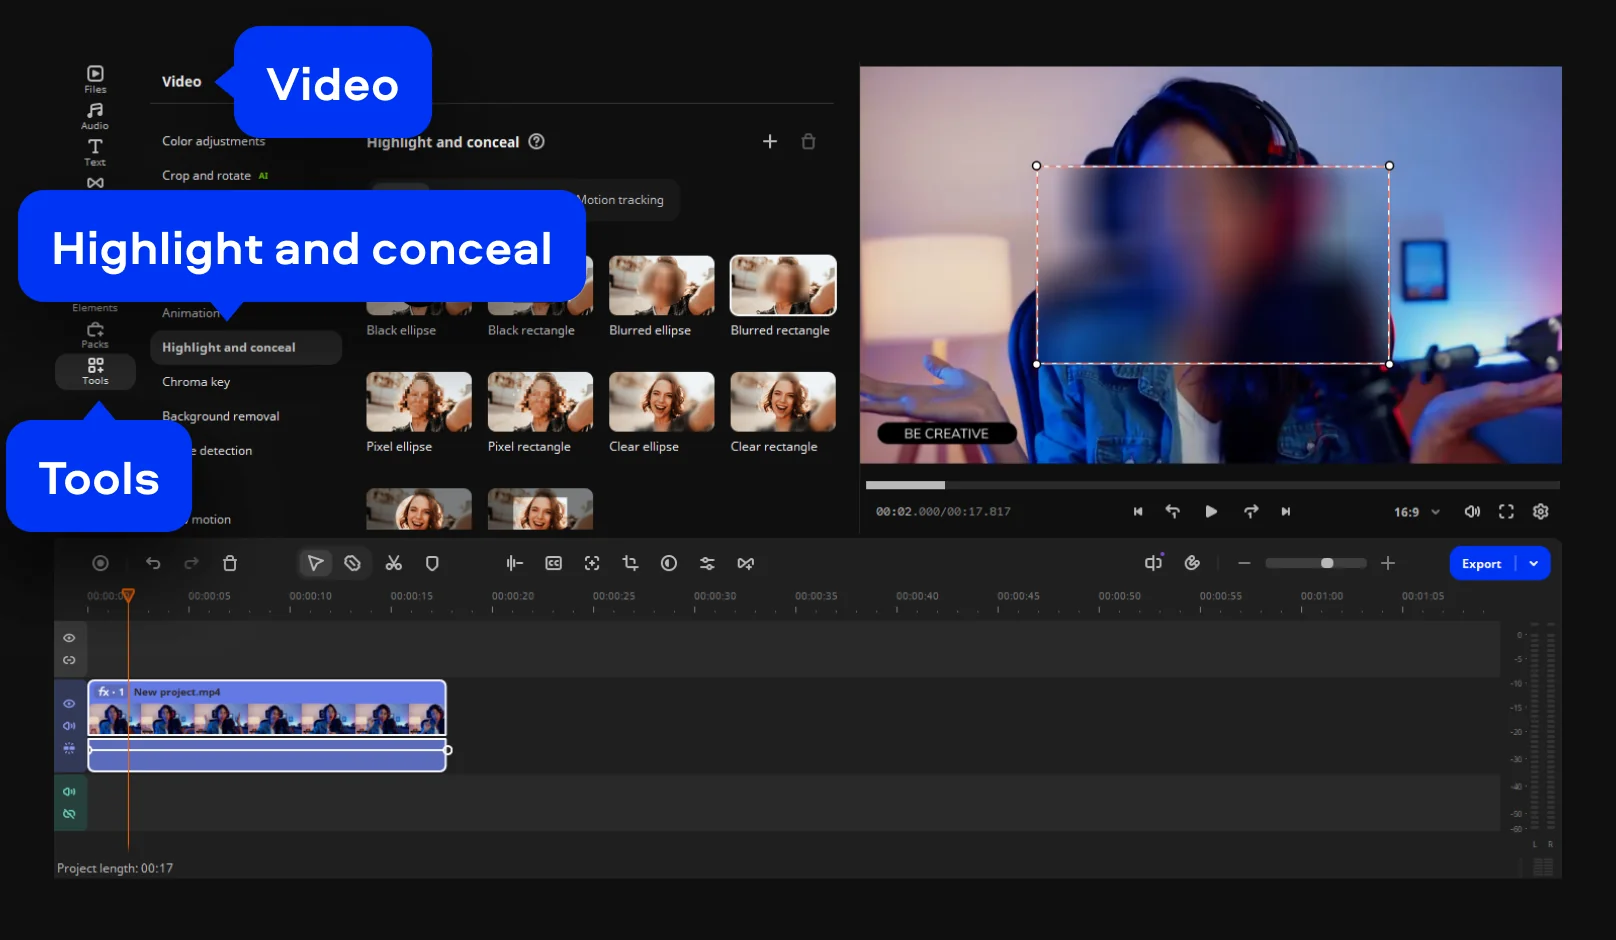
Select the clip on the timeline and open Tools > Video > Highlight and conceal. Choose a rectangular or elliptical mask shape with the effect you want. For example, try the Blurred rectangle mask to blur a watermark.

Step 3. Place the mask

Drag the center of the mask over the watermark, then drag the corners until it covers the whole mark. On the Mask properties tab, adjust Feathering to soften the mask edge. Move the cursor along the timeline to preview frames and check that the mask covers the watermark in each one.

Step 4. Track a moving watermark (optional)

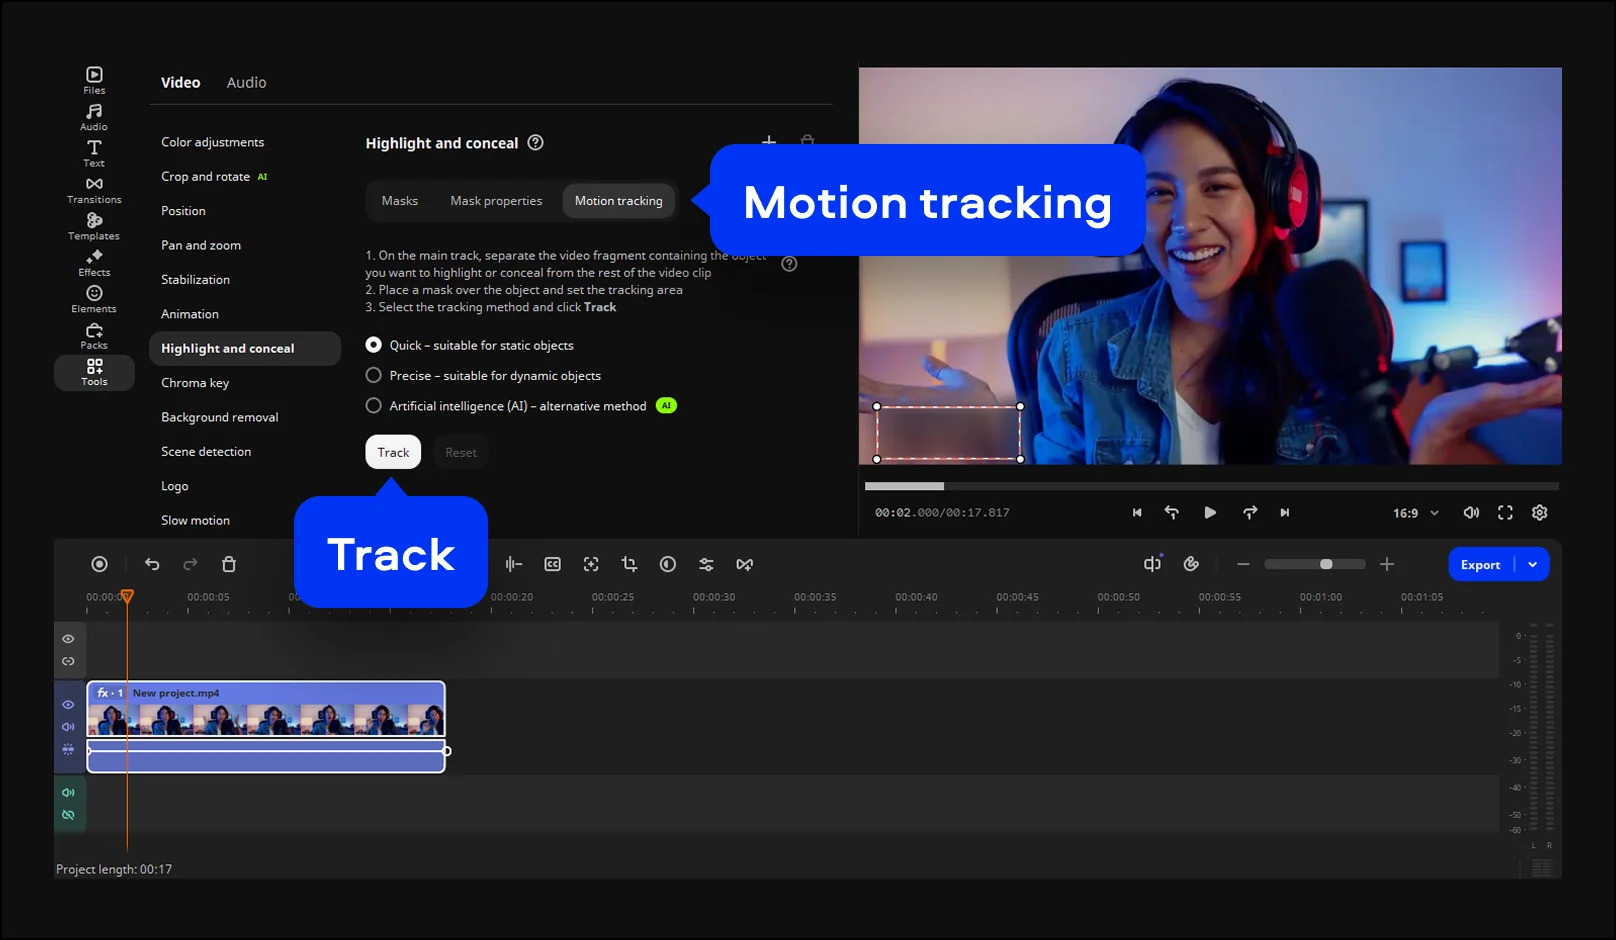
To conceal a moving watermark, open the Motion tracking tab, choose a tracking mode, and click Track. Motion tracking has three modes: Quick for still objects, Precise for moving ones, and an AI mode. The AI mode follows the object in one click, so the mask stays on it without manual nudging. A watermark pinned to the frame needs no tracking at all.

Step 5. Export the video

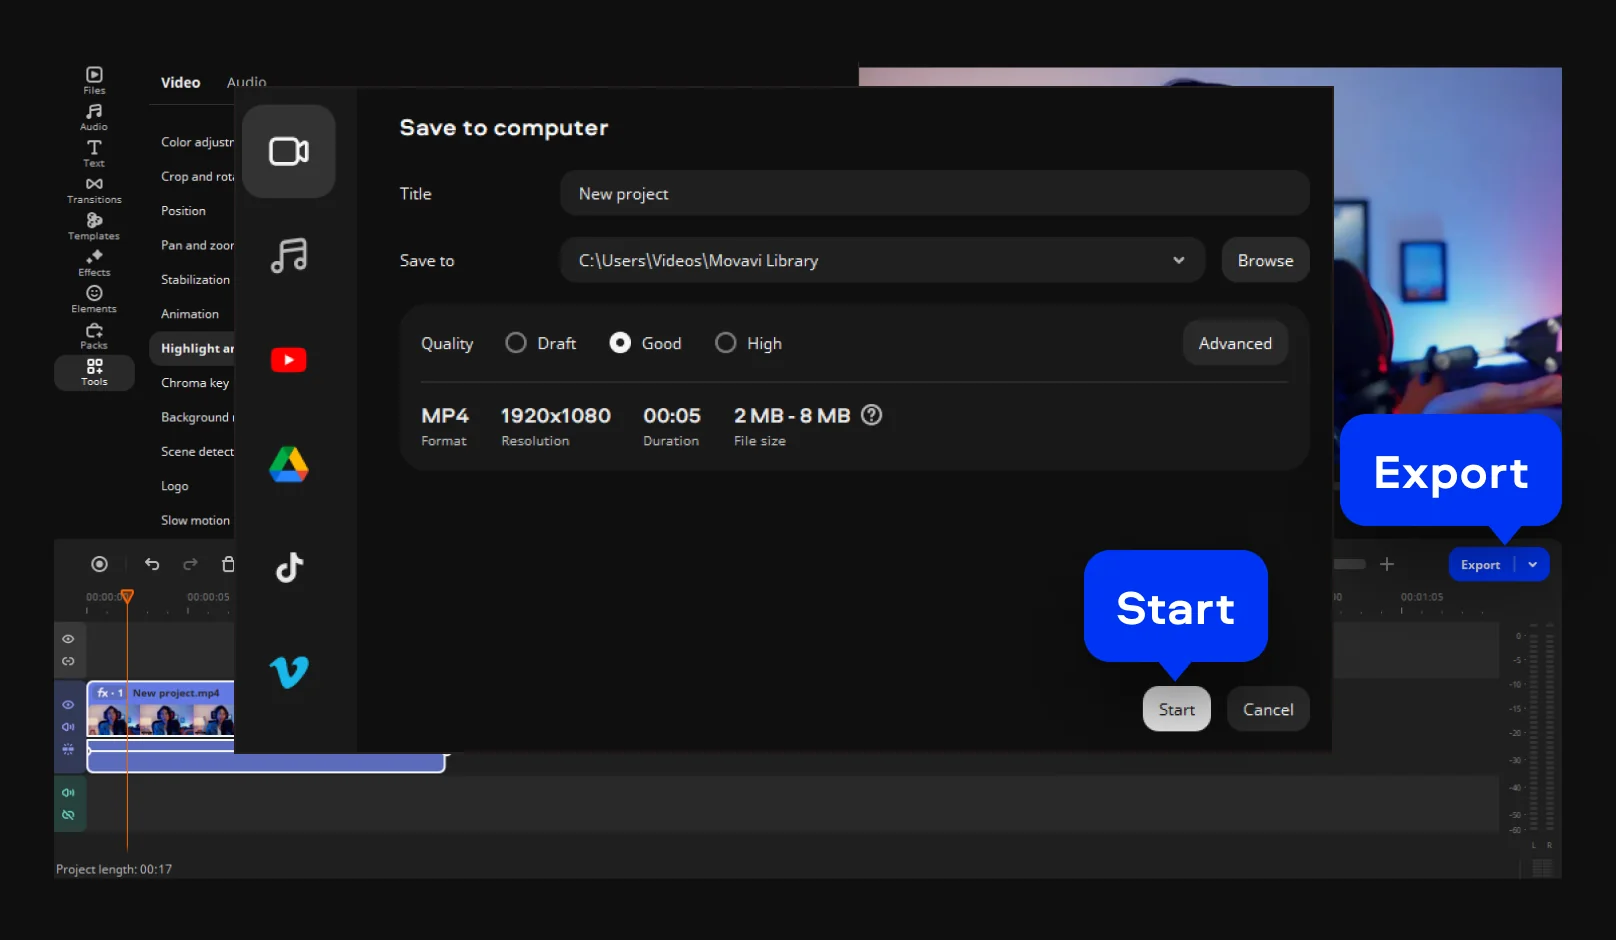
Click Export, set the output parameters, and click Start.

Method 2: Crop video to cut the watermark out

When the watermark sits in a corner or along an edge, cropping is the shortest route. Movavi’s crop tool gives you two ways to do it.

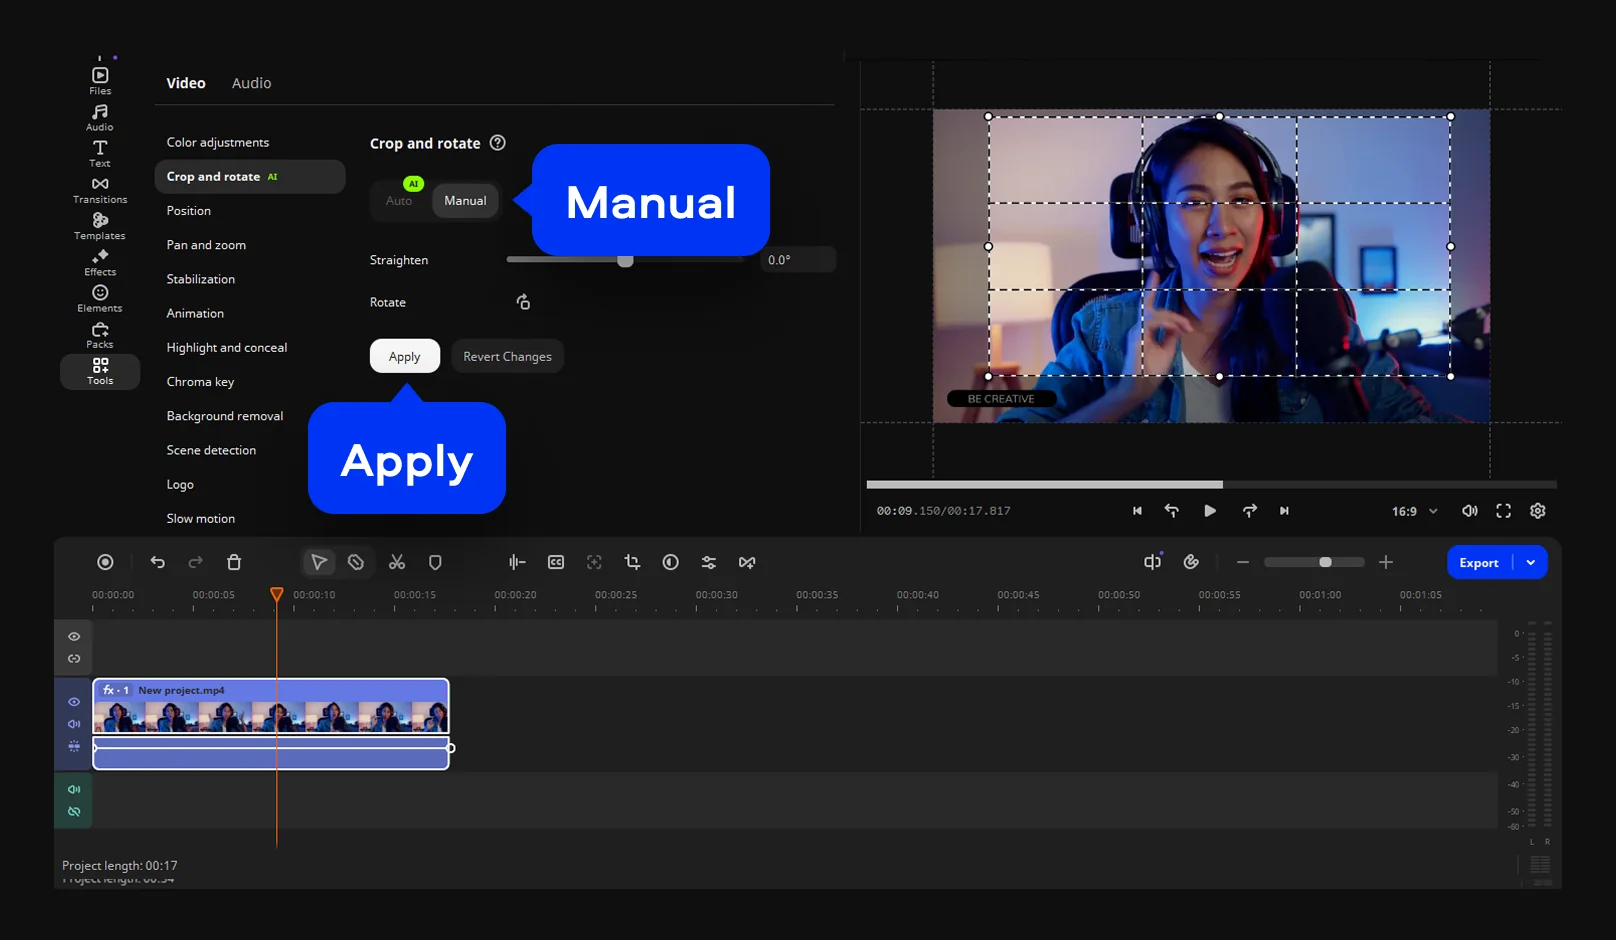
In Manual mode, you drag the crop frame yourself until the mark falls outside it. The frame gets smaller and the aspect ratio can change, so check that the shape still fits where you post.

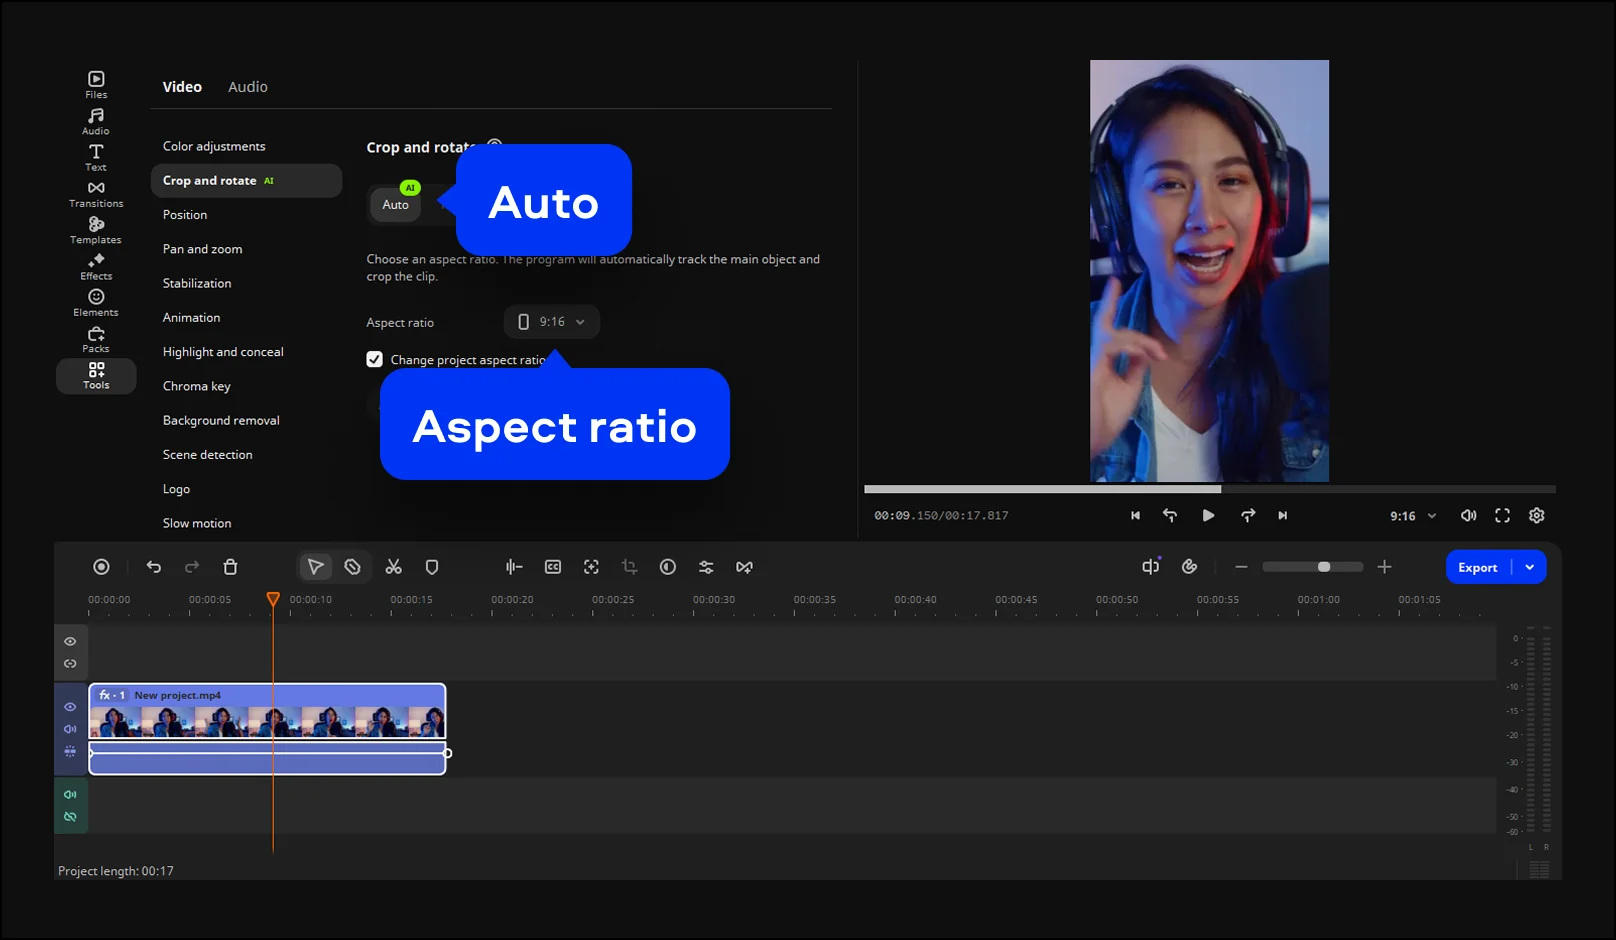
Auto mode uses AI and changes the aspect ratio for you. It tracks the speaker or product and keeps them centered while it reframes. Turn a horizontal video into a vertical one, and the narrower frame trims the sides, so a watermark in a corner can drop out of the picture.

Step 1. Add your video

Click Add Files, select your video, and drop the clip onto the timeline.

Step 2. Crop your video

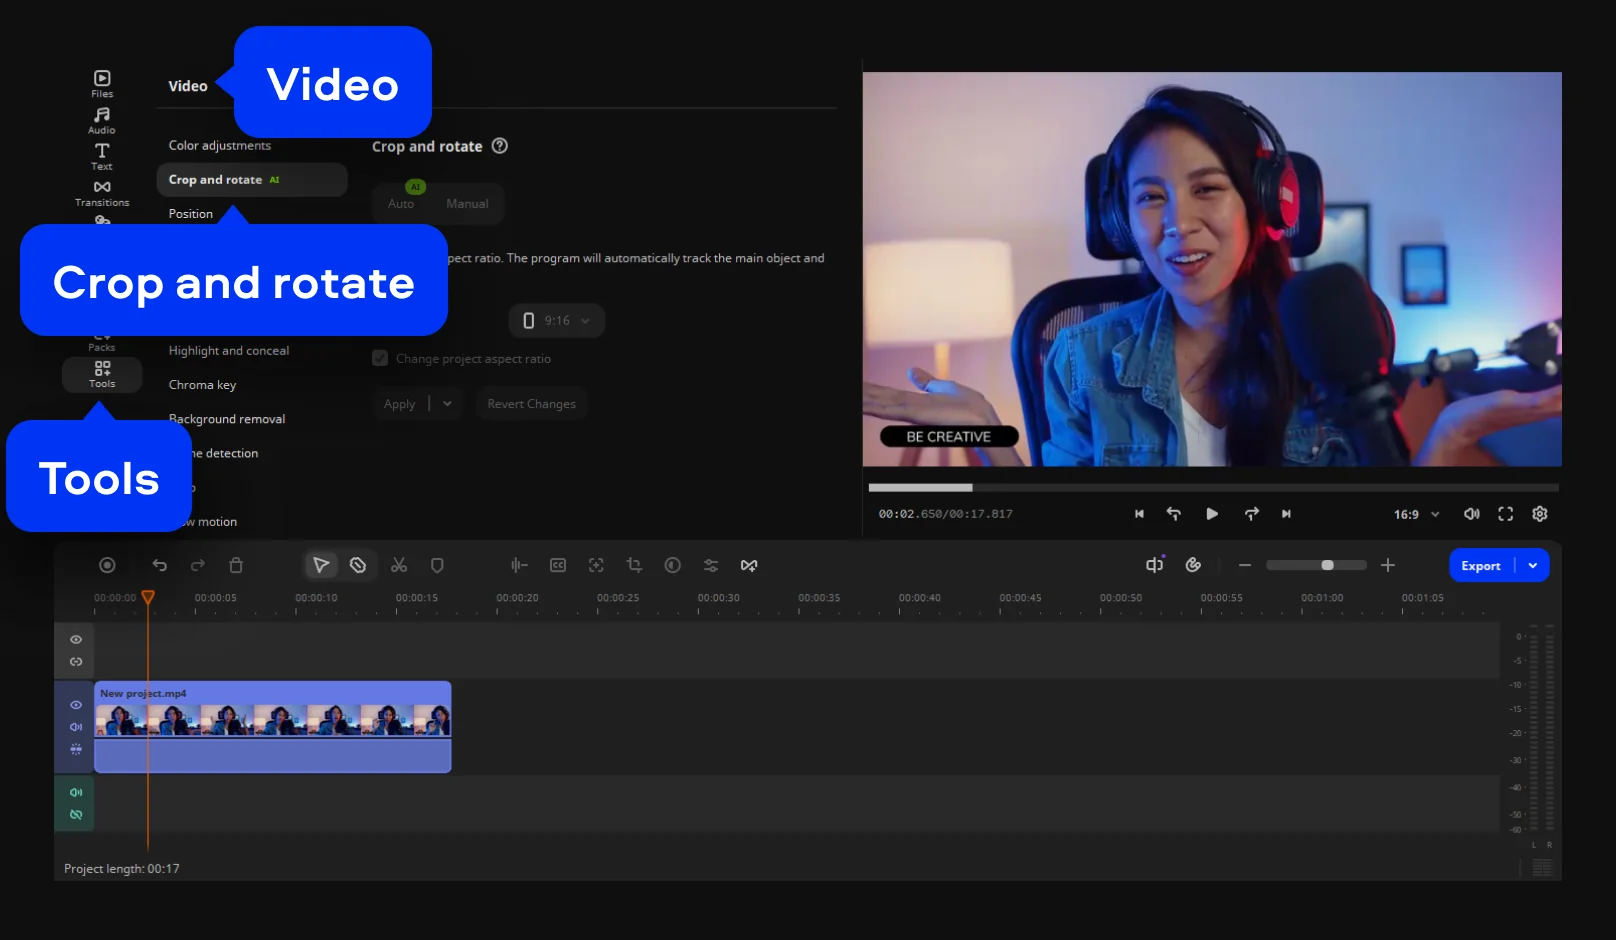
Select the clip on the timeline and open Tools > Video > Crop and rotate.

Crop the frame manually

Choose Manual mode, drag the crop frame so the watermark falls outside it, and click Apply.

Use AI auto crop

Choose Auto mode. Set a vertical aspect ratio and click Apply. Scrub the timeline afterward. If the watermark is still in the frame, switch to Manual mode and trim it out.

Step 4. Export the video

Click Export, set the output parameters, and click Start.

Method 3: Cover the watermark with your own logo

After a rebrand, the old logo can linger in videos you posted earlier. Put your new logo right on top of it. That works for a brand video bound for Instagram or Facebook, where the new logo ends up exactly where the old one sat.

Step 1. Add your video

Click Add Files, select your video, and drop the clip onto the timeline.

Step 2. Place the logo

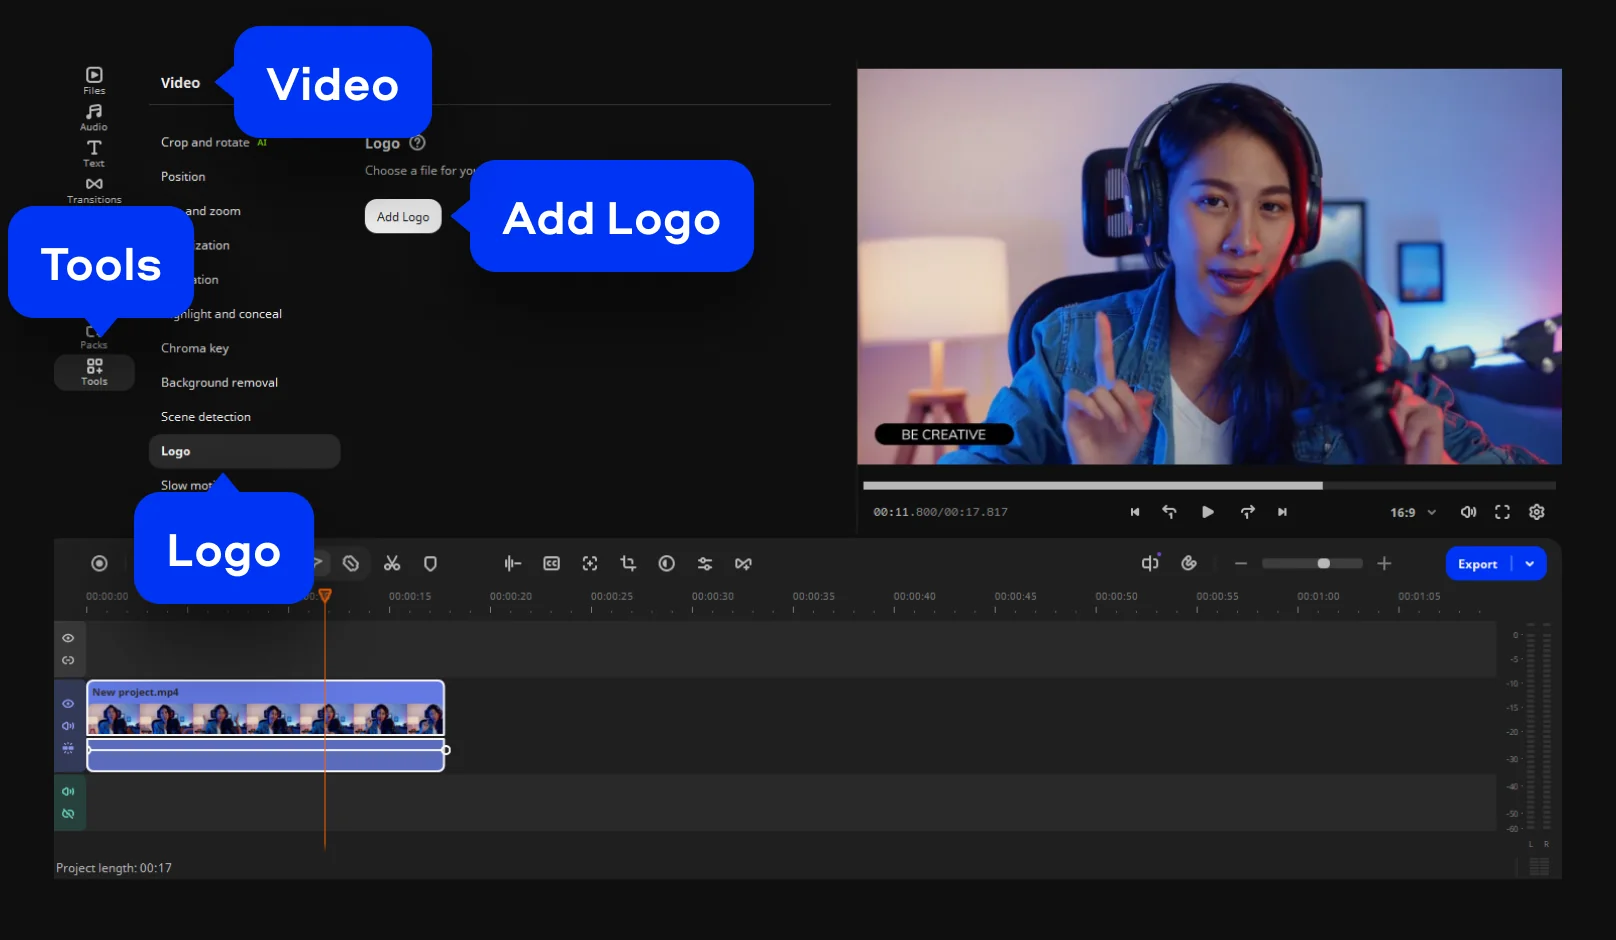
Select the video clip on the timeline and open the Logo tool. Click Add Logo and select your image. The file will appear on the timeline above the main video track.

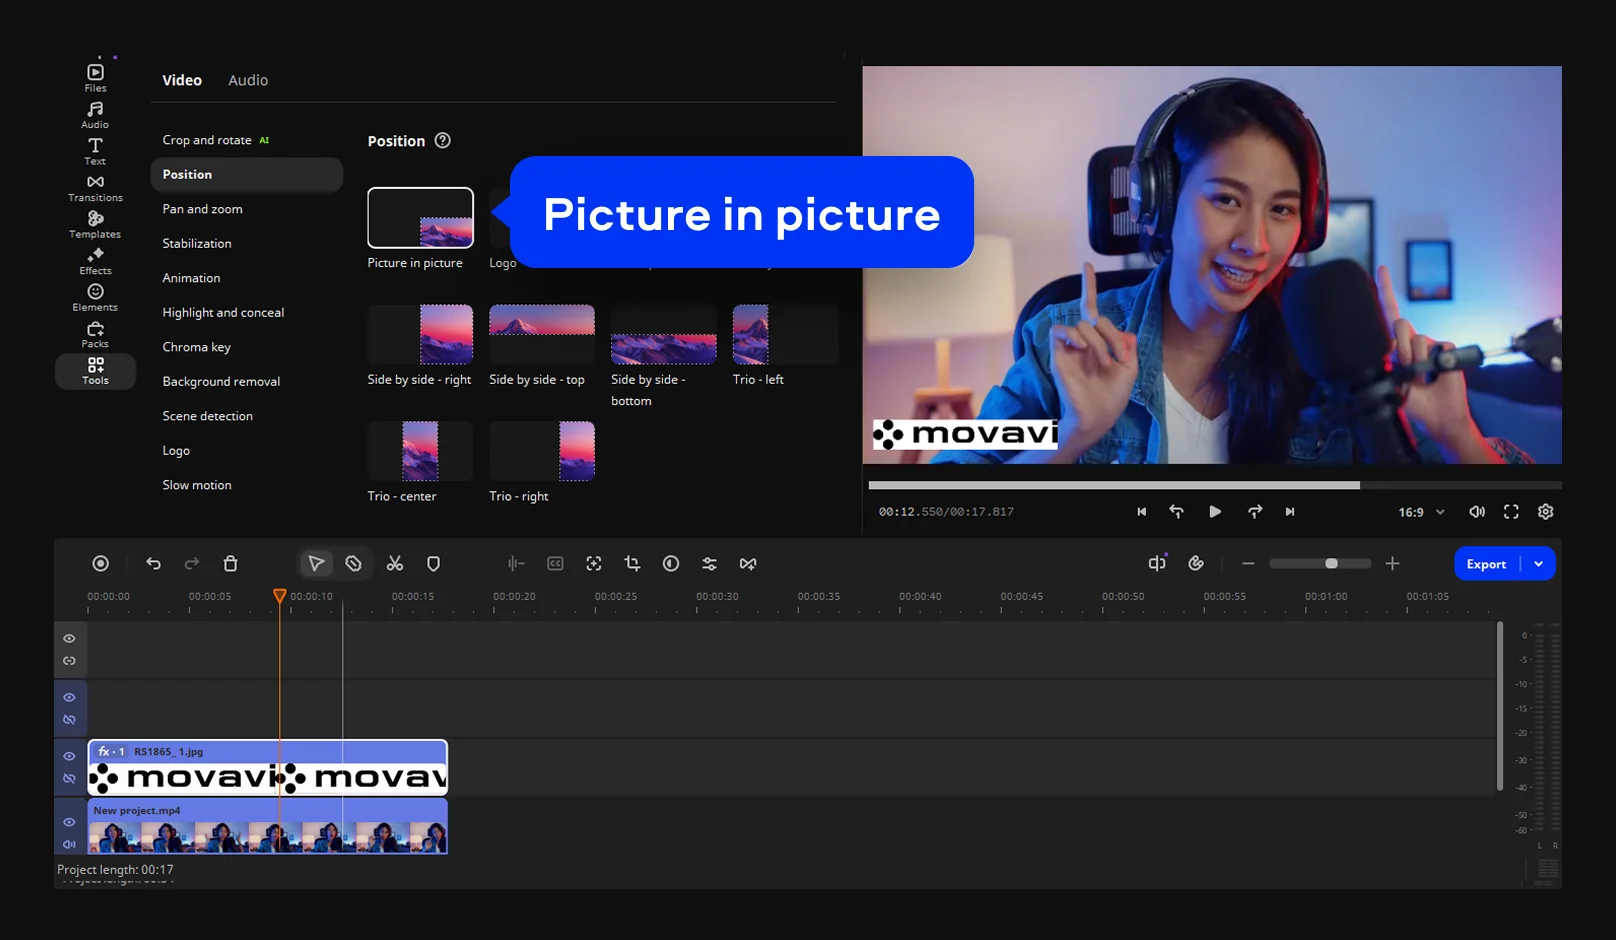
Choose the Logo or Picture in picture position for your new logo, then drag the logo over the old watermark. Adjust the image size until the old watermark is fully covered.

Step 3. Export the video

Click Export. Select the export format and hit Start.

AI watermark remover tools and online services

Video inpainting is the technique behind most AI tools for this job. Digital inpainting uses algorithms to replace lost or corrupted parts of image data, and it can remove logos or watermarks from video. In plain words, the tool erases the marked area and paints in its best guess of what was behind it. It handles text and other objects the same way.

A video watermark remover of this kind can beat a blur patch when the mark sits on a busy background, such as leaves or a crowd. A watermark remover online means your clip leaves your computer: you upload it, the service processes it on its server, and you download the result. VMake.ai and Unwatermark AI are two examples of online AI watermark removers. Try any of them on a short clip you own before you upload anything longer.

Weigh a few things first. The filled area is an estimate, so results can look smudged on busy backgrounds. Your footage travels to someone else’s server, so skip anything private. Free plans set their own limits, so read the caps on length, resolution, and exports before you upload.

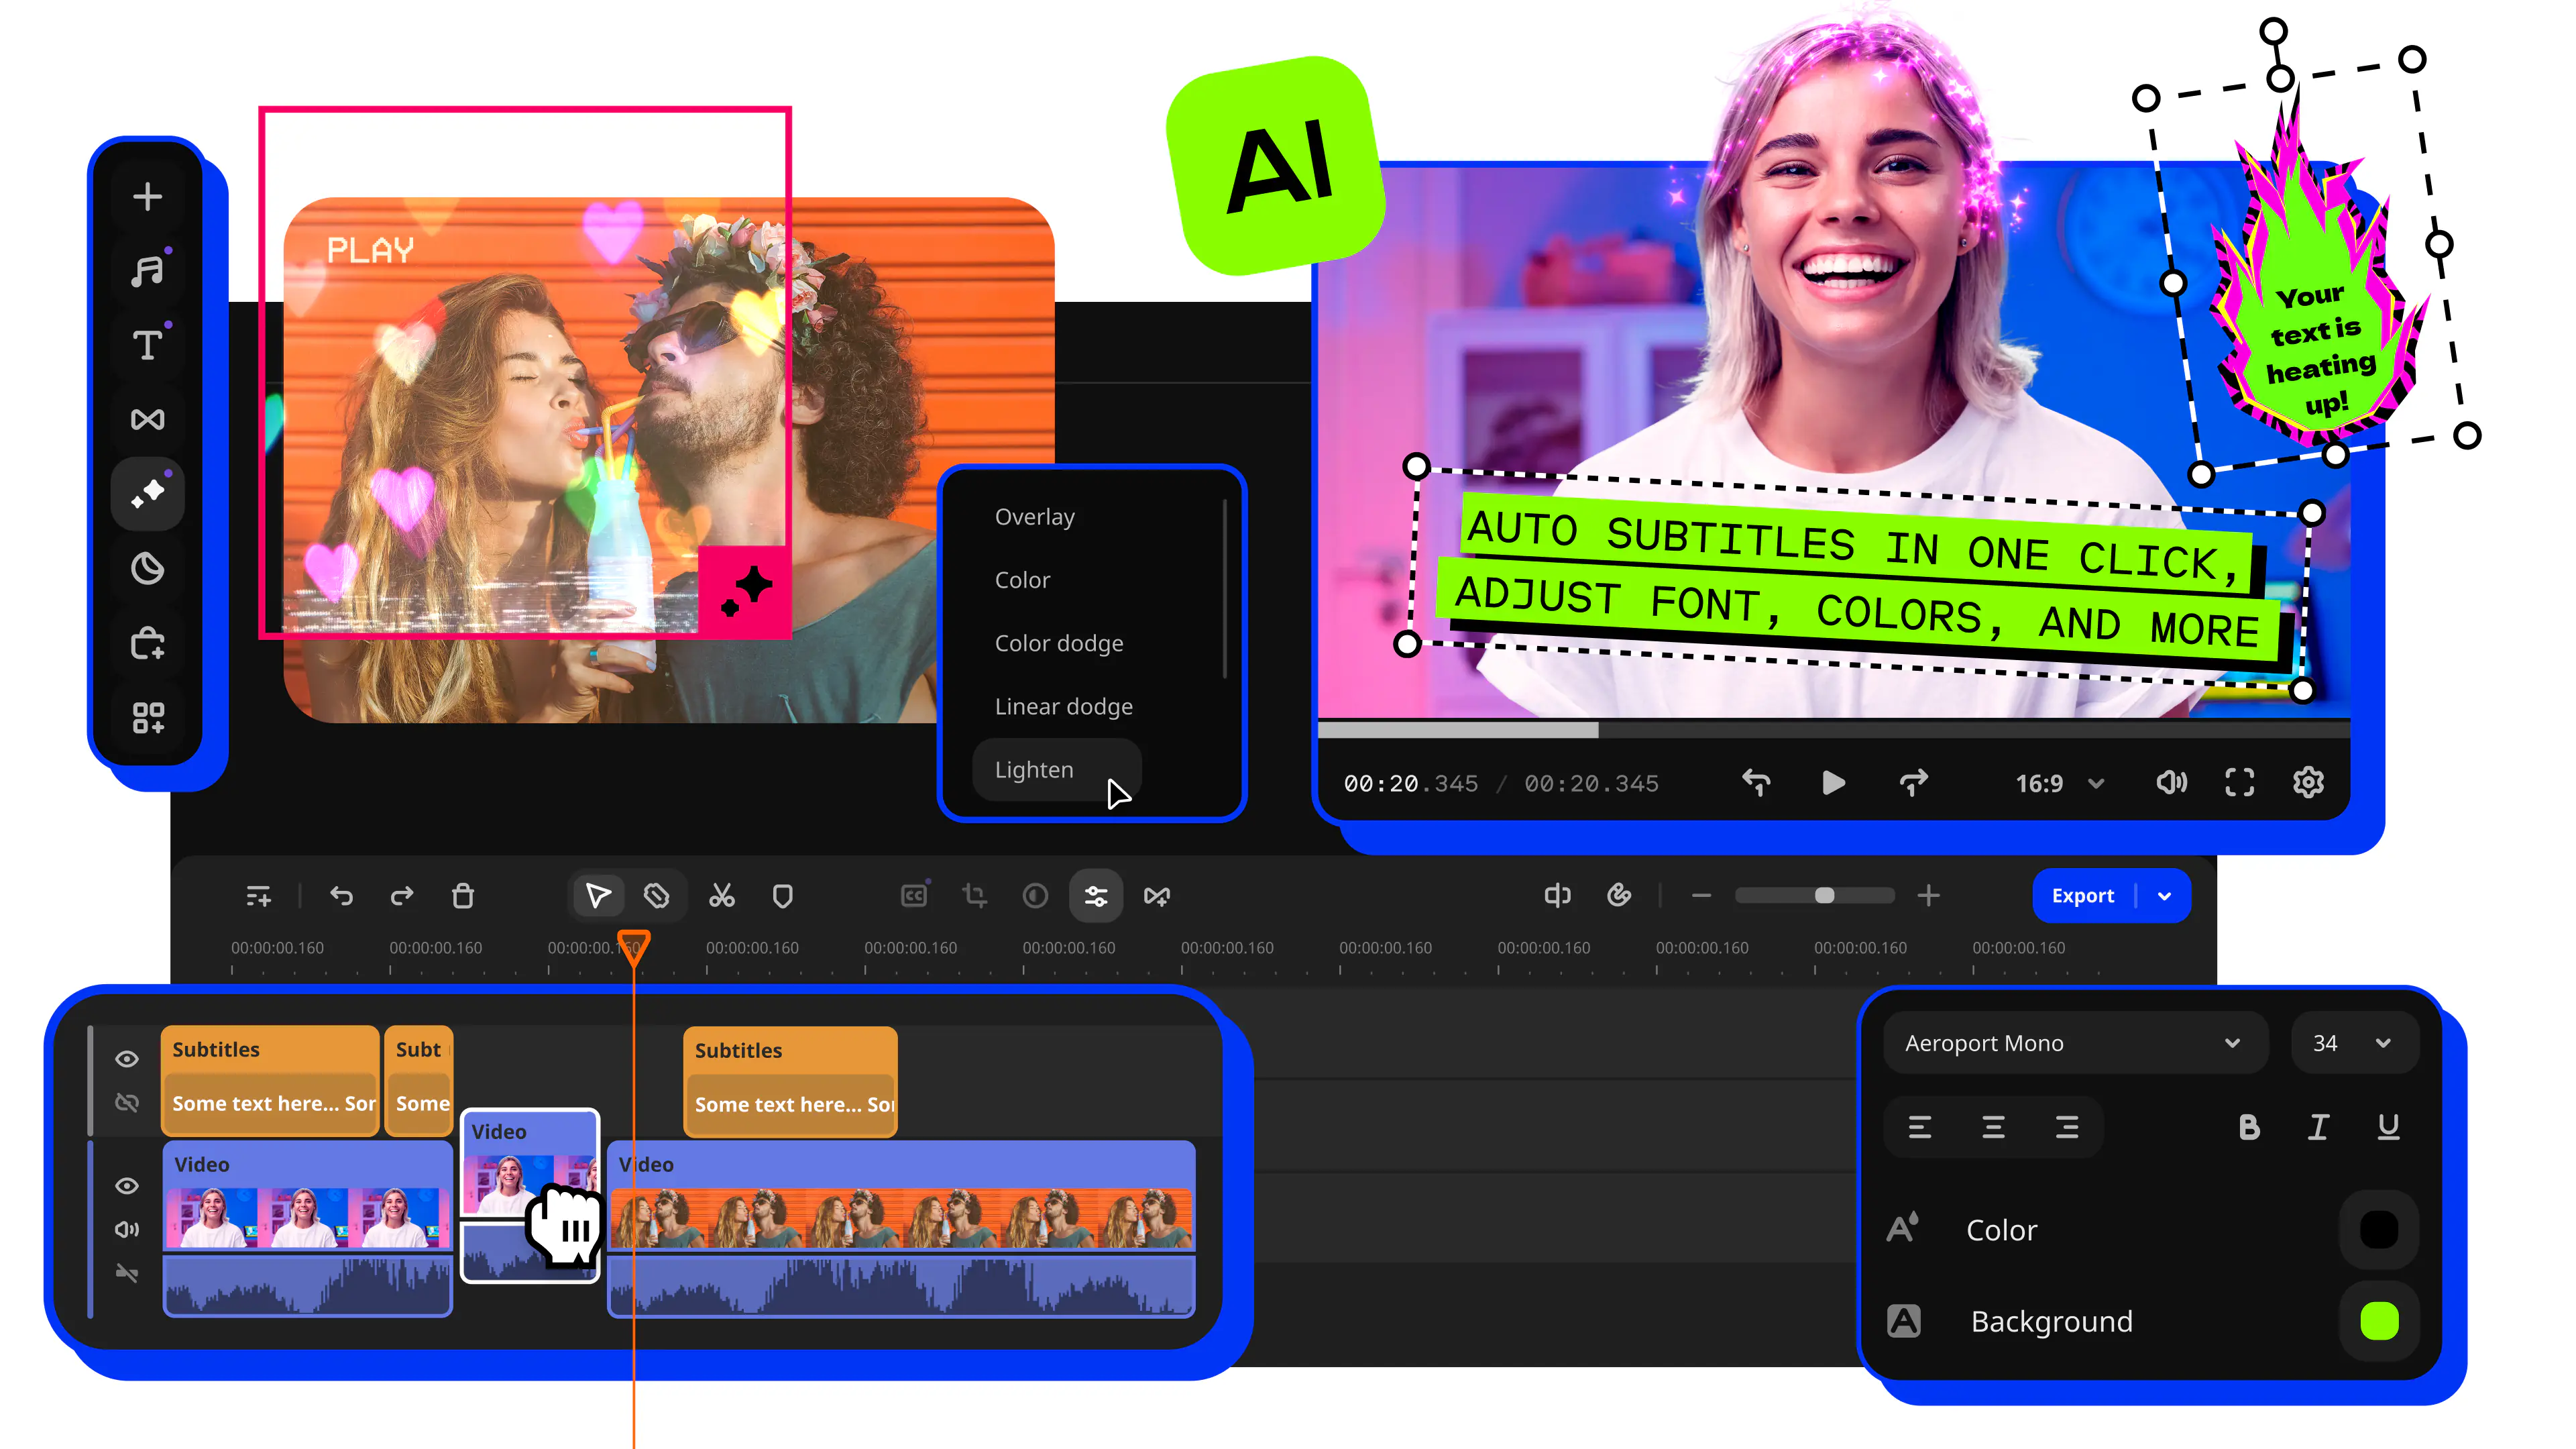
The three methods above stay on your desktop. Movavi Video Editor handles this job with masks, cropping, and your own logo, and its one-click AI tools work on other jobs, such as subtitles and noise removal.

Export for YouTube, TikTok, and Reels

MP4 is the format we recommend for broad compatibility. For TikTok, and Reels, 1080p is the number to aim for. YouTube recommends uploading videos in the highest resolution available. Platforms change these limits from time to time, so check each app’s help page before you publish.

Mistakes to avoid

Removing a watermark from someone else’s video.

Stick to your own footage, or get the rights holder’s permission first.

A blur that draws more attention than the watermark.

A mask that is too small or has a hard edge draws the eye. Resize it to hug the mark and adjust Feathering until the edge softens. No worries if the first try looks loud; you can resize and feather it again.

A crop that breaks the shot.

Trimming close to a face or an important object throws the composition off. Preview the frames before you export, and switch to a mask or a logo if the mark sits near the action.

Re-saving an exported file.

An exported file is already compressed, and exporting it again adds another round of compression. Edit from the original footage and export once.

Try it on your own clip

Open a clip you own in Movavi Video Editor and start with the blur: pick a shape, set Feathering, and apply. Once the old logo or date stamp is gone, make any other edits you need – apply color filters, add music, or generate auto subtitles. Creating awesome videos is easy with Movavi Video Editor!

Movavi Video Editor
Create awesome videos easily

*The free version of Movavi Video Editor may have the following restrictions depending on the build: watermark on exported clips, 60-second video or 1/2 audio length limit, and/or some advanced features unavailable when exporting videos.

Frequently asked questions

Is it legal to remove a watermark from a video?

It depends on whose video it is. Taking your own old logo or a camera date stamp off your own footage is your call. A watermark on someone else’s video should come off only with the rights holder’s permission. Rules differ by country, so ask a lawyer if you are unsure.

How can you remove a watermark from a video for free?

Run any of the three methods in Movavi Video Editor’s free version to see how the result looks. Exports from it carry Movavi’s own watermark and some other limits, so switch to the full version for the clip you publish. Online services add another route, and each sets its own free limits, so read them before you upload.

How can you remove a moving watermark from a video?

To remove a moving watermark, use motion tracking. In Movavi Video Editor, open Highlight and Conceal, select a mask for blurring your watermark, then pick the tracking method on the Motion tracking tab. You can also apply motion tracking to logos, titles, and stickers, so a replacement logo can follow the same object.

How can you remove the Movavi watermark from a video?

The free version of Movavi Video Editor adds its own watermark to exports. Upgrade to the full version, activate it with the key from your purchase confirmation email, and export the project again.

Have questions?
If you can’t find the answer to your question, please feel free to contact our Support Team.
Join us for discounts, editing tips, and content ideas

1.5M+ users already subscribed to our newsletter

By signing up, I agree to receive marketing emails from Movavi and agree to Movavi's Privacy Policy.