How to Reverse a Video: Step-by-Step Guide

The idea of reversing a video sounds simple, but users often struggle with complex steps, blurry exports, watermarks, or paywalls. Movavi Video Editor solves this by giving you a straightforward way to reverse video within a clean, intuitive interface. Just drop your file onto the timeline and find the reverse tool right in the clip settings – delivering high-quality, professional results on your very first try without any hassle.

On top of that, hundreds of built-in drag-and-drop effects and video templates out of the box help bring any creative design to life, while Movavi Ideas provides weekly video ideas with step-by-step tutorials to give creators fresh tricks and techniques.

Edited by
Ben Jacklin
35,360

A reversed clip quickly grabs attention. Water climbing back into a glass, a messy room putting itself together – the effect works instantly on TikTok, Reels, and Shorts, which is why so many bloggers use it. From travel vlogs to beauty tutorials, a reverse effect adds an extra beat of interest.

Below, we walk through the effect on desktop, in a browser, and from a phone. Rather than fighting with software you've never opened before, you'll drop a reversed clip into your project and layer effects on top of it without much thought. The tedious parts of editing – timeline math, format guessing – get handled automatically, which leaves more room for the part that actually matters: making the video sound and look like you.

How do you reverse a video in Movavi Video Editor

Movavi Video Editor runs on Windows and Mac and keeps things straightforward by design. No digging through nested menus – Reverse sits directly in the clip settings, and export preserves your video's original resolution.

Install and launch the app. Download Movavi Video Editor for your PC or Mac, then follow the setup prompts.

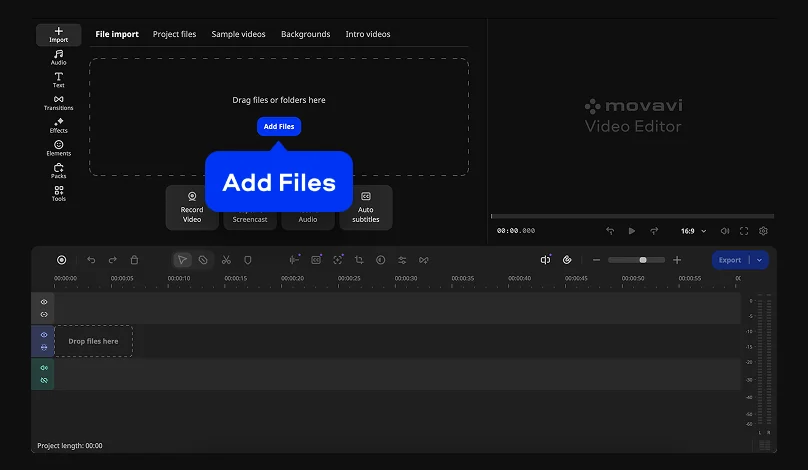
Step 1. Add your video

Click Add Files or drag the clip in, then drag it down onto the Timeline.

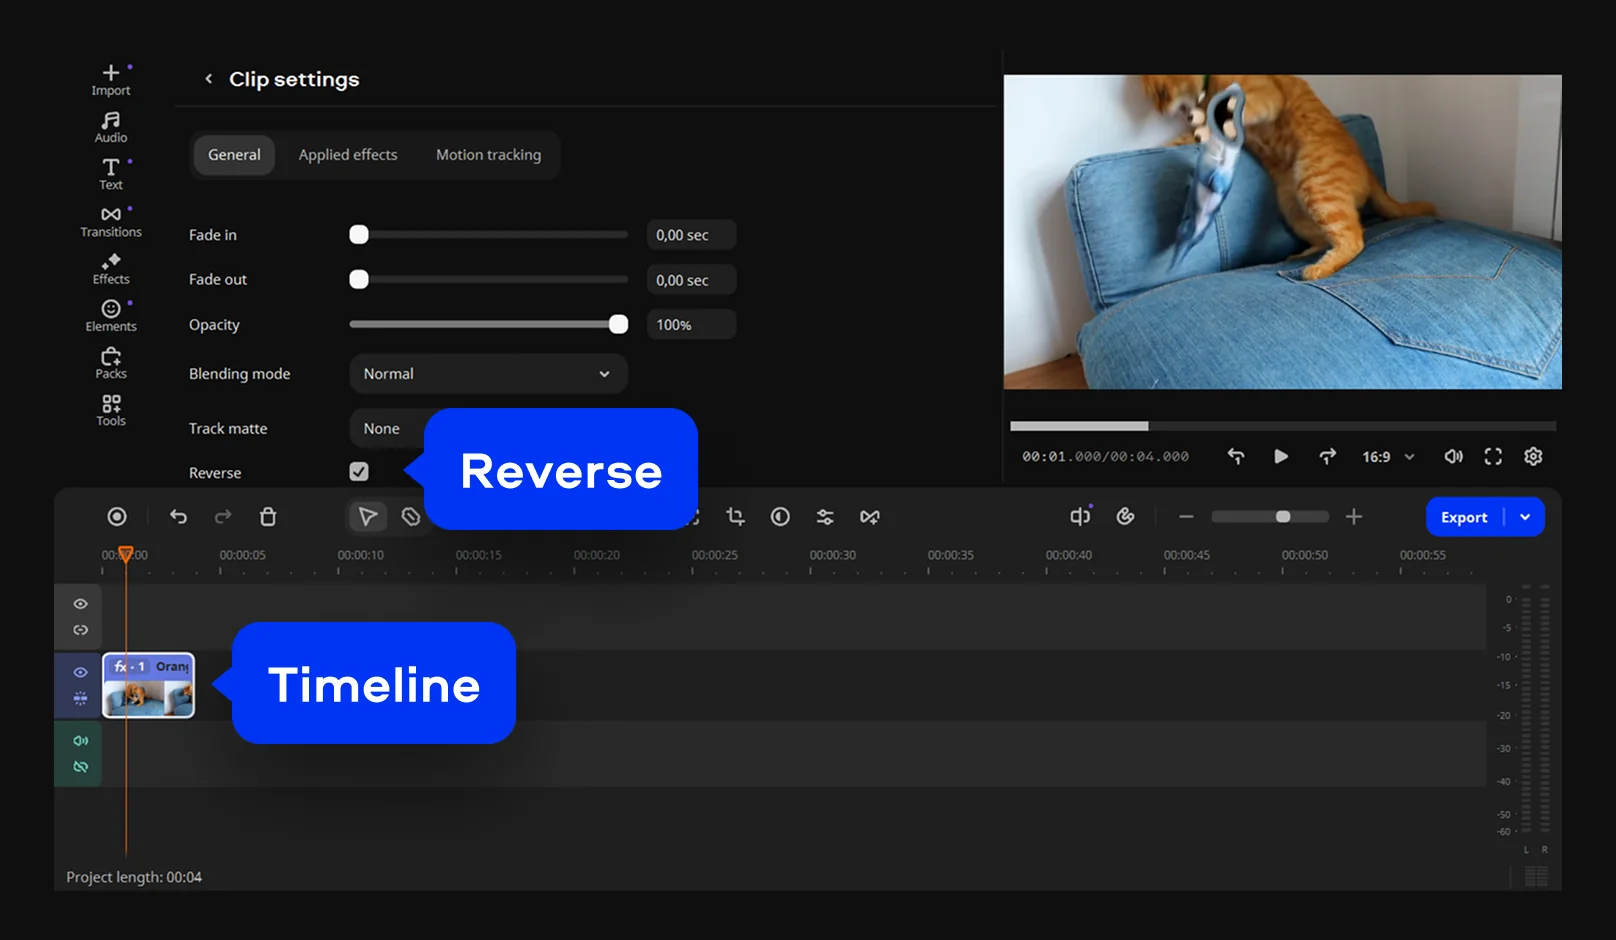
Step 2. Turn on Reverse

Double-click the clip on the Timeline – this opens Clip settings, where you'll find the Reverse option. Turn it on, and the clip picks up an FX icon, so you can tell at a glance which sections of your project run backward.

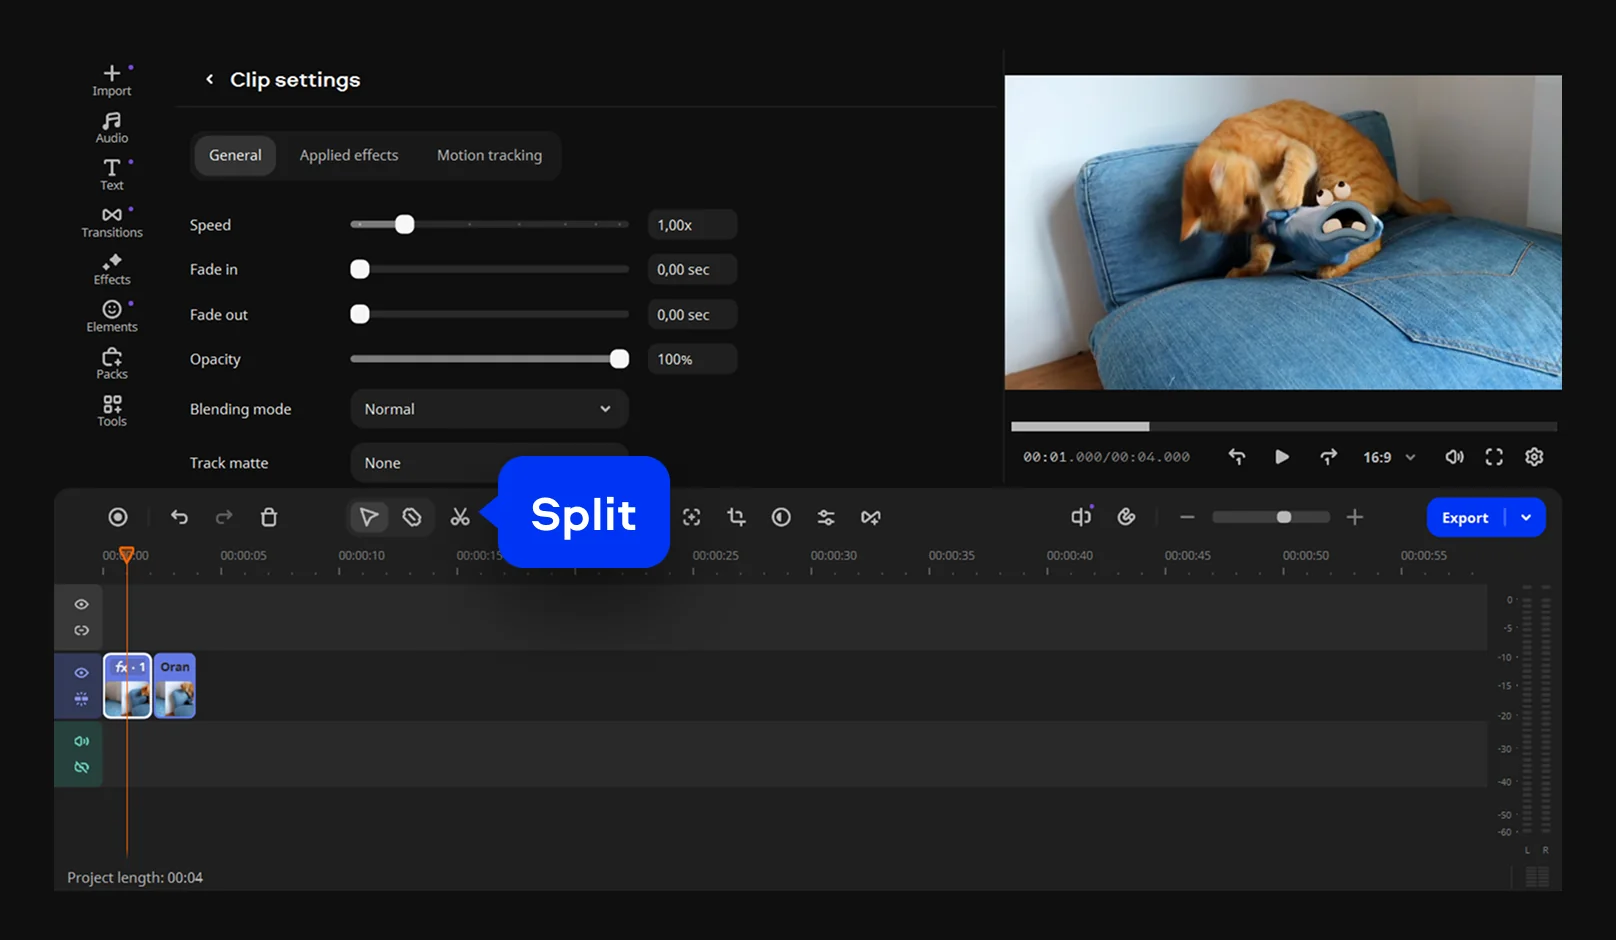
Only want part of a clip reversed? Cut out the section you need with the Split tool, then apply Reverse to that piece alone – it's exactly how creators build those "forward, then rewind" loops.

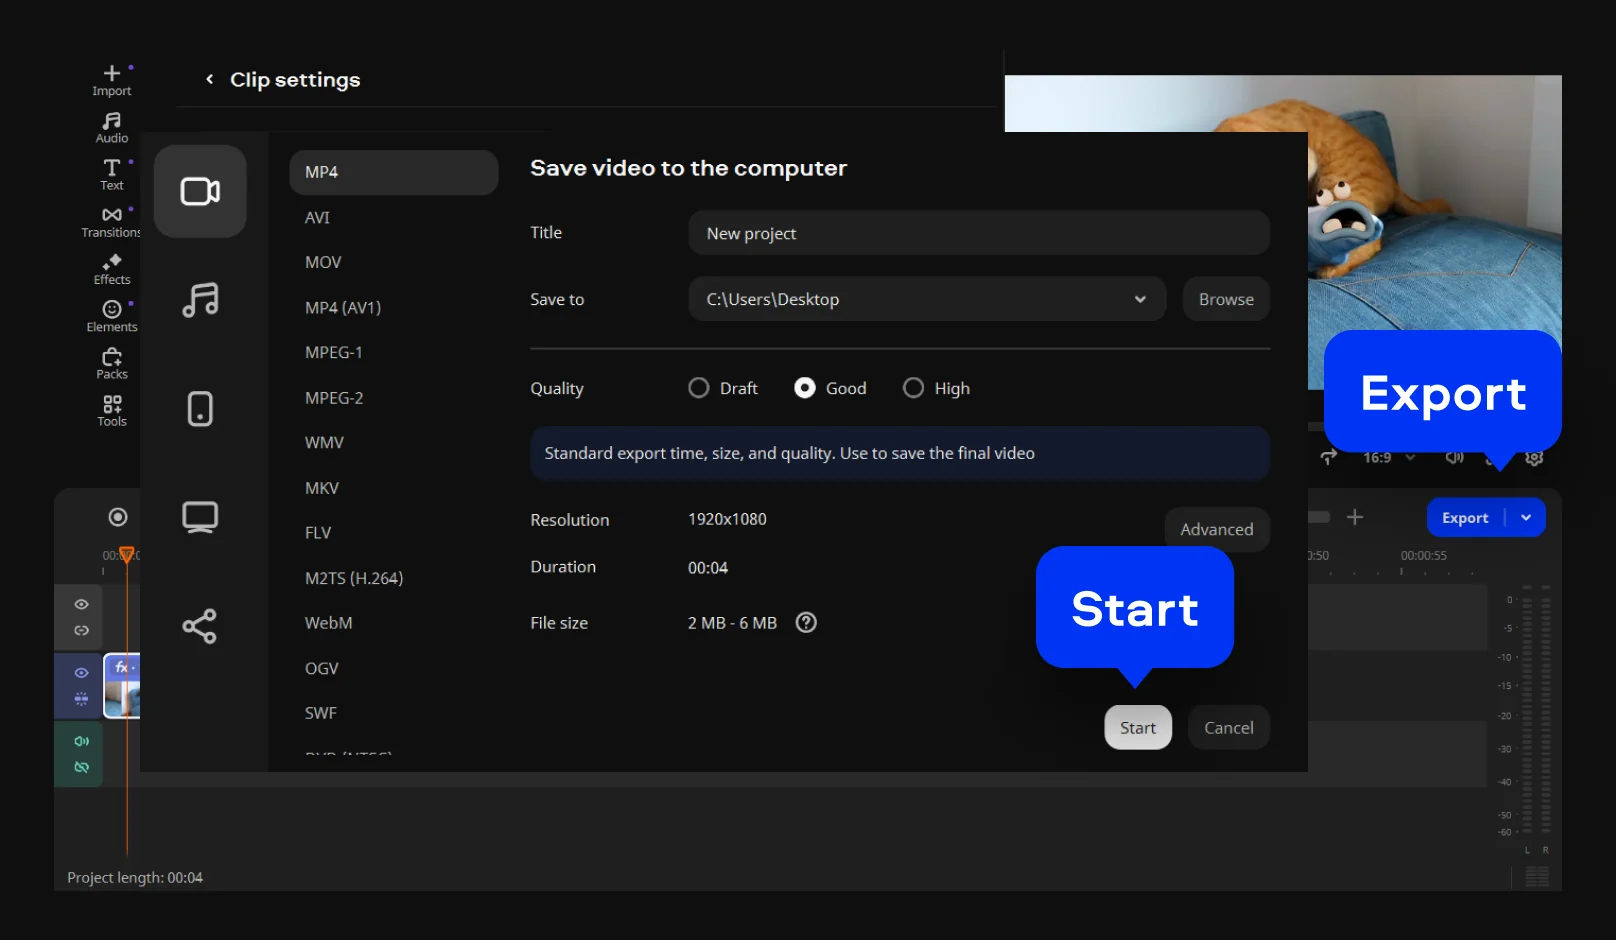
Step 3. Preview and export

Check the result in the preview window first. Once it looks right, hit Export, choose a format or a preset built for a specific social platform, and save.

Pro tip: pairing the reverse effect with a faster speed and the VHS filter gives you a quick rewind look. The speed slider sits in the same Clip Properties panel, so the whole combo takes seconds to set up.

Why reversing a video is harder than it should be

Online video tools

Movavi Video Editor

Access & accounts

Often requires sign-ups, accounts, or subscriptions even for short clips.

No account needed; runs locally on your PC or Mac once installed.

Interface & reliability

Layouts change frequently, features move behind paywalls, and sites may contain ads.

Stable, intuitive UI with the Reverse option located right in clip settings.

Tips for a better reverse effect

Pick footage with obvious direction. Pouring, jumping, throwing, walking, splashing, smoke or fire – these read clearly in reverse. A static talking-head shot generally falls flat played backward.

Watch what happens to the audio. Reversed speech and music tend to sound strange. Muting the original track and adding music over the top usually works better. Movavi's AI tools help here too – noise removal cleans up whatever audio you keep, and auto subtitles save time if there's a voiceover involved.

Film with the effect in mind. Leave a bit of extra footage before and after the key moment, so there's room to trim later.

Set the right aspect ratio. TikTok, Reels, and Shorts all expect vertical 9:16. Crop or set your project's ratio before export so nothing important gets cut off at the edges.

Don't overdo the length. Two to five seconds is usually the sweet spot for a reverse effect – pair it with a normal-speed clip for contrast rather than stretching it out.

Layer in more style. Beyond the VHS look, Movavi Video Editor includes filters, transitions, and titles for pretty much any aesthetic. Movavi Ideas adds new editing tricks every week if you're looking for something to try next.


Why creators choose Movavi

Free tools scattered across the web tend to share the same weaknesses – Movavi addresses them directly: no aggressive compression eating your quality, no digging to find the right button, and no account required just to test it out. That makes it a solid fit whether you're a lifestyle blogger chasing a TikTok trend, an entrepreneur putting together a promo, a gamer cutting a highlight reel, a parent editing family footage, or a student prepping a class presentation. Between the free online tool for quick jobs and the full desktop editor for everything else, there's a path here for whatever you're trying to make.

Frequently asked questions

How do you reverse a video on an iPhone?

Neither the built-in Photos app nor iMovie for iOS includes a reverse option. For full quality, move the file to a computer and use Movavi Video Editor instead.

How do you reverse a video in your gallery?

Standard phone gallery apps handle trimming and cropping but generally can't play footage backward. A few Android manufacturers build extra effects into their gallery editors, so it's worth checking that menu first. If there's nothing there, upload the clip to a desktop editor.

How do you reverse video on CapCut?

 Open the CapCut mobile app, start a new project, and import your clip. Tap the clip on the timeline, scroll the toolbar at the bottom, and tap Reverse – processing can take a moment on longer files. On desktop, select the clip and look for Reverse in the toolbar or the right-click menu.

How do you reverse a video on your camera roll?

The camera roll itself doesn't reverse anything, so you'll need a separate tool. To get full editing control – including speed adjustments, filters, and audio – transfer the file to a PC or Mac and edit it with Movavi Video Editor.

Have questions?
If you can’t find the answer to your question, please feel free to contact our Support Team.
Join us for discounts, editing tips, and content ideas

1.5M+ users already subscribed to our newsletter

By signing up, I agree to receive marketing emails from Movavi and agree to Movavi's Privacy Policy.