CapCut for PC: Step-by-Step Editing Guide for Beginners

Try Movavi Video Editor for quick and simple video editing!

  • Trim, cut, crop, and rotate videos

  • Add titles, stickers, and transitions

  • Apply visual effects

By clicking the download button, you're downloading a free version of the program.*

CapCut for PC is a desktop editor for short, trending videos: TikToks, Reels, Shorts, and clips for YouTube. This guide walks you through the CapCut video editor from download to export. You will install it, import clips, trim, add transitions, animate with keyframes, and save a finished file. If you are cutting a travel vlog, pulling together a class project, or turning a family road trip into a keepsake, the steps are the same.

What is CapCut for desktop good for?

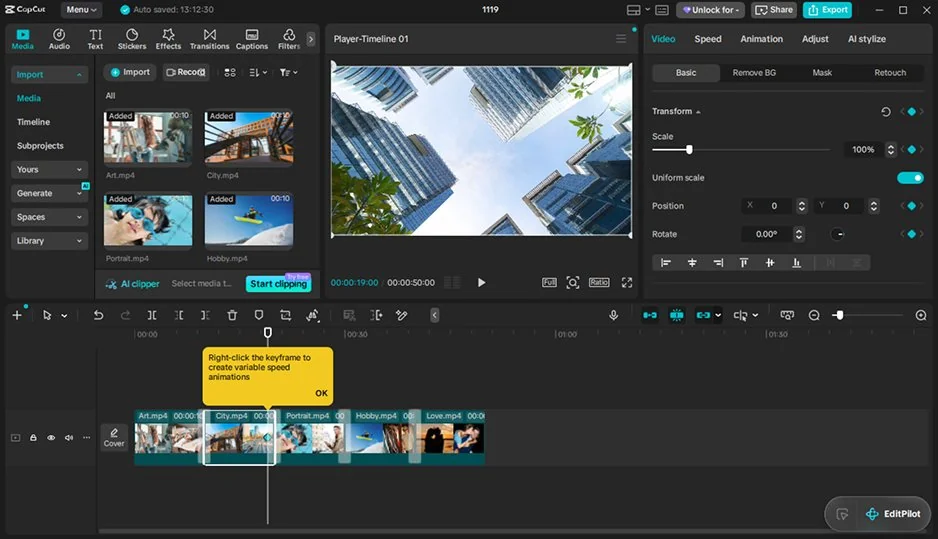
CapCut Desktop interface

CapCut began as a mobile-first editor and belongs to the TikTok ecosystem. On desktop you get a multi-track timeline, keyframe animation, chroma key, and speed ramping. The AI toolkit covers camera tracking, relighting, speech-to-text subtitles, retouching, AI voiceover, and background replacement. Some features and content need an internet connection and an account.

CapCut also ships a large library of trending templates and effects. Many of the best ones carry a Pro label and need a subscription, and which assets carry that label changes from time to time. Check the label before you build a project around one.

Here is how the plans compare:

CapCut (Free)

CapCut Pro

Export quality

Capped at 1080p in most cases

4K export and priority export speed

Watermark

Adds a watermark to some content

Watermark removed

AI features

Metered, with the AI tools hitting limits and Pro gates

Unlocks several categories of AI features that the free tier caps or blocks

Templates, effects and storage

Standard templates, 1GB cloud storage, limited commercial license

Premium templates, effects and filters, 100GB storage, full commercial license

What you will learn in this guide

You will go from an empty project to an exported video. Each section includes numbered steps, and anything paid is flagged where it comes up.

Topics covered

  • Installing CapCut on Windows
  • A tour of the interface
  • Importing files and arranging clips
  • Trimming, splitting, and deleting
  • Transitions and effects
  • Keyframe animation
  • Exporting and saving videos

Getting started: installing CapCut for PC

Installing CapCut on Windows

The CapCut download for a PC is available for Windows 10 and Windows 11 and can be downloaded from the following websites:

You can also install CapCut on your desktop using the Android emulators BlueStacks and MEmu Play.

Here are short step-by-step instructions on how to install CapCut using BlueStacks:

  1. Download BlueStacks from the official website and install it on your PC or laptop. Download BlueStacks
  2. Log in to your Google account to access the Play Store, or do it later.
  3. Search for CapCut in the search bar at the top right of the Play Store.
  4. Click the installation button when you find CapCut in the search results, then launch CapCut for a PC to start creating and editing your videos.

For MEmu Play:

  1. Download and install MEmu Play from the official website. Download MEmu Play
  2. Open Google Play on MEmu Play and search for CapCut.
  3. Install CapCut and launch it from the MEmu Play home screen. Done! Now CapCut can be used on your PC.

Interface overview: where everything lives

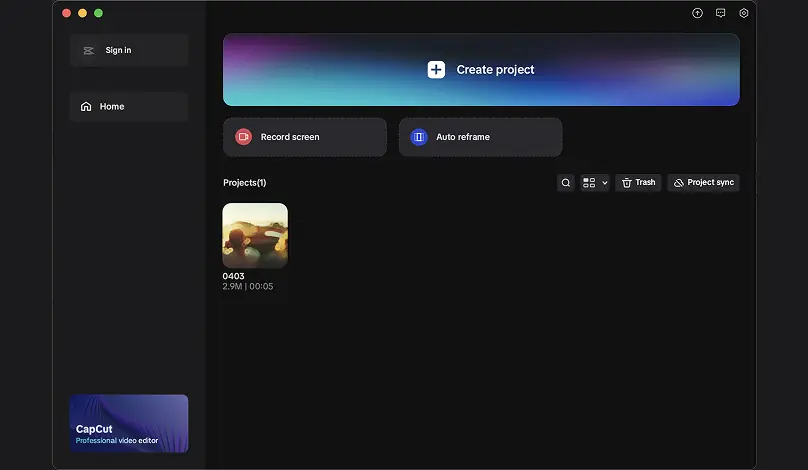
Before the editor itself opens, CapCut shows a launcher screen, so give yourself a minute to find your way around.

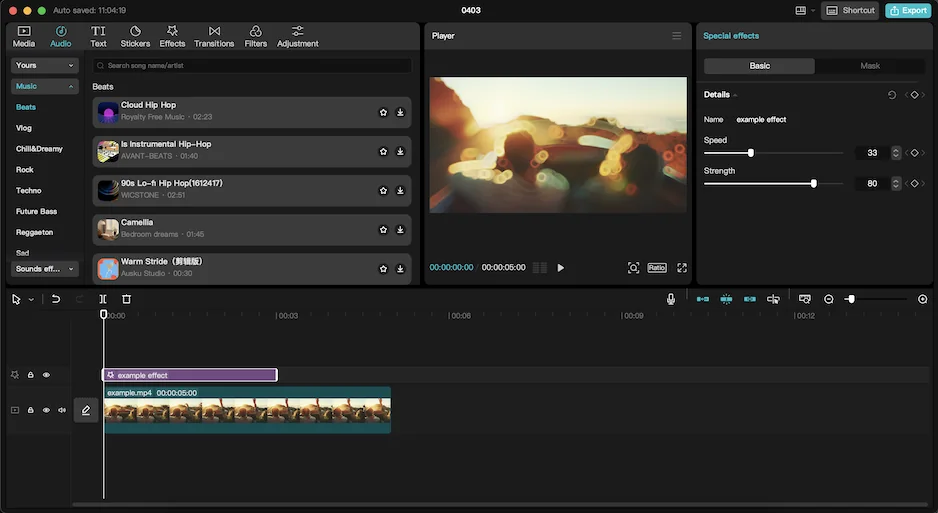
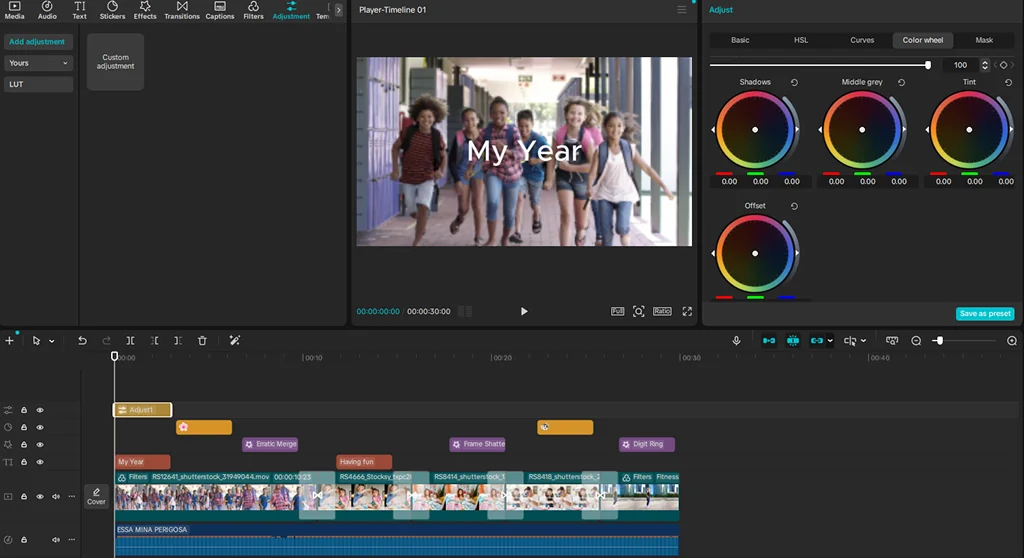
  • Media panel (top left): this is your asset hub. It has tabs along the top for imported media, audio, text, stickers, effects, transitions, captions, filters, and adjustments. Drag anything from here straight onto the timeline.
  • Player (top center): the preview window shows your project as you edit. Below it are playback controls, a timecode display, an aspect-ratio selector (16:9, 9:16, 1:1, and so on), and a fullscreen button.
  • Details panel (top right): Select a clip and its properties appear here, including position, scale, rotation, opacity, speed, animation, and color adjustments. It’s also where you set keyframes.
  • Toolbar (above the timeline): quick-access buttons for common actions like split, delete, crop, mirror, rotate, and freeze frame. There are also undo/redo buttons and a zoom slider for the timeline.
  • Timeline (bottom): your main editing area. Video, audio, text, and effect tracks stack vertically, and you drag clips to trim, reorder, and layer them. A “magnetic” main track keeps clips snapped together without gaps.
  • Export button (top right): once you’re done, click Export to choose resolution, frame rate, format, and bitrate, or to share directly to platforms like TikTok and YouTube. There’s no separate Deliver page.

CapCut updates its interface often, so tab names and button positions may differ slightly depending on your version.

Creating your first project and choosing an aspect ratio

Pick the aspect ratio first, because it decides how every clip sits in the frame. A travel vlog for YouTube suits a horizontal frame. A Reel or a TikTok needs 9:16, and Instagram posts often use 4:5.

  1. Open CapCut and sign in if prompted.
  2. Click Create project on the home screen. This opens a blank editor with an empty timeline.
  3. Name the project (optional). Click the project title at the top of the editor to rename it. New projects get a date-based default name.
  4. Import your media from the Media tab so you can start editing. The project autosaves and appears as a draft on the home screen.
  5. Find the ratio button at the bottom right of the Player window. It usually shows the current ratio, such as Original or 16:9.
  6. Click it and pick a preset:
    1. 16:9 for YouTube and standard widescreen
    2. 9:16 for TikTok, Instagram Reels, and YouTube Shorts
    3. 1:1 for square Instagram posts
    4. 4:3, 3:4, 21:9, 2:1, 1:2, 1.85:1, and others, depending on your version
    5. Original, which matches the first clip you add
    6. Custom, if available, to enter your own width and height

Adding and organizing files: videos, photos, and music

Say you are building a school project with interview clips, a few photos, and a soundtrack. Everything starts in the import area, then moves to the timeline.

Adding videos, photos, and music

  1. Open or create a project. Click Create project on the home screen to open the editor.
  2. Import your files. In the Media tab, click Import and select your files. You can also drag them from your file explorer into the panel. Videos, photos, and audio all use the same import flow.
  3. Use built-in music if you need it. The Audio tab has royalty-free background music and sound effects. Click a track to preview it before adding.
  4. Pull music out of a video if needed. Right-click a video on the timeline and choose Extract audio to get a separate audio clip.

Placing clips on the timeline

  1. Drag and drop. Drag a clip from the Media panel onto the timeline. Clicking the + icon on its thumbnail also adds it at the playhead.
  2. Video and photos go on the main video track. Photos appear as still clips with a default length that you can stretch or shorten by dragging the clip’s edge.
  3. Music and sound go on an audio track below the video. Drop it where you want it to start, then trim the end to match your video.
  4. Overlays such as extra footage, stickers, or text go on tracks above the main one, so they appear over the base video.

Rearranging clips

  • Reorder: drag a clip left or right along the main track. The other clips shift to make room, and the main track closes any gaps.
  • Move between tracks: drag a clip up or down to layer it as an overlay or send it back to the main track.
  • Trim: drag the left or right edge of a clip to shorten it.
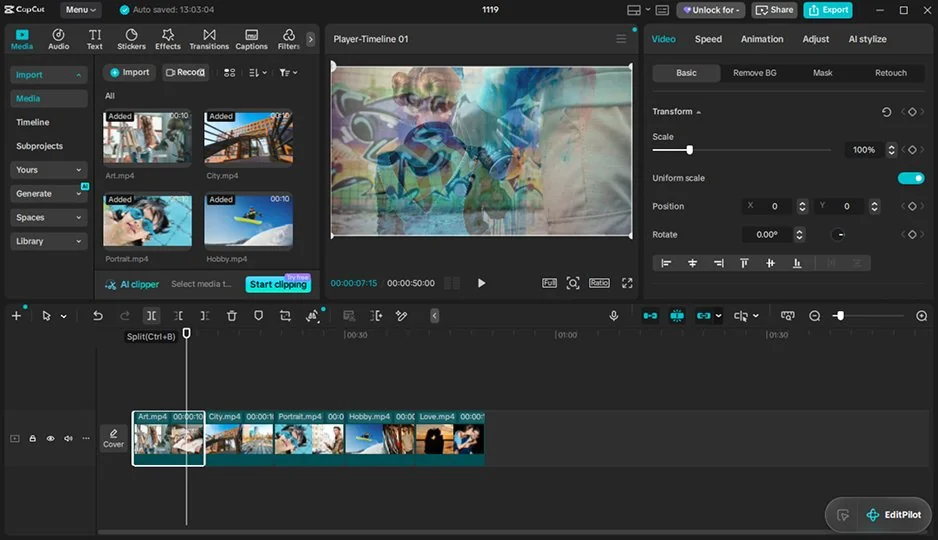
  • Split and delete: place the playhead where you want a cut, click Split in the toolbar, then select the unwanted part and press Delete.
  • Zoom: use the zoom slider above the timeline for precise placement.

Supported formats

Media type

Common formats

Video

MP4, AVI, MOV, MKV, and WMV

Audio

WAV, MP3, AAC, FLAC, and WMA

Images

JPG and PNG are the most reliably supported

How files are organized within a project

  • Media panel: everything you import appears here, in one flat library for that project. CapCut has no bins, folders, or metadata tagging like DaVinci Resolve’s Media Pool, so name your files clearly before importing.
  • Linked, not copied: the project generally references your original files on disk rather than storing copies. If you move, rename, or delete a source file, the clip may show as missing, so keep your media in a stable folder until you finish.
  • Projects on the home screen: each project is saved as a draft and autosaves as you work. You reopen it from the home screen.
  • Timeline vs. library: importing a file only adds it to the library. It becomes part of the edit once you drag it onto the timeline, and you can reuse the same file in several places.

Basic editing operations

How to cut and trim clips efficiently

Cutting and trimming are the core of any CapCut project. Here’s how to do them precisely.

Using the Split tool:

  1. Drag the playhead on the timeline to the exact frame where you want to cut.
  2. Click Split in the toolbar above the timeline, or press Ctrl+B (Cmd+B on Mac).
  3. Select the unwanted part and press Delete to remove it.

Trimming by dragging edges:

  1. Hover over the left or right edge of a clip on the timeline.
  2. Drag the edge inward to shorten the clip or outward to reveal more of the footage.
  3. On the main track, the following clips close up automatically, so no gaps are left behind.

Quick trim shortcuts:

  1. Place the playhead where you want the clip to start or end.
  2. Use the trim-start or trim-end option in the toolbar to cut everything before or after that point in one click.

Adding transitions and simple effects

Adding a transition:

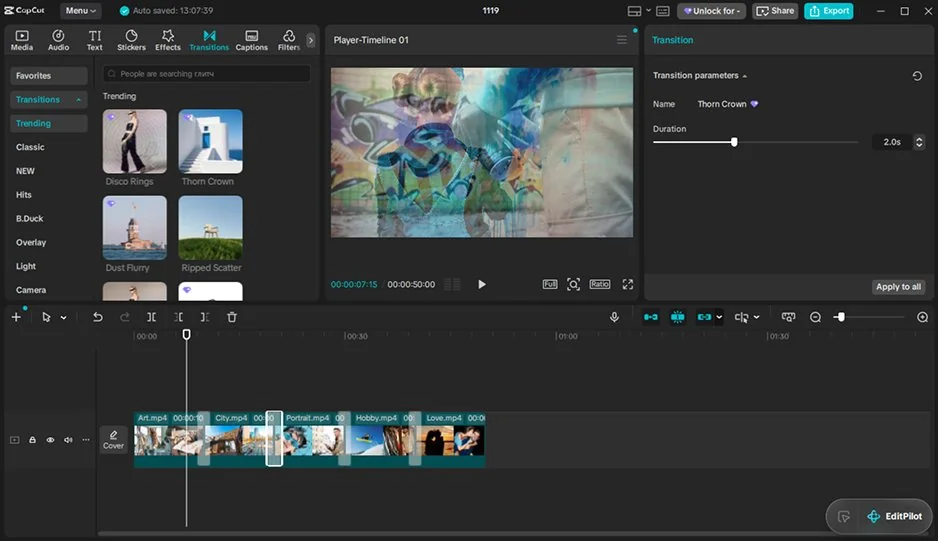
  1. Open the Transitions tab in the Media panel.
  2. Choose a transition such as a fade or dissolve and drag it between two clips on the timeline.
  3. Select the transition on the timeline and adjust its duration in the Details panel.

Adding effects:

  1. Open the Effects tab and browse the categories.
  2. Drag an effect onto a clip, or onto its own effects track above the video.
  3. Stretch or shorten the effect on the timeline to control how long it appears.
  4. Adjust its settings in the Details panel if options are available.

Items marked with a Pro icon require a subscription to export.

Using keyframes for animation

Keyframes let you animate properties such as position, scale, and opacity over time.

  1. Select the clip. Click it on the timeline and open the Basic tab in the Details panel, where properties like position, scale, and rotation are listed.
  2. Set the first keyframe. Move the playhead to the starting point and click the diamond icon next to a property, for example Scale.
  3. Add motion. Move the playhead to a new point and change the property value. A second keyframe is created automatically.
  4. Fine-tune the animation. Drag keyframes along the timeline to adjust timing. If your version offers easing or curve options, use them for smoother movement.

For quick results, the Animation tab in the Details panel has ready-made in, out, and loop animations that need no manual keyframes.

Saving videos: exporting your final project

Project file or finished video?

A project file keeps your edits open: clips, cuts, transitions, and keyframes stay changeable, and the file points to your original media. An exported video is a finished file, such as an MP4, that you can upload, send, or play anywhere. Save the project while you work. Export when you are done.

Choosing the right export settings

Platform

Resolution

Frame rate

Format

Additional notes

YouTube

1920 × 1080

24–60 FPS

MP4 (H.264)

High bit rate for quality. AAC for audio

Instagram

1080 × 1350

30 FPS

MP4 (H.264)

Set the aspect ratio to 4:5

TikTok

1080 × 1920

30–60 FPS

MP4 (H.264)

Vertical format with a 9:16 aspect ratio

  1. Check your timeline. Play the project through and remove any Pro-marked items if you don’t have a subscription.
  2. Click Export in the top-right corner of the editor.
  3. Name the file and choose a save location. Pick a folder with enough free space.
  4. Set the video options. Choose the resolution (for example 1080p), frame rate, bitrate, and format (MP4 or MOV). The free tier caps at 1080p in most scenarios.
  5. Export audio only (optional). Uncheck “Video” and check “Audio,” then choose a format such as MP3.
  6. Click Export again and keep CapCut open until the progress bar finishes. Don’t move or delete your source files in the meantime.
  7. Find your file in the chosen folder, or use the share buttons that appear afterward to upload to platforms like TikTok or YouTube.

Troubleshooting common issues

Most CapCut failures come down to heavy export settings, low storage, a bloated cache, or an outdated app. Work through the fixes below, trying the export again after each one.

  1. Payment prompts during export. This usually means your project contains paid features or materials. Look for items with a “Pro” icon in the top-left corner (effects, filters, transitions, templates, premium music) and delete them or swap them for free ones. If your cover used Pro materials, reselect it. Also note that 4K/60fps export is a Pro feature, so choose 1080p if you don’t subscribe.
  2. Saving errors. Low free storage and an outdated app are behind many failed exports, so free up space, update CapCut, and restart it. Don’t move or delete source files while exporting. If it keeps failing, clear the cache under Settings > Draft in supported versions.
  3. Loss of quality. Check resolution, frame rate, and bitrate in the Export window. The free tier caps at 1080p in most scenarios. Exporting at a higher resolution won’t improve low-quality source clips.
  4. Audio desynchronization. Convert phone recordings or screen captures with a variable frame rate to a constant frame rate, re-import them, and export at a matching frame rate. Also check the timeline for audio that was detached or moved away from its video.

Movavi Video Editor: an alternative to CapCut on Windows

Imagine a full day of horizontal footage that needs to become a travel vlog. Movavi Video Editor trims long files before they reach the timeline, the Blade tool makes frame-accurate cuts, and hover previews show a transition on your own clip before you drop it into place. It works offline on your desktop, with no account or cloud, and it is comfortable with long videos.

Class presentations and explainer videos get a different kind of help. The auto subtitle tool recognizes over 100 languages and offers more than 60 subtitle designs. Every AI tool comes with the full version and there is no AI credit system, so nobody counts credits halfway through an edit. CapCut's AI toolkit goes deeper on tasks like relighting and camera tracking, and it spends credits to do it.

For a family road trip, start from a template instead of a blank timeline. Movavi Templates is a multi-style library of customizable, pro-looking, modular templates for any kind of video. A template is a ready-made project built from Blocks: short segments of the video, such as an intro, a countdown, a quick cut, or an animated collage. You drop your own clips, photos, and text into the Blocks. The template arrives with pre-set editing, music, transitions, and text, and you can keep, change, or remove any of it. CapCut's templates lean toward trending vertical formats and are applied as a whole; Movavi's let you reorder, add, or delete Blocks one by one.
Movavi Video Editor
Create awesome videos easily

*The free version of Movavi Video Editor may have the following restrictions depending on the build: watermark on exported clips, 60-second video or 1/2 audio length limit, and/or some advanced features unavailable when exporting videos.

Frequently asked questions

How do I install CapCut on Windows?

Download it from the official CapCut website or Microsoft Store. It runs on Windows 10 and Windows 11. Sign in after installing, because some features and content need an account and an internet connection.

Is CapCut suitable for beginners?

For short vertical videos, mostly yes. Users on Reddit and review sites praise its fast, simple editing and low barrier to entry. On desktop, the number of tools and fine-tuning settings can slow you down, and you meet the launcher screen before the editor. Plan for a medium learning curve if you are new to editing.

Which features are available for free?

The free plan exports at 1080p, and a watermark appears when you use Pro content or AI clips. Look for the Pro label before you commit to a template or effect.

How do I save a finished video?

Export it. Saving a project keeps it editable inside CapCut, while exporting creates a file such as an MP4 (H.264) that you can upload anywhere. Name the file, choose the folder, and set resolution and frame rate to match the platform.

What are some alternatives to CapCut for desktop computers?

Movavi Video Editor runs on Windows and macOS and works offline with no account. DaVinci Resolve is built for colorists and professional editors. Clipchamp is Microsoft's browser-based editor, built into Windows 11 and Microsoft 365. OpenShot and Shotcut are free, open-source editors. For a beginner on Windows, start with the editor whose interface you can read at a glance.

Have questions?
If you can’t find the answer to your question, please feel free to contact our Support Team.
Join us for discounts, editing tips, and content ideas

1.5M+ users already subscribed to our newsletter

By signing up, I agree to receive marketing emails from Movavi and agree to Movavi's Privacy Policy.