Step 1. Install the software
Download the setup file for Movavi Screen Recorder onto your computer and open it. Follow the installation instructions on your screen to complete the setup process. When it’s done, the program will run automatically.

Want to Record a Webinar?
Use Movavi Screen Recorder!
Movavi Screen Recorder is one of the best webinar recording software in terms of usability. With its flexible settings and great capture quality, it makes recording online seminars a piece of cake! But the program is more than just a webinar recording tool – you can capture everything that happens on your screen: live streaming, Skype calls, software presentation or demonstration, and much more.
How to record a webinar on a PC or Mac with the screen recorder
To record a webinar, run the application. Position the capturing frame over the area where the webinar will be broadcast. Once it starts, click the red REC button in the bottom right corner of the app window. When the webinar is over, click Stop. Edit the recording if needed.
Download Movavi Screen Recorder and follow these simple steps to capture a webinar on your computer. The instructions work for Windows 10, 8, 8.1, and 7, as well as macOS.
Step 1. Install the software
Download the setup file for Movavi Screen Recorder onto your computer and open it. Follow the installation instructions on your screen to complete the setup process. When it’s done, the program will run automatically.
Step 2. Set the frame and record your webinar
Choose the recording option on the sidebar. Position the recording frame over the area you want to capture.
Make sure the System Audio icon is highlighted in green and the Microphone icon is not – this way, you’ll be capturing just the output of the speakers, without any background noise that may be picked up by your microphone.
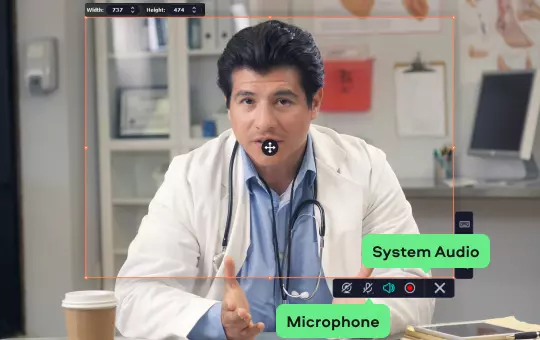
When the webinar starts, click the REC button and the program will start recording after three seconds. Don’t switch to a different window or tab while you’re recording. Once the webinar is over, hit Stop. You can also use the convenient control panel above the capture frame to manage the recording process – and grab snapshots during the capture.
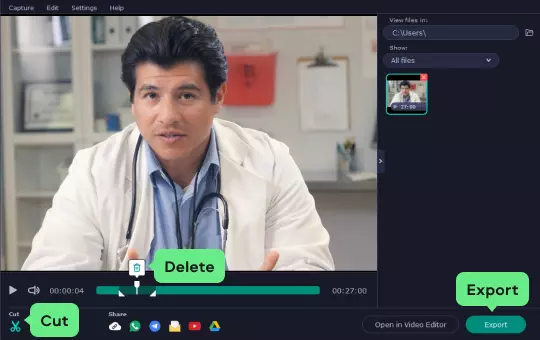
That's all there is to it! The recording will be automatically saved on your hard drive in MKV format and open in the preview window. If you want to cut the video or convert it to another format, go on to step 3.

Step 3. Cut and convert your video (optional)
When the capture process is complete, you’ll see a window in which you can play the recording. To cut out any unwanted sections from the video, move the white marker at the beginning of the footage you want to remove and click the Scissors icon. Now position the marker at the end of the unwanted section and click the Scissors again. Delete the section by selecting it on the timeline and pressing the Trash Can icon. To save the result and/or convert the recording to a different format, click Export.
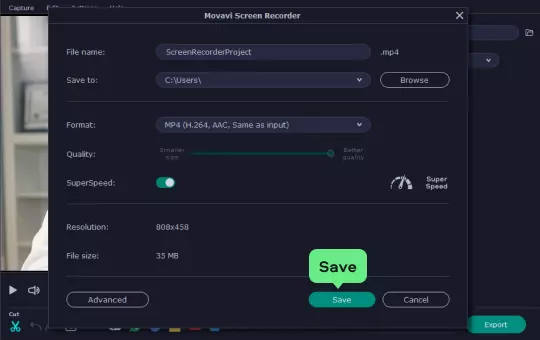
In the export dialog, select one of the formats at the top of the window and click Save. Your webinar session will be ready for you to watch again in a few minutes.
Movavi Screen Recorder
Disclaimer: Please be aware that Movavi Screen Recorder does not allow capture of copy-protected video and audio streams.

Have questions?
Join us for discounts, editing tips, and content ideas


1.5M+ users already subscribed to our newsletter