Step 1. Install the software
Launch the downloaded file. After the installation is complete, the program will open automatically.

Use Movavi Video Editor!
Edit and enhance videos easily
Add stylish transitions, titles, and filters
Stabilize and reverse video, equalize sound, and more
Have a bunch of videos and looking for software to help you make a fancy collage from them? Movavi Video Editor may be one of the best apps for you. Impress your friends with a dazzling gallery of moving pictures from someone’s wedding or your last pub crawl, using this simple, yet effective tool for getting creative with vids and photos on your PC or Mac.
Download Movavi Video Editor now and follow the steps below to learn how to make video collages in no time.
Launch the downloaded file. After the installation is complete, the program will open automatically.
Select Backgrounds from the list on the left and pick a background clip for your collage. Drag and drop it onto the Timeline below. Set the duration of the clip by dragging the right boundary to the desired point on the Timeline.

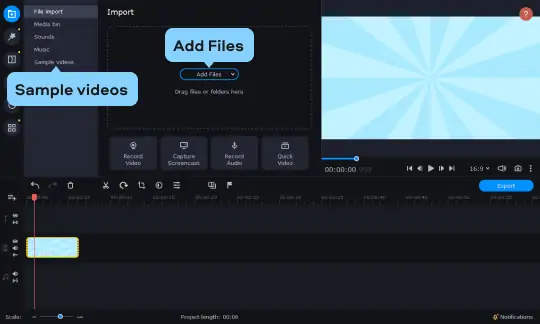
Select File import, then click the Add Files button and browse for the videos you want to include in your collage.
You can also use content from the online stock video collection offered by our partner, VideoBlocks, in your collage. Check out what’s available from this great selection of professionally created videos by clicking on Sample videos and then on Download more! Alternatively, simply visit the VideoBlocks website.
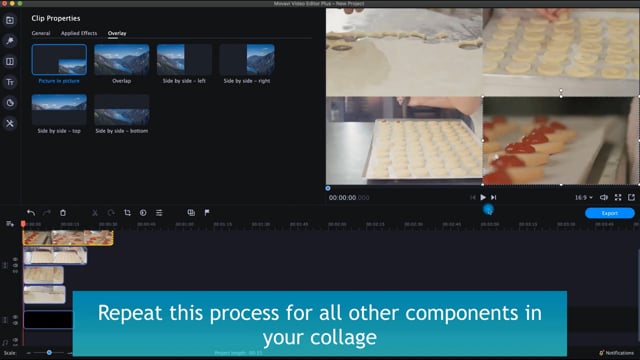
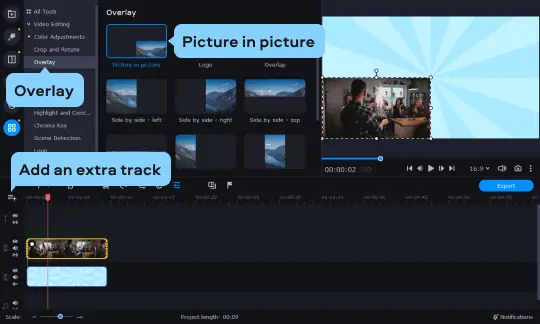
Drag and drop your videos from Media Bin into the Timeline. By default, the videos you select to include in your collage will be placed to the right of your background clip on the Video Track. To start making the collage, first, you need to create an overlay track. Click the Plus icon, as shown in the picture, and choose Add Video Track. Then drag one of the added videos up and drop it above the background clip onto the newly created Overlay track. Next, select Picture in picture. You will see the video placed over the background clip in the Preview Window. Adjust the position of the video by dragging it to the desired position in the window. You can also adjust the video’s dimensions by dragging on its corners.
Repeat this process for all other components in your collage.
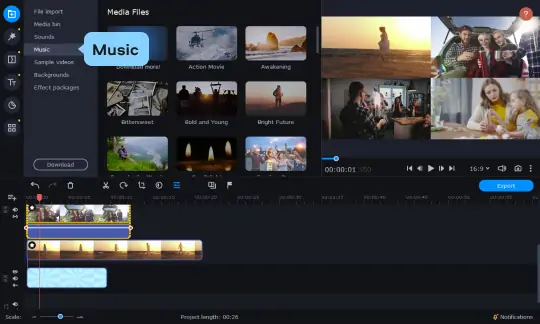
You can add some appropriate music to your video collage. To add music, simply drag an audio file from its folder on your computer to where you want it to play on the Timeline. Or you can also add an audio track from the built-in library. To do this, open the Import tab and choose Music.
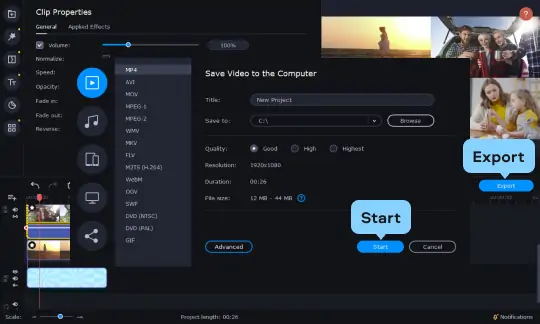
Click the Export button and select the desired format tab in the window that pops up. Once you’ve specified the parameters, click Start.
That’s all there is to it! Feel free to experiment with these guidelines to create a fun experience for your audience with a video collage of your very own!
*The free version of Movavi Video Editor may have the following restrictions depending on the build: watermark on exported clips, 60-second video or 1/2 audio length limit, and/or some advanced features unavailable when exporting videos. Learn more


An easy way to record from your screen in HD. Make video footage of any application, record online streaming video, webinars, even Skype calls, and save clips in all popular formats.
An intuitive photo-editing app that lets you retouch any photo on the fly. Improve quality, add filters and captions, remove unwanted objects, change backgrounds, and more!


1.5M+ users already subscribed to our newsletter