Final Cut Pro Transitions: Step-by-Step Tutorial [2025]

Use a Final Cut Pro alternative – Movavi Video Editor to add transitions!

  • Trim, cut, crop, and rotate videos
  • Add titles, stickers, and transitions
  • Apply visual effects

By clicking the download button, you're downloading a trial version of the program.*

Edited by Ben Jacklin
13,028

Audiences have got very used to seeing transitions in videos they watch – they are essential tools in video editing and help to create natural shifts between scenes or clips. Final Cut Pro transitions offer a wide array of transitions to enhance storytelling and maintain viewer engagement. Final Cut Pro is Apple’s flagship video-editing software and provides a powerful option for making advanced edits (including transitions).

This guide provides an overview of Final Cut Pro transitions that’s free and step-by-step instructions on adding and customizing them.

What transitions are available in Final Cut Pro

Final Cut Pro includes a diverse selection of built-in transitions to suit various editing needs. Whether somebody wants to go all-out and add Star Wars style wipes or they just want some subtle transitions to help the flow, there are many free Final Cut Pro transitions. Some of the most commonly used free Final Cut transitions are:

  • Cross dissolve: creates a smooth fade from one clip to another, often used to signify a passage of time or a gentle scene change.
  • Fade in/out: gradually increases or decreases the visibility of a clip, typically used at the beginning or end of a sequence.
  • Wipe: replaces one clip with another using a moving line or shape, adding a dynamic visual effect.
  • Slide: moves the incoming clip over the outgoing clip, simulating a sliding motion.
  • Zoom: transitions between clips using a zoom effect, either zooming in or out.

These Final Cut Pro transitions packs can be found in the Transitions Browser within Final Cut Pro, categorized for easy navigation. Users can preview each transition before applying it to ensure it fits the desired look and feel of the video they’ve made.

How to add transitions in Final Cut Pro

Adding transitions in Final Cut Pro is a straightforward process. Follow these steps to incorporate transitions into your project:

  1. Download and install Final Cut Pro.
    Download Final Cut Pro
  2. Launch Final Cut Pro and open the project you wish to edit.
  3. Access the Transitions browser. Click on the Transitions button located in the toolbar to open the Transitions browser.
  4. Preview transitions. Browse through the available transitions. Hover over a transition thumbnail to preview its effect.
  5. Apply a transition. Drag and drop the desired transition between two clips in the timeline. The transition will automatically snap into place.
  6. Adjust the transition duration. To modify the length of the transition, click on it in the timeline and drag its edges to the desired duration.
  7. Customize transition settings. You can select the transition in the timeline, then use the Inspector to adjust parameters such as direction or color, depending on the transition type.
  8. Preview the transition. Play back the timeline to see how the transition appears between your clips before choosing it.

For quick application, Final Cut Pro also offers keyboard shortcuts. For instance, pressing Command + T applies the default transition (usually Cross dissolve) between selected clips.

How to make custom transitions in Final Cut Pro

Creating custom transitions allows for unique visual effects tailored to your project's needs. Final Cut Pro users can design custom transitions using Apple Motion, a motion graphics tool that integrates seamlessly with Final Cut Pro. Here's how:

  1. Open Apple Motion. Launch Motion and choose Final Cut Transition as the project type.
  2. Set project parameters. Define the resolution, frame rate, and duration for your transition project.
  3. Design the transition. Use Motion's tools to create the desired animation. This can include keyframing properties like position, opacity, scale, or applying filters and behaviors.
  4. Save the transition. Once satisfied, save the project. Motion will automatically place the custom transition in Final Cut Pro's Transitions browser under the category you specified.

Return to Final Cut Pro, locate your custom transition in the Transitions browser, and apply it between clips as you would with built-in transitions. Custom transitions offer a personalized touch to your videos, enabling you to stand out with distinctive visual styles and create a signature as an editor.

How to add transitions to a video with Movavi Video Editor – a Final Cut Pro alternative

Movavi Video Editor is a user-friendly video-editing software suitable for both beginners and professionals. It offers a wide range of transitions, filters, and effects, making it a viable alternative to Final Cut Pro, especially for those seeking a more straightforward interface. It is also usable on Windows devices, whereas Final Cut Pro is just for Mac computers.

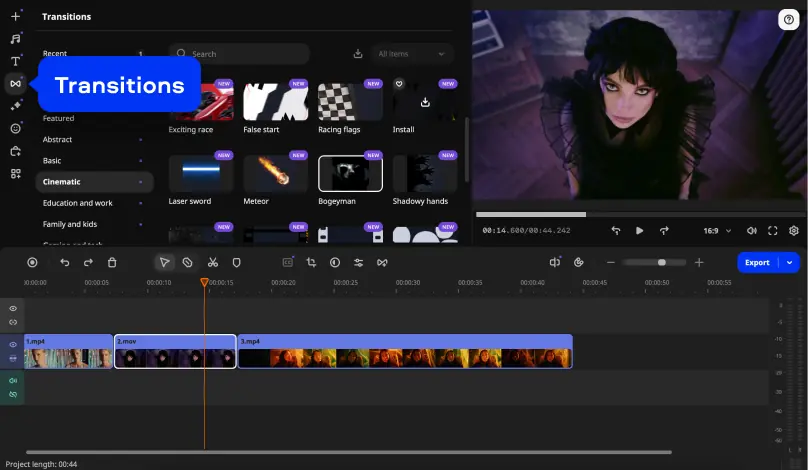
The software is designed for straightforward use, allowing quick learning and efficient editing. There is an extensive library of transitions, including classic fades and dynamic motion effects.

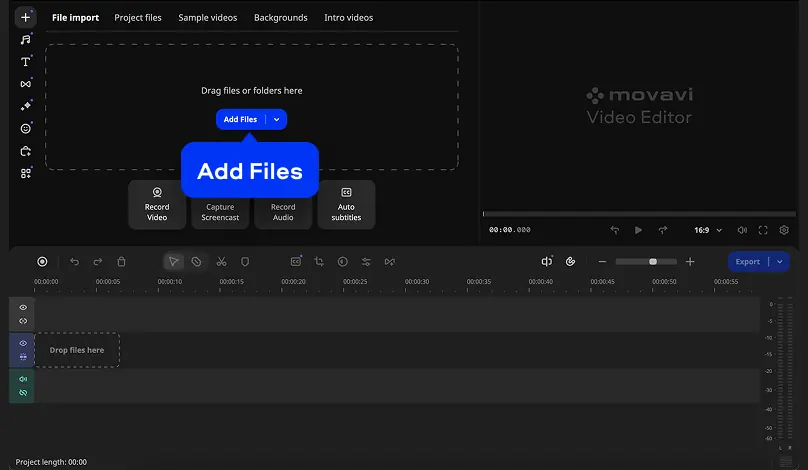
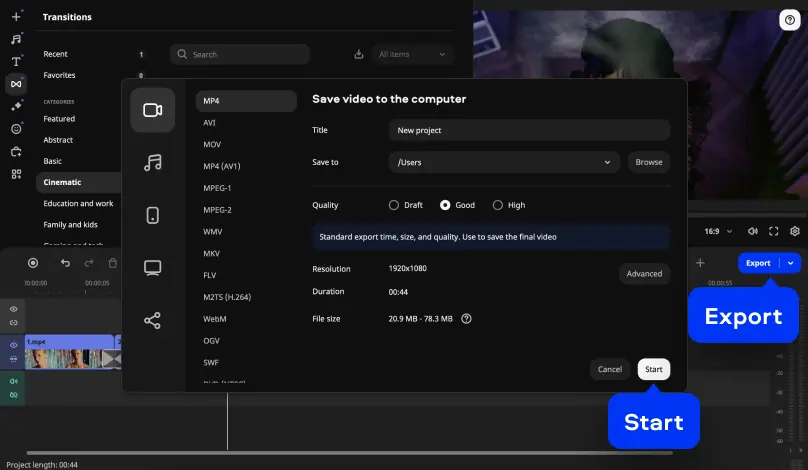
Movavi Video Editor simplifies the process of adding transitions, making it accessible for users who prefer a more guided editing experience with options to do things in a very simple way (while still looking pro and clean cut).

Step 1. Download and install Movavi Video Editor

Get Movavi Video Editor and install it on your computer.

Step 2. Import media files

Open the program and click Add Files to import your video clips. The files will appear in the Project files. Drag and drop your video clips onto the timeline in the desired sequence.

Step 3. Apply transitions

Click on the Transitions tab to view the available transition effects. Drag your chosen transition and drop it between two clips on the timeline. The transition will be applied automatically. Click on the transition in the timeline and drag its edges to set the desired length.

Step 4. Preview and export the video

Use the preview window to review your edits. Once satisfied, click Export to save your video in the preferred format and quality. Hit the Start button.

Summary

Transitions play a crucial role in video editing and if they are done right, they improve the visual appeal of your projects. Final Cut Pro offers a comprehensive suite of built-in transitions and the ability to create custom effects and give a professional end-result. There are also lots of free transitions for Final Cut Pro available. Additionally, there are Final Cut Pro alternatives that people can use with wider compatibility and a more affordable price point.

Movavi Video Editor

Create awesome videos easily

*The free version of Movavi Video Editor may have the following restrictions depending on the build: watermark on exported clips, 60-second video or 1/2 audio length limit, and/or some advanced features unavailable when exporting videos.

Movavi Video Editor
Have questions?

Have questions?

If you can’t find the answer to your question, please feel free to contact our Support Team.

Join us for discounts, editing tips, and content ideas

1.5M+ users already subscribed to our newsletter

By signing up, I agree to receive marketing emails from Movavi and agree to Movavi's Privacy Policy.