How to Add Captions on CapCut: Step-by-Step Guide [2025]

Use a CapCut alternative – Movavi Video Editor to add captions!

  • Trim, cut, crop, and rotate videos
  • Add titles, stickers, and transitions
  • Apply visual effects

By clicking the download button, you're downloading a trial version of the program.*

How to add CapCut subtitles

Edited by Ben Jacklin
15,201

Adding captions to videos enhances accessibility and engagement, making content more inclusive for viewers. CapCut is a popular video-editing tool offering features for both automatic and manual captioning and means that people can improve the accessibility of their content. In the age of social media, captions are even more important. This guide will walk you through the steps to learn how to add captions on CapCut.

How to add subtitles to a video in CapCut

How to add auto captions

CapCut's auto-captioning feature simplifies the process of adding subtitles by automatically transcribing spoken words in your video. Here's how to add captions in CapCut on the desktop version.

  1. Download and install CapCut. Then, open the CapCut application on your desktop.
    Download CapCut
  2. Import your video. Click on New Project and import the video file you wish to edit.
  3. Add the video to the timeline. Drag and drop your video onto the timeline to begin editing.
  4. Access auto captions. Navigate to the Text tab and select Auto Captions.
  5. In the Create Captions panel, choose the language spoken in your video to ensure better accuracy and the correct wording.
  6. Generate captions. Click the Create button. CapCut will process the audio and generate captions automatically.
  7. Review the generated captions for accuracy. You can also edit some stylized aspects such as adjust timing, and modify the style, including font, size, color, and positioning.
  8. Export your video. Once satisfied, export your video by clicking on the Export button, choosing your desired resolution and format.

How to add closed captions

It is possible to add closed captions in CapCut, and you may need to use an encoder and decoder to make it available on some devices. Closed captions are those that are not automatically on the video and can be turned on or off. Many people prefer to add captions manually, if you find CapCut auto captions are not working, this allows for precise control over subtitle content and timing. Here's how to add subtitles to CapCut:

  1. Download and install Capcut, then open CapCut for captions editing on your desktop.
    Download CapCut
  2. Create a new project and import the video file you want to caption.
  3. Add your video to the timeline. Drag your video onto the timeline to begin editing.
  4. Insert text boxes. Go to the Text tab and select Add Text. A text box will appear on the preview screen.
  5. Enter the caption text. Click on the text box and type in your desired caption.
  6. Adjust the timing. Align the text box on the timeline to match the timing of the spoken words in your video.
  7. Customize the appearance of your captions by changing the font, size, color, and position to suit your video's aesthetic.
  8. Repeat as needed. Continue adding text boxes and captions throughout your video as necessary.
  9. Export the final video. Once all captions are in place, export your video with the embedded subtitles.

How to add captions to a video with Movavi Video Editor – a CapCut alternative

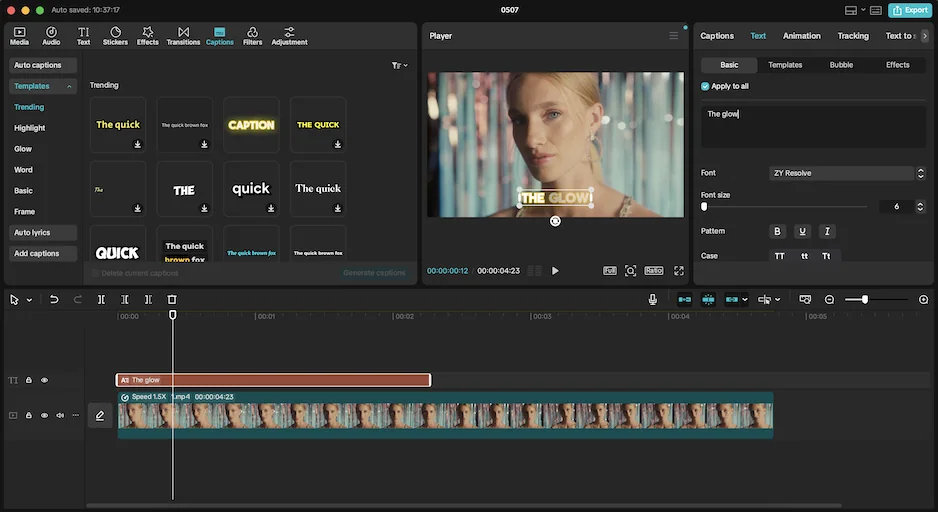
Movavi Video Editor is a versatile video-editing software that offers an intuitive interface and a range of features, including automatic subtitle generation. The software is equipped with AI-driven features that can bring a more professional look to any video project.

Movavi Video Editor's AI-powered subtitle feature supports multiple languages and offers a user-friendly experience for both beginners and professionals.

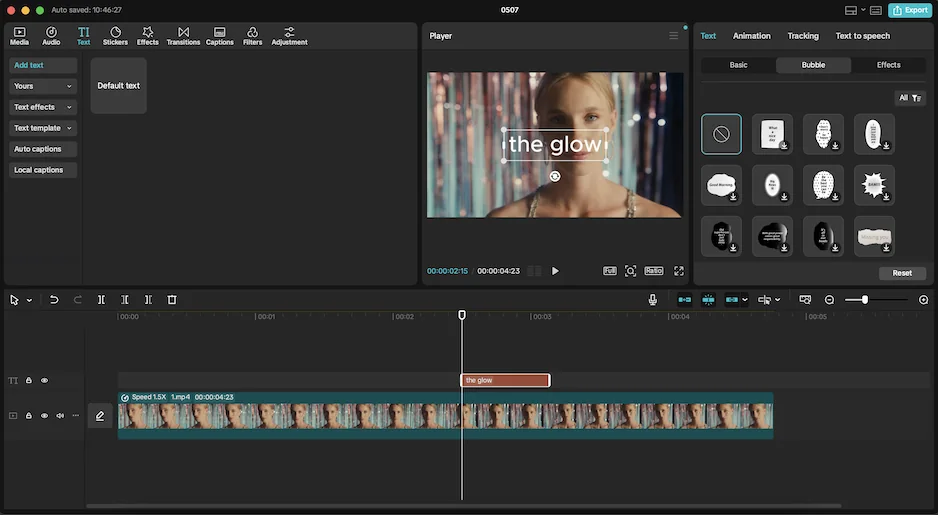
Movavi Video Editor is a powerful and user-friendly video-editing software designed for both beginners and experienced users. It offers a range of features including one-click automatic subtitles, AI-powered tools like motion tracking and background removal, and a vast library of filters, transitions, and overlays.

The revamped timeline and intuitive interface make editing smooth and efficient. With support for 4K video processing and frequent updates, Movavi Video Editor ensures a seamless editing experience. This software provides the tools needed to produce high-quality videos in a simple and intuitive way.

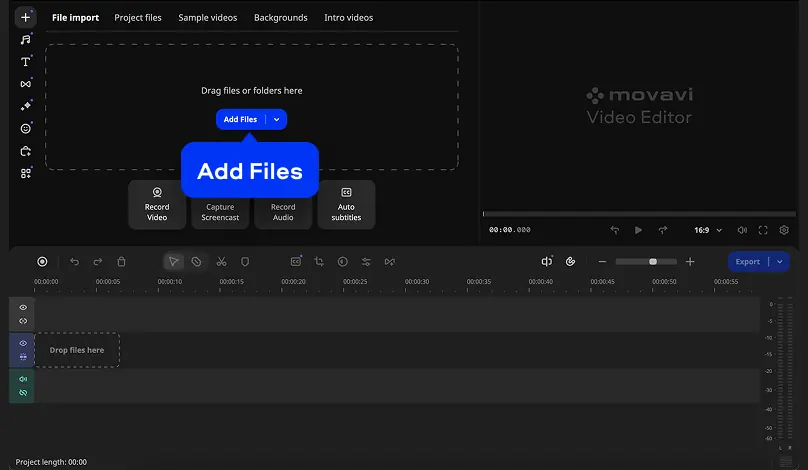
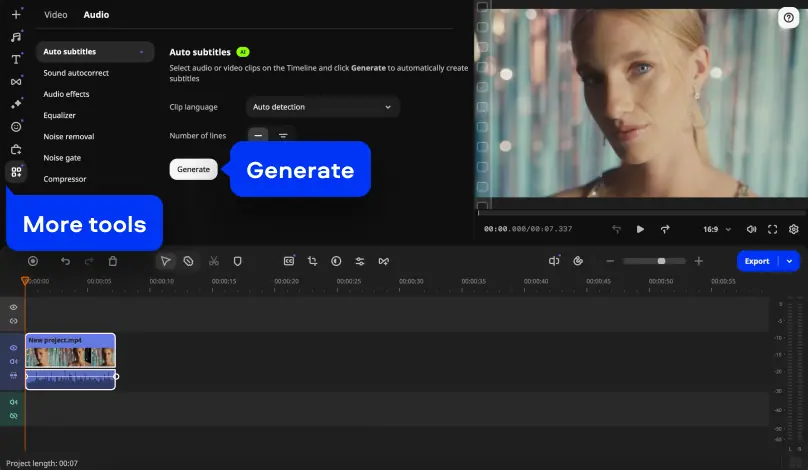
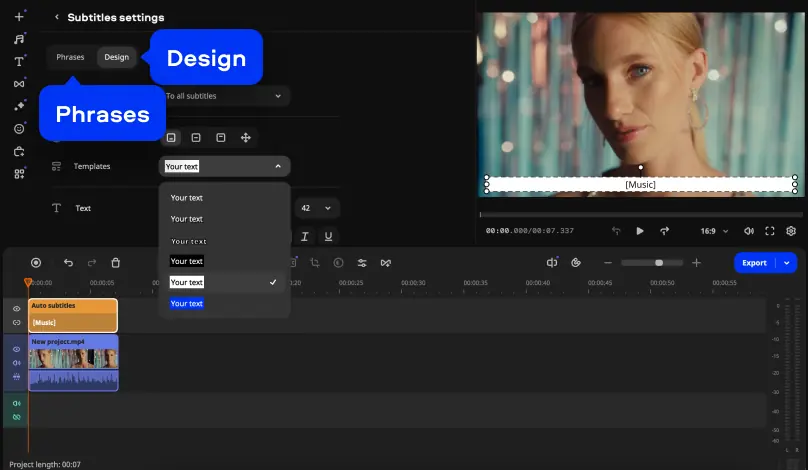
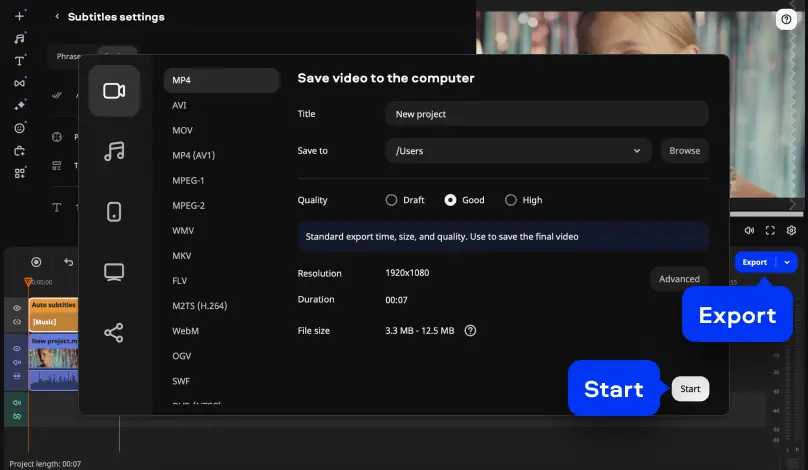
Here’s how to use Movavi Video Editor:

Step 1. Download and install the program

Get the installation file and install Movavi Video Editor on your computer. Make sure you’ve got the right version for your OS.

Step 2. Import your video

Click on Add Files to import the video you wish to edit, then drag it onto the timeline.

Step 3. Access the auto subtitles feature

Select your video on the timeline, go to More tools, and choose Audio. Then, click on Auto subtitles. Movavi Video Editor can detect the language automatically, or you can select it manually from the Clip language dropdown menu.

Click the Generate button. The software will process the audio and create subtitles accordingly.

Step 4. Edit subtitles

Once generated, you can edit the text in the Phrases tab for accuracy. This is useful if you need to edit a few words here and there.

In the Design tab, adjust the font, size, color, and position of your subtitles to match your video's style. This means more options for how the video ends up looking.

Step 5. Export the video

After finalizing your captions, click Export, choose your desired settings, and save the video. It will then be ready for uploading wherever you need it.

Summary

Adding captions to your videos enhances accessibility and viewer engagement. CapCut provides both automatic and manual captioning options, catering to different needs and potentially saving time. For those seeking an alternative, Movavi Video Editor offers a robust and intuitive platform for captioning, with the added benefit of AI-powered features that can increase accuracy. Adding captions is a great way to increase accessibility and now it doesn’t have to take forever.

Movavi Video Editor

Create awesome videos easily

*The free version of Movavi Video Editor may have the following restrictions depending on the build: watermark on exported clips, 60-second video or 1/2 audio length limit, and/or some advanced features unavailable when exporting videos.

Movavi Video Editor

Frequently asked questions

How do I add auto captions on CapCut?

To add auto captions in CapCut:

  1. Import your video.
  2. Go to the Text tab, and select Auto Captions.
  3. Choose your language, then click Create. CapCut will automatically generate subtitles, which you can review and edit before exporting the final video.

How do I solve the CapCut auto captions not working issue?

If CapCut's auto captions aren't working, check your internet connection and make sure you're using the latest version. This feature may also require a Pro subscription, so confirm your access level. Restarting the app or reinstalling it can also help fix glitches.

How do I add closed captions on CapCut?

To add closed captions manually in CapCut:

  1. Go to the Text tab and choose Add Text.
  2. Type your caption, place it on the timeline to sync with the audio, and repeat for each line.
  3. Customize the font and style.
  4. Export your video with embedded captions.

What is the best CapCut alternative?

Movavi Video Editor is a strong CapCut alternative. It’s user-friendly, supports both automatic and manual subtitles, and works well for both beginners and experienced users. The software also offers powerful video-editing tools and allows for easy customization of captions with just a few clicks.

Have questions?

Have questions?

If you can’t find the answer to your question, please feel free to contact our Support Team.

Join us for discounts, editing tips, and content ideas

1.5M+ users already subscribed to our newsletter

By signing up, I agree to receive marketing emails from Movavi and agree to Movavi's Privacy Policy.