Movavi Screen Recorder
The perfect way to record anything from your screen
Disclaimer: Please be aware that Movavi Screen Recorder does not allow capture of copy-protected video and audio streams.

[Solved!] How to Change Background in Microsoft Teams: 3 Best Ways
Try Movavi Screen Recorder to capture video calls!

With 320 million users, Microsoft Teams has become an essential tool for remote collaboration all around the globe, allowing teams to connect seamlessly through video meetings. Offering ease of communication, Microsoft Teams doesn't limit itself to it, featuring many other useful functions, one of which is the ability to customize your background, ensuring a professional, private, and distraction-free environment during calls. Whether before or during a meeting, changing your background is a straightforward process and in this article, we’ll explore how to change the background on Teams fast and easy.
Special pick: Movavi Screen Recorder

For those looking to elevate their Microsoft Teams experience, Movavi Screen Recorder emerges as a special pick, being an extremely user-friendly software for both Windows and macOS users. Whether you’re recording video calls, creating tutorials, or demonstrating software, Movavi Screen Recorder offers several features and advantages that will definitely help you with your next call in Microsoft Teams:
And now it's time to take a closer look at how to change your Microsoft Teams background and three different methods to do so to further personalize and enhance your virtual interactions. Whether you're preparing for a meeting or adjusting settings on the fly, these methods will explain how to add and apply backgrounds and help you tailor your digital environment with ease:
Method 1: Changing your background before a meeting
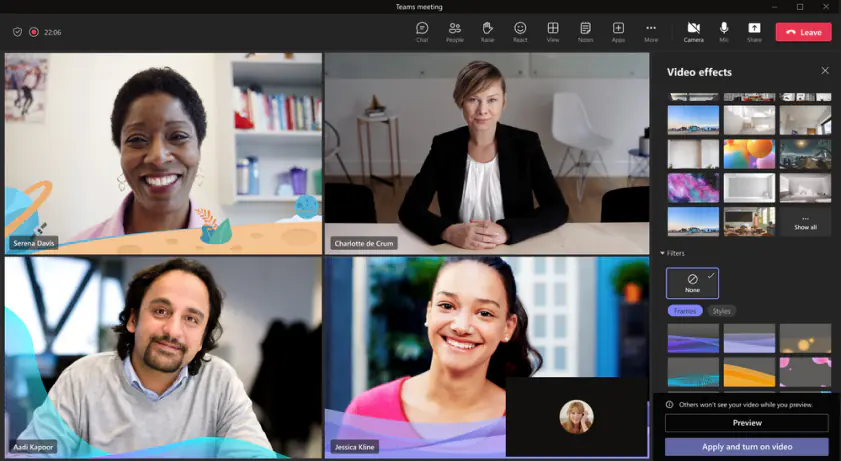
Desktop:
Mobile:
Open the Microsoft Teams app. Launch the Microsoft Teams app on your mobile device.
Join or start a meeting. Tap on the meeting you want to join from your calendar or start a new meeting by selecting New meeting.
Set up your video. Before joining the meeting, ensure your camera is turned on and your video feed is active.
Access background settings: Look for the Background effects or Background settings option at the top of your screen. Tap on it to access your background options.
Choose the background effect. Below your image, select Blur to blur your background, or choose one of the provided background images to replace your background.
Upload your own image (optional). If you want to use your own image, tap on the plus sign to upload an image from your device. Make sure that you are adding files in JPG, PNG, or BMP format.
Save and join. Once you've chosen your preferred background option, tap Done or Apply to save your changes. Your chosen background will remain active throughout the meeting.
Method 2: Changing your background during a meeting
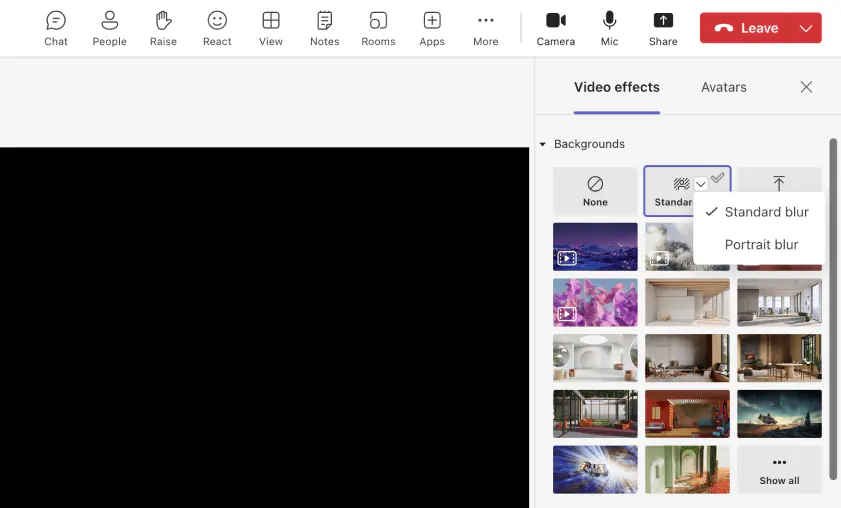
Desktop:
Please note that Linux users or those on optimized virtual desktop infrastructure will not be able to change their backgrounds during a meeting.
Mobile:
Method 3: Setting a default background for all meetings
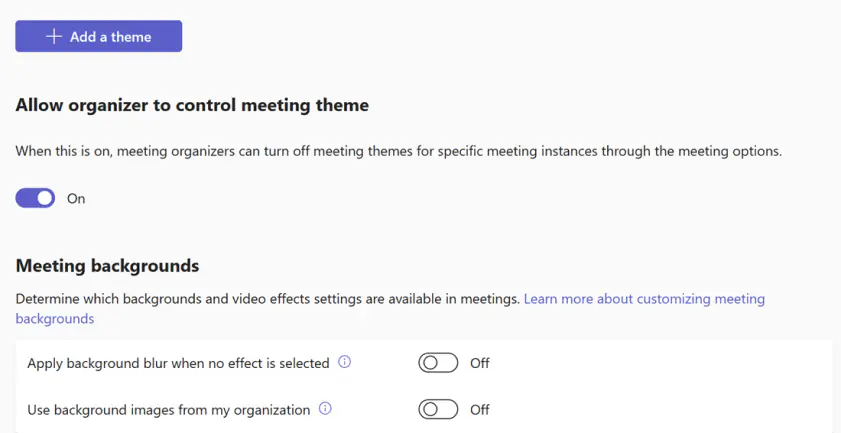
Microsoft Teams lacks a direct option for setting a default background, but IT admins can achieve this workaround:
Access Microsoft Teams admin center. Open your web browser and go to the Microsoft Teams admin center.
Navigate to Customization Policies. Within the admin center, find and select Meetings followed by Customization Policies.
Choose policy to configure. From the list of customization policies, select the policy you want to configure to set the default background.
Enable custom backgrounds. Within the selected policy settings, locate the option labeled Custom Backgrounds and ensure it is turned on.
Assign a default background image. After enabling custom backgrounds, you'll have the option to assign a default background image. Upload or select the desired image that you want to set as the default background for all meetings.
Save changes. Once you've configured the policy settings, remember to save your changes to apply automatically the default background to all meetings.
Please note that participants who have enabled high-contrast display settings won't be able to see branded content. Additionally, organizational-defined backgrounds are exclusive to Teams Premium license holders; guests and anonymous participants won't be able to use them.
Summary
In conclusion, while Microsoft Teams offers various options to customize your background during meetings, including blurring it, replacing it with an image, or utilizing virtual backgrounds, there are limitations and considerations to keep in mind. Users can adjust their backgrounds before joining a meeting on both desktop and mobile devices, but certain features may not be available for all users, as well as the default background can not be set by anyone.
Overall, understanding these options allows users to improve their meeting environments and tailor their experiences to suit their preferences and organizational needs, while leveraging tools like Movavi Screen Recorder can help to enhance even further the virtual meeting experience.
Movavi Screen Recorder
Disclaimer: Please be aware that Movavi Screen Recorder does not allow capture of copy-protected video and audio streams.
If you want to change your background in Microsoft Teams without being on a call, you can use Movavi Video Editor. This program allows you to easily add a background to any video, including your Microsoft Teams meetings. It's perfect for creating professional-looking videos for your colleagues and clients. You can choose from a variety of pre-made backgrounds or upload your own images. This is a great solution for anyone who wants to personalize their Microsoft Teams experience.
You can blur your background in Microsoft Teams with the help of Movavi Video Editor. It offers an easy-to-use background blur feature that allows you to create professional-looking video recordings. This is perfect for anyone who wants to improve the look of their video calls and meetings.
The best backgrounds for your Teams meetings can be created using Movavi Photo Editor. It offers a variety of tools that can help you create stunning backgrounds that will make your meetings stand out. This is perfect for anyone who wants to add a professional touch to their video calls.
Movavi Video Editor allows you to easily store and access your Teams backgrounds. This program is perfect for anyone who wants to personalize their Microsoft Teams experience by creating custom backgrounds. It's easy to use and offers a variety of features for customizing your backgrounds.
Yes, you can easily add a background to Microsoft Teams before a meeting using Movavi Screen Recorder. This program allows you to record your screen and add a custom background. This is perfect for anyone who wants to create professional-looking video recordings of their Teams meetings and instantly improve the quality of their video calls.

Have questions?
Join us for discounts, editing tips, and content ideas


1.5M+ users already subscribed to our newsletter