How to Crop a Video in CapCut: Step-by-Step Guide [2025]

Use a CapCut alternative – Movavi Video Editor to crop videos!

  • Trim, cut, crop, and rotate videos
  • Add titles, stickers, and transitions
  • Apply visual effects

By clicking the download button, you're downloading a trial version of the program.*

Edited by Ben Jacklin
16,233

Few video editing tools are more important than the humble crop. Fortunately, learning how to crop a video in CapCut is straightforward. We’ll walk you through the steps, and provide an alternative program to crop videos in, should you wish to explore beyond CapCut.

How to crop in CapCut on a PC

CapCut’s desktop app has been downloaded by tens of millions of people. It’s a great option for beginners to video editing, with a streamlined user interface that’s intuitive and straightforward to use. You likely won’t be surprised, then, to hear it’s easy to learn how to crop in CapCut.

Follow these steps:

  1. First, you need to install the program. It’s available on CapCut’s website.
    Download CapCut
  2. Once you’ve downloaded the program, launch it and start a new project.
  3. If you’ve already got a project created, open it. Now you can get started with CapCut’s crop video feature.
  4. Import your video clip into CapCut by dragging and dropping the video file. Alternatively, click the Import button to upload your video file.
  5. Drag your video onto the timeline. Make sure it’s selected by clicking it.
  6. Click the Edit tab. Next, click Crop. That should activate the crop tool. You’ll see a box frame appear around the border of your video clip.
  7. Adjust the dimensions of this box frame by dragging the corners. A preview window will show you what the video will look like as a result of your crop.
  8. You might notice a box under your video clip labeled Crop ratio. If it’s set to Free, that lets you adjust the box frame to your heart’s content. But you might not want that. If you want to crop your video clip to a certain aspect ratio, select it from the options in the drop-down box.
  9. When you’re satisfied, click Apply. That will save your adjustment.

There’s an alternative method to crop video in CapCut. You follow all the steps above, but instead of clicking Edit, go to the attributes panel on the right of your screen. Click on the Video tab, and the Basic tab underneath. There, you should see some details about the position and size of your video clip. You can adjust the values here to change the size, rotation, and position of your video. By doing this, you can achieve the same effect as cropping.

How to crop a video on CapCut online

CapCut offers a free online video editing tool, which is perfect for anyone wanting to crop videos without downloading software. The online editor is also great for people working on a device they don’t own, or who frequently switch between different devices. It’s just as easy to learn how to crop on CapCut’s online editor as in the desktop version.

Follow these steps to learn how to crop a video on CapCut:

  1. Go to CapCut’s website and open the online editor. If it’s your first time using the editor, you’ll need to create an account.
    Go to CapCut
  2. Once you’ve done that, start a new project. Or open an existing one, if you’re a returning user.
  3. Import your video clip by dragging and dropping. Alternatively, click Upload and select your video file.
  4. Drag your imported video onto the timeline. Click on it to select it.
  5. You should see some icons appear in a horizontal toolbar above your clip. One of them is the Crop tool. It has the icon often used to represent cropping: a box frame with overlapping lines, with a dotted line running through the middle. If you hover over this icon with your cursor, Crop should appear. Click on this icon to activate the Crop tool. That will open the Crop editing window.
  6. You have a few options here. If you want total control over the crop, select Custom in the Aspect ratio dropdown menu. That lets you adjust the box frame around your clip at will. Do that by dragging and dropping the frame. Alternatively, choose from one of the aspect ratio presets.
  7. CapCut also offers an Auto reframe tool. Click on that to have CapCut automatically crop your video. It should detect the subjects in your video and keep them well framed.
  8. You can also rotate your video with the provided slider.
  9. When you’re happy, click Apply.

CapCut online also lets you crop by adjusting a video clip’s position, size, and rotation. You can access these options by clicking on your video clip, then clicking Basic in the options sidebar that appears to the right of your CapCut editing window.

How to crop a video on CapCut on a phone

CapCut’s online editor might be handy for those editing on different devices, but the mobile app is best for anyone who edits on the move. Available on both Android devices and iPhones, CapCut’s mobile app offers many of the same editing tools as the online and desktop versions.

Follow these steps to learn how to use CapCut to crop videos:

  1. Download the CapCut mobile app if you haven’t already. It should be available on your mobile device’s app store.
    Download CapCut for iOS
    Download CapCut for Android
  2. Then, open the app and start a new project. Import your video clip.
  3. Tap on the Edit button in the toolbar along the bottom of your screen.
  4. Scroll along the tools until you find Transform. Tap on that. It should have the crop icon.
  5. You’re not there yet, though. Now, locate and tap the Crop button.
  6. As with CapCut’s other versions, you can select a preset aspect ratio or crop manually. You should see the usual box frame around your video, which you can tap and drag to adjust.
  7. When you’re happy, tap on the checkmark to save your changes. It should be located at the bottom right of your screen.

How to crop a video with Movavi Video Editor – a CapCut alternative

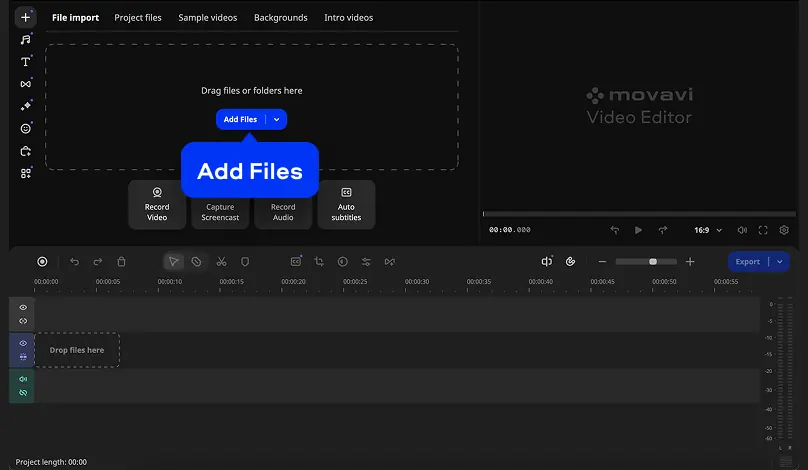
CapCut is great, but what if you want to try something else? For a video editor with powerful AI-assisted tools, look no further than Movavi Video Editor.

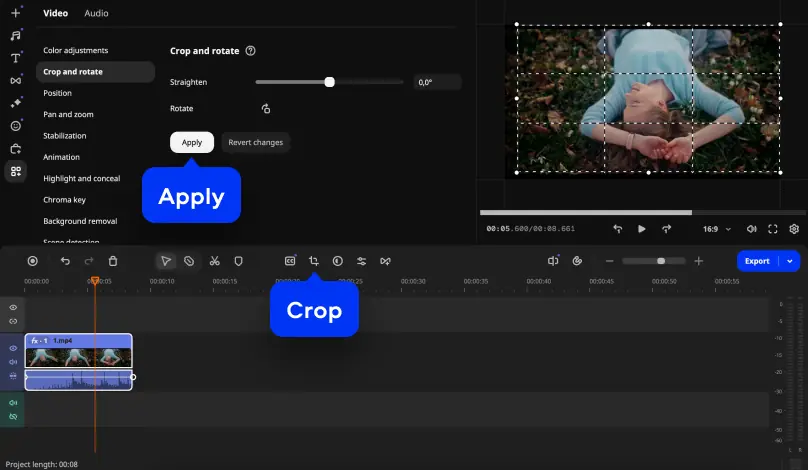
Movavi Video Editor has all the basic editing tools you’d expect from a video editor. That includes cropping, of course. But it’s also an editor with some seriously powerful features. For example, the AI-powered automatic subtitle tool generates subtitles from the speech in your videos. That’s great for anyone making videos for social media.
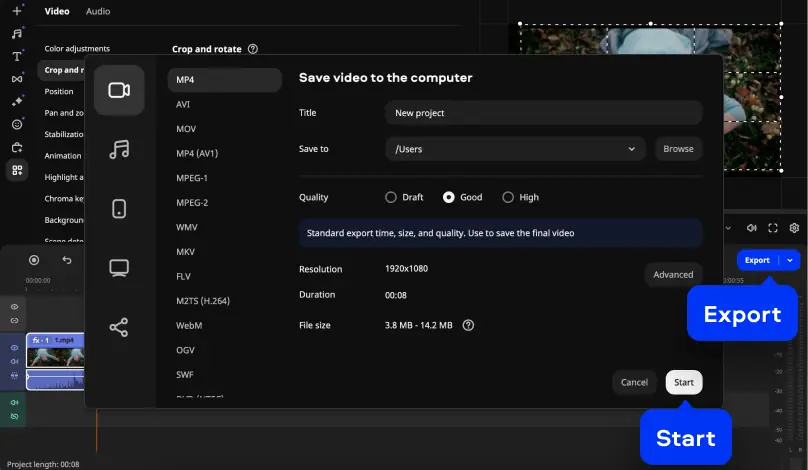
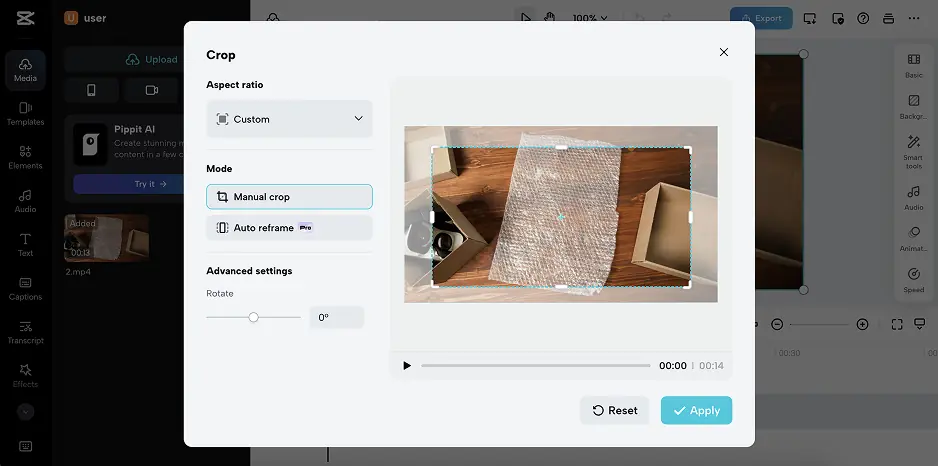
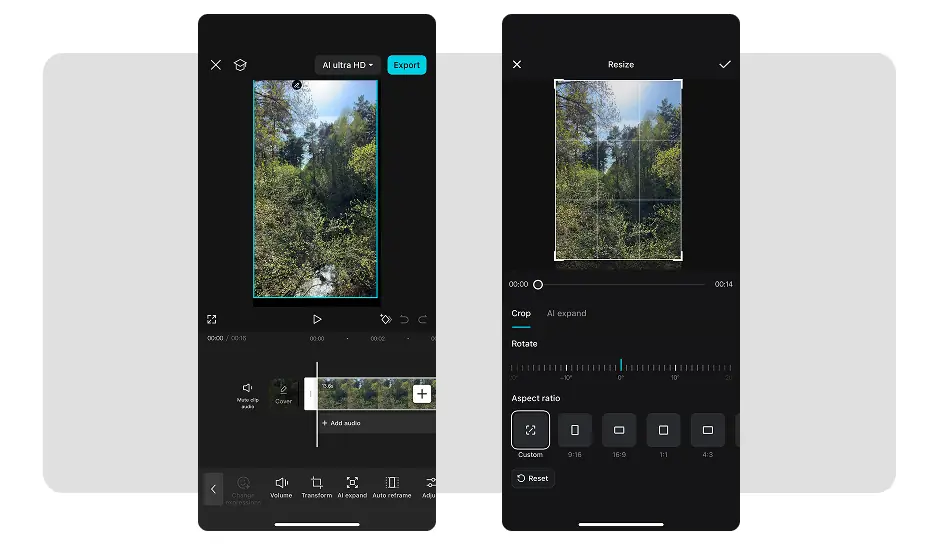
Follow these steps:

Step 1. Download and install Movavi Video Editor

Download Movavi Video Editor first. It’s available on both Windows and Mac computers.

Step 2. Upload your video

Import your video file by dragging and dropping it into the program window or clicking the Add Files button. Drag your video clip onto the timeline.

Step 3. Crop the video

Click the video to select it, then click the Crop tool. Adjust the box frame around your video clip. When you’re happy, click Apply.

Step 4. Save the file

Click the Export button and choose the saving settings. Hit Start to export the video.

Summary

Cropping is one of the fundamental video editing skills that all video editors must master. CapCut allows you to crop with ease on desktop, browser, and mobile. But if you want a powerful alternative, consider Movavi Video Editor.

Movavi Video Editor

Create awesome videos easily

*The free version of Movavi Video Editor may have the following restrictions depending on the build: watermark on exported clips, 60-second video or 1/2 audio length limit, and/or some advanced features unavailable when exporting videos.

Movavi Video Editor
Have questions?

Have questions?

If you can’t find the answer to your question, please feel free to contact our Support Team.

Join us for discounts, editing tips, and content ideas

1.5M+ users already subscribed to our newsletter

By signing up, I agree to receive marketing emails from Movavi and agree to Movavi's Privacy Policy.