
Step 1. Download and install Movavi Photo Editor
Before you can start resizing images, you'll need to download and install Movavi Photo Editor. Choose the version suitable for your operating system.
How to Resize an Image Without Losing Quality
Try Movavi Photo Editor:
Smart AI enlargement
Image quality enhancement
AI-based photo restoration
Often, we find ourselves needing to resize images to fit specific dimensions or reduce their file size for optimal web performance. However, resizing an image can lead to a significant loss in quality. Blurry, pixelated, and distorted images are the last thing we want. In this article, we will show you how to resize images without losing quality.

When selecting products to include in our reviews, we research both demand and popularity.
All the products in this article have been tested by Movavi Content Team.
We compare the key characteristics of every product, including photo scaling and cropping, object and background removal, image restoration, and other significant features.
We study user reviews from popular review platforms and make use of this information when writing our product reviews.
We collect feedback from our users and analyze their opinions of Movavi software as well as products from other companies.
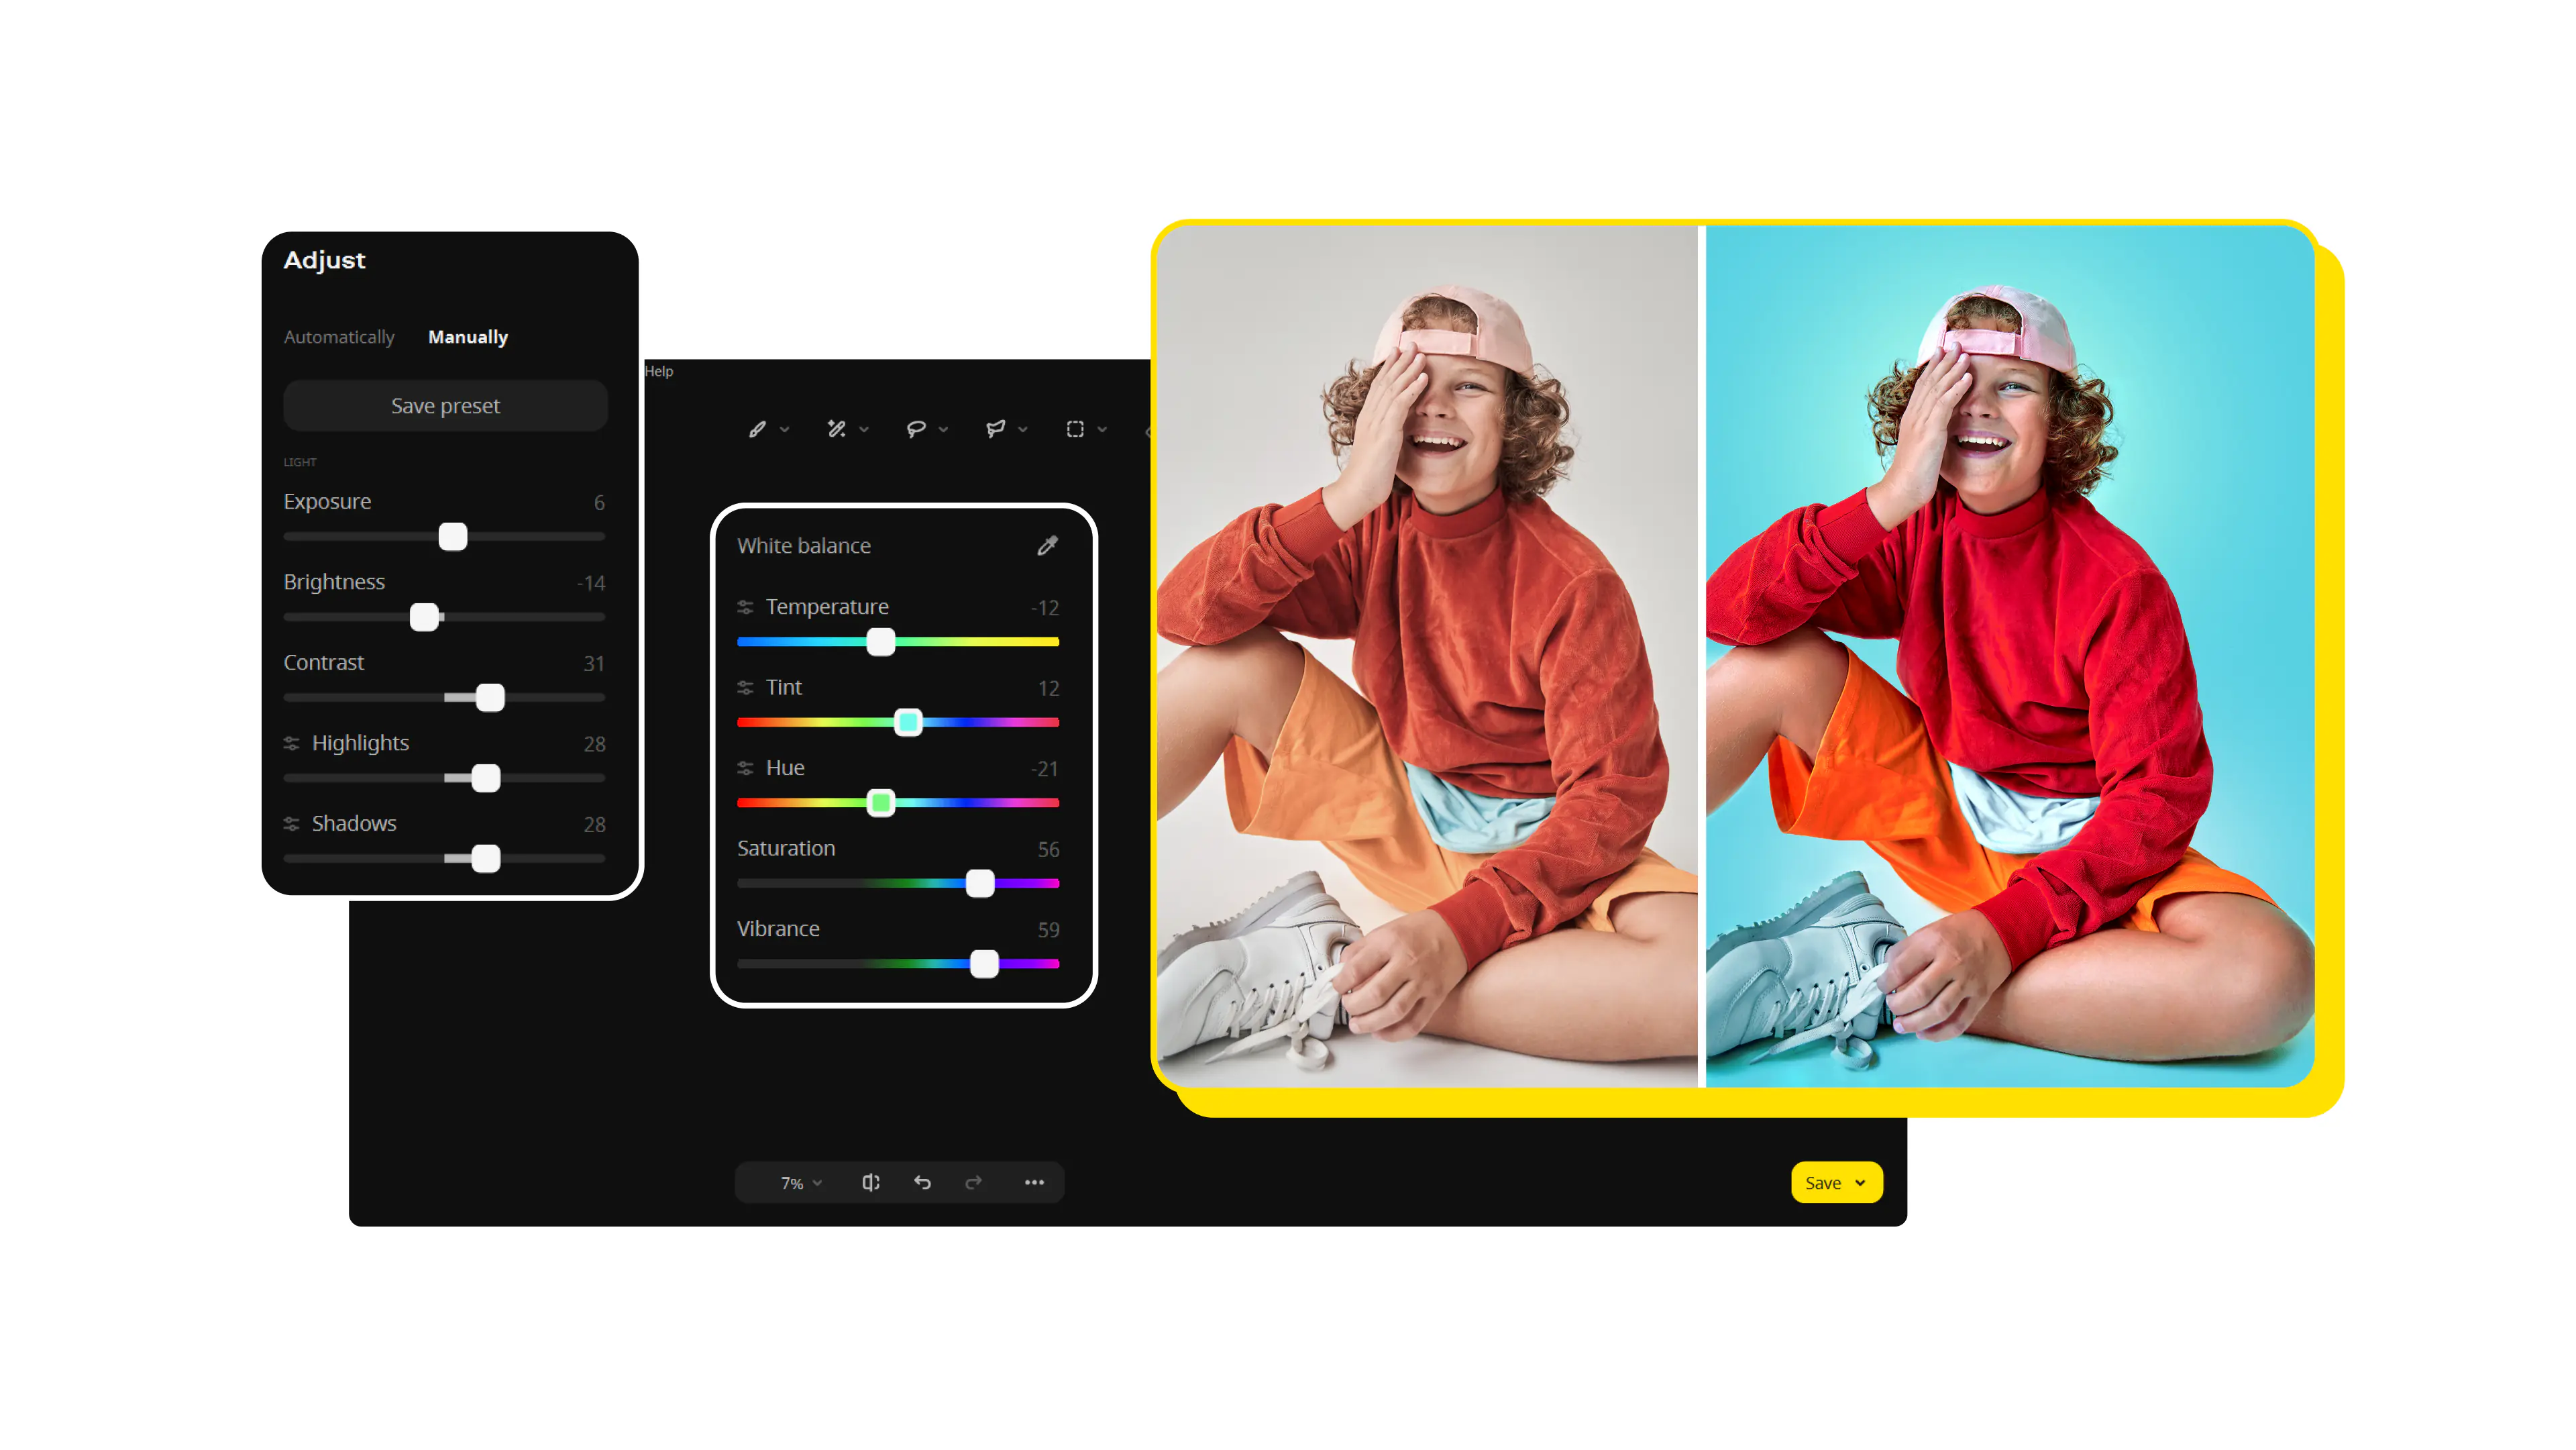
How to reduce or increase image size without losing quality with Movavi Photo Editor
Resizing images is a common task for photographers, designers, and anyone who works with visuals. However, the challenge lies in maintaining image quality while adjusting its dimensions. Movavi Photo Editor is a powerful tool that can help you resize images without losing quality. In this step-by-step guide, we'll walk you through the process.
Step 1. Download and install Movavi Photo Editor
Before you can start resizing images, you'll need to download and install Movavi Photo Editor. Choose the version suitable for your operating system.
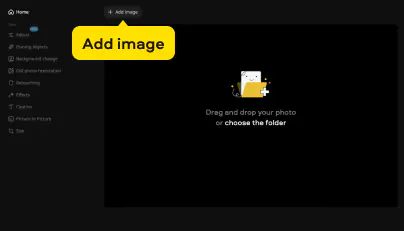
Step 2. Import your image
Click on the Add image button or simply drag and drop the image you want to resize into the program's workspace. Your image will appear in the editing area.
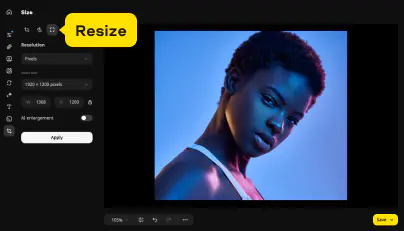
Step 3. Select the resize tool
In the left-hand menu, you'll find various editing tools. Click on the Size option to access the resizing tool.

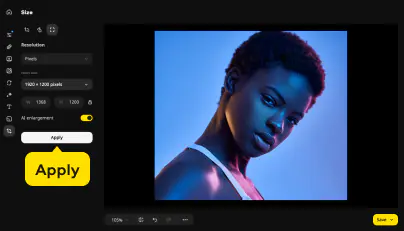
Step 4. Adjust the image size
The tool in the third tab allows you to adjust the photo size. You can choose to resize by percentage or set specific dimensions (width and height) in pixels, inches, or other units. Make sure to enable the Keep proportions option to maintain the image's aspect ratio, preventing distortion.
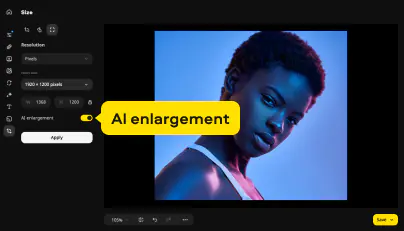
Step 5. Choose the resampling method
Movavi Photo Editor offers its AI enlargement feature to efficiently make images larger. Activate this toggle to increase image size without losing quality.
Step 6. Apply the changes
If you are satisfied with the preview, click the Apply button to resize your image. Movavi Photo Editor will process the image, maintaining its quality while adjusting its size.
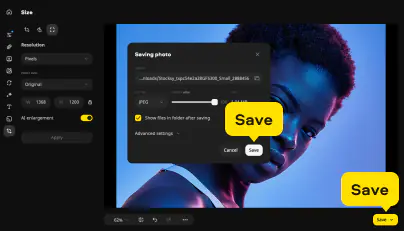
Step 7. Save your resized image
After resizing, don't forget to save your edited image. Click on the Save button, choose the format and quality settings you prefer, and select the destination folder where you want to save the resized image. Click Save again.
Now you know how to reduce image size without losing quality. Movavi Photo Editor provides a user-friendly and effective solution for resizing images without compromising quality. With these simple steps, you can confidently adjust the dimensions of your images while maintaining their sharpness and clarity. Give it a try, and elevate your image resizing game today!
Resizing images: reasons why photos lose quality
It's not uncommon for images to lose quality during various processes. Understanding the reasons behind this degradation can help us prevent it and ensure that our visuals remain sharp and clear. In this article, we'll explore some common reasons why images lose quality.
One of the most prevalent causes of image quality loss is compression. When an image is compressed, data is removed or simplified to reduce file size. While compression is necessary for web optimization and reducing storage space, excessive compression can result in noticeable loss of detail and sharpness. JPEG files, for instance, are prone to compression artifacts when saved with high compression ratios.
Resizing an image without using the right techniques can lead to quality degradation. Enlarging a small image often causes pixelation, making it appear blurry or jagged. When you shrink an image it can also result in loss of detail if not done correctly, as some software may use algorithms that sacrifice quality for speed.
Choosing the wrong file format can impact image quality. For example, using a lossy format like JPEG for images with transparency or sharp edges can lead to artifacts and a decrease in quality. It's crucial to select the appropriate format based on the content and intended use of the image.
Starting with a low-quality source image can limit your ability to maintain image quality. If the original photo or graphic is blurry, noisy, or has a low resolution, attempts to enhance or resize it may exacerbate these issues rather than improving the quality.
Overprocessing an image with excessive filters, adjustments, or edits can result in quality loss. Each edit introduces the potential for artifacts, color shifts, and loss of detail. To preserve quality, it's advisable to make non-destructive edits and use high-resolution source files.
Repeatedly saving an image in a lossy format like JPEG can compound quality loss over time. Each save may introduce additional compression artifacts. To mitigate this, consider working with lossless formats like PNG or TIFF for editing and only save the final version in a lossy format if necessary.
Incorrect color profiles or mismatched color spaces can lead to color shifts and loss of image quality, especially when printing. Ensure that your image editing software is set to the correct color profile and that you are working with consistent color management practices.
Images with a low bit depth may exhibit banding, especially in gradients and subtle color transitions. Increasing the bit depth can help preserve image quality by providing more color information.
Understanding the reasons behind image quality loss is crucial for maintaining the visual integrity of your pictures and graphics. By avoiding excessive compression, using proper resizing techniques, choosing the right file formats, starting with high-quality source material, and practicing careful editing, you can minimize the loss of image quality and ensure that your visuals remain crisp and vibrant.
Why it’s important to keep quality when resizing your images
The importance of maintaining image quality during resizing cannot be overstated. Let's explore why it's crucial to keep the quality intact when resizing your images.
The most apparent reason for preserving image quality is visual appeal. A high-quality image is pleasing to the eye, displaying sharp details, vibrant colors, and smooth transitions. When images lose quality during resizing, they can become blurry, pixelated, or distorted, detracting from their visual impact.
In professional settings, maintaining image quality is essential. Whether you're designing a website, creating marketing materials, or producing content for a client, the quality of your visuals reflects your professionalism. A low-quality, resized logo can convey a lack of attention to detail and expertise.
For businesses and brands, consistency in image quality is crucial for brand identity. Distorted or poor-quality visuals can undermine brand credibility and erode trust. A cohesive and high-quality visual presence helps establish a strong and reputable brand image.
When resizing images for print, maintaining quality is paramount. Low-quality prints can result in images that look grainy or have visible artifacts. For marketing collateral, brochures, posters, and more, high-resolution images are essential to ensure a polished and professional finish.
On websites and apps, image quality significantly impacts user experience. Slow-loading, pixelated images can frustrate users and drive them away. To provide a seamless and engaging online experience, it's crucial to optimize images for the web without sacrificing quality.
Photographers understand the importance of preserving image quality. For them, resizing images while maintaining quality is about preserving the integrity of their work. High-quality photographs capture fleeting moments, emotions, and details, and resizing should not compromise these aspects.
In some cases, resized images are used in educational materials or presentations. Maintaining image quality ensures that important details remain visible, making the content more accessible to the audience. This is particularly relevant in fields like education and research.
As technology advances, larger and higher-resolution displays become more common. Images that are resized with quality preservation in mind are more likely to remain relevant and visually appealing in the future. This future-proofing ensures that your visuals will stand the test of time.
Efficient techniques that help keep quality can save time and resources. Repeatedly editing and replacing low-quality images can be time-consuming and counterproductive. Investing in quality resizing upfront streamlines your workflow and prevents the need for constant adjustments.
Ways to resize photo without losing quality
Here’s how to resize images without losing quality and maintain the sharpness and clarity.
Upsampling vs. downsampling
Upsampling and downsampling are two distinct processes used to adjust the resolution or size of images, audio, or data in various applications. The choice between upsampling and downsampling depends on the specific goals and requirements of a given task. Let's explore both processes and when one might be considered "better" than the other.
Upsampling:
Downsampling:
The key is to implement these processes carefully, using appropriate techniques to minimize the loss of quality or detail, regardless of whether you are expanding or compressing your data or visuals.
Enlarging or making an image smaller without quality loss

Enlarging or reducing the size of an image without sacrificing quality can be a challenging task, as it often involves manipulating the pixel count and dimensions. However, there are some tips and techniques that can help you achieve this goal.
Tips for enlarging images without quality loss:
Tips to reduce image dimensions without quality loss:
In both cases, remember that there may be limits to how much an image can be enlarged or reduced while still maintaining quality, as it depends on the initial resolution and the final dimensions required. It's essential to strike a balance between your desired output and the limitations of the source material. By following these tips and using appropriate software and techniques, you can significantly improve your ability to resize images without quality loss.
Summary
Resizing images without compromising their quality is a crucial skill in the digital era, whether you're a photographer, designer, or content creator. To enlarge images without quality loss, consider using vector graphics or upscaling with advanced interpolation algorithms. Starting with a high-resolution source image and applying noise reduction techniques can also help. When reducing image size, choose lossless formats, maintain the aspect ratio, and use dedicated resampling tools. Always save a copy of the original and preview the results before finalizing the changes. By following these tips and techniques, you can effectively resize images while preserving their quality.
*The trial version of Movavi Photo Editor has the following restrictions: you can save up to 10 images with added watermark, screenshots are disabled.
Use Movavi Photo Editor to resize a photo without losing quality:
You can resize images without losing quality online. To scale an image in JPEG on a desktop, use a photo editing tool like Movavi Photo Editor. Open the image, select the Size option, input the desired dimensions, and ensure the Keep proportions option is enabled. Apply the changes to resize a JPG without losing quality.
Resizing an image can lead to a loss in quality if not done carefully. Enlarging it may result in pixelation, while reducing its size can cause loss of detail. Proper resizing techniques and software can help minimize quality loss.
Image size refers to the physical dimensions of an image, typically measured in pixels, determining its display or print size. Image file size, measured in bytes, kilobytes, etc., represents the amount of digital storage space an image occupies, influenced by resolution, color depth, and compression level.
Downsizing an image can make it blurry because the process involves removing pixels to reduce the size. When pixels are removed, the image loses detail and sharpness, resulting in blurriness. Want to know how to make an image smaller effectively? To scale down an image while minimizing blurriness, consider using Movavi Photo Editor, which offers tools to help maintain quality while you downscale the image.
The best way to c change an image size without stretching it, use a photo resizer like Movavi Photo Editor. Open the image, go to the Size tab, ensure the Keep proportions option is enabled, and then adjust either the width or height. This maintains the original aspect ratio, preventing stretching and preserving image quality.


1.5M+ users already subscribed to our newsletter