How to Reverse a Video on CapCut: Step-by-Step Guide [2025]

Use Movavi Video Editor to easily reverse videos!

  • Trim, cut, crop, and rotate videos
  • Add titles, stickers, and transitions
  • Apply visual effects

By clicking the download button, you're downloading a trial version of the program.*

Edited by Ben Jacklin
17,221

There are a lot of different reasons why people are looking to reverse videos. Sometimes, it can just be a cool look that people may want to use in their compilation or montage. There are also a lot of examples of reversing videos being part of special effects or tricks of the camera. There are lots of ways to reverse videos and different options for different devices.

How to reverse a video on Capcut on a PC

CapCut’s desktop app is perfect for creators who prefer a larger editing workspace and more precise control (such as being able to use a mouse and keyboard). Reversing a video is straightforward using the PC version.

Here’s how to reverse a video on CapCut:

Step 1. Download and install CapCut

Visit the official CapCut website and download the desktop version for Windows or Mac. Install the program and launch it.

Download Capcut

Step 2. Start a new project

Click Create project to begin. This will open the editing timeline and workspace.

Step 3. Import your video

Drag and drop your video into the media bin, then move it to the timeline. Click on the video clip on your timeline to activate editing options.

Step 4. Reverse a clip

In the top toolbar or the right-side panel, click Reverse. CapCut will begin processing the reversal. Depending on your clip’s length, this might take a few seconds or minutes.

Step 5. Preview and export

Once reversed, preview the effect. If you’re satisfied, click Export, choose your preferred settings, and save the file.

How to reverse a video on Capcut online

Can you reverse a video without installing an app? Sure! CapCut also offers an online version that lets you reverse videos right in your browser. A lot of providers now give options to perform some basic editing online and using a browser like Chrome.

Here’s how to reverse a video in CapCut online:

Step 1. Open the CapCut online editor

Go to CapCut’s official online editor.

Go to CapCut

Step 2. Log in or sign up

You’ll need a free CapCut account to access the online editor, log in or sign up for an account.

Step 3. Upload your video

Drag your video file into the editor or click Upload to browse files on your computer. Once uploaded, drag the clip to the timeline at the bottom of the editor.

Step 4. Reverse the video

Select the clip on the timeline, then click Reverse from the editing toolbar. The tool will process the reversal automatically.

Step 5. Export your reversed video

Click Export in the upper-right corner, select your resolution and format, then download your video. It will be found in the downloads folder that you have specified.

How to reverse a video on Capcut on a phone

CapCut’s mobile app is ideal for on-the-go editing. Whether you’re using an iPhone or Android device, the app’s reverse function is easy to access (along with a lot of other editing features). iPads and tablets also follow similar steps for editing and reversing your videos.

Follow these steps to reverse a video on your phone using CapCut:

Step 1. Install and open CapCut

Download CapCut and open it.

Get CapCut for iOS

Get CapCut for Android

Step 2. Create a new project

Tap New Project and select the video you want to reverse from your gallery. Tap Add to place the clip into the timeline and start video editing.

Step 3. Access the reverse tool

Tap the video on the timeline to open the editing menu. Scroll through the toolbar and select Reverse.

Step 4. Preview and save

Tap the Play button to preview the result. If you’re happy with how it has panned out, tap the Export icon in the top-right corner to save the reversed video.

How to reverse a video with Movavi Video Editor – a Capcut alternative

While CapCut is a good tool, some users may want a more powerful editor. Movavi Video Editor is a great alternative that offers advanced features in a user-friendly interface. It’s compatible with both Windows and Mac, supports faster processing, and gives you more control over things like effects as well as audio and transitions. It also makes it super simple to reverse videos.

Movavi Video Editor offers a powerful yet beginner-friendly editing experience packed with advanced AI features. With one-click tools like automatic subtitles as well as background and noise removal, and motion tracking, it makes professional-looking videos effortless.

Creative tools like blending modes and precise cutting ensure your content stands out. Its revamped timeline and hover-to-preview effects speed up editing while enhancing usability. Whether you’re making social media clips or full-length features, Movavi Video Editor gives you all the tools to craft polished content with ease. Perfect for creators who want fast but impressive results.

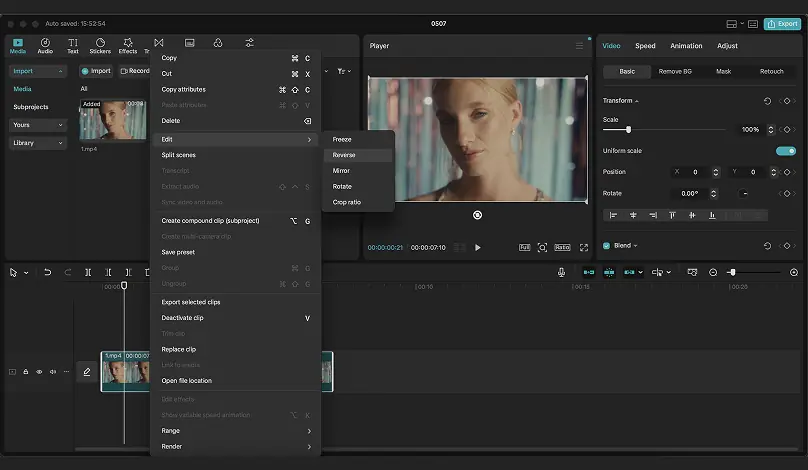
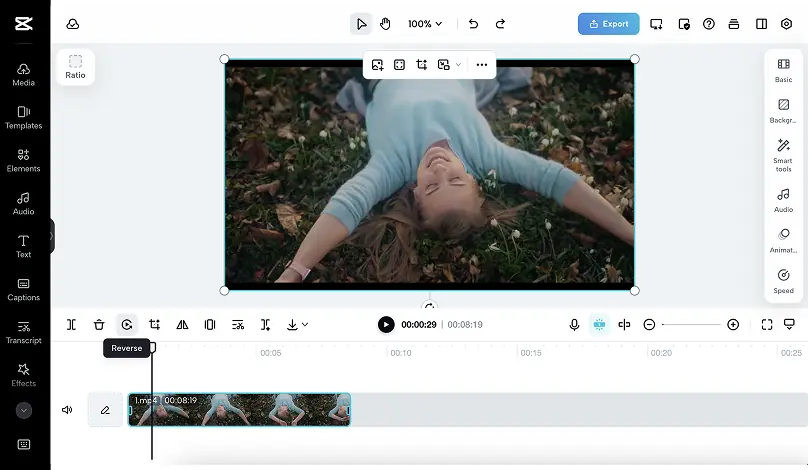
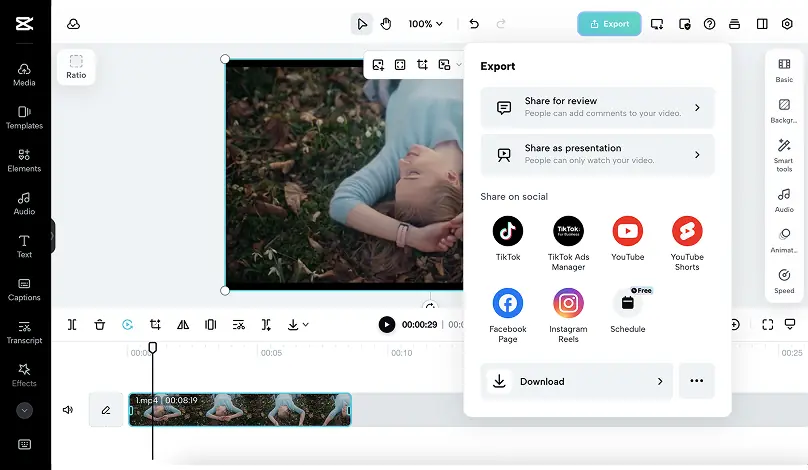
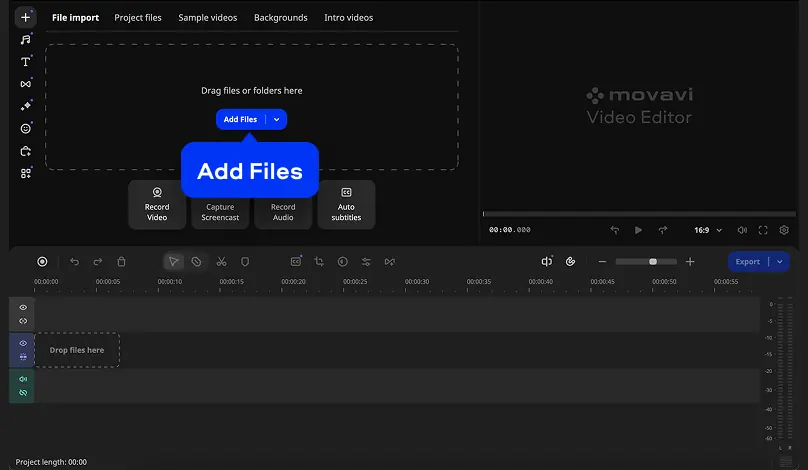
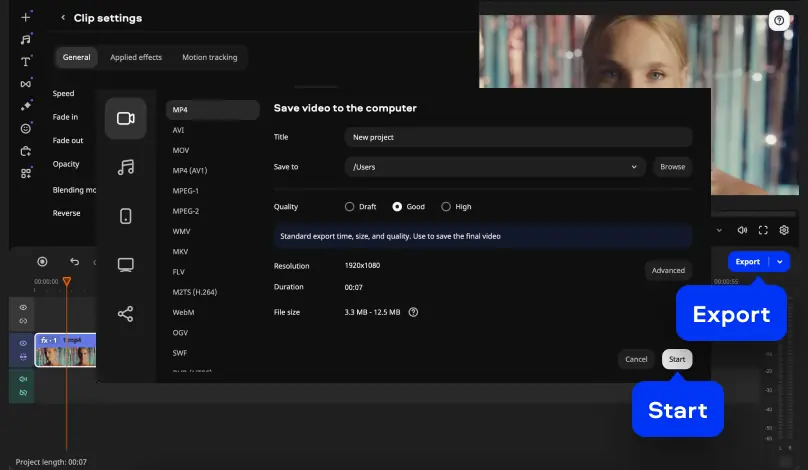
Here’s how to reverse a video with Movavi Video Editor:

Step 1. Download and install Movavi Video Editor

Download the appropriate version for your system based on whether you are on Mac or Windows.

Step 2. Add your video

Click Add Files to import your video, then drag it from the Project Files to the timeline.

Step 3. Reverse the video

Click the video clip on the timeline and then the Clip settings icon. In the tab that opens, select the Reverse check button.

Step 4. Adjust other settings

Optionally, mute the reversed audio (reversed audio often sounds odd) or replace it with a new track.

Step 5. Export the video

Click Export, choose your video resolution and format, then save the reversed file to your device.

Summary

Reversing a video is a creative way to enhance your content and opens doors for certain video effects. CapCut offers multiple ways to do it depending on your device, and the reverse tool is easy to use and can provide a visual impact. If you’re looking for more advanced tools, Movavi Video Editor is a strong CapCut alternative worth considering and provides a lot of other pro effects and simple usability.

Movavi Video Editor

Create awesome videos easily

*The free version of Movavi Video Editor may have the following restrictions depending on the build: watermark on exported clips, 60-second video or 1/2 audio length limit, and/or some advanced features unavailable when exporting videos.

Movavi Video Editor
Have questions?

Have questions?

If you can’t find the answer to your question, please feel free to contact our Support Team.

Join us for discounts, editing tips, and content ideas

1.5M+ users already subscribed to our newsletter

By signing up, I agree to receive marketing emails from Movavi and agree to Movavi's Privacy Policy.