How to Use Zoom Filters and Set a Virtual Background [Quick Guide]

Try Movavi Screen Recorder to capture video calls!

  • Full-screen or custom area recording
  • Webcam capture and drawing on recordings in real time
  • Highlighting mouse cursor and keystrokes

By clicking the download button, you're downloading a trial version of the program.*

11,457

Adding filters to your Zoom video calls can make your meetings more engaging and enjoyable. Whether you're looking to add a professional touch with a subtle filter or want to lighten the mood with a fun effect, there are options for every situation. Follow these detailed steps to learn how to use Zoom video filters.

Using Zoom filters

Checking your Zoom version

Ensure you updated your Zoom software or application – desktop or mobile – to the latest version, as Zoom is always adding new filters, backgrounds, and avatars. You can check your version and update if necessary by visiting the Zoom download page.

Setting up a custom virtual background on the desktop in Zoom

Step 1. Open the settings

Before you can apply any filters, you must access your settings in Zoom. Follow these steps to make it happen:

  1. Open your Zoom client.
  2. Click on your profile picture in the top right corner.
  3. Select Settings from the dropdown menu.
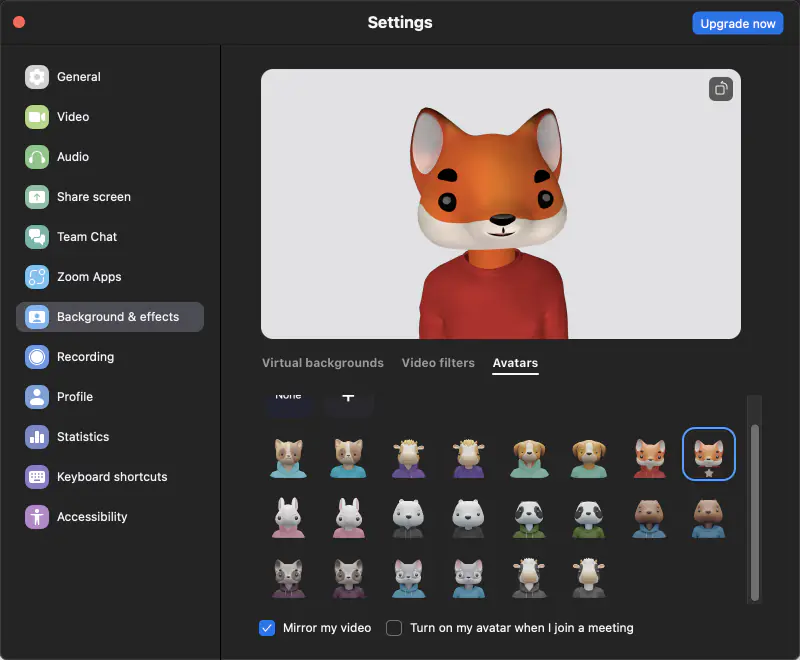
  4. Click the Background & effects tab, where you can preview your webcam and adjust various video settings.

Step 2. Access backgrounds and filters

Within the Background & effects you can choose from three tabs and one link at the bottom right of the menu.

  • Virtual backgrounds
  • Video filters
  • Avatars
  • Studio effects (link in blue at the bottom of the Virtual backgrounds tab)

Step 3. Choose your background, filter, avatar, or effect

Under each tab, you will see a collection of video filters ranging from color effects to whimsical frames and facial features. Browse through the options and click on any filter or effect to preview how it looks with your camera feed.

Virtual backgrounds

  1. Click on any background to activate.
  2. Click None to deactivate.

Custom backgrounds

  1. To add your own image or video, click the + sign next to Virtual Backgrounds. Select Add Image or Add Video.
  2. Locate and select your desired image file, then click Open to set it as your background. This background will now appear during your Zoom sessions and be available in your virtual background options.
  3. If you wish to remove a previously uploaded image, click the X on its thumbnail in the background selection area.

Blurred background

Zoom makes it easy to blur your background quickly during a meeting if needed.

  1. Enter the meeting or webinar.
  2. Click the Up arrow icon next to the Start/Stop Video icon.
  3. Select Blur My Background.
  4. If the option isn’t available, you may need to update your Zoom client.

Video filters

Zoom provides subtle filters that enhance your appearance, and fun filters that add visual elements like masks, hats, glasses, makeup, or jewelry.

  1. Like the backgrounds, you can simply click on any filter to activate.
  2. Click the None icon to deactivate.

Avatars

If you’d like to change your look for a meeting completely, you can choose from Zoom’s selection of animal avatars.

  1. Click any of the icons to enable.
  2. Click the None icon to disable.

Custom avatars

  1. Zoom also has a feature to create your own avatar as well. Click the + icon at the top of the menu next to the None icon, and a menu will appear.
  2. It’s possible to customize your avatar with tons of options like skin tone, hair color and style, eyes, eye color, eyelashes, nose, lips, mouth, and so much more. You can even adjust the age and clothing of your avatar and add a hat or glasses.

Effects

  1. To access effects, click the Virtual background tab first, and then click the blue Studio effects link at the bottom of the window.
  2. From there, a menu will appear to the right, allowing you to alter the look of your eyebrows, lip color, or mustache and beard.
  3. Like the other menus, click on any icon to activate and click the None icon to deactivate.

Enhancing virtual backgrounds with a green screen

  1. Position your green screen directly behind your seating area.
  2. Open Zoom and access your profile settings via your name at the top right.
  3. Go to Settings, then select Background & Effects from the sidebar.
  4. Check the option I have a green screen and select your preferred virtual background to enhance its appearance.

Note: if you’re using a green screen, be sure that green screen color differs from your shirt, eyes, and/or hair. Otherwise, the system may display the background over the color.

Using the beauty filter on Zoom

  1. Before entering a meeting on your desktop, open Settings from your profile menu.
  2. Click on Video from the sidebar.
  3. Enable Touch up my appearance using the checkbox and adjust the slider to set the effect's strength.

Changing your Zoom background on mobile (Android and iOS)

  1. During a meeting, tap More in the lower-right corner (you may need to swipe to see this option).
  2. Choose Backgrounds & Effects.
  3. Pick a pre-existing background or upload a new one by tapping the + sign and selecting an image or video from your device.

Additional tips

  • For professional settings, consider using milder filters that enhance but do not distract.
  • To get Zoom filters to really work for you, test your filter before a meeting to ensure it appears as intended during the call.
  • Remember, filters add a bit of fun or polish to your calls, but use them appropriately based on the context of your meetings.
  • Once you’ve selected and customized your filter, it will automatically apply to your next Zoom call. However, you can also check the box for Apply to all future meetings if you really like what you see.

Capture your video calls with Movavi Screen Recorder

Movavi Screen Recorder is a comprehensive screen-recording tool designed for high-quality screen capture. The program is ideal for a broad range of users – from professionals conducting webinars to casual users wishing to save memorable video calls. It’s intuitive, versatile, and packed with powerful features.

Compre­hensive video call recording

With Movavi Screen Recorder, you can record both internal and external audio to capture every participant's voice with clarity. This is invaluable in professional settings where recording meetings, interviews, and group discussions is necessary for record-keeping and compliance.

Movavi Screen Recorder also supports simultaneous screen and webcam recording, allowing for Picture-in-Picture (PiP) videos that are especially useful for creating tutorials or engaging presentations.

Drawing tool and mouse effects

A standout feature of Movavi Screen Recorder is its drawing tool, which allows users to draw on the video during the recording. This is useful in educational and professional contexts where highlighting information, creating on-screen annotations, or drawing attention to specific details enhances the communication. Users can also put on mouse effects to visualize clicks – an essential feature for tutorials and instructional videos – making it easier for viewers to follow the action.

Taking screen­shots

The ability to take screenshots during a recording session adds to the versatility of Movavi Screen Recorder. Users can capture still images from their video at any moment, which is perfect for creating thumbnails, instructional content, or saving specific information from videos.

Summary

Using Zoom filters can transform your video calls from mundane to memorable. By following the simple steps above, you now know how to add filters to Zoom to bring a creative touch to your interactions. Combine this with Movavi Screen Recorder to capture these moments and ensure you never miss a detail from your meetings – both fun or important.

Movavi Screen Recorder

The perfect way to record anything from your screen

* The trial version of Movavi Screen Recorder has the following restrictions: a 7-day trial period, a watermark on output videos, and an inability to add a description or tags to a video before sharing it on YouTube.

Movavi Screen Recorder
Have questions?

Have questions?

If you can’t find the answer to your question, please feel free to contact our Support Team.

Join for how-to guides, speсial offers, and app tips!