Step 1. Install Movavi Photo Editor
Download the installation file for your OS and install the program following the on-screen instructions. Launch Movavi Photo Editor after the installation is complete.

How to Watermark Photos [4 Easy Ways]
Try Movavi Photo Editor!Easily add your own watermark to photos
Edit and tweak your watermark as needed
Enhance pictures with AI-powered tools
By clicking the download button, you're downloading a trial version of the program.*

Adding watermarks to photos is essential to protect your content from plagiarism or theft. In this guide, we cover how to watermark photos in 4 best ways on your desktop or mobile device.
Quick summary
Inserting watermarks and enhancing photos on a PC or Mac: Movavi Photo Editor
Putting watermarks on photos online: Fotor
Watermarking and sharing pictures with an iPhone: eZy Watermark Photos Lite

At Movavi, our primary goal is to provide you with only verified information. Here’s what we do to ensure this:
When selecting products to include in our reviews, we research both demand and popularity.
All the products in this article have been tested by Movavi Content Team.
We compare the key characteristics of every product, including photo scaling and cropping, object and background removal, image restoration, and other significant features.
We study user reviews from popular review platforms and make use of this information when writing our product reviews.
We collect feedback from our users and analyze their opinions of Movavi software as well as products from other companies.
How to add a watermark to photos (Win & Mac)
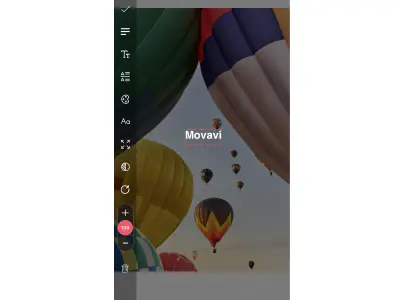
If you want to not only put a watermark on pictures but edit your photos as well, then your best option is to use a desktop software, such as Movavi Photo Editor. It’s a feature-rich photo-editing program available for both Windows and macOS computers. With this software, you can easily watermark pictures as well as edit your watermarks – change its position and size, adjust the transparency settings, and more. Additionally, you can use AI-powered features to further enhance your photos. To learn one of the easiest ways on how to add a watermark to photos, follow the steps below.
Step 1. Install Movavi Photo Editor
Download the installation file for your OS and install the program following the on-screen instructions. Launch Movavi Photo Editor after the installation is complete.
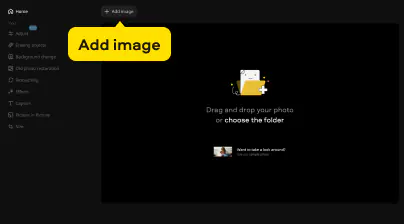
Step 2. Upload your picture
To add your picture to the program, click the Add image button. Alternatively, you can drag and drop your file into the program interface.
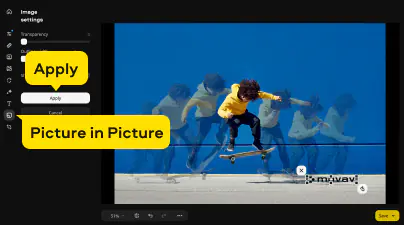
Step 3. Add a watermark to your picture
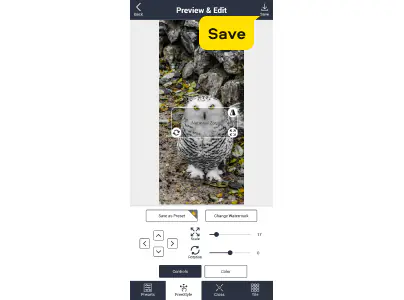
Open the Picture in Picture tab to add your water stamp. Click the Paste an Image button and select your watermark. Place your watermark on the picture where needed. You can also change the watermark’s transparency, make round corners, and change outline width – just use the corresponding sliders to make edits. When you’re finished, click the Apply button.
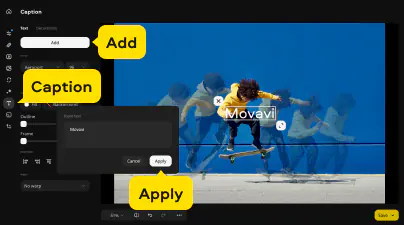
If you want to make your watermark, open the Caption tab. Click the Add button, input text you want to use as a watermark, and hit Apply. Next, you can adjust the text: change the font and size, and its position on your image.
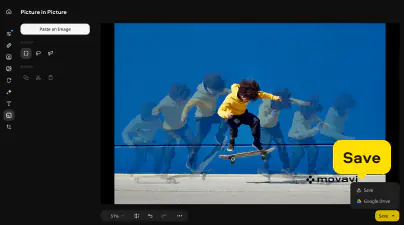
Step 4. Save the edited picture
When you’re happy with your edits, click the Save button in the lower-right corner of the program interface. Hit Save and select the saving settings: an output folder, file type, and the quality. Finally, click the Save button. That’s it! Now you know how to put a watermark on a photo on your desktop.
Movavi Photo Editor
*The trial version of Movavi Photo Editor has the following restrictions: you can save up to 10 images with added watermark, screenshots are disabled.

How to put a watermark on a photo online
How do you watermark a photo online? Fotor’s watermarking tool is a user-friendly and feature-rich application designed to add watermarks to images effortlessly online. Whether you're a professional photographer looking to protect your work or an individual who wants to add a personal touch to your photos, Fotor provides a simple and effective solution. Users can choose from various watermark types, including text, image, and a combination of both. This flexibility allows for customization to suit your specific branding or personalization needs. Before finalizing the watermarking process, users can preview the watermarked images to ensure they meet their expectations. This helps in making adjustments as needed.
Follow the instructions below to learn how to watermark an image online.
Step 1. Go to Fotor
Open the Fotor website by following the link below.
Step 2. Import images
Click the Add Watermark Now button. Select the images you want to watermark and import them into the program.

Step 3. Select a watermark
Select a caption template to use as a watermark. Adjust the watermark's appearance, position, size, and opacity to your liking. Apply the watermark to your images, either individually or in batches.

Step 4. Preview and export your picture
Review the watermarked images to ensure they meet your expectations. Choose the output format, quality, and other settings, then export the watermarked images to your desired location.

How to watermark an image on iOS
eZy Watermark Photos Lite is a user-friendly mobile application designed for iOS devices that offers a quick and convenient way to add watermarks to your photos. Whether you're a photographer looking to protect your work or simply want to personalize your images, eZy Watermark Photos Lite provides a straightforward and efficient solution. The app supports batch processing, allowing you to watermark multiple photos simultaneously. This feature saves time when applying watermarks to a collection of images.
If you’re wondering, “How do I watermark my photos on my iPhone?” then follow the instructions below.
Step 1. Install eZy Watermark Photos Lite
Follow the link below to download the app on your device. This app is free to download, with in-app purchases available for additional features.
Step 2. Upload your picture
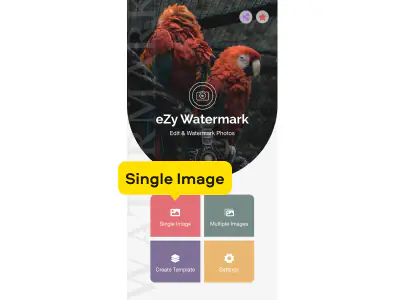
Once the installation is complete, locate the eZy Watermark Photos Lite app icon on your device's home screen and tap to open it. You'll be greeted with the app's main screen. To add a watermark to a single image, tap on the Single Image option.
The app will prompt you to select the source of your photo. Navigate to the specific photo you wish to watermark within your selected source.
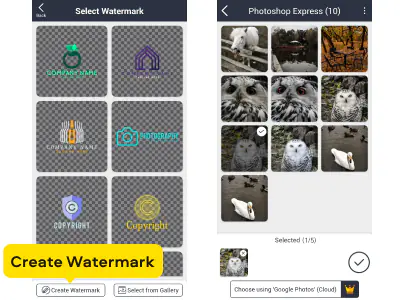
Step 3. Choose a watermark
Next, you'll need to tap on the option where you want your watermark to be sourced from. eZy Watermark Photos Lite offers multiple watermark sources, including Text and Gallery. Choose the source that fits your needs.

Step 4. Adjust the watermark
Depending on your selected watermark source, you'll now be prompted to customize and adjust the watermark. For text watermarks, you can define the text content, font, size, color, opacity, and position. For image watermarks, you can adjust its size and placement.
Once you've customized the watermark, look for a checkmark icon. Tap this icon to apply the watermark to your selected photo.
Step 5. Save the watermarked photo
After applying the watermark, tap Export. Your watermarked photo is now saved to your device's gallery. You can access it later for sharing or further editing.

How to watermark pictures on Android
This watermarking app developed by Simply Entertaining Apps is your go-to Android app for effortlessly adding watermarks to pictures. Whether you want to protect your work or simply personalize your images, it provides a simple and intuitive solution right on your Android device. It offers an intuitive and user-friendly interface that makes watermarking photos a breeze. The app is designed to be accessible for all users, from beginners to experts.
Here’s how to watermark photos on your Android device:
Step 1. Install the app
Follow the link below to download the app on your device. Please note that the app is free to download, with in-app purchases available for additional features.
Step 2. Upload your picture
On the app's main screen, you will see various options. Tap on Apply on Images to start the watermarking process. Browse through your device's gallery to locate the specific photo. Once you've found it, tap Done.

Step 3. Add a watermark
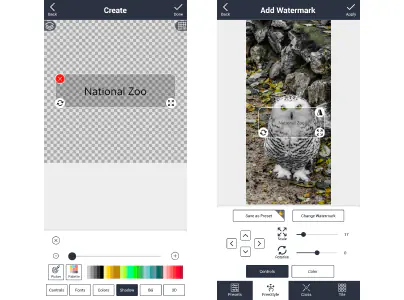
To add a text watermark, tap Create Watermark. Type the text you want to use as a watermark in the provided text field. You can customize the text's content, font, size, color, and opacity.
To add a picture as a watermark, tap the Select from Gallery button.
Drag the watermark to the desired location on the photo. You can also pinch or expand with two fingers to adjust the size of the watermark.
Step 4. Save the result
When you're satisfied with the watermark placement and appearance, look for a checkmark icon on the screen. Tap this icon to confirm your changes. Then, tap the Save icon to save the watermarked image to your device.
Pros and cons of watermarking images
Pros:
Cons:
Where to place a watermark
The placement of a watermark on a picture can vary depending on your specific goals and the nature of the image. Here are some commonly recommended positions for placing watermarks:
How to choose the best method for watermarking
Here are some tips to help you choose the best method for watermarking your pictures:
Summary
Hopefully, this article helped you learn how to watermark photos in the best way. Choosing watermarking software is a pivotal decision for content creators seeking to protect their work and enhance their online presence. By carefully considering factors like compatibility, customization options, batch processing, and user reviews, you can make an informed choice that aligns with your specific needs and preferences. With the right watermarking software in your toolkit, you can safeguard your intellectual property, build brand recognition, and navigate the digital landscape with confidence. Remember that the right choice today can have a lasting impact on the security and visibility of your visual content.
Movavi Photo Editor
*The trial version of Movavi Photo Editor has the following restrictions: you can save up to 10 images with added watermark, screenshots are disabled.
Here’s how to watermark photos using Movavi Photo Editor:
Download Movavi Photo Editor for Windows
Download Movavi Photo Editor for macOS
Photographers watermark their photos by using specialized software or apps. They typically create a watermark, which can be text or an image, and then apply it to their photos. The watermark is strategically placed to protect their work, enhance branding, and deter unauthorized use.
Follow the instructions below to learn how to watermark photos with Movavi Photo Editor:
To put a logo on your iPhone pictures, follow these steps:
Yes, you can watermark a JPG. Watermarking involves overlaying a text or image on a JPG image to protect it, enhance branding, or add a personal touch. Various software and apps facilitate this process.
Yes, you can use a PNG image as a watermark. PNGs are a common choice for watermarks because they support transparency, allowing the underlying image to show through while the watermark remains visible.
To turn your logo into a watermark, you'll need image-editing software like Adobe® Photoshop® or online tools. Open your logo in the software, adjust its size and opacity, and position it where you want the watermark. Save it as a PNG with a transparent background. This PNG can then be placed over your photos or documents as a watermark.

Have questions?
Join us for discounts, editing tips, and content ideas


1.5M+ users already subscribed to our newsletter