
If you need more control, then you can add a custom video to a Facebook story. You can create a video using Movavi Video Editor and add a variety of different audio tracks and effects and blend the original audio and the music you want to add. It’s also a great option to edit the video.

How to Add Music to a Facebook Story
Try Movavi Video Editor!
Export in a 9:16 dimension, perfect for Facebook
Add custom music, even if it isn’t in the Facebook library
Easily make edits and add effects
There are a few options to add music to an FB story, and if you want to make the most impact with your video, it doesn’t hurt to add a bit more interest via an audio track. There are only certain ways that you can share music on stories, so it is important to know the options you have.
How to add music to a Facebook story from an audio library
When you log into your Facebook account on your desktop and try to create a post, you will notice that you have only two options. You can add a text post or an image post. No video files or audio files are supported, so you can only write a simple message or share a photo from your desktop. So you will need to use the Facebook app on your mobile device.
Here’s how to add music to a Facebook story from an audio library using your mobile device:
Log into your Facebook app on a mobile device, such as Android or iPhone devices.
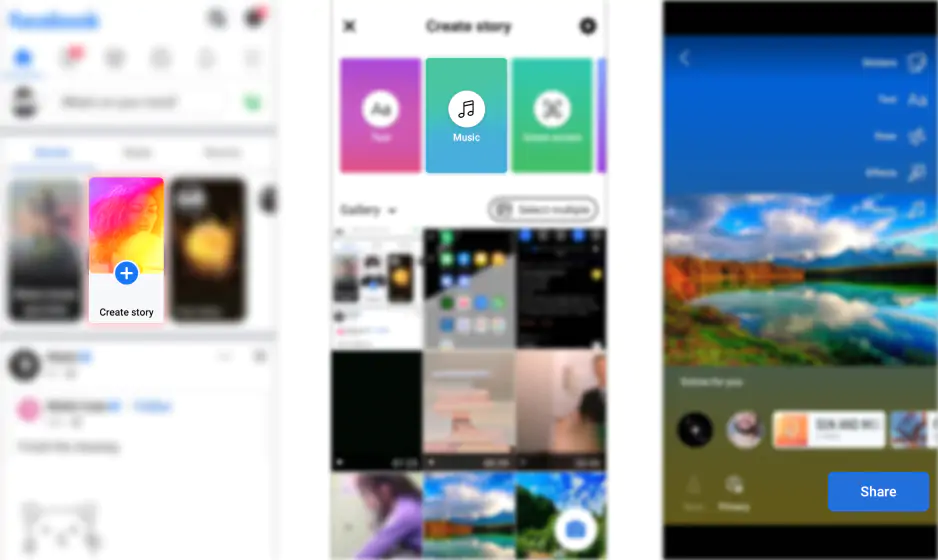
Tap the Create Story button on your Facebook home page.
Tap the Music icon that allows you to scroll through the huge list of songs in the inbuilt library.
Search for the song you want and then tap the song you’re looking to share.
Use the slider to choose which 20 second section of the song you want to share as your story.
Select Share, and your story will appear, along with the album artwork of the artist.
Another option is to use the stickers section, which allows you to add music over the image. Select the Stickers icon, which is a smiling face, and then choose the Music sticker. This will bring up the same list of songs from the Facebook library, allowing you to add the song as a sticker, with your own image in the background.
How to add music to a Facebook story with a video
If you want to add music to your Facebook story with video content, then the steps are similar to the above, with some slight differences. Once again, this is not a function that is included on the desktop version, so you will need to use the app version. Your choices are then either to create a video with audio embedded or to add it as an overlay when you are uploading to Facebook. The steps for this are as follows:
Log into your Facebook account using an app on your mobile device.
Tap the Create Story button on your Facebook home page.
Your camera roll will appear. Choose a video, photo, or even experiment with multiple photos.
Tap the Stickers icon and then select Music.
Search for the song you want and then select your song to share it to an FB story.
Tap the song and use the slider to choose a 20-second clip of the song you chose.
Select Share to Story and your story will appear, along with a sticker depicting the artwork of the artist.
With this method, the original audio in your video will be replaced with the music you have chosen. So, if you want more advanced editing options and to blend the music with your existing audio, then you might have to take a more detailed approach using software, such as Movavi Video Editor.
How to add a custom video to a Facebook story
Step 1. Install the video editing program
Launch the installation file for either macOS or Windows, depending on your operating system. Follow the on-screen instructions. After the program is successfully installed, it will open automatically.
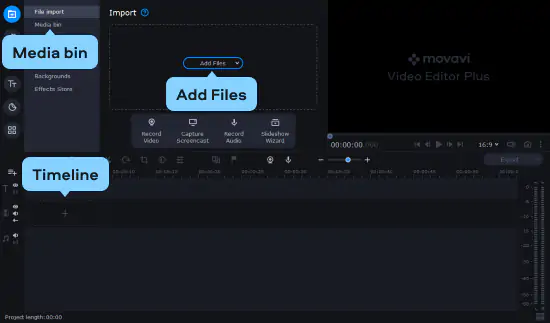
Step 2. Add your video or selection of photos
Click the Add Files button. You can then navigate to the video file you want to use and add audio to. You can then drag the video or image from the Media Bin to the Timeline.
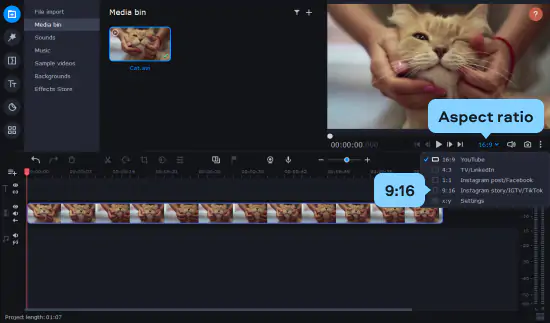
Step 3. Change the aspect ratio (optional)
The ideal aspect ratio for a Facebook story is usually 9:16. If your video has a different aspect ratio, you can easily change it. Under the preview window, find the list with the available aspect ratios and choose 9:16.
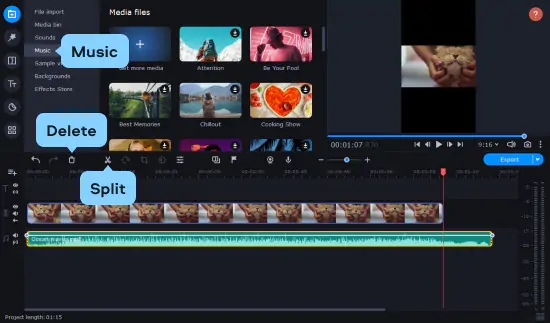
Step 4. Add music
First, make sure your audio track is saved on your computer as a standard audio file, such as an MP3. You won’t be able to add music directly from streaming platforms, so you will need to own the files specifically. Select Add Files and add the audio file in the same way that you added the video file.
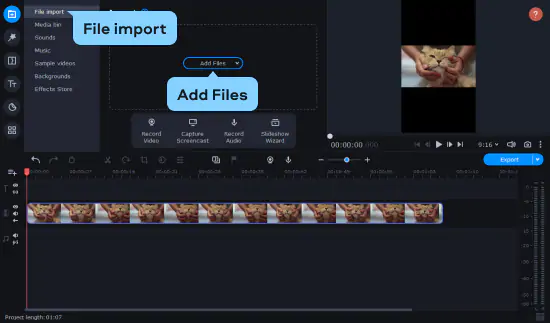
Movavi also provides you with a choice of inbuilt audio options from the library. Open the Import tab and click Music to choose one of these audio files. Drag and drop either your own song from the Media Bin or an audio file from the Music menu.
If the audio track is not the right length, and you just want to use a smaller section of the song, you can cut it. Select the audio on the timeline, choose the sections you want and make a cut by clicking the Split button. You can then hit Delete on the parts that you don’t need.
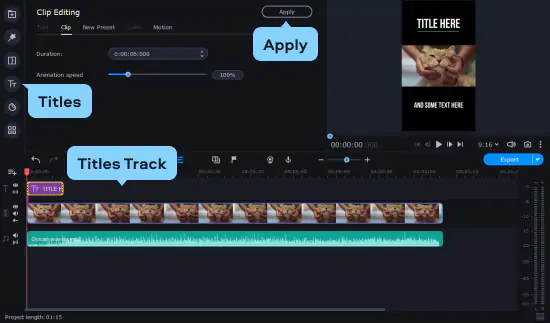
Step 5. Add captions to your video (optional)
If you want to add titles or captions, simply click the Titles tab and select one of the many presets included. Next, drag and drop the preset onto the Titles Track.
Double-click the title on the timeline and change the text, alter the color, font, and size. Click Apply when you are ready, and this will set the titles.
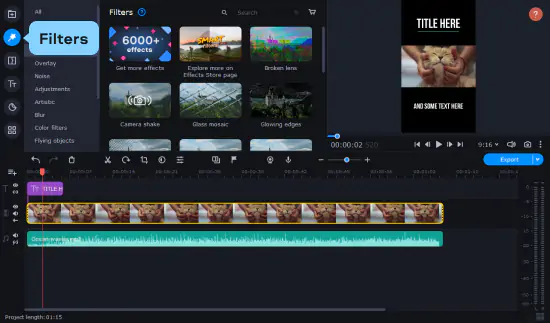
Step 6. Add effects and filters (optional)
If you want to add filters, click the Filters menu and select from the list of options. To apply the filter to your video, drag it onto the video that is within the track.
There are also a bunch of effects available in the program, such as transitions, animation, slow motion, and much more. Check the tabs to find all the available tools and effects.
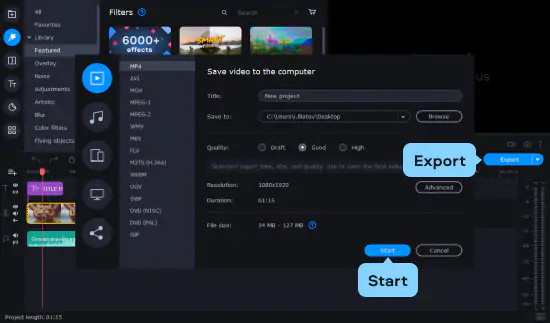
Step 7. Save the video
When the video is complete, click the Export button, and you will see the saving options. The best option is usually to save in an MP4 format, which makes it easy to transfer to a mobile device and then upload to your Facebook story. Keep in mind that the higher quality means larger file sizes.
Step 8. Add your video to a Facebook story
As we’ve already explained in this article, you won’t be able to do this directly on your computer, as the desktop version of Facebook only allows text and photo stories. You will need to transfer your MP4 to your mobile device. You can email it to yourself, airdrop the file, or use cloud storage to transfer the file.
Then, go to Facebook on your mobile app and click Create Story. You will have the option to upload the video directly from your camera roll or the Photos app. Remember that Facebook Story videos can only be up to 20 seconds long.
Summary
Hopefully, this guide has helped you add music to your stories. Keep in mind that there’s no option to upload a video, except for on a mobile app, at this moment in time. Within the Facebook app, it is possible to add audio from a huge library of music, including artists in a variety of genres, but it will replace the audio already presented in a video. If you want a bit more control, you can use a desktop video editing program, such as Movavi Video Editor. It will help you add video effects, music, and even filters to your video before uploading to Facebook stories from your mobile device.
Movavi Video Editor
Create awesome videos easily
*The free version of Movavi Video Editor may have the following restrictions depending on the build: watermark on exported clips, 60-second video or 1/2 audio length limit, and/or some advanced features unavailable when exporting videos.

Frequently asked questions
How do I add music to my Facebook posts and stories?
How do I add music to my Facebook posts and stories?
You can easily add music to your Facebook posts and stories with Movavi Video Editor. Movavi Video Editor is a user-friendly tool with a vast library of royalty-free music that you can use to enhance your videos, making them more engaging and enjoyable. This is especially beneficial for social media marketers, content creators and anyone who wants to add a personal touch to their Facebook posts.
Can I share audio or video with music on Facebook?
Can I share audio or video with music on Facebook?
Yes, you can share audio or video with music on Facebook. You can easily add music to your videos with Movavi Video Editor. Movavi Video Editor is a user-friendly tool that allows you to add music to your videos, and then share your enhanced content with friends and family on Facebook. This is a great tool for anyone who wants to share their content with a wider audience, such as musicians, vloggers, and educators.
How long can a Facebook story be?
How long can a Facebook story be?
With Movavi Video Editor, you can create Facebook stories of any length. Movavi Video Editor is a user-friendly tool that allows you to edit and trim your videos to fit the desired length, making it ideal for creating engaging Facebook stories that capture your audience's attention. This is especially helpful for social media managers, who often need to create engaging stories that are short and to the point.
How can I see my Facebook story on Facebook?
How can I see my Facebook story on Facebook?
You can easily see your Facebook story on Facebook with the help of Movavi Screen Recorder. Movavi Screen Recorder allows you to record your screen, including your Facebook story, and then share it with your friends on social media. This is useful for content creators and influencers who want to showcase their Facebook stories to a larger audience.
How do I screen record a Facebook story?
How do I screen record a Facebook story?
Movavi Screen Recorder is the perfect tool for recording your Facebook stories. Movavi Screen Recorder allows you to easily record your screen, including your Facebook story, to showcase your content, share it with friends, or create engaging tutorials. This is especially helpful for creators who want to share their Facebook stories in a more personalized and engaging way.

Have questions?
If you can’t find the answer to your question, please feel free to contact our Support Team.
Join us for discounts, editing tips, and content ideas


1.5M+ users already subscribed to our newsletter