Here’s how to create Instagram videos step by step in Movavi Video Editor.

How to Make Instagram Videos: Guide to Reels, Stories, and More
Use Movavi Video Editor!
- Trim, cut, crop, and rotate videos
- Add titles, stickers, and transitions
- Apply visual effects
By clicking the download button, you're downloading a trial version of the program.*

Edited by
10,725
Filming for Instagram stopped being the hard part years ago – any phone from the past few years can shoot something usable. What trips most people up is everything that happens after: turning a folder of clips into a video someone finishes watching.
This guide walks through how to make Instagram videos using Movavi Video Editor, along with the exact specs Instagram expects and tips on making each video faster than the last one. It’s especially useful for bloggers, lifestyle creators, and small brand accounts posting on a schedule who want a process they can repeat rather than one lucky edit. That's the exact problem Movavi Video Editor is built to solve: drag your clips onto a timeline, drop effects on with a single click, and export your finished video.
Why use a separate Instagram video editor?
Instagram's own trim-and-filter tools work fine for the occasional post, but they reach their limits as soon as posting becomes a habit. Dedicated video editors like Movavi Video Editor streamline this process with tools: auto subtitles that don't require guessing at word timing, noise removal that clears out background sound while keeping your voice intact, and templates you can reuse across a dozen videos instead of rebuilding the same intro from scratch every time. The point is doing the repetitive work once, then reusing it.
Video specs for Instagram
Here are the Instagram video specs that each placement actually needs:
Of all the formats, Reels get the heaviest push from Instagram's discovery algorithm. The platform favors clips it can surface to people who don't follow the account yet, which explains why a 90-second Reel and a 3-minute one perform so differently. If you're posting to grow your account rather than just document your day, use the vertical 9:16 frame and keep your video short. Reels also carry remix eligibility, so other accounts can react to yours or build on top of it, which stretches your reach beyond your own followers.
Instagram pulls a cover image automatically from a frame in your Reel or Story, but you can replace it with your own – a good habit if the auto-pick happens to land on a blink or a mid-transition frame.
How to make Instagram Reels
Step 1. Install Movavi Video Editor
To start video editing for Instagram, download and install Movavi Video Editor on your PC or Mac.
Step 2. Upload your footage
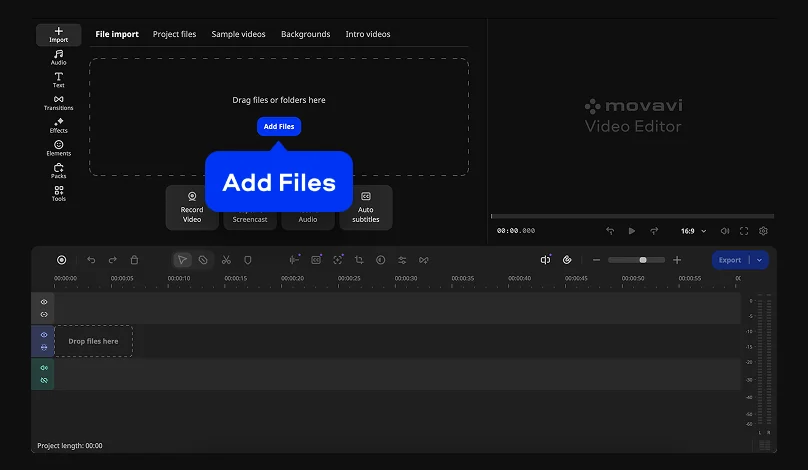
Hit the Add Files button to import your clips into Movavi Video Editor, then drag them onto the Timeline in playback order.
Step 3. Switch the frame to 9:16
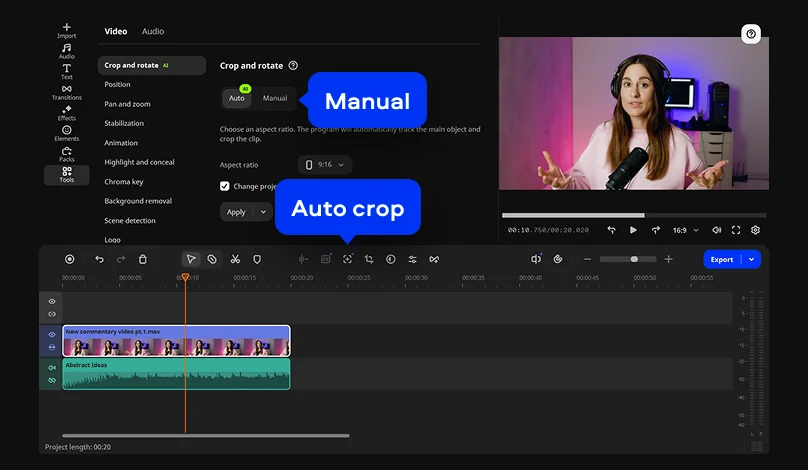
The Auto crop tool's tracks your subject and reframes the shot automatically as it moves, or you can switch to Manual mode and set the crop yourself.
Step 4. Cut your clip
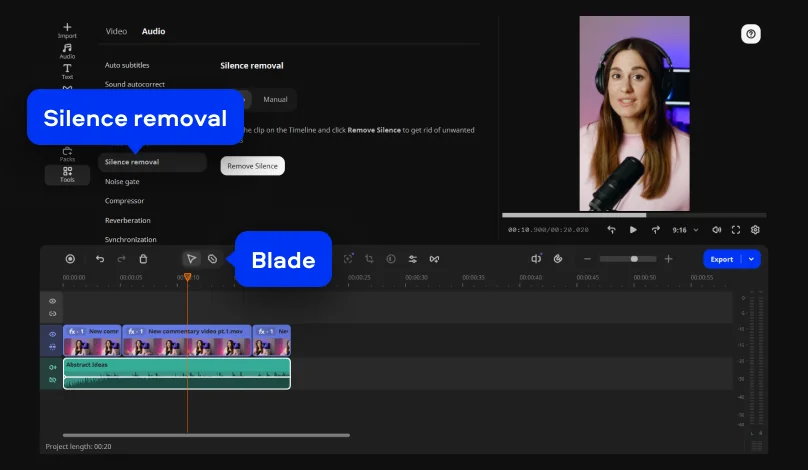
The Blade tool removes flat moments in a couple of clicks, or you can run Silence removal first and let it find and strip out the pauses before you touch the timeline at all.
Step 5. Add captions and music
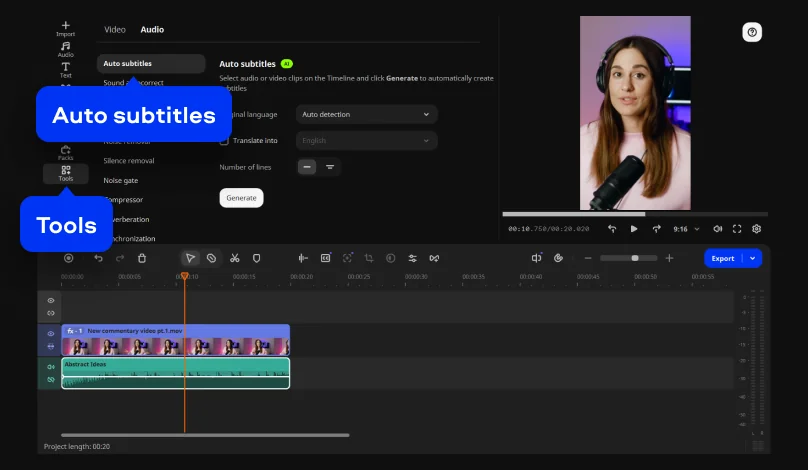
To add captions, open Tools > Audio and select Auto subtitles. Captions let viewers scrolling with the sound muted keep up with what's being said, and you can pick a caption style that matches your usual look afterward.
Choose music from the built-in copyright-free Audio library, or add your own audio track and let it sync automatically.
Step 6. Export the finished clip
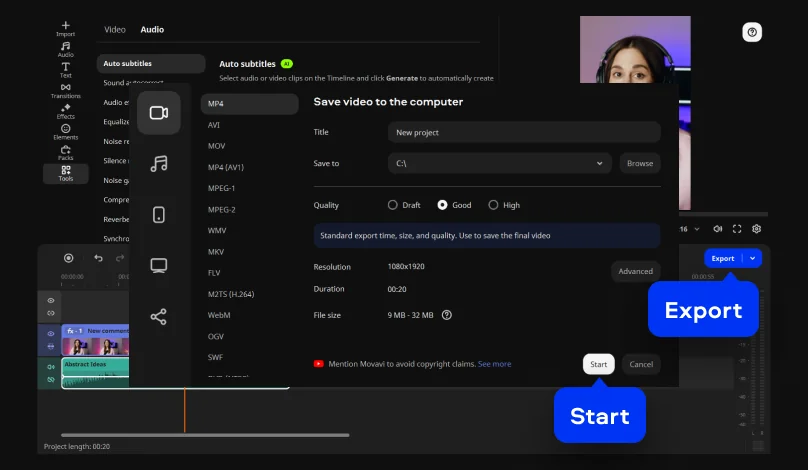
Click Export, select the MP4 format and an output folder. Finally, hit the Start button. From there, it's a normal upload through the Instagram app, cover image and caption included.
That covers the entire process for building an Instagram Reel. What follows goes deeper into each stage, and nearly all of it applies just as well to Stories and feed videos.
Turning landscape footage into a Reel or Story
Not every clip starts out vertical, and reshooting isn't always realistic. Auto-tracked cropping in Movavi Video Editor handles the conversion instead, keeping your subject centered as it turns horizontal footage into a vertical format and adjusting the frame continuously as your subject moves, rather than locking in one static crop for the whole clip. Movavi's own internal comparisons against other video editors showed smoother, more precise tracking in 7 out of 10 test cases – useful to know if you're sitting on a backlog of horizontal clips you'd rather repurpose than reshoot.
Making the audio sound good
AI audio noise removal clears traffic noise, wind, and background hum in a single click. And if your videos involve a lot of talking, the auto-silence removal feature finds and removes dead air on its own. Movavi's internal testing found this speeds up that part of the process by close to 5 times versus trimming pause by pause on the timeline.
Adding captions people can read with the sound off
Sound off is the default for most people scrolling Instagram, which makes captions a requirement – often the deciding factor between someone watching ten seconds and watching the whole thing. Movavi's auto subtitle tool converts speech to text at over 99% accuracy across 100+ languages, offers 60+ styles to match whatever caption look fits your videos, and adds real-time word highlighting synced to the audio – the bouncing-word effect you've likely spotted on Reels already.
Effects and templates for every kind of video
A beauty tutorial calls for different treatment than a drone shot over a hiking trail, and Movavi Video Editor's built-in library – hundreds of transitions, filters, overlays, and titles – covers both without any extra downloads. For a head start instead of a blank timeline, Movavi Templates are built from modular Blocks (think an intro, a countdown, a quick-cut montage) that accept your own footage, can be reordered, or swapped out completely. Creators cycling through different themes – a product review one week, a recipe video the next, a tarot reading after that – can add the optional Movavi Effects subscription, which brings in 10,000+ more effects and 1,500+ music tracks across nearly every category, all previewable on your own footage before any purchase.
Batch a week of content in one sitting
One Reel at a time might take your entire Sunday. A quicker habit is filming several ideas in a single session, then editing them one after another while your settings, color presets, and music choices are still dialed in from the first edit. A single well-shot horizontal clip can also turn into three or four separate pieces – a Reel, a couple of Story segments, maybe a square feed post – just by reframing each version with auto-tracked cropping instead of reshooting the same scene four separate times. From there, Instagram's own scheduling tools let you queue everything in advance rather than posting live each time.
If you want to create Reels but short on what to actually film, Movavi Ideas puts out a new step-by-step editing trick every week – free, exclusive to Movavi Video Editor users, and covering everything from vlogs to vertical clips to holiday content.
Additionally, if you want more control than the Instagram’s built-in scheduler gives you, a dedicated social media scheduler like SchedPilot might come in handy. SchedPilot lets you upload the whole week’s batch of Reels at once. All you need to do is set a date and time for each, and have them go live on their own while you’re already filming the next round. That way you can schedule them on YT Shorts, Tiktok, X or Linkedin, all from the same dashboard.
Seeing every post laid out on one calendar also makes it easier to spot gaps and keep a steady posting rhythm, which Instagram’s algorithm tends to reward.
Movavi Video Editor
Create awesome videos easily
*The free version of Movavi Video Editor may have the following restrictions depending on the build: watermark on exported clips, 60-second video or 1/2 audio length limit, and/or some advanced features unavailable when exporting videos.

Frequently asked questions
Do you need an iPhone or a pricey camera to make Instagram Reels?
Do you need an iPhone or a pricey camera to make Instagram Reels?
No, most recent phones capture more resolution than Instagram actually needs, and the platform compresses everything again on upload regardless. For editing straight from a phone rather than a computer, Movavi App for iOS is built around creating social videos on the go, with pre-designed templates and trending effects already sized for Reels.
What size should my Instagram video be?
What size should my Instagram video be?
1080 × 1920 pixels at a 9:16 ratio covers Reels, Stories, and Live. Feed posts run at 1080 × 1350 (4:5) or 1080 × 1080 (1:1) instead. Set your project size to match the placement before editing begins, rather than cropping everything down at the end.
How do I create Instagram videos without a full production setup?
How do I create Instagram videos without a full production setup?
Shoot short, clean takes with reasonable lighting, then hand the harder work – noise removal, subtitles, reframing – to the editing software. Doing it in that order saves the most time overall.
Can I edit Instagram videos on a computer instead of my phone?
Can I edit Instagram videos on a computer instead of my phone?
Yes, and once posting becomes more than occasional, it's worth switching over. A larger screen makes frame-accurate trims and color work easier to judge, and running several videos back to back in one Movavi Video Editor session beats reopening a phone app each time around.
Are there real viral Reels tricks, or is that mostly hype?
Are there real viral Reels tricks, or is that mostly hype?
Mostly hype, at least anywhere it's sold as a guaranteed formula. That said, the technical details covered in this guide – the 9:16 frame, staying under 90 seconds, captions, clean audio – do genuinely affect how far a Reel travels, since Instagram's discovery system checks exactly these things before deciding who sees it. None of them guarantee an outcome, but getting them wrong is a common reason a Reel gets passed over early.
What's the difference between Reels, Stories, and feed videos?
What's the difference between Reels, Stories, and feed videos?
Reels serve as Instagram's main discovery format, with the best odds of reaching people who don't already follow you. Stories are short, vertical, and gone after 24 hours – built for quick updates. Feed videos stay on your profile and can run in a slightly wider portrait frame.

Have questions?
If you can’t find the answer to your question, please feel free to contact our Support Team.
Join us for discounts, editing tips, and content ideas


1.5M+ users already subscribed to our newsletter