6 Ways to Remove CapCut Watermark

Use Movavi Video Editor to edit and enhance your videos!

  • Trim, cut, crop, and rotate videos
  • Add titles, stickers, and transitions
  • Apply visual effects

By clicking the download button, you're downloading a trial version of the program.*

Edited by Ben Jacklin
19,653

CapCut is a legendary video editing software used by hundreds of millions of people around the world. However, the free version leaves watermarks on your videos.

There are different kinds of watermark: ones that are in a video’s introduction, ones overlaid throughout the entirety of a video, and ones in CapCut’s templates. Fortunately, all can be removed. Read on to learn how to remove CapCut’s watermark from your videos.

Best methods to remove CapCut watermark

To learn how to get rid of CapCut’s watermark for free, you need to figure out where that watermark will be. Sometimes, the watermark is at the end of the video. Other times, the watermark is overlaid on the video itself.

The right method for removing the watermark in a CapCut video depends on what kind of watermark is present. We cover the most common methods to help you determine how to take out the CapCut watermark on your video for free.

Crop or resize the clip

Sometimes, the watermark is overlaid on the edge of the video itself. In these cases, the solution is simple: crop out the watermark.

Remember, though, that cropping will also remove parts of your video. Before doing this, make sure you won’t be cropping out anything important from your film.

Alternatively, you can intentionally film at a wider angle to give yourself extra space at the edges. That way, when you crop out the watermark, you won’t be losing anything important from the video itself.

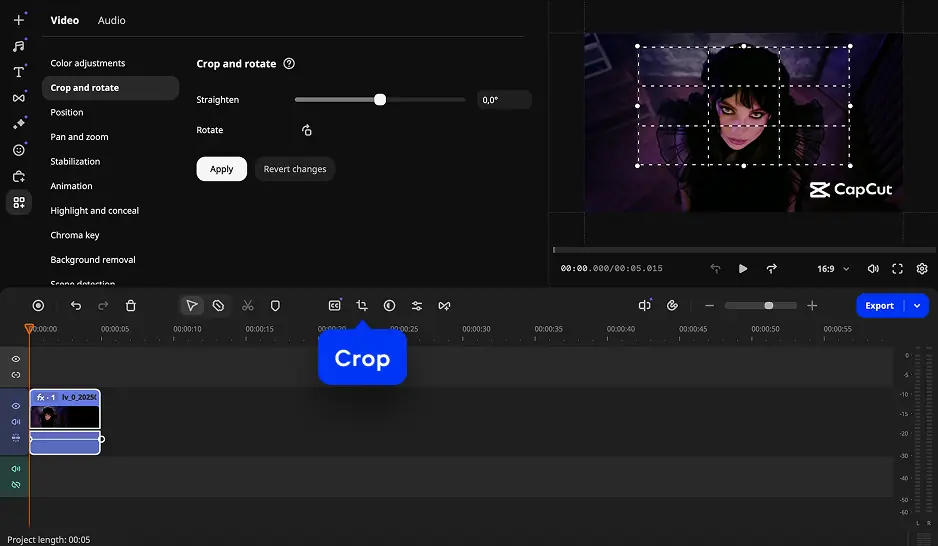
To remove the watermark from CapCut by cropping, follow these steps:

  1. Launch a free video-editing software.
  2. Import your video into the timeline.
  3. Select the Crop tool.
  4. Adjust the frame until the watermark is excluded by dragging the corners.
  5. Apply your changes.

Another option is to switch to a different aspect ratio. In effect, you’re resizing the clip, or cutting specific parts of it to switch from one aspect ratio to another. By strategically switching the aspect ratio, you can effectively crop out the watermark without losing too much material.

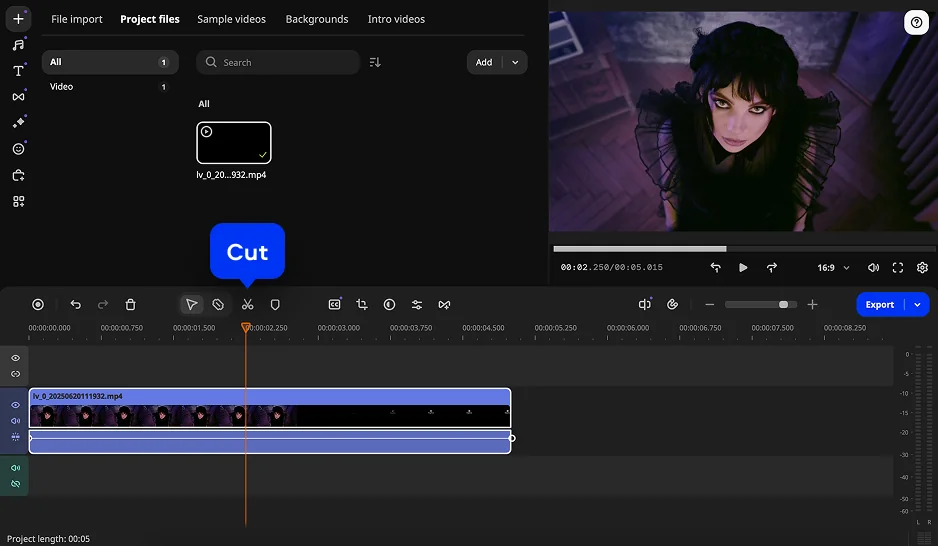
To do this, follow these steps:

  1. Launch your video editor and import your video.
  2. Go to the Crop settings.
  3. Select one of the standard aspect ratios.
  4. If those don’t work, enter custom values in the Width and Height boxes.
  5. Apply your changes.

While this method is a surefire way to remove CapCut’s watermark, it can also impact the quality of your video. Unless you filmed with this crop in mind, you’re likely going to lose content when you crop out the edges. Additionally, you might end up with a strange aspect ratio.

Add stickers or blur

A slightly less destructive way to remove the CapCut watermark from a video is by covering it up. You can cover the watermark in whatever way you like. A simple blur is one common method. Another option is a sticker. You could even replace CapCut’s watermark with one of your own.

To add a sticker, follow these steps:

  1. Launch CapCut and import your video.
  2. Scroll to the Stickers option in the menu.
  3. Browse through CapCut’s library of stickers until you find one you like.
  4. Add your chosen sticker to the video, positioning it over the watermark.

A sticker is a cute way to cover a watermark, but it can be even more distracting than the watermark itself. Blurring the watermark is often less subtle.

One method for blurring the watermark involves online watermark remover. We cover that below. Alternatively, you can manually blur the watermark with a video editor like Movavi Video Editor. To do that, follow these steps:

  1. Install and launch Movavi Video Editor.
  2. Import your video.
  3. Under More tools, select Highlight and conceal.
  4. Choose a mask shape that matches the watermark and position it until the watermark is completely covered.
  5. If the blur isn’t strong enough to fully conceal the watermark, increase the intensity in the settings.
  6. When you’re done, apply your changes and export your completed video.

As you can see, blurring the watermark is a little more labor-intensive than some of the other techniques in this list. However, it does remove the watermark while preserving most of your video. Only the portion within the applied mask will be blurred, so if you make the mask the same size as the watermark, you’ll minimize your losses.

Delete the ending clip

When CapCut applies a watermark at the end of the video, removal becomes a whole lot easier. All you need to do is cut the bit with the watermark at the end from your video, and you’ll be done.

There are two ways to do this. All require you to launch another video editor and import your video. Then, do one of the following:

  • Option 1: drag the handle on the right-hand side of the video to the left until you have removed the end portion of the video with the watermark. Your video will end wherever you leave the handle.
  • Option 2: adjust the playhead until it is placed at the point in your video where the watermark appears. Click the Scissors icon to split the video into two clips. Alternatively, press control- or command-B to do the same. You can then delete the clip with the watermark.

In effect, you’re simply removing an additional clip that CapCut added to your video. For that reason, you shouldn’t have to destroy any of your video itself.

However, it’s possible to accidentally split your clip in the wrong location, or delete too much. That could cause you to lose the end of your video, which is obviously no good. Therefore, take care when doing this method. Ensure you are only removing the CapCut watermark clip and not deleting any part of your video.

Use an online watermark remover

If all that sounds too complicated, no fear. There are plenty of online watermark removers that can help you remove the CapCut watermark from a video, even if it’s in a template, for free.

The exact process depends on the tool you use. Generally, they follow these steps:

  1. Load your watermark remover tool, for example the Media.io watermark remover.

Go to Media.io

  1. Upload your video to the tool.
  2. Select the part of your video that contains the watermark.
  3. Click Remove to instruct the tool to erase the watermark.
  4. Export or download your video.

Some watermark removal tools use AI-generated masks to intelligently remove watermarks. Others apply a simple blur to conceal an unwanted watermark. Regardless, they’re a great way to quickly remove watermarks from your videos, including watermarks from templates.

However, sometimes you might find that a watermark remover fails to properly remove a watermark. This can sometimes happen, especially if the watermark is covering complex footage. In these cases, try adjusting the area of the mask. Alternatively, try using a different watermark removal tool.

Upgrade to CapCut Pro

The simplest way to remove watermarks from CapCut is upgrading to CapCut Pro. Pro users don’t get watermarks on their videos, which means no watermark to remove.

To upgrade to Pro, open CapCut and go to the Pro section. You can then choose which plan you want, and whether you want to subscribe on a monthly or annual basis. Finally, you need to pay.

Removing watermarks from templates

Sometimes the CapCut watermark is present in templates. Removing the watermark from a template is basically the same as removing it from any video.

To remove the watermark by cropping, follow these steps:

  1. Open a free video editor.
  2. Upload your video into the program.
  3. Choose the Crop function.
  4. Modify the frame until the watermark is removed by dragging the edges.
  5. Save your changes.

To remove the watermark by resizing, do the following:

  1. Start your video editor and load your video.
  2. Navigate to the Crop options.
  3. Choose one of the standard aspect ratios.
  4. If those don't function, input custom values in the Width and Height fields.
  5. Save the video.

Summary

As you can see, there are plenty of ways to remove the CapCut watermark from a video. Choose the method most appropriate for the type of watermark you have. Ideally, you’ll remove the watermark without impacting your video itself. However, when removing a watermark without the Pro subscription, you often need to sacrifice part of your video.

Movavi Video Editor

Create awesome videos easily

*The free version of Movavi Video Editor may have the following restrictions depending on the build: watermark on exported clips, 60-second video or 1/2 audio length limit, and/or some advanced features unavailable when exporting videos.

Movavi Video Editor

Frequently asked questions

How do I remove the CapCut watermark for free?

You can remove the CapCut watermark for free by editing it out. The exact process depends on the type of watermark on your video. If the watermark is in a separate clip, for example at the end of your video, simply delete that clip.

However, if the watermark is overlaid on your video, you need to either crop it out or cover it up. You can use a sticker or blur to cover the watermark.

Is it illegal to crop out the CapCut watermark?

Cropping out the CapCut watermark likely violates their terms of service, which you probably agreed to when signing up. It also potentially violates copyright law, especially if your video is for commercial purposes.

However, this is rarely enforced, especially on individuals making videos for personal use.

Do I need another video editor to remove the CapCut watermark?

Sometimes, you can remove the CapCut watermark with CapCut itself. When the watermark is at the end of a video, you might be able to simply delete the watermark clip.

This might not work. For example, you might export your edited video to find another watermark on there! In that case, simply use another video editor, like Movavi Video Editor.

Have questions?

Have questions?

If you can’t find the answer to your question, please feel free to contact our Support Team.

Join us for discounts, editing tips, and content ideas

1.5M+ users already subscribed to our newsletter

By signing up, I agree to receive marketing emails from Movavi and agree to Movavi's Privacy Policy.