How to Remove a Green Screen from a Video

If you've filmed in front of a green screen and now need it gone, the tool you're looking for is chroma key – sometimes called a green screen remover. Because Movavi Video Editor is built for everyday creators, this traditionally tedious process is instantly intuitive.

We handle the technical heavy lifting, so you can focus on creating and simply being yourself on screen. Whether you're a beauty vlogger, a gamer, or an edu-tuber, this tool gives you complete creative freedom.

Edited by
Ben Jacklin
32,451

It works by picking a color, telling your video editor to treat every pixel that shade as invisible, and swapping in whatever background you actually want behind you. This lets you effortlessly transform a regular bedroom into a chic studio, drop your facecam seamlessly into the action, or stand in front of dynamic charts. This guide walks through how it works, how to get a high-quality, polished result on your very first try, and how to fix the parts that trip people up – mainly green spill.

What is chroma key

Chroma key video editing is the process of removing a solid background color from footage so you can replace it with something else. Green is the usual pick because it's rarely present in human skin tones or hair, which makes the keying process – the technical name for isolating and cutting out that color – cleaner. Blue works too, and shows up more in movie productions where an actor's outfit already leans green.

The green screen effect itself isn't new. It's the same setup behind weather forecasts, YouTube gaming overlays, and product review videos where the creator sits in front of a changing backdrop instead of their actual office. What's changed is how easy the software makes it.

What you need before you start

A few things make the difference between a clean key and a jagged, glitchy edge:

  • Even lighting on the screen. Shadows and hot spots create patches of slightly different green, which confuses the keying process.
  • Distance from the subject to the backdrop. A few feet of space cuts down on the green spill problem covered below.
  • A backdrop that's actually green – solid, flat, no wrinkles or sheen. Fabric with texture catches light unevenly.
  • A file the editor can read. Movavi Video Editor works with standard formats like MP4 and MOV for import and export, so footage shot on a phone or camera in either format drops straight into the timeline.

None of this needs to be a studio setup. A green bedsheet and a desk lamp gets most creators a usable result.

How to remove green screen background: Step by step

Step 1. Import your files

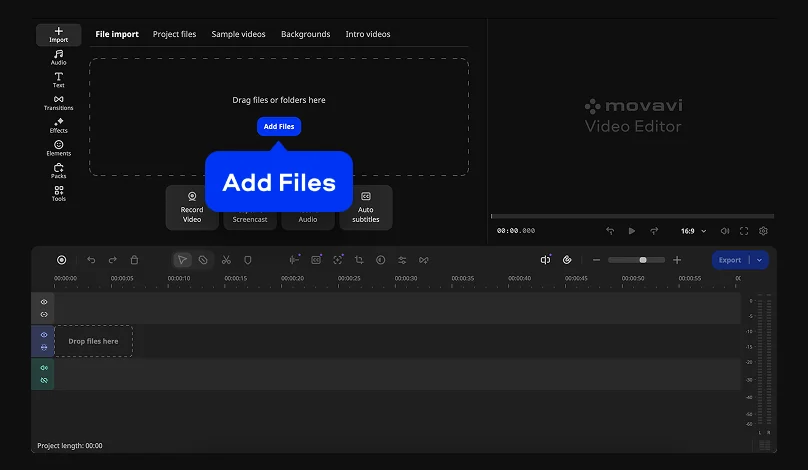
Open the program, click Add Files, and choose the green screen video you want to edit. Drag the clip onto the Timeline to start working. If you already know which background you want to use, import that image or video now as well – it saves time and makes the next step much smoother.

Step 2. Remove the green screen and replace the background

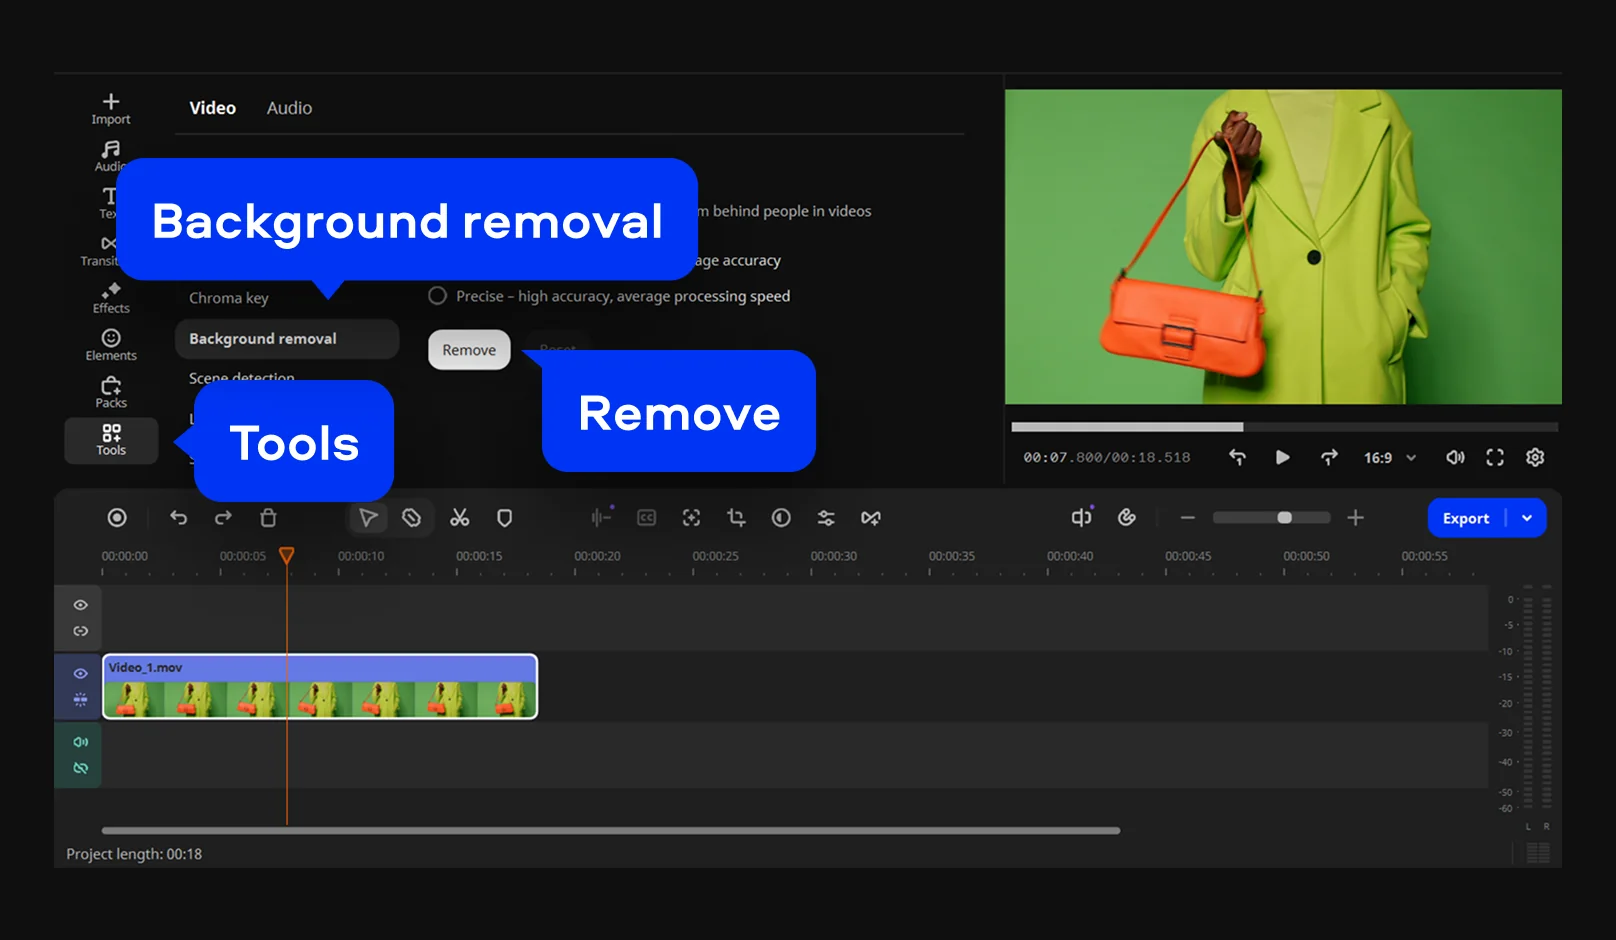
Select the clip on the Timeline, navigate to the Tools tab, and open the Background removal tool. Click Remove, and the AI will automatically process the footage. Next, create an overlay track and place your new background image or video underneath the main clip on the Timeline to fill in the removed area.

Step 3. Fine-tune the details and export

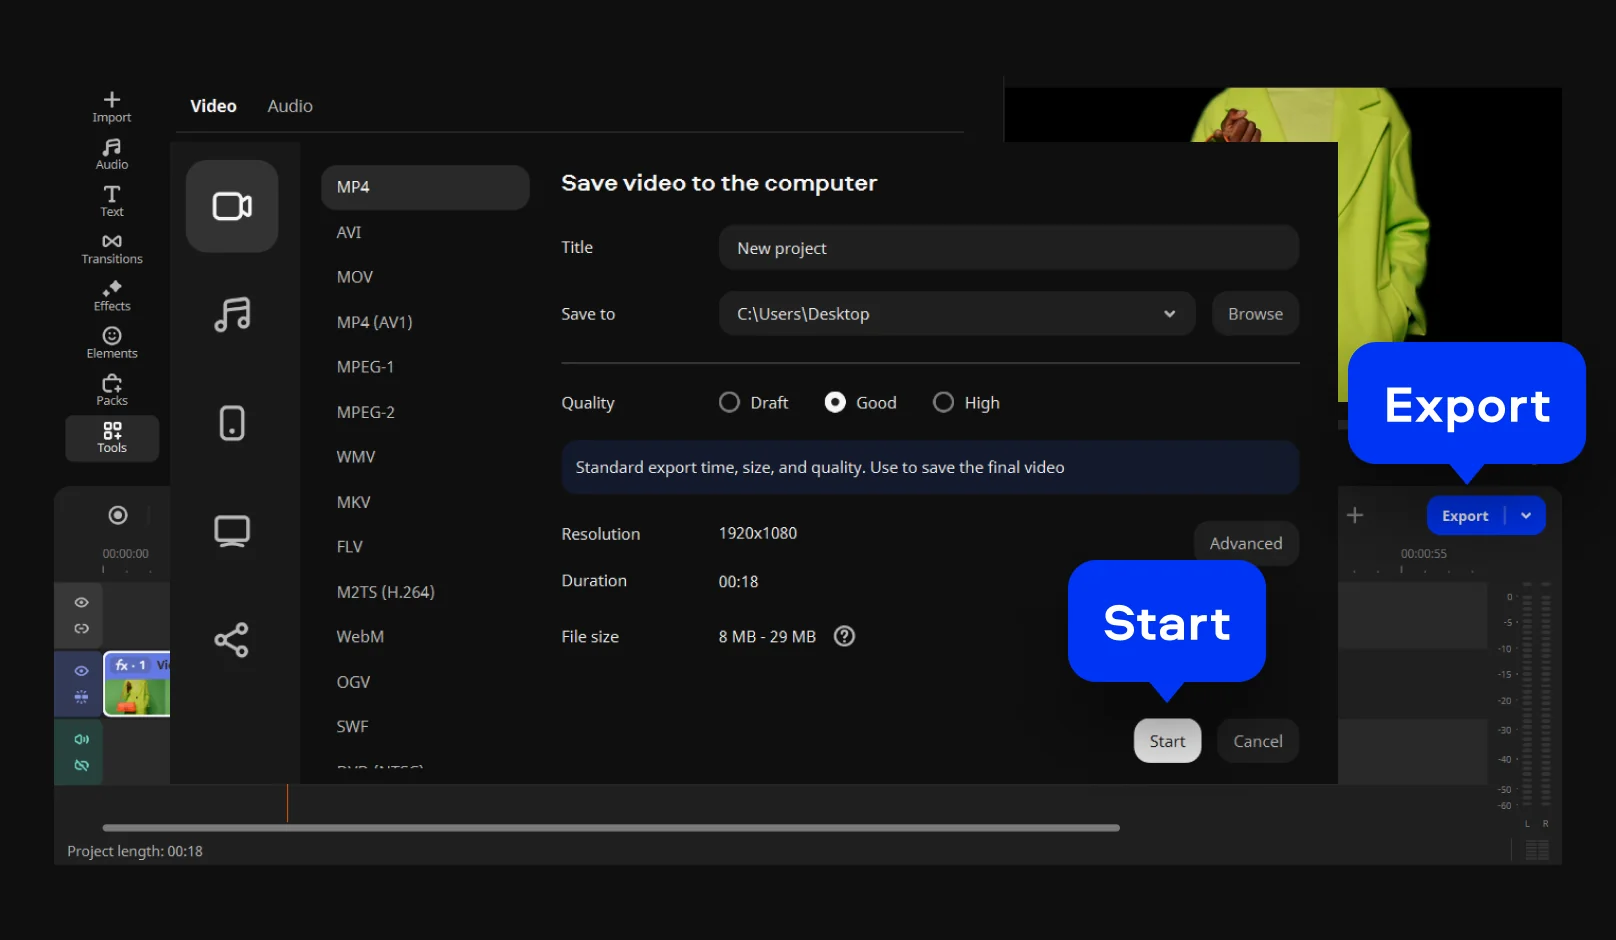
Play the video back and watch the details closely. Hair, hands, and fast movements usually reveal whether the cutout holds up or starts to fall apart. If needed, fine-tune the result using the adjustment sliders until the subject looks completely clean. Once everything feels natural, click Export, choose your preferred format, and save the finished video.

Fixing green spill

Green spill is the reflection of the green screen onto your subject – a faint green tint along the edges of hair, shoulders, or skin, caused by light bouncing off the backdrop and hitting whatever's standing in front of it. It's one of the most common reasons a chroma key still looks off even after the background is technically gone.

You'll usually spot it as a thin green halo, most visible around hair and on lighter clothing. The fix starts at the shoot: move your subject farther from the screen, and light the subject separately from the backdrop rather than letting one light source hit both. If the spill still shows up in the footage, dialing back Tolerance slightly and nudging Edges can pull in the softened boundary enough to reduce how much of that tint survives into the final frame. It won't erase heavy spill from a shoot with the subject standing right against the fabric – that one's easier to prevent at recording time than to fully undo in post.

Choosing and placing your new background

Once the green is gone, you need something behind it. This is where the actual creative choice happens – and it's worth treating as one, not an afterthought.

A gaming or reaction video might sit well with a static image or a looping animated backdrop. A product review benefits from a clean, neutral background so nothing competes with what's being demoed. A vlog-style intro might use actual location footage – a second video clip playing behind your on-camera segment, so it looks like you're standing somewhere you're not.

Movavi Video Editor's built-in effects library gives you overlays, filters, and transitions to make that new background feel intentional rather than pasted-in – a light grade to match the color temperature of your subject to the new scene goes a long way toward making the swap convincing.

Common chroma key mistakes

Wrinkled or shadowed backdrop. Every shadow reads as a slightly different shade of green, and the keying tool treats each shade differently. Iron the fabric, and light it flat.

Wearing green. If your shirt matches the screen, parts of you disappear along with the background. Simple fix – check your outfit against the backdrop before you hit record, not after.

Skipping the test clip. Record ten seconds, run it through Chroma Key, and check the edges before committing to a full shoot. Catching a lighting problem early saves a reshoot later.

Overcorrecting Tolerance. Cranking it up to eliminate every trace of green usually removes detail you wanted to keep. Small adjustments, checked on playback, beat one aggressive slider push.


Why this is worth learning once, properly

Chroma key isn't a one-video trick. Once you've got a lighting setup and a workflow that works, it becomes a repeatable part of how you shoot – intros, product shots, green-screen reaction clips, or full segments where the backdrop changes scene to scene. Movavi Video Editor is built to make that repeatable: drag-and-drop effects, one-click AI tools for the parts of editing that used to eat the most time, and templates for the segments you'll reuse across videos. It's simple and fast by design, which matters most on the tenth video, not just the first.

For creators building this into a regular workflow – reaction content, tutorial intros, gaming overlays – Movavi Ideas publishes new editing tricks every week, free, with the kind of step-by-step walkthroughs that make trying a new technique less of a gamble.

Frequently asked questions

What's the difference between a green screen and blue screen?

Both work the same way – chroma keying removes whichever color you set. Green is more common because it's less likely to match skin tones, and cameras tend to pick up more detail in the green channel.

Can I remove a green screen without one – from any background?

Chroma key specifically needs a solid, consistent color to isolate. Removing an arbitrary background (a cluttered room, for instance) uses a different tool – AI-based background removal, which isolates a person from their surroundings without needing a green backdrop at all.

What video format should I export in after using chroma key?

MP4 works for most platforms and keeps file sizes manageable for uploading. If you're planning to layer the clip into another project later and want to preserve editing flexibility, MOV is the better call.

Why does my green screen footage still show a green tint after keying?

That's almost always green spill. Revisit lighting and subject-to-backdrop distance first, then fine-tune Edges and Tolerance in the Chroma Key tool to pull in the softened boundary.

Do I need special lighting equipment for a green screen at home?

No – even lighting matters more than expensive gear. A couple of desk lamps positioned to avoid shadows on the backdrop will get you a workable key.

Have questions?
If you can’t find the answer to your question, please feel free to contact our Support Team.
Join us for discounts, editing tips, and content ideas

1.5M+ users already subscribed to our newsletter

By signing up, I agree to receive marketing emails from Movavi and agree to Movavi's Privacy Policy.