How to Reverse a Clip in iMovie: A Quick Guide to Reversed Videos

Reverse videos easily with Movavi Video Editor!

  • Trim, cut, crop, and rotate videos
  • Add titles, stickers, and transitions
  • Apply visual effects

By clicking the download button, you're downloading a trial version of the program.*

Edited by Ben Jacklin
17,532

Have you ever watched a video played in reverse and wondered how to create that effect yourself? The reverse video effect is a filmmaker's playground: here is where you can experiment with time, physics, and visual storytelling without complex editing techniques. 

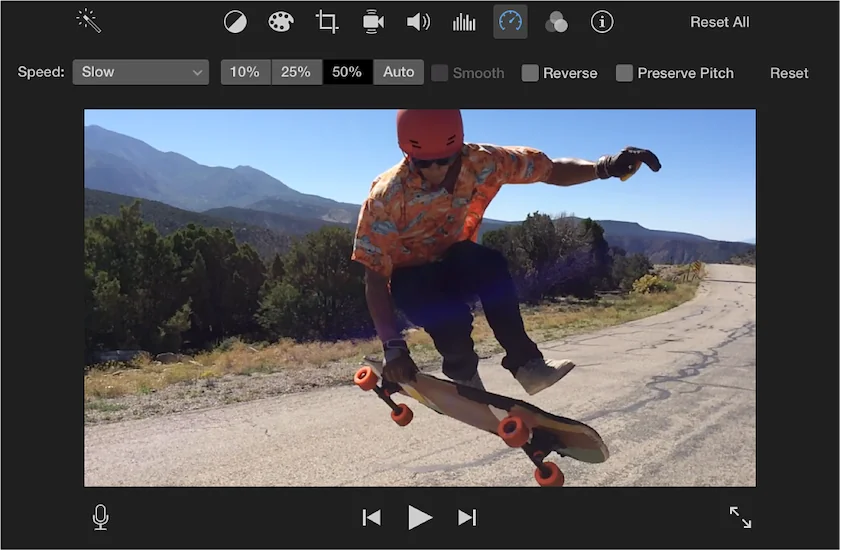
Learning how to reverse a clip in iMovie is essential for adding creative flair to your videos. With just a few clicks, you can transform ordinary footage into something captivating and unexpected.

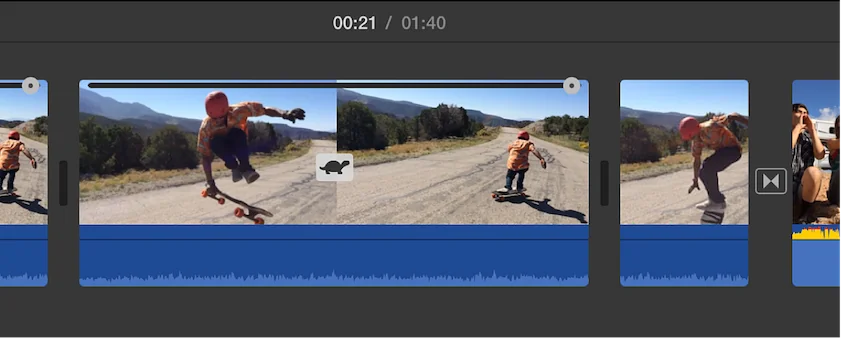
Nevertheless, the art of reversing videos isn't just about clicking a button. How do you maintain quality? What storytelling possibilities does it unlock? 

Famous creators on YouTube, TikTok, and Instagram use reversed clips to create mind-bending illusions, comedy moments, and dramatic reveals. If you want to add professional polish to your videos, experiment with creative ideas, or simply have fun with visual storytelling, here's everything you need to know about how to reverse a clip in iMovie.

Understanding the reverse video effect in iMovie

The reverse video effect in iMovie lets you tell your story in reverse – literally. From visual tricks to unique transitions, reversed videos can transform ordinary scenes into something surreal or dramatic. While reversing videos is straightforward on a Mac, things get trickier on mobile. 

This section explores what the effect does, how it’s different on a Mac vs. iOS, and how to use it creatively, including how to find the reverse checkbox.

What is the reverse video effect in iMovie?

The reverse video effect in iMovie is a playback feature that makes your footage run backwards – from the last frame to the first. It's like rewinding time within your project. When you reverse a clip in iMovie, actions unfold in the opposite direction: falling objects rise, splashes return to water, and people walk backwards, changing their clip speed. This simple but powerful effect creates visual interest and can completely transform the meaning of your footage.

The implementation differs slightly between Mac and iOS devices. On a Mac, the iMovie reverse feature is built directly into the speed controls, making it accessible with just a few clicks. Unfortunately, iOS users face a different situation. 

The mobile version doesn’t include a native tool to reverse a video, requiring alternative solutions we’ll explore later in this guide.

The creative benefits of reverse videos include:

  • Creating surreal, dreamlike sequences

  • Adding humor through backwards motion

  • Building suspense by revealing events in reverse

  • Showcasing cause-and-effect relationships from a new angle

  • Developing unique transitions between scenes

Before you begin: Essential requirements and preparations

Before applying the reverse effect to any video in iMovie, make sure your system and software are ready. Creating a new project with a heavy clip can push your processor, especially once it hits the timeline, so checking these basics upfront will save you time later.

System requirements and iMovie version

Before diving into reversed videos, ensure your system meets the necessary requirements. For Mac users, you'll need macOS 10.15.6 or later and iMovie version 10.1.9 or newer. The reverse feature works smoothly on most recent Mac computers, but older systems might experience some lag with high-resolution footage.

iOS users should have iOS 15 or later on their iPhone or iPad, though remember that the mobile version doesn't include a native reverse function. Regardless of your device, you'll need enough storage space for your original clip plus the reversed version. iMovie works best with common video formats like MP4, MOV, and M4V. For optimal performance, keep individual clips under five minutes when applying the reverse effect, as longer reversed videos can strain processing power.

Why use reverse video in iMovie?

From practical problem-solving to surreal transitions, reverse in iMovie offers editors a powerful way to reshape how scenes are seen and felt.

Creative and practical applications

Reversing videos in iMovie opens up a world of creative storytelling possibilities. Imagine a splashing puddle reforming into a perfect surface, a crumpled paper unfolding itself, or shattered glass magically reassembling. These visually arresting moments grab viewer attention and create a sense of wonder. You can also choose to add music to enhance the experience Directors often use reversed videos to represent memories, dreams, or supernatural events within their storytelling.

From a practical standpoint, reversing videos can solve filming challenges. Can't capture someone perfectly catching an object? Film them dropping it and reverse the clip in iMovie. Need someone to appear as though they're moving in an impossible way? Reverse their actions during editing. 

Both amateur videographers and professional editors benefit from mastering this technique, especially if they want to only a part of their video to be reversed. Amateurs gain a simple yet impressive effect for social media videos, while professionals add another tool to their visual storytelling arsenal.

Step-by-step guide for iMovie reverse on a Mac

The iMovie reverse process is smooth once you understand where everything lives in the interface. This section covers how to create a new project, import a video clip, and apply the reverse video effect in iMovie using the speed tools available on a Mac. 

If you’ve ever wondered how to reverse a clip in iMovie or how to effectively play videos backwards, here’s your step-by-step guide.

Getting started with your project

  1. Launch iMovie by clicking its icon in your Applications folder or finding it through Spotlight search (Command + Space).

  2. Once open, click New Project from the File menu or use the + button in the projects browser. Choose Movie as your project type.

  3. Import your video clip by selecting Import Media from the File menu or dragging files directly from Finder into the iMovie browser. For best results, use clear, well-lit footage with distinct motion that will be recognizable when reversed. 

  4. After importing, drag your clip to the timeline at the bottom of the screen. The timeline is where all your editing magic happens, including applying the video reverse effect.

Applying the reverse effect in iMovie

  1. To reverse a video in iMovie, first select the clip in your timeline that you want to play backwards.

  2. With your clip selected, click on the Speed adjustment icon (it looks like a speedometer) above the preview window or right-click on the clip and choose Speed from the contextual menu.

  3. In the speed controls panel that appears, check the box labeled Reverse. You'll immediately see a small backward-facing arrow appear on your clip in the timeline, indicating the reverse option has been applied.

  4. While you're here, you can also adjust speed using the speed slider. A slower speed (below 100%) can emphasize the effect, while faster speeds create a more frantic backward motion.

  5. Audio often sounds strange when reversed, so consider muting or detaching it. To mute, right-click the clip and select Detach Audio, then delete the separated track. For a polished result, add new background music that complements your reversed sequence. 

  6. Preview your work by positioning the playhead before your clip and pressing the spacebar. Once satisfied, export your project by selecting Share from the File menu and choosing your preferred format and quality.

Alternative methods for iMovie reverse on iOS

If you’re trying to apply the reverse video effect in iMovie on your iPhone or iPad, you’ll quickly find out that the mobile app is missing a few desktop-only features. 

Fortunately, with a bit of prep and the right third party app, you can still get creative. Here’s what you need to know before editing your video in iMovie on iOS.

Limitations of iMovie on iOS

Despite its many features, iMovie for iOS lacks a built-in reverse video function. This limitation frustrates many iPhone and iPad users expecting feature parity with the Mac version. The mobile app focuses on simplicity and touch-friendly controls, which unfortunately means some advanced features didn't make the cut. Apple has maintained this disparity across multiple updates, suggesting it's an intentional design choice rather than an oversight.

This absence forces iOS users to either complete their video in iMovie edits on a Mac or turn to a third-party app. While this extra step is inconvenient, several excellent alternatives exist that integrate well with iMovie projects.

Step-by-step process using alternative apps

Since iMovie on iOS can't reverse videos natively, you'll need to use a third party app as an iMovie alternative before bringing your reversed clip back into the editor. Several excellent options include Movavi App and CapCut, all available on the App Store for free (with some premium features).

To reverse a video using Movavi App:

  1. Download and install the app.
    Download Movavi App
  2. Open the app and choose a video you want to edit.
  3. Select your video clip on the timeline and tap the Reverse tool. Your video clip will be automatically reversed.
  4. If needed, edit and enhance your video by adding filters and effects.
  5. Export and share the video.

Advanced creative tips and best practices

Once you know how to apply the reverse video effect, it’s time to edit videos like a pro. From subtle visual tricks to clever audio layering, these advanced ideas help turn basic reversed clips into compelling sequences.

Enhancing your reversed videos

Take your reversed clips to the next level by adding complementary effects. Try applying a slight color filter to distinguish reversed segments from normal footage. A subtle blue tint or black-and-white effect can signal to viewers they're watching something out of the ordinary. 

Smooth transitions between normal and reversed footage create a more polished feel. Cross-dissolves work particularly well for dreamy sequences, while quick cuts create jarring, attention-grabbing moments.

Audio deserves special attention with reversed clips. Instead of using the reversed audio (which rarely sounds good), try adding ambient sounds, music with a reverse reverb effect, or even normal speed narration explaining what's happening. 

For sophisticated projects, consider only reversing certain elements within a scene through careful masking or using picture-in-picture effects. This creates a surreal effect where some objects move forward in time while others move backward.

Troubleshooting and common pitfalls

Many beginners make the mistake of reversing clips without considering the logical consistency of their story. Even in creative projects, sudden reversed footage can confuse viewers if not properly established. Another common issue is audio synchronization problems. If you keep audio attached, it may drift out of sync, especially with longer clips or when combining multiple speed adjustments.

If you need to undo the reverse effect, simply select the clip and open the speed controls again, then uncheck the Reverse box. For more extensive corrections, use iMovie's undo function (Command + Z) or revert to an earlier version from the File menu. If your reversed video appears jerky or low quality, try reducing the clip's resolution before applying the effect, then scaling it back up afterward. 

This sometimes produces smoother results, though at the cost of some image quality. These editing options can help maintain video quality, and when the reverse play icon appears, it’s a visual confirmation that your clip has been reversed.

Conclusion and next steps

Mastering how to reverse a clip in iMovie unlocks a new dimension of creative possibilities for your videos. This simple yet powerful technique transforms ordinary footage into eye-catching, thought-provoking content that stands out in a crowded digital landscape. 

Now that you understand both the technical process and creative applications of reverse videos, it's time to experiment. Try capturing footage specifically designed to be reversed, like dropping objects into water or bursting balloons. 

Movavi Video Editor

Create awesome videos easily

*The free version of Movavi Video Editor may have the following restrictions depending on the build: watermark on exported clips, 60-second video or 1/2 audio length limit, and/or some advanced features unavailable when exporting videos.

Movavi Video Editor

Frequently asked questions

How do you reverse a video clip?

On a Mac, select your clip in the iMovie timeline, click the Speed controls icon, and check the Reverse box. Preview your changes before exporting. On iOS, since iMovie doesn't support native reversing, use a third-party app like Movavi App to reverse your clip.

How do you reverse a video on an iPhone?

iMovie for iOS doesn't include a built-in reverse function. Instead, download an app like Movavi App or CapCut from the App Store. Import your video, look for the Reverse tool, apply the reverse effect, and save the reversed clip to your Photos app.

Can you flip a clip in iMovie?

Yes, but flipping (mirroring) is different from reversing. To flip a clip horizontally in iMovie, select your clip, click the Crop tool above the preview window, then click the Flip Horizontal button. This mirrors your image from left to right, while reversing plays your clip backward in time. You can apply both effects to the same clip for unique results.

How do you undo a clip in iMovie?

To undo a reverse effect or any other change in iMovie, select the modified clip and reopen the speed controls panel, then uncheck the Reverse option. For immediate undoing of recent actions, use Command + Z (macOS) or tap the Undo button (iOS). For more extensive changes, you can also revert to an earlier version of your project through File > Revert To > Browse All Versions on a Mac. These editing options help maintain flexibility while exploring creative tools.

Have questions?

Have questions?

If you can’t find the answer to your question, please feel free to contact our Support Team.

Join us for discounts, editing tips, and content ideas

1.5M+ users already subscribed to our newsletter

By signing up, I agree to receive marketing emails from Movavi and agree to Movavi's Privacy Policy.