Movavi Video Editor is built to make this kind of task feel less like a chore – its Auto subtitles tool listens to your audio and hands back a transcript at a vendor-reported 99%+ accuracy across 100+ recognized languages, so you're rarely starting from a blank page.

How to Transcribe a Video
The fastest way to transcribe a video is to run it through an AI speech-to-text tool instead of typing it out by hand. Designed to be simple and fast, Movavi Video Editor removes the steep learning curve of this tedious task for beginners, bloggers, and YouTubers with its clean interface and one-click Auto subtitles tool.
The workflow is effortless: simply drag your media onto the timeline and generate auto-subtitles with a single click. By handling the heavy lifting in seconds, it drastically speeds up your process, and from there, you can easily correct any text in the dedicated Phrases panel.

Edited by
34,517
Whether you are subtitling a dynamic travel vlog, adding trendy captions to a beauty review, or transcribing fast-paced gaming highlights, this approach empowers absolutely anyone to create polished, accessible content on their very first try. The drag-and-drop design makes everything instantly intuitive – leaving you free to focus on creativity and self-expression.
What video transcription actually means
A video transcript is a written record of everything said in a video – every word, in order, usually with timestamps marking when each line was spoken. That's slightly different from subtitles or captions, which are the same text but formatted to appear on screen in sync with the audio. In practice, most tools generate both from the same pass: automatic speech recognition listens to the audio track, turns it into text, and time-stamps each phrase. From there, you can use that output as a plain transcript, as on-screen captions, or both.
For anyone working with spoken content – an interview, a voiceover, a recorded call – a transcript also does a job that scrubbing back and forth through a timeline can't: it makes the video searchable. You can scan the text for the exact line you're after instead of hunting through minutes of footage.
Who needs a video transcript
If you make content for a living or a hobby, a transcript saves you from one of the most repetitive tasks in the whole process. A beauty creator turning a tutorial into a blog post, a travel vlogger who wants captions for a silent-scroll audience, a cooking channel pulling ingredient lists straight from the video's dialogue – all of it starts with getting the spoken word into text form.
It's not only content creators, either. Journalists transcribing a recorded interview, marketers pulling usable quotes from a Zoom webinar, researchers working through hours of recorded sessions, and educators turning a lecture into searchable notes all lean on the same automatic transcription tools, just for different reasons.
Automatic transcription vs. dedicated transcription services
There are two broad routes to a transcript. Standalone transcription services – Otter, Notta, Happy Scribe, Speaknotes, and Brasstranscripts among them – specialize in turning audio to text, usually through a browser upload, and hand back a text file when they're done. If you're transcribing anything sensitive, like client calls or internal meetings, it's worth checking how a service handles your files; end-to-end encryption is one of the features some cloud-based tools advertise for exactly that reason.
The other route is a video editor with AI tools built in – Movavi Video Editor, Microsoft Clipchamp, and Adobe® Premiere® Pro all fall into this category. Instead of exporting your video, uploading it somewhere else, and waiting for a transcript to come back, the transcription happens directly on your timeline. You end up with a transcript, styled captions, and your edited video from the same project, without switching tools mid-task.
How to transcribe a video with Movavi Video Editor
Step 1. Import your media
Launch Movavi Video Editor and drag your video or audio file (MP4, MOV, MP3, etc.) onto the timeline.
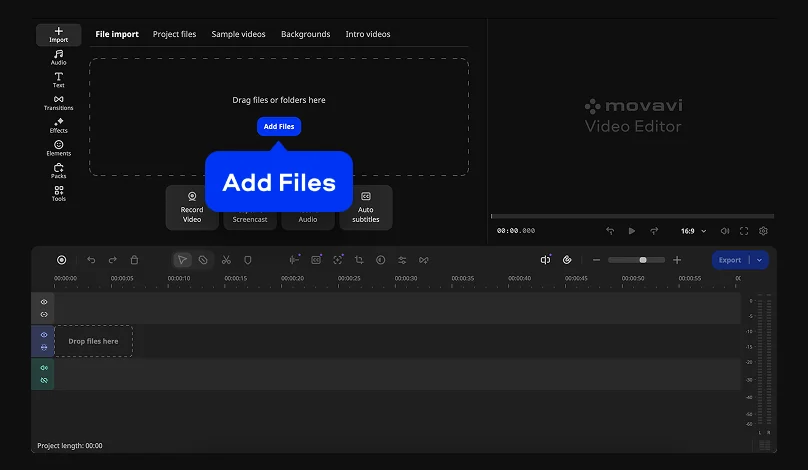
Step 2. Run Auto subtitles
Go to the Tools, than choose Audio tab on the left sidebar and click Generate, or right-click the audio track on your timeline, and select Auto subtitles.
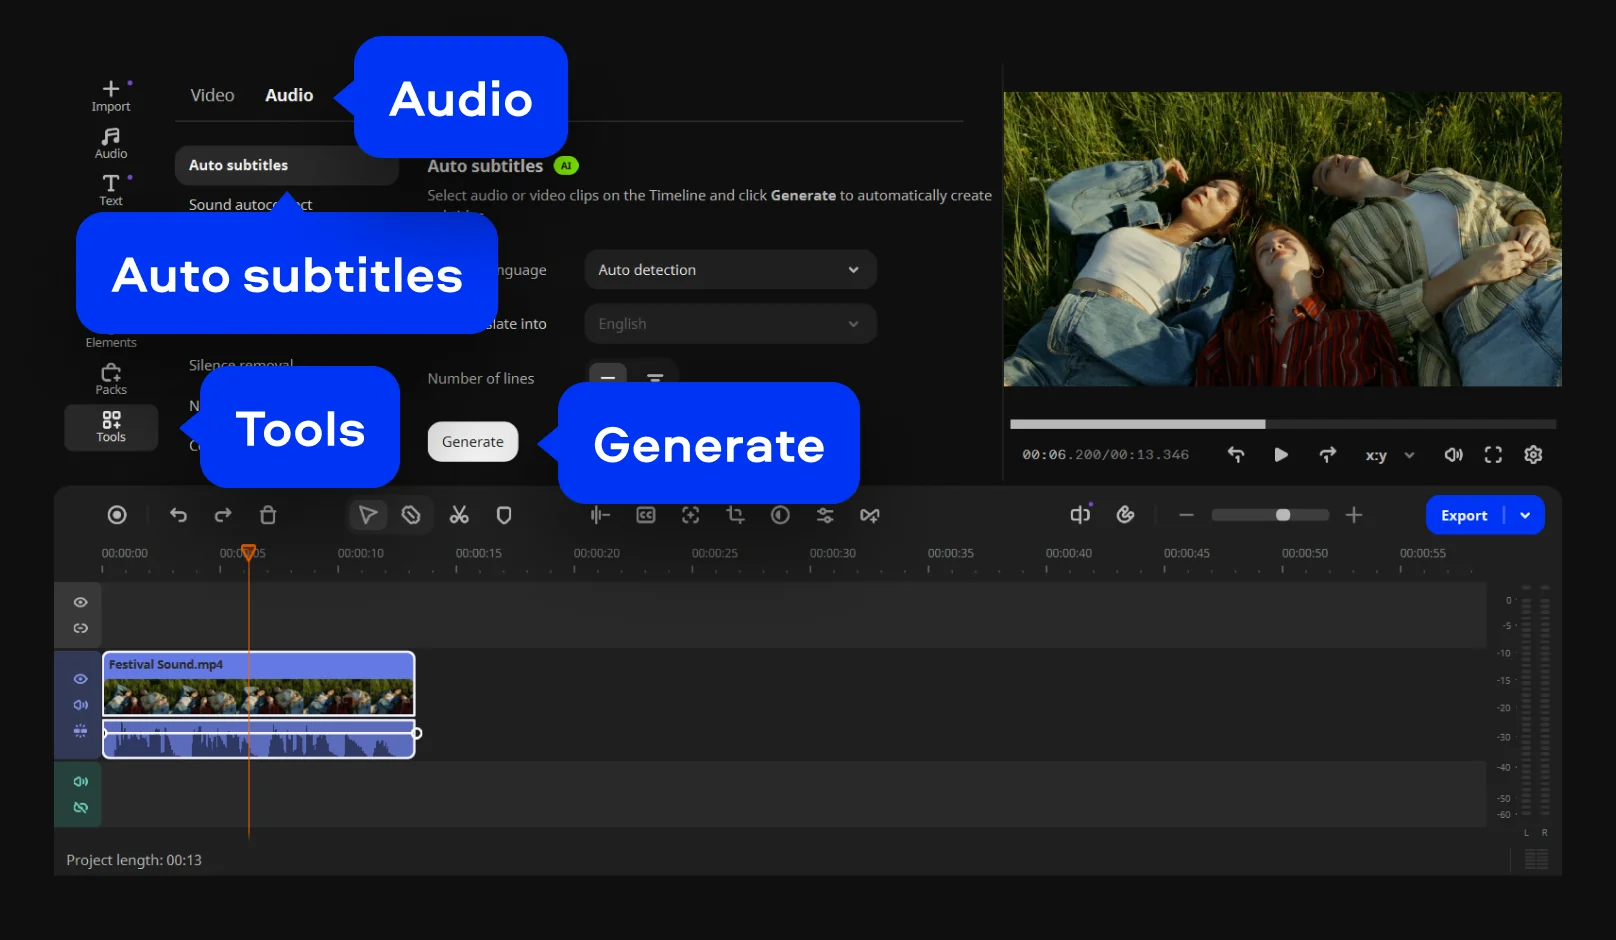
Step 3. Review and edit
Check the transcript in the dedicated Phrases panel. Read through line by line to easily correct any misheard words or names without having to navigate the timeline. You can customize fonts and colors, or turn on active word highlighting to have each word light up in sync with the audio.
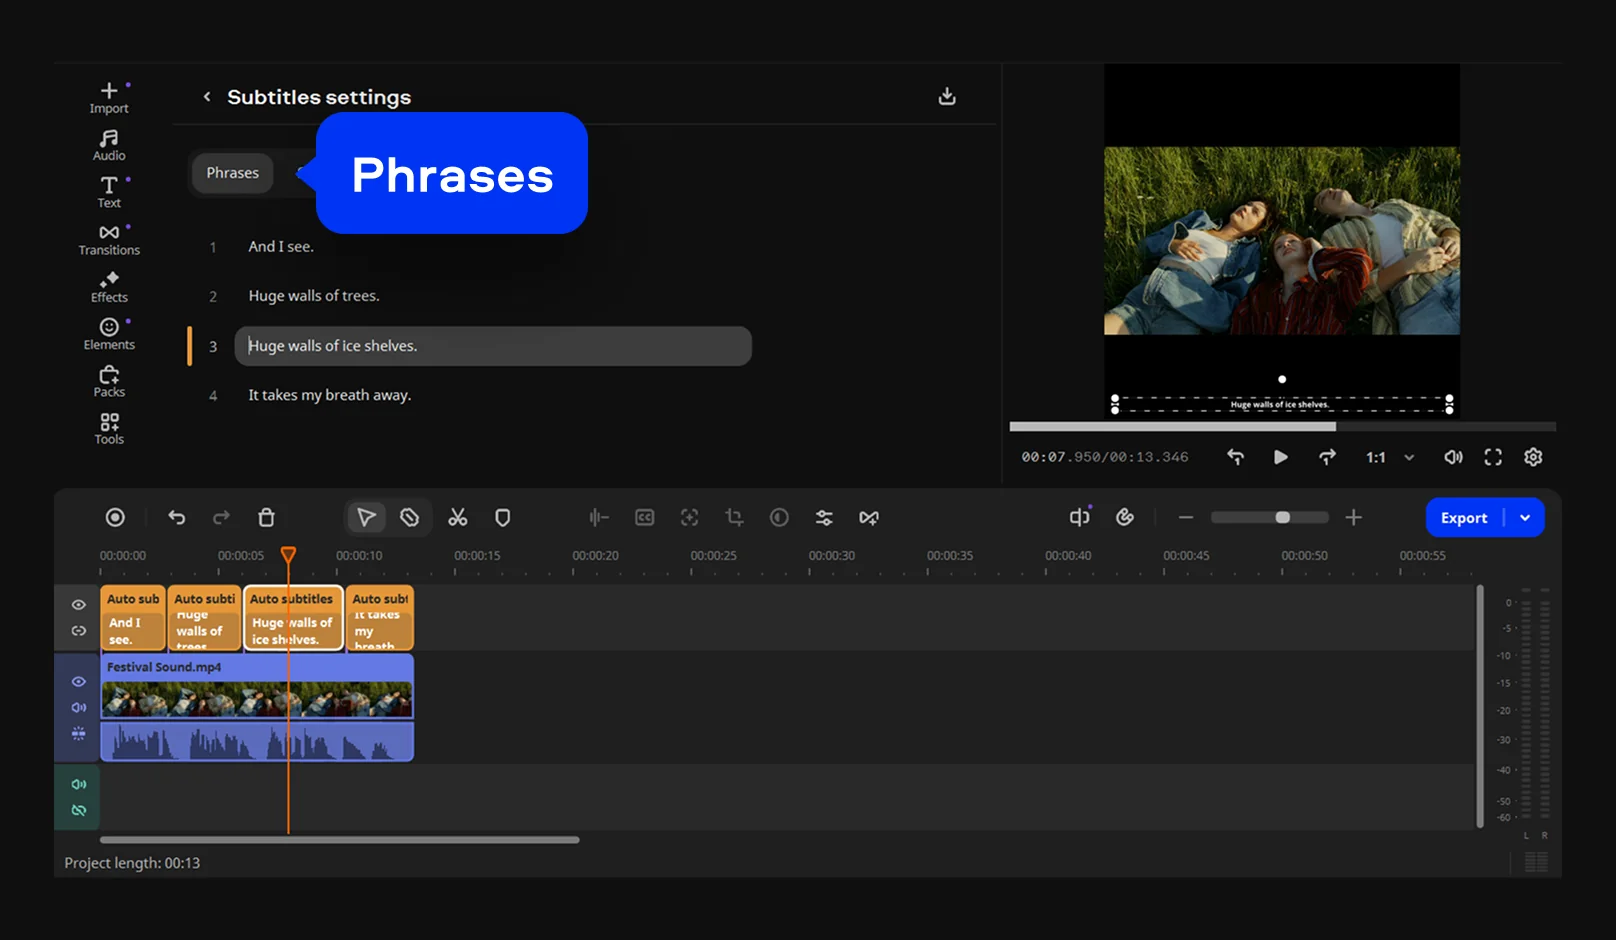
Step 4. Export the results
Click Export to save your video with the burned-in captions, or save the transcript separately as a standalone .srt file to use elsewhere.
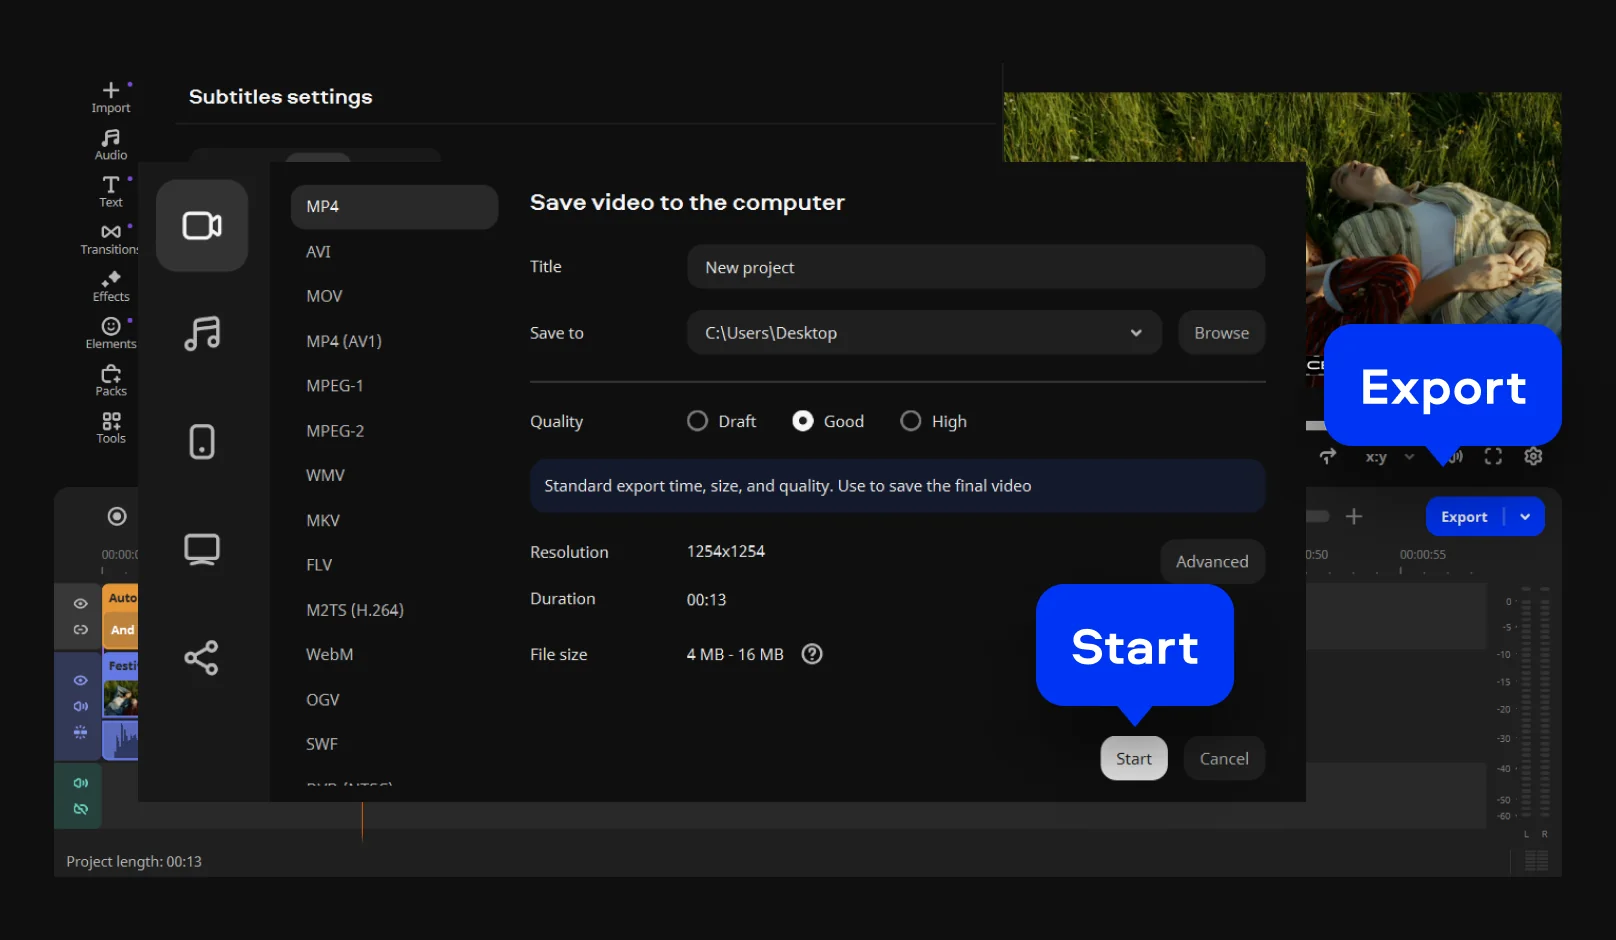
You can try all of this without paying first. The free download lets you test Auto subtitles and every other automated tool in the app, though exports are capped at 60 seconds and carry a watermark. Movavi Video Editor Lite removes that length cap and adds a smaller watermark, and the full version removes both restrictions entirely. It's a setup built so you're not paying for anything you're not using yet.
Formats worth knowing before you start
MP4 is the safest default if you're planning to upload the finished video to YouTube afterward – it's the format most platforms expect and the one Movavi Video Editor recommends for broad compatibility.
Getting more out of a finished transcript
Once you've got captions generated and cleaned up, they're not limited to sitting on top of your video. Export the .SRT file and you can attach it to a YouTube upload as a separate subtitle track, drop the text into a blog post as a full write-up of the video, or use the timestamps to build out video chapters. If you want more ways to put a transcript to work – repurposing it into a caption pack, a script for a follow-up video, or a quote graphic – Movavi Ideas publishes a new step-by-step trick every week, free and exclusive to Movavi Video Editor users.
And once the words are sorted, the rest of the edit is still one project away: hundreds of built-in transitions, titles, and filters are sitting in the same timeline, ready for whatever style the video calls for next.
Movavi Video Editor
Create awesome videos easily

Frequently asked questions
Can I transcribe an audio-only file, not just a video?
Can I transcribe an audio-only file, not just a video?
Yes. Movavi Video Editor accepts MP3, WAV, and FLAC audio files directly, so you don't need a video attached to turn a recording into text.
How accurate is automatic video transcription?
How accurate is automatic video transcription?
Movavi Video Editor's Auto subtitles tool generates highly accurate text across 100+ languages. Even with such reliable results, a quick pass through the Phrases panel is worth it for names, brand terms, or anything spoken quietly.
What's the difference between a video transcript and subtitles?
What's the difference between a video transcript and subtitles?
A transcript is the full text of what's said, typically with timestamps. Subtitles are that same text formatted and timed to display on screen. Auto-generated subtitles double as a transcript – you get both from one pass.
Do I need an internet connection to auto transcribe video files?
Do I need an internet connection to auto transcribe video files?
Movavi Video Editor is desktop software, so your files stay on your own computer through the editing process rather than uploading to a browser-based service.
Can I get a downloadable transcript file, not just on-screen captions?
Can I get a downloadable transcript file, not just on-screen captions?
Yes – subtitles export as standalone .SRT files, which carry the full transcript with timestamps and work independently of the video.

Have questions?
If you can’t find the answer to your question, please feel free to contact our Support Team.
Join us for discounts, editing tips, and content ideas


1.5M+ users already subscribed to our newsletter