Brighten Your Video in One Click for a High-quality Result

Movavi Video Editor is complete video editing software for Windows and Mac that lets you brighten a video in seconds with the one-click Magic Enhance feature, or fine-tune brightness, contrast, saturation, and tint manually. Whether you're looking for how to make a video brighter in just a few clicks or want to learn how to lighten a video with full manual control, this guide walks you through every option.

Try it for free on any Windows or Mac device.

Trusted by 70 million creators worldwide

We’re the #1 choice for millions of people from all around the world. Join our thriving community and create stunning content with incredible ease.

70M+

users

190+

countries

15+

updates per year

10,000+

effects to choose from

Key features of the video brightening software

From one-click auto-fix to precise manual control – everything you need to lighten a video and improve its visual quality.

One-click Magic Enhance – instant brightness and contrast fix

Magic Enhance is Movavi's automatic brightness correction tool: just click it, and the software analyzes your clip and adjusts the brightness and contrast levels in one shot. It's the fastest way to brighten a video that came out too dark without touching a single slider.

Advanced color panel – brightness, contrast, saturation, and tint

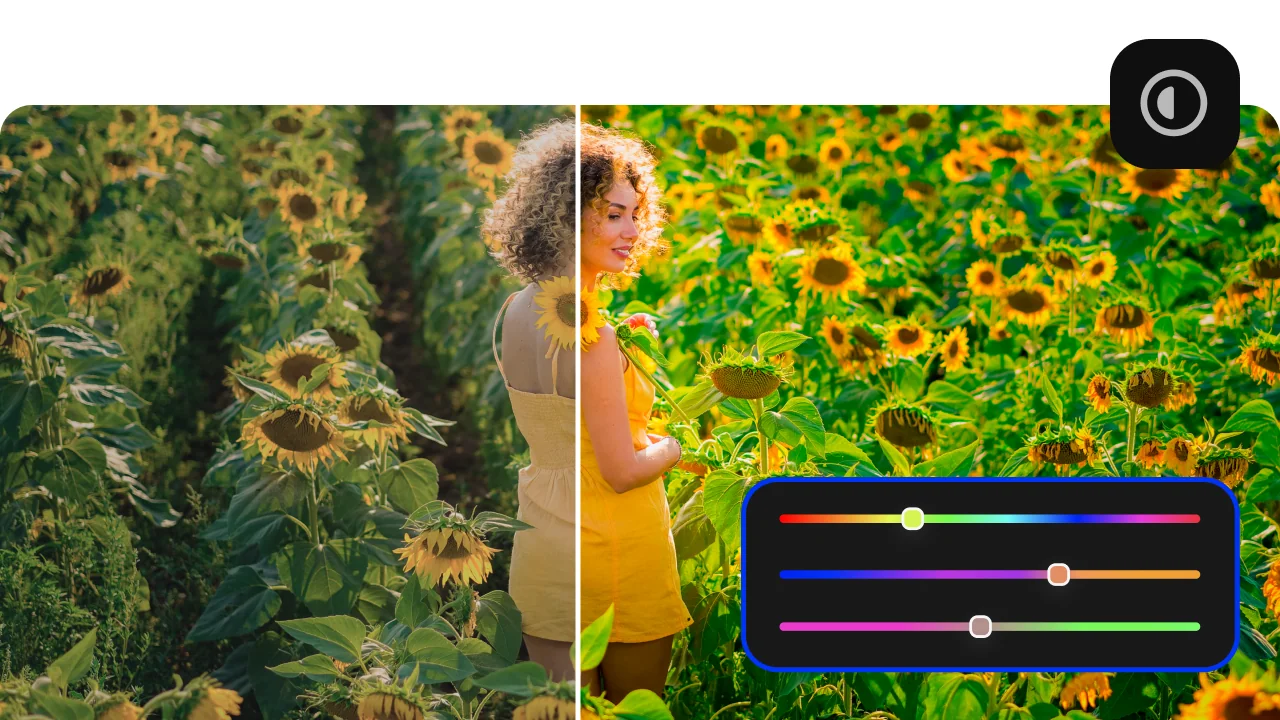
When the one-click fix isn't precise enough, the Advanced tab in the Color Adjustments panel gives you individual sliders for Brightness, Contrast, Saturation, Tint, and more. Drag the Brightness slider to the right to lighten the video, then nudge up Contrast to keep the image sharp as you brighten it. This combination works especially well for recovering underexposed footage shot on phone cameras or in low-light indoor settings.

180+ filters and color presets for consistent visual quality

Beyond brightness correction, Movavi includes a library of over 180 filters, LUTs, and color presets that you can drop onto any clip to apply a consistent look. If you're brightening multiple clips from the same shoot, applying the same filter preset across all of them is the fastest way to boost quality and maintain visual consistency across a longer edit.

Brighten and finish the full edit in one app

Movavi Video Editor isn't just a brightness tool – it's full-featured video editing software. After brightening your clip, you can trim it, add music, drop in titles, stabilize shaky footage, denoise the audio, and export in any popular format – all without leaving the app. This makes it the practical choice over single-purpose brightness tools that hand your clip back with no other options.

Why Movavi is the right tool to brighten a video

Three reasons people reach for Movavi when footage comes out too dark.

Two modes – auto fix or full manual control

Most brightness tools force you to choose: either an automatic fix you can't fine-tune, or a full manual workflow with a steep learning curve. Movavi gives you both in the same panel. Hit Magic Enhance for a fast, clean result on most clips, or switch to the Advanced tab whenever you need more precise control over brightness, contrast, and saturation together. No other free video editor handles both this well.

Works on any video – phone footage, old clips, low-resolution files

Whether you're brightening a dark iPhone video, fixing underexposed DSLR footage, or making an old low-resolution clip more watchable, Movavi handles it the same way. The color tools work with every supported format – MP4, MOV, MKV, AVI, and more – and there's no file size limit or resolution cap. A 4K clip and a 480p phone video get the same quality treatment.

Free to try – Windows and Mac

Movavi Video Editor is a free download for both Windows and Mac, with a trial that unlocks every brightness and color tool – Magic Enhance, the full Advanced panel, all filters and LUTs, and export – before you spend a dime. The trial version adds a watermark to exported files; the paid version removes it. Download straight from movavi.com and start brightening right away.

How to make a dark video brighter with Movavi Video Editor

Step 1. Download and install Movavi Video Editor

Start by downloading the Movavi Video Editor installation file on your Windows PC or Mac. Once you’ve downloaded the installation file, open the file and follow any on-screen instructions to complete the installation.

Step 2. Add a video clip to brighten up

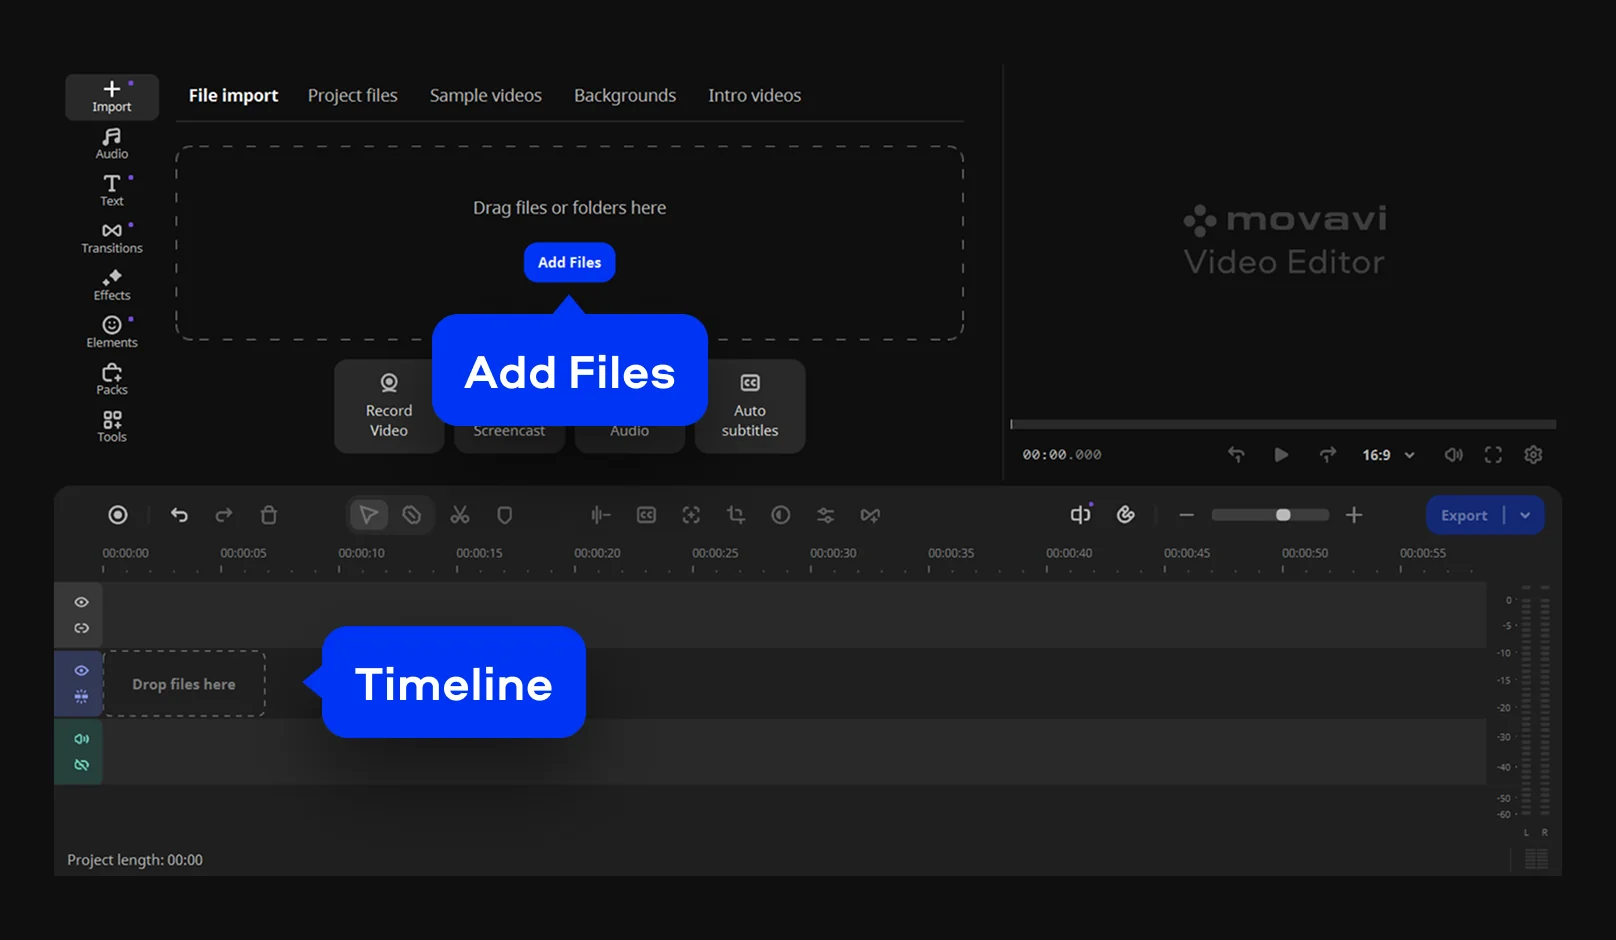
Open Movavi Video Editor once the installation is complete. Drag your video file into the File import section to open it, or press Add Files to select it manually.

The video file will appear in the Project files – drag and drop the file into the Timeline section at the bottom of the window to open it for editing. I tested it on a clip of my dog where he was doing his tricks outside in the dark and even a 10-20% increase made a big difference while still keeping the video quality.

Step 3. Adjust the video brightness

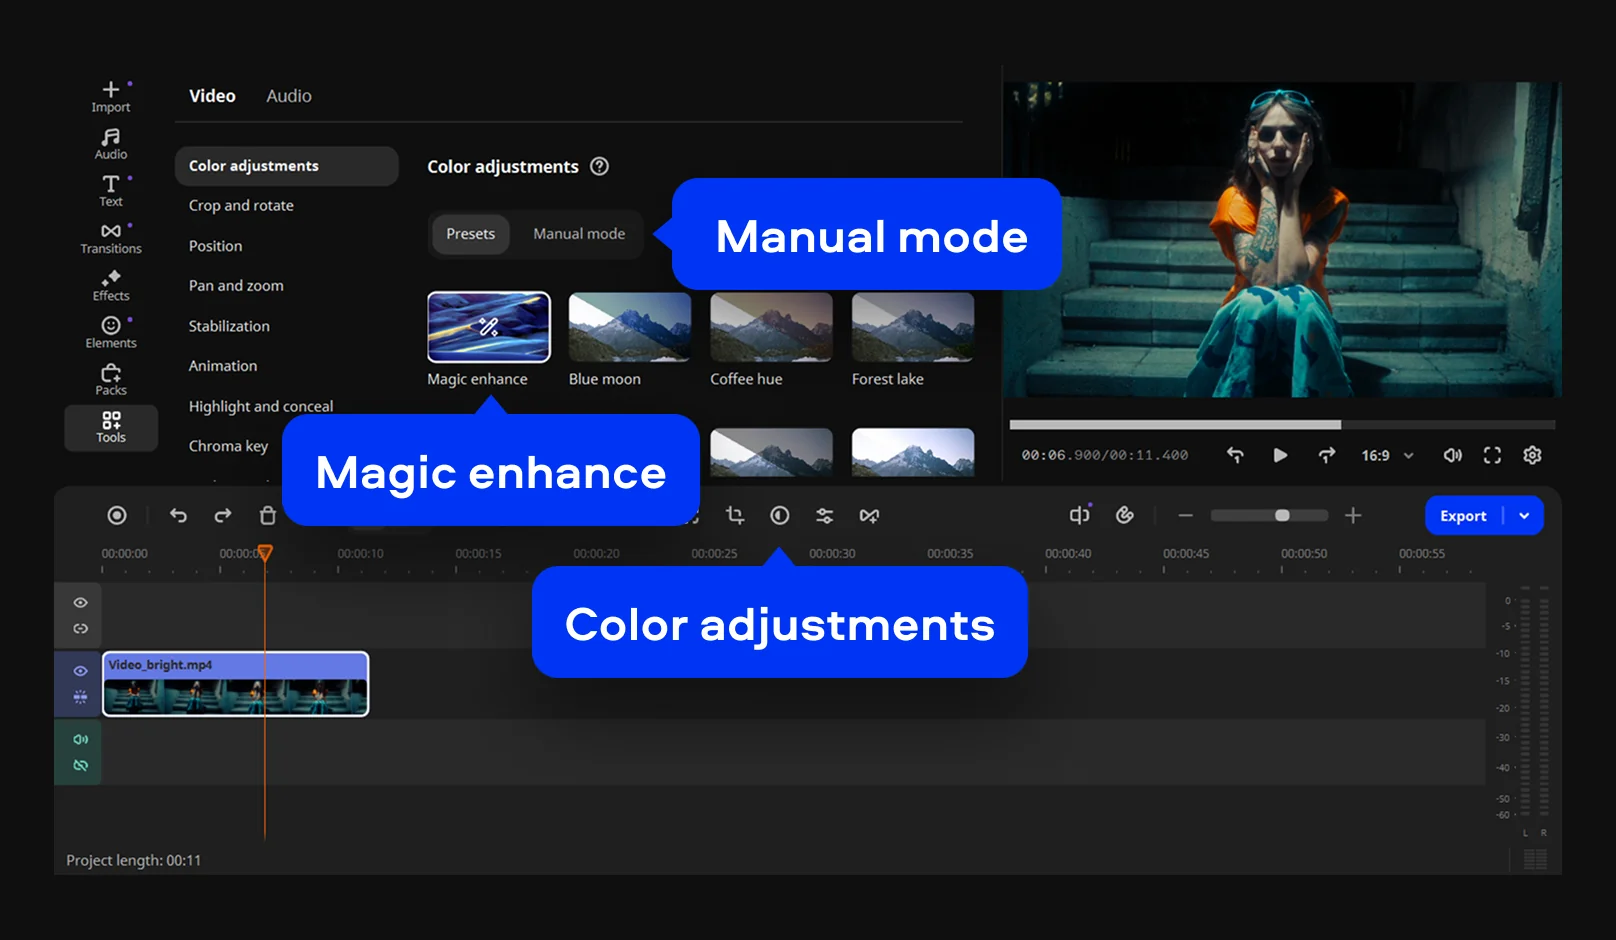
To adjust the brightness, press the Color adjustments icon above the Timeline section. Press Magic enhance to automatically improve the video’s brightness and contrast levels or select the Manual mode tab to change these settings manually.

I like the fact that there is an automatic way to do this. To adjust the brightness, press the Color adjustments icon above the Timeline section. Press Magic enhance to automatically improve the video’s brightness and contrast levels or select the Advanced tab to change these settings manually.

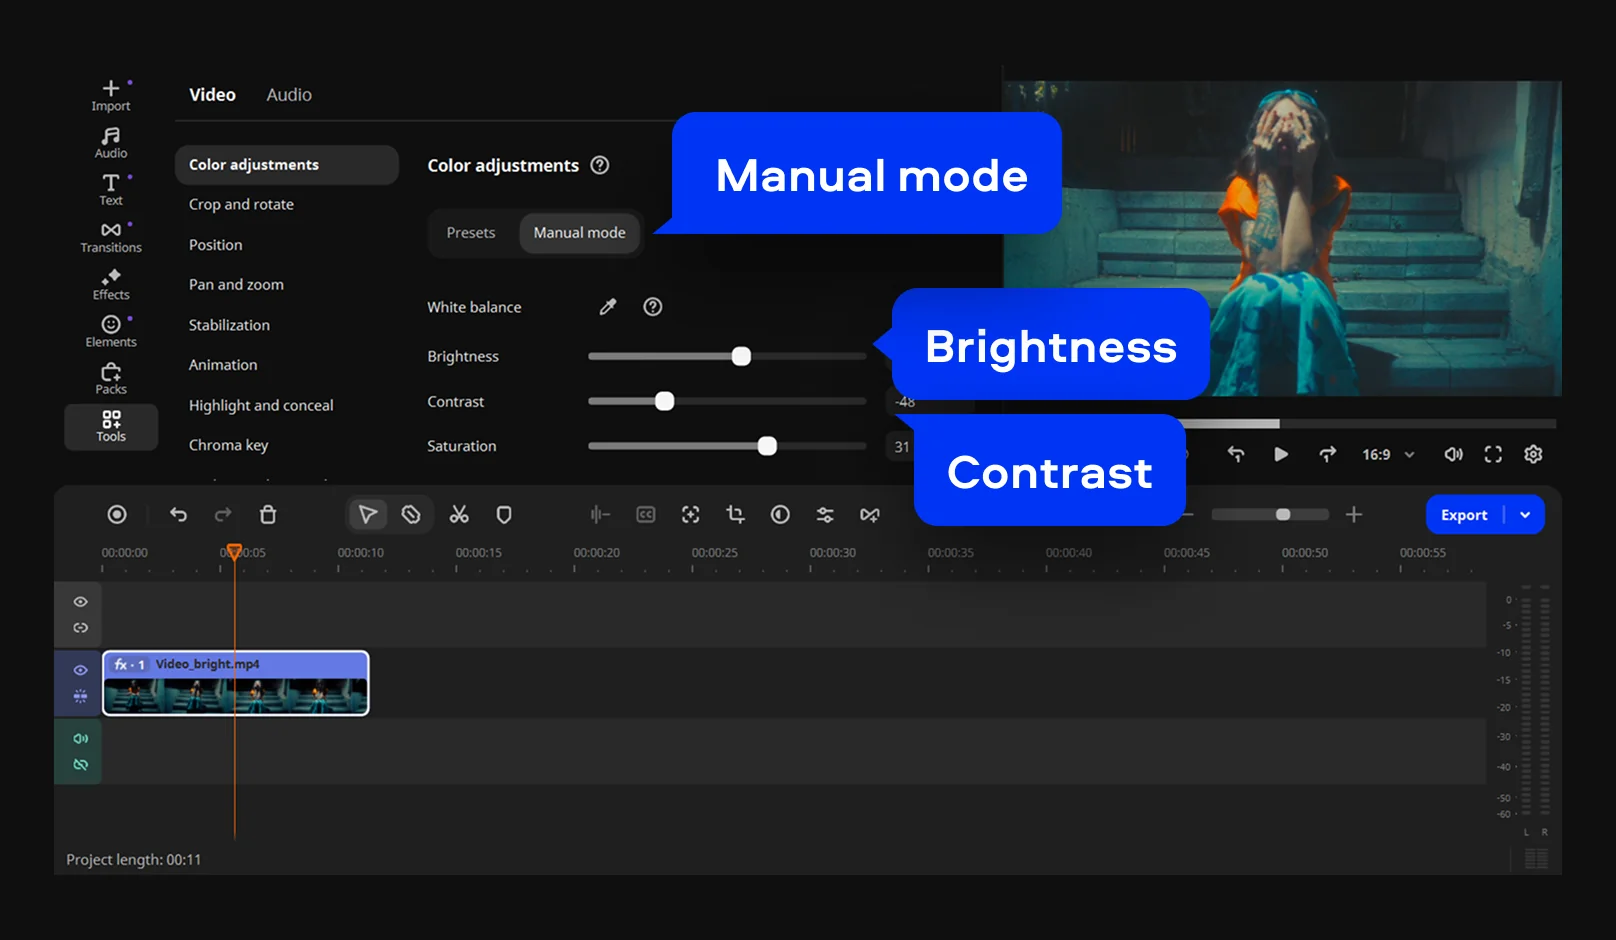
In the Manual mode, move the Brightness and Contrast sliders towards the right to increase those settings, or left to decrease them. Make any additional changes to your video’s color settings (such as saturation and tint levels) as required.

Step 4. Save the edited video

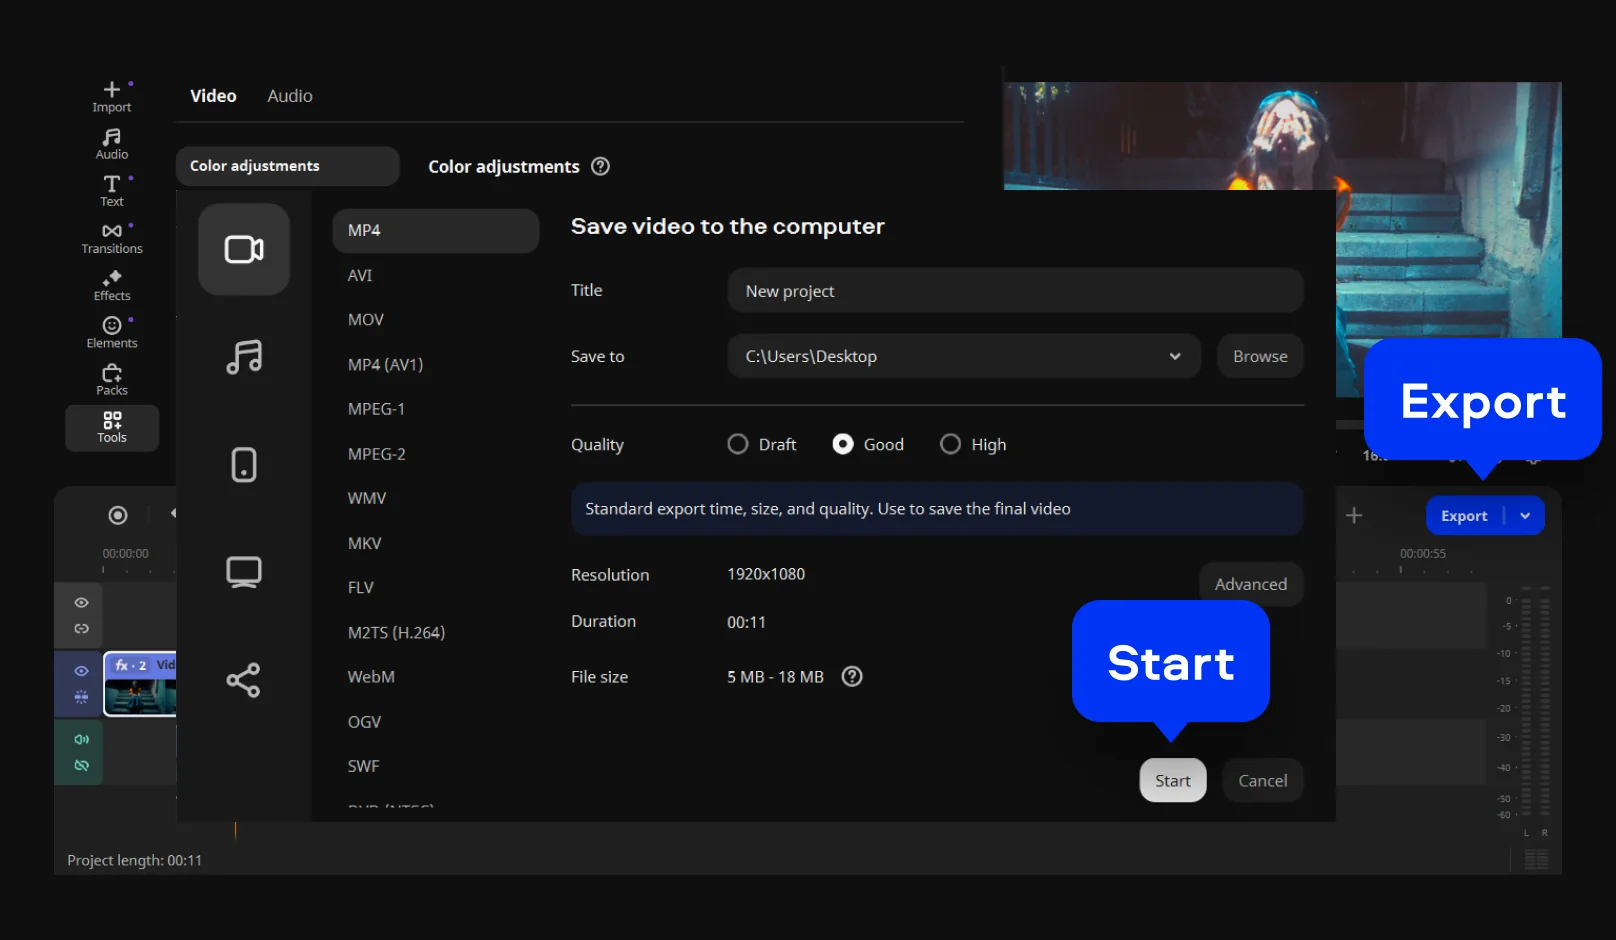
When you’re ready to save the video, press the Export button. Confirm your file output settings, including the video title, resolution, quality, and file type, then press Start to save the video.

Who needs to brighten a video

Dark footage is one of the most common video problems – and it shows up across every type of creator and project.

CONTENT CREATION

Mobile creators and everyday videographers

Phones are the most common video capture device, and phone cameras frequently underexpose in mixed lighting, indoors, or at night. The Magic Enhance one-click fix in Movavi makes it easy to brighten a dark iPhone or Android video after the fact – no color correction experience required. Drag the clip in, click Magic Enhance, and export. It's become a standard step for creators who edit phone footage before posting.

YOUTUBE / VLOGGING

Vloggers and YouTube creators

Vloggers filming in uncontrolled environments – restaurants, outdoor events, indoor venues with poor lighting – routinely end up with clips that are too dark to publish without correction. Movavi's Advanced color panel gives them the precision to brighten specific tonal ranges (shadows and midtones) rather than blowing out the highlights, which produces a more natural result than a blanket brightness boost.

BUSINESS

Corporate and event video teams

Marketing teams and event videographers who capture conference footage, interviews, and product demos in office lighting or on location often have no control over the shooting environment. Movavi’s batch-friendly workflow and consistent color tools let a small team improve the quality of an entire library of underexposed clips without outsourcing the work to a professional colorist.

Frequently asked questions

Common questions about brightening dark videos on Windows, Mac, iPhone and Android.

How do I increase the brightness of a video?

To increase video brightness in Movavi Video Editor: import your clip and drag it to the Timeline, then click the Color Adjustments icon above the Timeline. Click Magic Enhance for a one-click automatic brightness boost – this is the fastest way to brighten most clips. Or open the Advanced tab and drag the Brightness slider to the right for manual control. Click Export to save. Brighten gradually and adjust contrast at the same time for the best results.

Can I brighten up a dark video?

Yes – brightening a dark video after filming is a standard video editing task, and it works well as long as the original footage isn't completely black. Movavi's Magic Enhance button handles most everyday underexposure cases automatically – phone footage shot in dim restaurants, indoor event clips, and nighttime outdoor video all respond well to a small brightness and contrast boost. For more severely dark footage, the Advanced color panel lets you target shadows and midtones independently, which produces a cleaner result than a global brightness boost.

Can I brighten a video on my iPhone?

Yes, with the right app or tool. The iPhone's built-in Photos app has a basic exposure slider under Edit → Adjust that can lighten a video quickly for casual use. For more control, Movavi Clips – Movavi's free mobile app for iOS – includes a Brightness slider under Adjustments for more precise results; it's free with optional paid features. InShot is another popular mobile app for iOS and Android that lets you adjust the Lightness slider under Filter → Adjust. For full precision – especially if you want to improve quality beyond a basic brightness bump – transfer the video to a Mac or Windows computer and use Movavi Video Editor's Advanced color panel, which gives you significantly more control than any mobile device tool.

How do I fix a video that is too dark?

The fastest fix: open the clip in Movavi Video Editor, click Color Adjustments, and hit Magic Enhance. That single click brightens the video and adjusts contrast automatically. If the result needs tweaking, open the Advanced tab and manually raise Brightness and Contrast together. Here are four things to keep in mind when fixing a dark video:

  • Raise brightness gradually – 10–20 points at a time works better than one big jump.
  • Adjust contrast alongside brightness to keep definition intact.
  • Reduce noise first if the original clip is grainy – brightening amplifies noise, so denoise the footage before you lighten it.
  • Export once in high quality – re-exporting a compressed video adds artifacts, so get the brightness right before saving the final file.

If the clip is low-resolution or shot on an older device, these steps will still noticeably improve quality, even if they can't fully recover lost detail.

Join us for discounts, editing tips, and content ideas

1.5M+ users already subscribed to our newsletter

By signing up, I agree to receive marketing emails from Movavi and agree to Movavi's Privacy Policy.