Step 1. Install the program
Download the installation file and install the program on your computer following the on-screen prompts.

Movavi Video Editor uses AI tools and manual controls to sharpen footage, correct color, remove noise, and stabilize shaky clips in one workspace.
Whether you want to upscale an old video file, fix a blurry phone clip, or bring a color-graded, professional look to your footage, Movavi works without requiring technical expertise.
70M+


A complete set of tools to improve video quality – from AI upscaling and noise removal to color correction and stabilization.
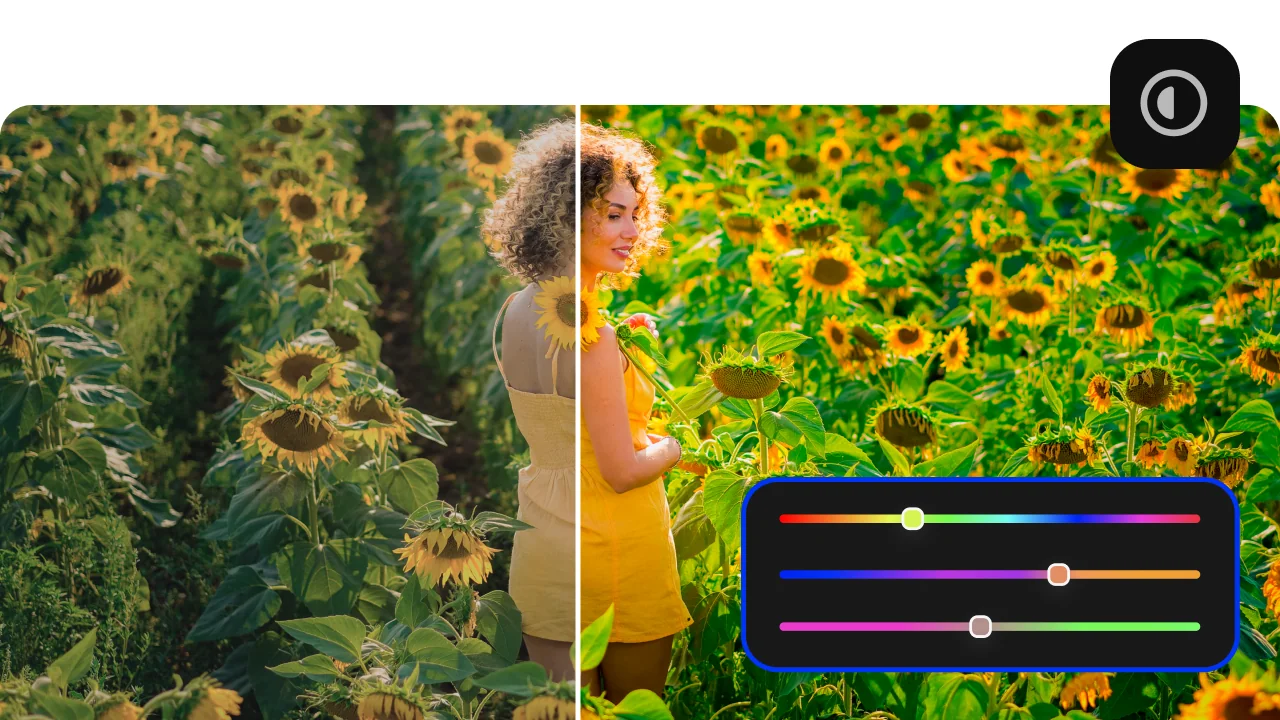
Color correction with presets and manual controls
The Color adjustment panel in Movavi Video Editor gives you both one-click presets and full manual sliders for Brightness, Contrast, Saturation, Hue, and Warmth. Presets apply a balanced correction instantly – useful when you need to improve video quality across many clips quickly. Manual controls give precise frame-level authority over tone and mood for projects where consistency or a specific cinematic look is the goal.
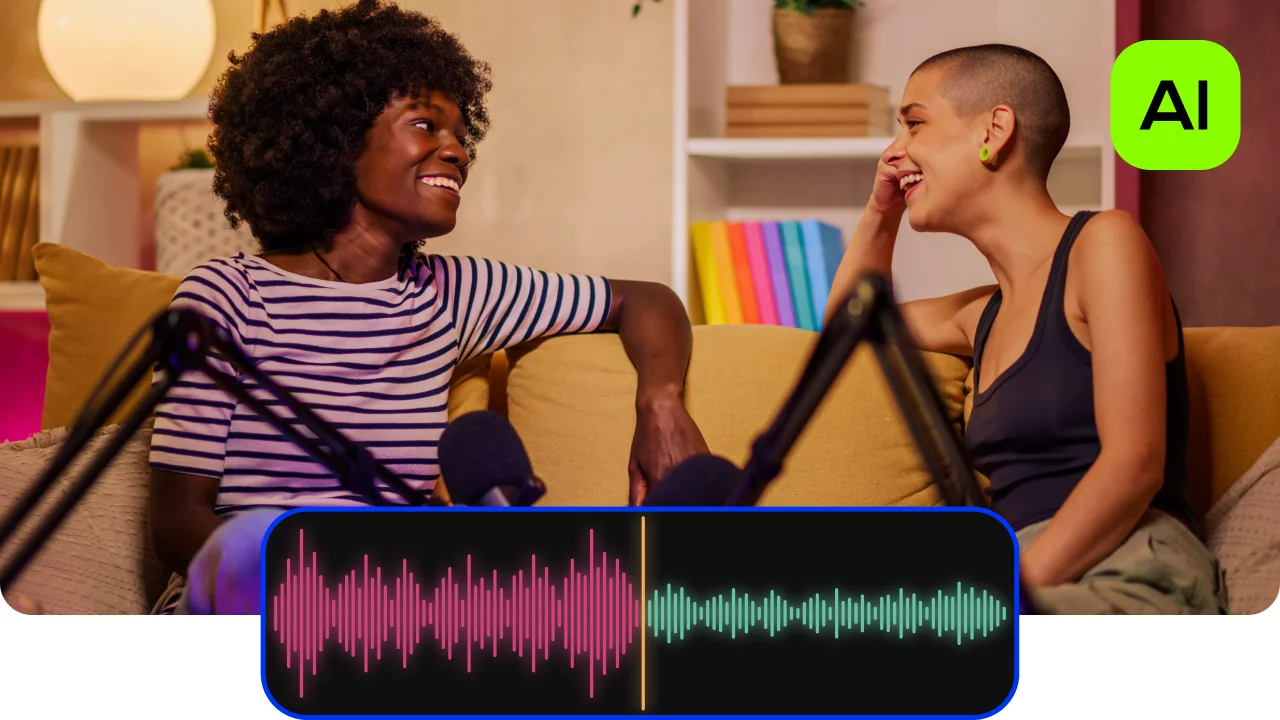
AI audio denoiser – remove background noise automatically
Movavi Video Editor scans the audio track of any video file and automatically identifies and removes background sounds without affecting the primary voice or sound in the recording. This is one of the most practical quality improvements for footage shot outdoors, in vehicles, or in rooms with poor acoustic treatment, and it runs in a single click without requiring manual frequency adjustment.
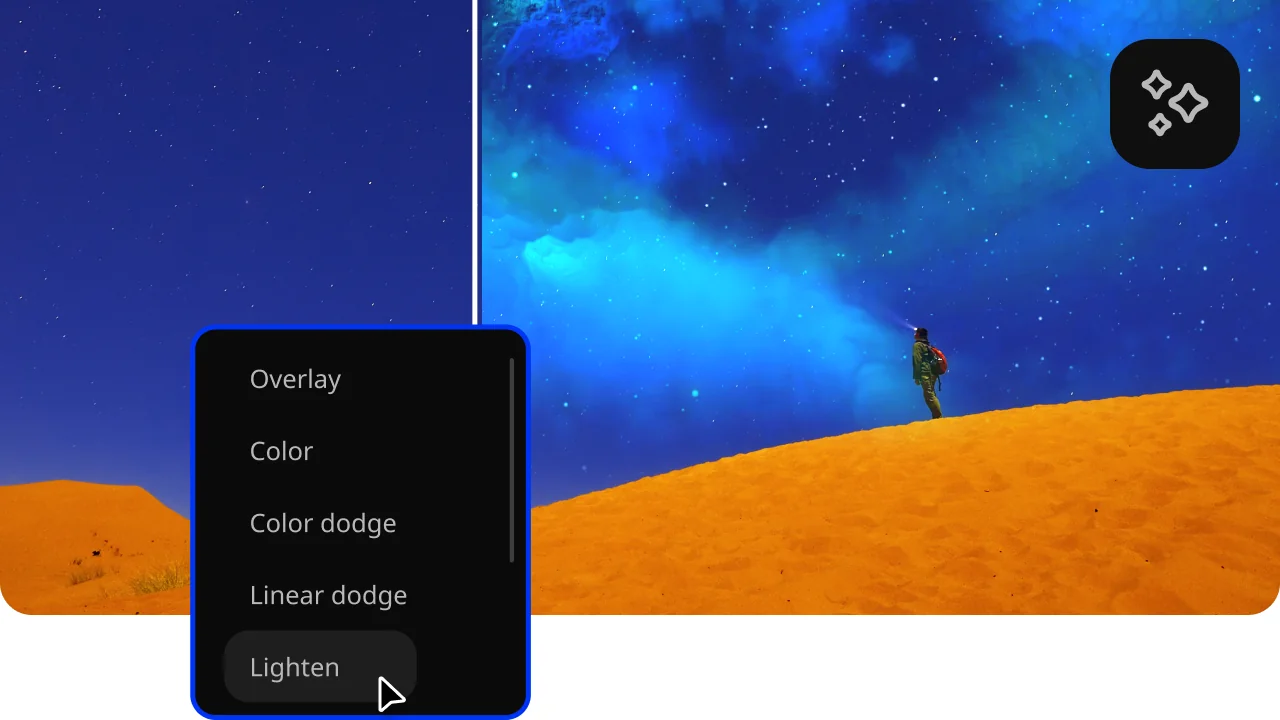
Filters, LUTs, and cinematic effects library
Movavi includes a library of over 10,000 effects, filters, and LUTs that apply professional color grades to footage instantly. LUTs are particularly useful for matching the visual quality of clips shot in different conditions – different cameras, different lighting – so that a finished video looks consistent from start to finish. Drag any filter from the library onto a clip on the timeline to preview the result immediately.
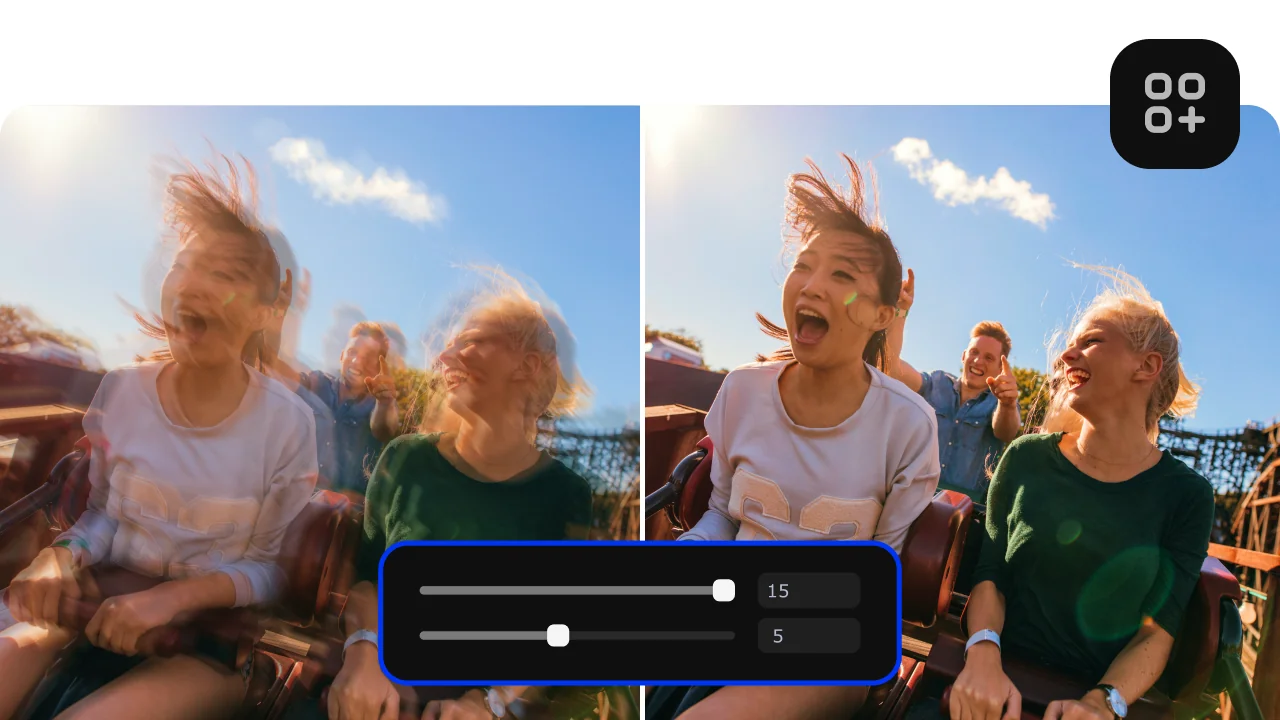
Video stabilization
The Stabilization tool analyses shaky footage and applies frame-by-frame correction to smooth out camera movement – essential for handheld clips, action footage, and anything recorded without a tripod. On the export side, Movavi Video Editor supports output at HD and 4K resolution.
Three reasons Movavi's video enhancer stands out from online tools and standalone apps.
From raw, uneven footage to a sharp, color-balanced video file – ready to share.
Download the installation file and install the program on your computer following the on-screen prompts.
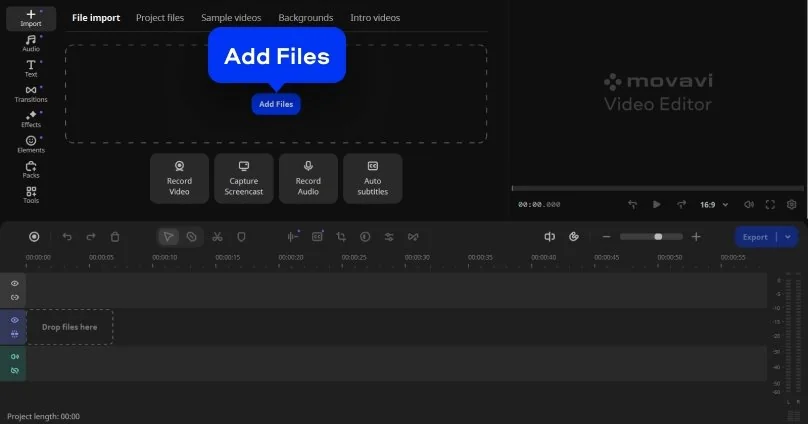
Click Add Files or drag videos, images, and audio into the Import area, then place them on the timeline. Reorder clips to set the story flow before you start refining.
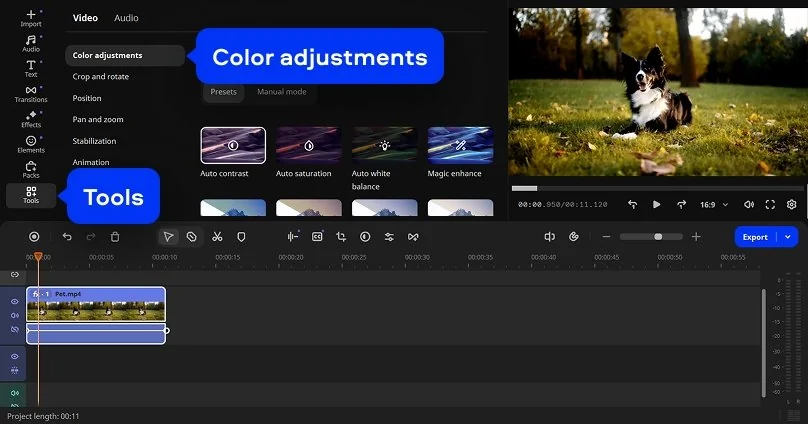
Open the Tools tab and select Color adjustments. You can select a ready-made preset or edit your video manually, adjusting parameters like Brightness, Contrast, and Saturation. Cut unwanted pieces, stabilize shaky footage, and apply AI enhancement tools to make every clip look sharp, balanced, and professional.
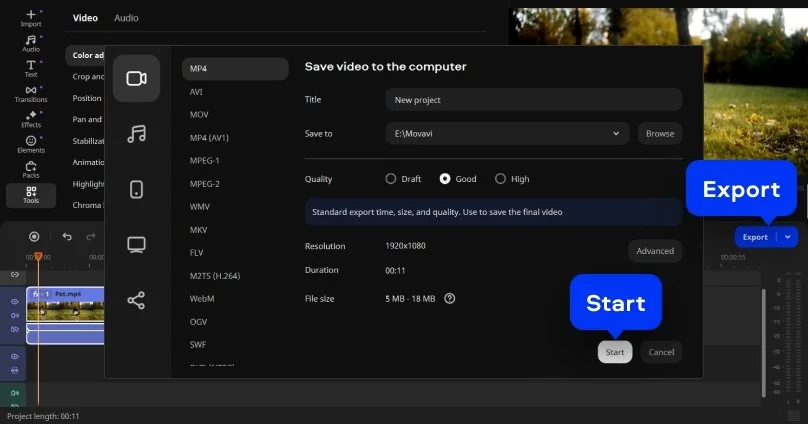
Click Export, pick a format (e.g., MP4), choose Quality and Resolution (up to HD/4K if available), set the save location, then press Start to render your video.
Improving video quality is a practical need across very different types of creators and projects.
Businesses updating existing video content · BUSINESS
Small businesses and marketing teams with existing promotional videos that look outdated use Movavi Video Editor to improve quality without reshooting. Color correction, noise removal, and output resolution upscaling can make a video filmed two or three years ago look current enough to use on today's platforms – a significant cost saving compared to commissioning new footage.
Families restoring archive and home footage · PERSONAL
Families digitising old VHS tapes, home videos recorded on early digital cameras, or phone clips from years ago use AI tools to bring back clarity, warmth, and stability to footage that has degraded or was captured at low quality. Stabilization smooths out handheld camera shake, color correction restores faded tones, and upscaling makes old footage watchable on modern screens.
Vloggers and content creators matching footage quality · CONTENT CREATION
Travel vloggers and content creators who shoot across different conditions and devices use Movavi Video Editor to match the visual quality of clips recorded in inconsistent light or on different cameras. Auto color presets and LUTs bring footage from an outdoor overcast shot and an indoor artificial-light shot into a consistent visual register, so the finished video looks intentional rather than assembled from unrelated sources.

Common questions about improving video quality, AI enhancers, blurry footage, and upscaling.
Yes, improving video quality in post-production is a standard part of video editing. A program like Movavi Video Editor can address the most common quality problems: low brightness or exposure, inconsistent color, background noise in the audio track, shaky camera movement, and low resolution. The tools that handle these issues – Color adjustments, Noise removal, Stabilization, and Effects – are all present in Movavi and available from the Tools tab. The extent to which quality can be improved depends on the original footage: very heavily compressed or extremely low-resolution video files will see limited improvement, but most real-world footage captured on a phone, a consumer camera, or a drone can be made significantly cleaner, sharper, and more visually consistent through color correction, noise treatment, and upscaling.
ChatGPT is a text-based language model and cannot process, edit, or enhance video quality directly. It has no ability to open, read, or modify video files. What ChatGPT can do is advise on which video enhancer tools to use, explain how to apply specific settings in an editor, or help write scripts and descriptions for video projects. For actual AI video enhancement like upscaling resolution, removing noise, stabilizing footage, or correcting color automatically, you need a dedicated AI video enhancer tool such as Movavi Video Editor, Topaz Video AI, or an online service. These applications apply machine learning models directly to the video file's pixel and audio data, which is a fundamentally different kind of task from what a text-based AI system does.
To improve the quality of a blurry video, use a video enhancer that includes a sharpening or upscaling tool. In Movavi Video Editor, go to Tools > Color adjustments, and increase Contrast slightly – this makes edges more defined and reduces the perceived softness of the image. Apply the Stabilization tool if the blur is partly caused by camera movement. For very blurry footage caused by extreme defocus or heavy compression, dedicated AI upscaling tools like Topaz Video AI apply more aggressive sharpening algorithms and produce better results than general-purpose editors, though they are significantly more expensive. A free online tool such as Clideo can handle light sharpening without installation, but they impose file-size limits.
Converting a blurry or low-resolution video to HD requires software that supports resolution upscaling. In Movavi Video Editor, import the video file, apply color correction and stabilization as needed. For more aggressive upscaling – converting SD footage to 4K – dedicated AI upscaling tools like Topaz Video AI or Runway ML produce higher-quality results than general-purpose editors, but require more processing time and hardware resources.


1.5M+ users already subscribed to our newsletter