Step 1. Download the split-screen Video Maker
Download the Movavi Video Editor installation file and launch it. Once the setup is completed, the program will open automatically.

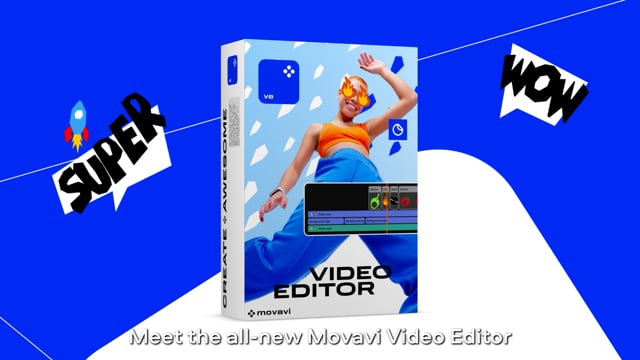
How to make a split-screen video?
Use Movavi Video Editor!
Edit and enhance videos easily
Add stylish transitions, titles, and filters
Stabilize and reverse video, equalize sound, and more
By clicking the download button, you're downloading a free version of the program.*
How to put two videos side by side
If you want to combine two videos on your monitor and create a stunning split-screen clip that will impress the viewers, you’ll need efficient video-editing software. We recommend you Movavi Video Editor! This easy-to-use app for Windows and Mac OS will help you to not only produce dramatic split-screen clips but also perform many other video-editing tasks like adding music, applying transitions, and exporting video to different output formats.
Download Movavi Video Editor and start creating your split-screen videos now!
Creating the split-screen effect is easy, just follow the instructions and see for yourself!
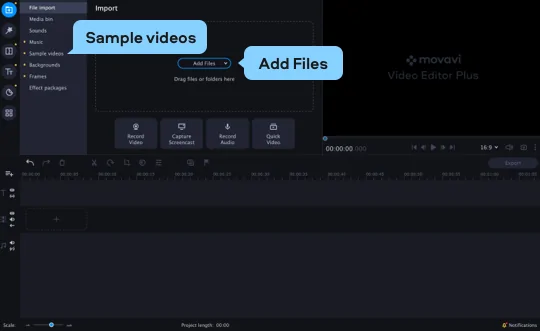
Step 1. Download the split-screen Video Maker
Download the Movavi Video Editor installation file and launch it. Once the setup is completed, the program will open automatically.
Step 2. Add videos to the program
As you've launched the program, click Add Files and locate the videos you want to combine.
To make your video fancier, add some professionally directed footage from our partner’s stock video library. Select Sample video and click Download more! (or visit the Videoblocks page) to get more information about this option.
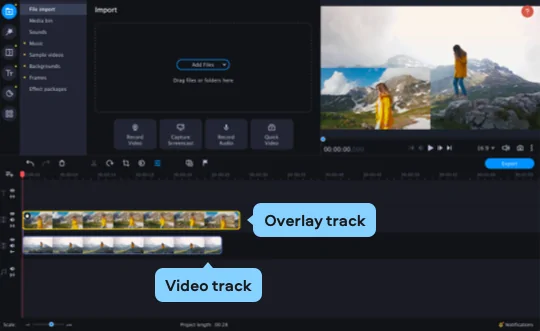
Step 3. Transfer a video to an overlay track
By default, the chosen videos will be added to the Video Track on the Timeline in the lower part of the program window. First, select one of your videos and start dragging it up the Timeline – this will create an Overlay Track above the main Video Track. Drop the video onto the Overlay Track.
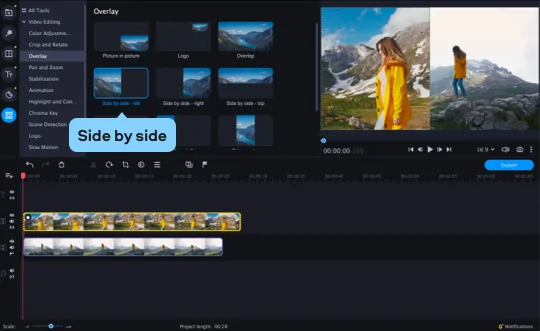
Step 4. Create a split-screen video
Combining Two Videos
With our split-screen video editor, you can split a screen in half horizontally or vertically. To do this, double-click the video on the upper (overlay) track to enter editing mode. Open the list above the Preview window and choose Side by side. Click one of the four buttons next to the list to choose where the video from the main (lower) video track will play. The video from the overlay (upper) track will appear on the opposite side of the screen. For example, click the left button to play the main video on the left and the other video on the right side of the screen. Note that the videos will be split in half.
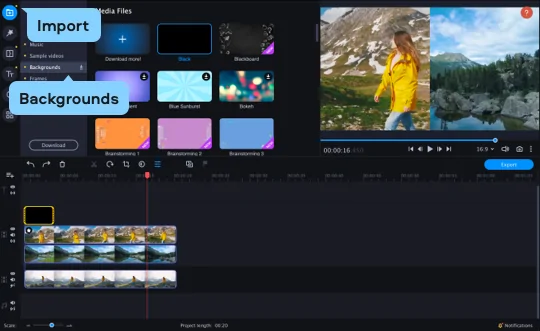
If you want to put your videos side by side without splitting them in half, use the Picture in picture option. First, you need to add a background image – for example, a simple black background. On the Import tab, click Backgrounds, find an image you like, and click it to download. Then drag the picture to the Timeline. Alternatively, you can add a picture from your library, click Add Files, and select an image you want to use as a background. The picture will appear on the Timeline.
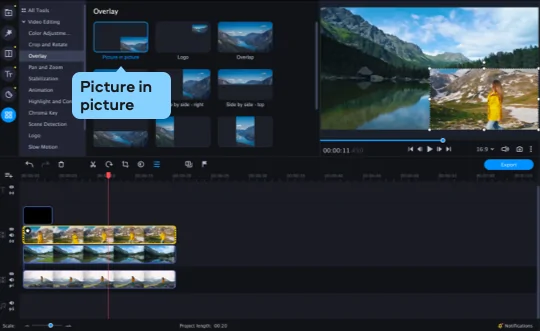
Now you need to drag the video you added before from the main Video Track to the Overlay Track, so both videos are on the Overlay Track. The background picture needs to stay on the main Video Track.
Double-click the first video and choose the Picture in picture option. To change the video size, drag on its corners. Drag and drop the video to change its position on the background. Repeat the same actions to edit the second video.
Putting Multiple Videos Side by Side
With Movavi Video Editor, you can put as many videos side by side as you want. To do this, add a background image for your videos first. Open the Import tab, click Add Files, and locate a picture. The picture will be added to the Timeline. To add more videos to your project, click Add Files again and select the clips. All your videos will appear on the main Video Track along with the background image you added earlier. Now you need to move all the videos to the overlay (upper) track. Make sure that the background image stays on the main (lower) video track.
To create a multi-screen video, double-click the first video on the Overlay Track and select Picture in picture from the list above the preview window. Drag on the edges of the video to change its size. Drag and drop the clip to position it over the background. Repeat these actions with every video on the Overlay Track.

Step 5. Manage the sound
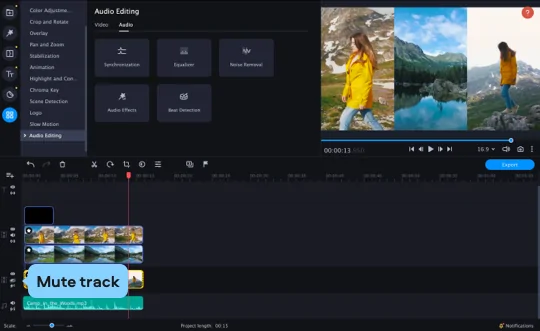
If you play your newly created split-screen video, you’ll hear the soundtracks of the clips you’ve added playing at the same time. If you’ve placed two videos side by side using different video tracks, you can mute one of the videos to avoid confusing your audience. To do this, simply click the Mute Track icon on either the Video Track or Overlay Track.
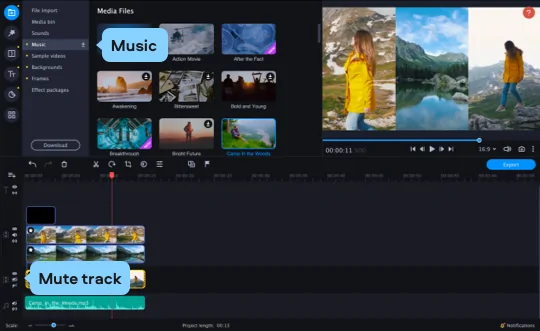
If you’ve combined multiple clips into a single video track, it’s better to mute this track and add background music. First, click the Mute Track icon on the Overlay Track. To add music from the built-in library, open the Import tab and select Music. Click your choice of music sample to download it. After the download is complete, drag and drop the audio track to the Timeline. To add music from your own library, click the Add Files button and choose a track. It will be added to the Timeline automatically.
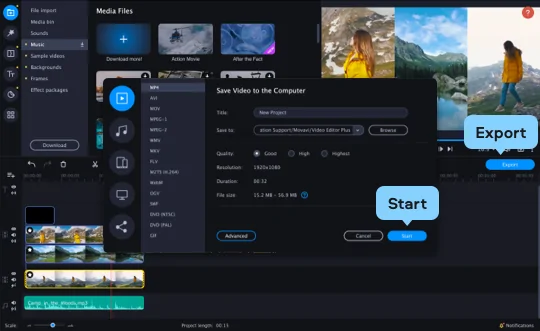
Step 6. Save your clip
Now your side-by-side video is ready to wow your audience. Click the Export button and choose the appropriate tab at the left side of the pop-up window. You can save the video for viewing on your computer or mobile device or convert it for uploading to the web. Once you’ve entered the save settings, click Start.
It’s easy to create a split-screen video with Movavi Video Editor!
Movavi Video Converter
*The free version of Movavi Video Editor may have the following restrictions depending on the build: watermark on exported clips, 60-second video or 1/2 audio length limit, and/or some advanced features unavailable when exporting videos. Learn more

You can easily create a picture-in-picture effect using Movavi Video Editor. Check out our detailed step-by-step guide by following the link below.
You can combine multiple videos into one with Movavi Video Editor. Just follow these steps:
Apart from Photoshop, there are many other programs that let you join pictures. Movavi Photo Editor is one. With this program, you can combine images in just a few clicks.

Have questions?
You may also like
An easy way to record from your screen in HD. Make video footage of any application, record online streaming video, webinars, even Skype calls, and save clips in all popular formats.
An intuitive photo-editing app that lets you retouch any photo on the fly. Improve quality, add filters and captions, remove unwanted objects, change backgrounds, and more!
Join us for discounts, editing tips, and content ideas


1.5M+ users already subscribed to our newsletter