Step 1. Select your video
Open the iMovie app on your Mac and then select the clip you want to edit. It also works for photos in your timeline. If you are not already working in a specific project, open a new movie project.

[Solved!] How to Crop a Video on iMovie: Quick Guide
Try an alternative – Movavi Video Editor!
By clicking the download button, you're downloading a free version of the program.*

In this guide we’re exploring how to crop videos on iMovie, one of the fundamental skills, allowing people to just show a section of the footage they want to use on screen. It is fairly common that the important footage is just in one section of the frame, and cropping video is the solution to this.
How to crop a video in iMovie
iMovie is the freeware that comes included with Apple devices and Mac, so it is automatically included when you purchase a MacBook, iMac, or even a mobile device that runs Apple’s OS. This simple video editing software is fairly basic, so Hollywood movies aren’t edited on it. However, for things like cropping movies and sharing simple videos, plus adding some basic effects and music, the software is ideal.
So, how can you crop a video in iMovie on a Mac? The steps are simple:
Step 1. Select your video
Open the iMovie app on your Mac and then select the clip you want to edit. It also works for photos in your timeline. If you are not already working in a specific project, open a new movie project.
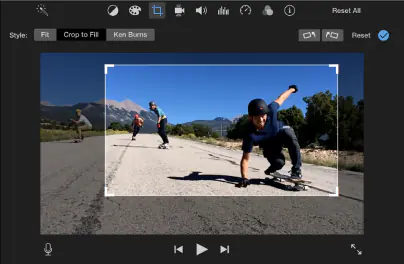
Step 2. Crop your video
Click the Cropping button to bring up the crop controls. A frame will appear on top of the clip in the viewer, which is constrained to a 16:9 aspect ratio by default. You can move and resize this frame until you have focused on just the footage you want to keep.
Click the Apply button and this will then crop out the rest of the viewer, keeping what you have chosen. If you need to make changes or reset the crop, then you can simply click the Reset button.
Step 3. Export your video
Once you have finished editing, export your video, you can do so by clicking the Share button or by saving the video to your Photos folder and then sharing it from here.
iMovie alternative: Edit your videos with Movavi Video Editor
We’ve covered how to crop videos in iMovie, but the simple nature of the software does lead to people looking for more advanced options. Movavi Video Editor can be a great solution for cropping movies as well as far more advanced editing techniques.
Movavi Video Editor is an option for Mac users as it is compatible with both Mac and Windows. As well as being able to do the basics such as cropping, it has some extremely advanced features while still being simple to operate. Movavi Video Editor has embraced the power of AI, meaning that the features such as motion tracking are both simple and extremely effective.
As well as simple cropping, it is easy to do other, more advanced editing with your footage. For example, you can crop some footage and use it as a picture-in-picture display, ideal for scenarios such as tutorial videos where you may want a “talking head” on screen as well as footage of whatever the tutorial is about.
AI can also be used within Movavi Video Editor to perfect the look of the footage you are using. AI-powered noise removal can get rid of things like wind noise and other unwanted sounds that creep into recordings. These are very common, especially on outdoor recordings. Additionally, AI is behind the background removal function, so if you want to get rid of whatever is behind the person on screen then you can do so simply and easily, even if you don’t have an advanced knowledge of things like Chroma Key.
Movavi Video Editor also has a variety of different video, audio, and other clips for people to use, along with effects and transitions that can be applied with a click, giving a really professional look and feel without having to know how to use complex or overly-confusing software.
Overall, Movavi Video Editor has some exceptional reviews on Trustpilot, with many people trusting this software to create excellent videos. Even those who have no background in video editing can quickly get to grips with Movavi’s software, helping them with everything they need to do to get the video looking slick it is time to crop their footage.
To crop a video with Movavi Video Editor:
Step 1. Download and install Movavi Video Editor
Download and install the program. It is simple to install Movavi Video Editor on your device, once you have downloaded, just follow the on-screen guide to complete the installation. Remember, the software is available for Mac and Windows, so make sure you have the right software for your device.
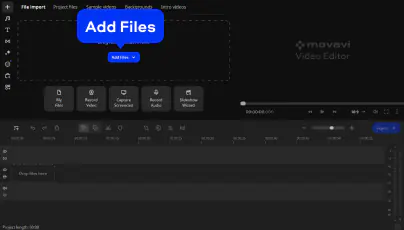
Step 2. Add the video you want to crop
Simply open the program and then click on the Add Files button you will see displayed on the top menu, where you can then navigate to the file you want to use. Once it's loaded into the software, you can then drag it into the timeline.
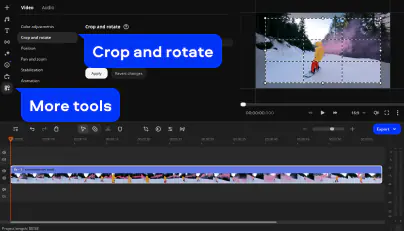
Step 3. Crop your video
Click More tools and choose the Crop and rotate tool. This will allow you to use the preview window to drag the corners to outline the area you want to keep. Once you are satisfied, click Apply and this will trim the video to the size you want, getting rid of the unwanted parts of the frame.
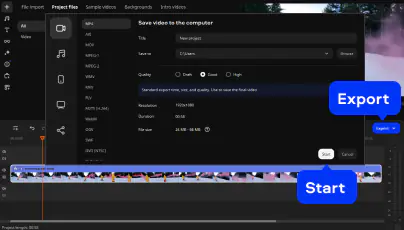
Step 4. Save the video
After the video has been cropped, you will need to save it or convert it to the formats you wish to export it, ready for social media, YouTube, or other video platforms. Click on the Export button and choose the ideal options for quality and size of the file. Press Start when you are ready, and this will begin the exporting process. Your new clip is ready to send, upload, and use as you please.
Summary
Cropping videos is one of the simplest skills to learn, and should form part of a foundational knowledge of video editing. You don’t have to be a professional (or even plan to have a high level of editing skill) to get this right, and iMovie is one of the options perfect for cropping footage on a Mac. If you want a more advanced option, Movavi Video Editor can provide more features, including AI-powered editing and more ways to enhance your footage.
Movavi Video Editor
*The free version of Movavi Video Editor may have the following restrictions depending on the build: watermark on exported clips, 60-second video or 1/2 audio length limit, and/or some advanced features unavailable when exporting videos.

You can absolutely crop your videos with Movavi Video Editor, which is a powerful and user-friendly software that offers a wide range of editing features. This video editor is perfect for anyone who wants to easily crop their video clips, regardless of their experience level.
To crop a video, you can use Movavi Video Editor. It’s a simple yet powerful tool that allows you to easily resize your video and remove unwanted areas. The intuitive interface makes it easy to understand and navigate, even for beginners.
If your video is getting cropped in iMovie, it could be due to several reasons. However, with Movavi Video Editor, you have complete control over the cropping process, ensuring that your video gets cropped exactly as you want it. This gives you the assurance that you can edit your videos without any unintended cropping.
Movavi Video Editor offers a variety of cropping options so you can achieve the perfect results. You can crop your video to any aspect ratio, resize it, or remove unwanted parts of the video. The software also offers advanced features like keyframing, which allows you to create dynamic cropping effects. This makes Movavi Video Editor the perfect tool for creating professional-looking videos.

Have questions?
Join us for discounts, editing tips, and content ideas


1.5M+ users already subscribed to our newsletter