How to Screen Record on a Computer [Any OS]

Try Movavi Screen Recorder:

  • Record video and audio

  • Capture rolling screenshots that don’t fit your screen

  • Easily schedule recordings

Edited by Ben Jacklin
17,652

We’ve scoured the web for the best options on how to screen record on your computer and compiled the ultimate list of programs to capture and edit videos from your computer screen. No matter whether you’re using a Mac or PC, these apps will have you covered.

Special pick: Movavi Screen Recorder

Movavi Screen Recorder allows you to capture any window, screen, or tab on your computer. You can record both video and external audio with the click of a button. This lightweight yet powerful video-recording software will allow you to record on your Mac and PC. Whether you want to record a single something or everything, Movavi Screen Recorder will get the job done.

Here’s what Movavi’s team does to provide you with verified information:

  • When selecting products to include in our reviews, we research both demand and popularity.

  • All products mentioned in this article have been tested by Movavi Content Team.

  • When testing, we aim to highlight the best features of a product and what it’s best suited for.

  • We study user reviews from popular review platforms and make use of this information when writing our product reviews.

  • We collect feedback from our users and analyze their opinions of Movavi software as well as products from other companies.

disclaimer_person
Game Bar
4.3/5
Editor's choice
OBS
4.5/5

How to record your computer screen on a Windows PC

Game Bar

Do you want to share screenshots or video recordings of your computer screen whilst playing online games on your PC? Game Bar is a customizable screen-recording tool built into Windows 10 and 11, meaning you can easily capture any screen activities, not only video games.

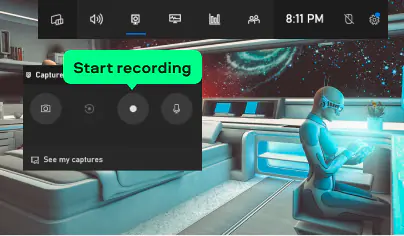
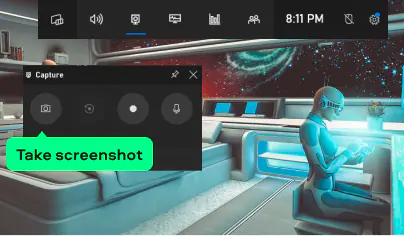
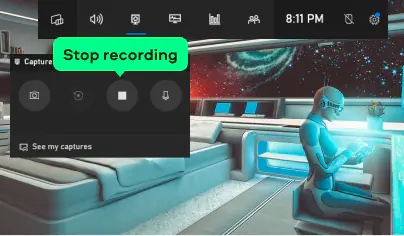
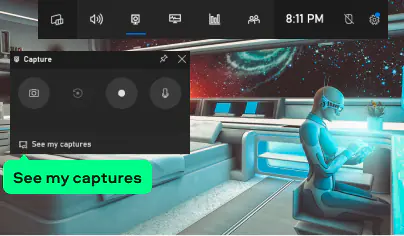
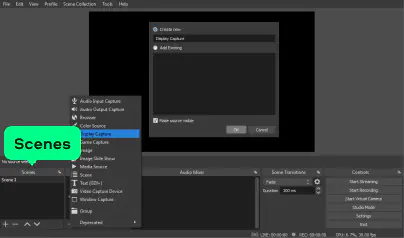
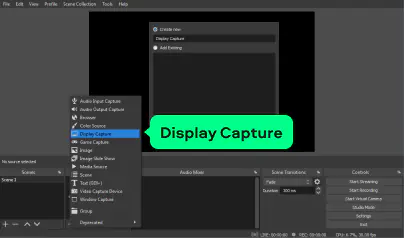
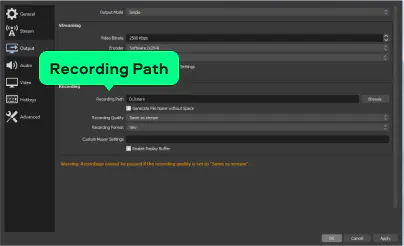
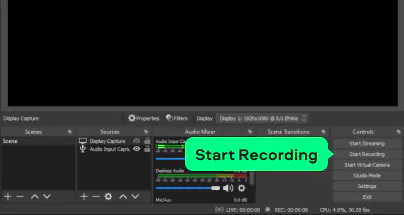
Here are the steps on how to record your computer screen:

Step 1

Press the Windows logo key + G to screen record on a Windows computer. This will open Game Bar. If you have an Xbox 360 or Xbox One controller plugged into your PC, you’ll have to press the Xbox button on your controller.

Step 2

To record your computer screen on Windows 10, select Start recording. Use the Windows logo + Alt + G to start and stop recordings for PC games.

Step 3

Click the camera icon to capture a picture of what is happening in the game.

Step 4

If you want to finish your computer screen recording, hit the Stop recording button.

Select See my captures if you want to edit a clip you recorded.

How to record a screen on a computer: Guide for a Mac

QuickTime Player

QuickTime Player is a great built-in media player that allows you to record your screen on your Mac desktop or a MacBook. You can use this versatile application for recording your computer screen.

Here’s how to record your screen on a computer:

Step 1

To start recording on your Mac, first, open QuickTime Player. 


Step 2

Next, you need to open the File menu and choose New Screen Recording. You’ll see a recording toolbar on your screen. You can control what you record by clicking on Options. This will allow you to set the location where you want to save your screen recording, set the timer, and choose an audio source. You can also choose to include mouse clicks in your screen recording.

Step 3


Next, click the Record button in the toolbar to capture what's going on your screen.

Step 4

To end the recording session, simply click the Stop Recording button.

How to record a video from a computer screen on Linux

OBS Studio

So, how do you record your computer screen on Linux? One of the options is to use a third-party screen-recording software. Our choice is OBS Studio – free and open-source software for recording videos and live streaming on Windows, Mac, or Linux. It can capture real-time video and/or audio recording and mixing. With OBS Studio, you can capture various scenes made up of different sources, including program windows, images, text, browser windows, webcams, and more.

Here are the instructions on how to record a video from your computer screen with OBS Studio.

Step 1

Download and install OBS Studio on your computer. When the installation is complete, open the screen-recording program.

Download OBS Studio

Step 2

Click the + icon in the Scenes box on the bottom-left part of the program windows to add a scene.

Step 3

In the Sources box, click + sign, then select the Display Capture option. Create a title and press OK.

Step 4

In the next pop-up window, select your display and capture method and click OK.

Step 5

Click on Settings on the bottom-right part of the screen. Open the Output tab. In the Recording box, choose the Recording Path by clicking on Browse.

Step 6

Once you’ve set everything up, click Start Recording to record a computer screen video.

How to record a computer screen video on a Chromebook

Movavi Screen Recorder for Chrome

How do you screen record on a computer with a ChromeOS? There are various ways to do this. One of the options is to use a Chrome browser extension, like Movavi Screen Recorder for Chrome. The screen-recording extension makes it easy to take a video of any window in your browser. You can grab any webpage, capture your voice with a microphone, record tab sounds, and embed your webcam into the video capture with a simple click of a button.

Here’s how to video record your computer screen using Movavi Screen Recorder for Chromebook:

Step 1

Use the link below to add Movavi Screen Recorder to your Chrome browser.

Add Movavi Screen Recorder to Chrome

Step 2

Pin the extension in the top-right corner of the browser window. Now you have quick access to the screen recorder to capture all the things you need.

Step 3

Click the extension icon to specify the recording settings. You can choose what you want to capture – the current tab or your entire computer screen. And you can also decide on recording sound and webcam preferences.

Step 4

To screen capture a video, click the Start Recording button. Record your video and download the file to your desktop.

Keyboard shortcuts for computer screen recording

Start recording

  • Windows: Windows logo key + Alt + R

  • macOS: Control + Command + 5

  • Linux (Ubuntu): Ctrl + Alt + Shift + R

  • ChromeOS: Shift + Ctrl + Show windows

Pause recording

  • Windows: N/A, but you can create your own shortcuts if needed

  • macOS: N/A

  • Linux (Ubuntu): N/A

  • ChromeOS: N/A, use the toolbar

Stop recording

  • Windows: Windows logo key + Alt + R

  • macOS: N/A, use the toolbar

  • Linux (Ubuntu): Ctrl + Alt + Shift + R

  • ChromeOS: N/A, use the toolbar

Additional apps for recording your computer screen

Movavi Screen Recorder

Best for: recording your screen in HD

  • OS:

    Windows, macOS

  • G2 rating:

    4.5 out of 5, 50 reviews

Movavi Screen Recorder is a great all-round app for capturing webinars and online calls, recording tutorials and video instructions, and capturing other screen actions. Besides recording videos, you can also take screenshots, including scrolling ones. The screen recorder also allows you to show your keyboard and mouse clicks in the recorded videos, which can be very useful when recording tutorials.

Features:

  • Button clicks and cursor movement capture
  • HD and 4K video recording
  • Drawing right on your videos while recording live

Screencapture.com

Best for: recording your screen without any additional software

If you want to simply record on the go without installing any additional software, then an online recorder is the best choice for you. Screencapture.com is an online video recorder that allows you to record your screen, audio, and your webcam. With this online tool, you can capture your activity without any downloads. Though if you’re the kind of person who prefers desktop apps, you will be happy to know that the desktop version offers a range of advanced features.

Tips for recording your computer screen

  • Firstly, you’ll want to spend some time deciding which screen-recording solution is the right one for you. Taking all of the information outlined above into consideration, take some time to list your wants and, more importantly, needs.

  • Consider what you will be using the screen-recording program for. Do you want to record tutorials or share information with your colleagues? Can you record HD videos with a program? Is there a way to add annotations to the videos?

  • Lastly, consider your budget. If you’re in need of a program that will allow regular screen recordings, lots of editing features, and different extras, you might want to invest some bucks to make it worth your while.

Program

Best for

OS

Download

Capturing your screen while playing games on PC

Windows 10/11

Perfect if you need to record your screen in a pinch

macOS, Windows 7

Best ways to screen-record on computer

  1. Movavi Screen Recorder – best for video and audio capture.
  2. Game Bar – best for users who want to record gameplay videos.
  3. QuickTime Player – best for users who want an all-in-one recorder and player.
  4. OBS Studio – suitable for live broadcasting on Windows/Mac/Linux.
  5. Movavi Screen Recorder for Chrome – simple browser capture in Chrome.
  6. Screencapture.com – simple online capture.

Summary

Hopefully, this article helped you with choosing the right screen-recording method. You should now be equipped with enough information on different available recording programs, their pros and cons, and their features to make an informed decision on which one you want to try out first.

Movavi Screen Recorder

The perfect way to record anything from your screen

Disclaimer: Please be aware that Movavi Screen Recorder does not allow capture of copy-protected video and audio streams.

Movavi Screen Recorder

Frequently asked questions

How do I record my computer screen with sound?

What are the shortcut keys for screen recording?

How do I screen-record my PC?

Can screen recording be detected? 

Can you record your computer screen?

Have questions?

Have questions?

If you can’t find the answer to your question, please feel free to contact our Support Team.

Join for how-to guides, speсial offers, and app tips!