
Step 1. Download Movavi Video Editor
Download and install Movavi Video Editor for your Mac or PC. Follow the prompts to install the program on your computer, and then launch Movavi Video Editor to start editing.
Try Movavi Video Editor:
Amp up your videos with pro-quality color correction
Boost your videos with rad transitions, titles, and intros
Save at high speed and get ready to collect those likes
If you want to take your video projects to the next level, you need to know how to color grade. But you don’t have to spend hours (or days) figuring out how to do it. Let’s walk through two easy ways to enhance your video editing with color grading.
Before we dive too deep into color grading your video, we need to answer a question: what is color grading in a video? In photos or videos, color grading is a process in which you’ll adjust the colors in your image or video to create a specific mood or feel. Color correction, as you might have figured out by its name, is the process of correcting color on the screen so that it appears as it would in real life. For instance, if your white balance is off, anything white in your shot might look yellowish or a little blue. With color correction, you’ll fix that tint to bring your colors closer to their true appearance. With color grading, you might actually want your colors to have a more bluish or greenish tone to convey a certain mood.
In Movavi Video Editor, you have multiple color grading presets that can automatically make color adjustments to your video. To use these presets to color grade and/or color correct a video, follow these steps:
Download and install Movavi Video Editor for your Mac or PC. Follow the prompts to install the program on your computer, and then launch Movavi Video Editor to start editing.
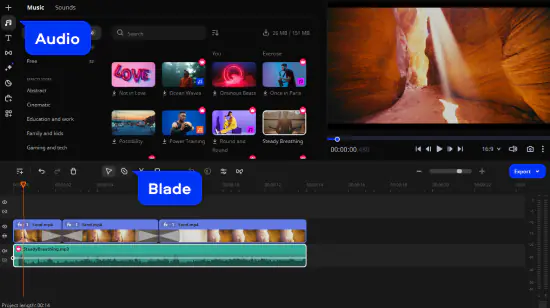
Click Add Files. From here, you can browse for your video file(s) on your computer and upload them into the editor. Once you’ve added your video, drag it into the Timeline to start using presets for your video’s color grading.

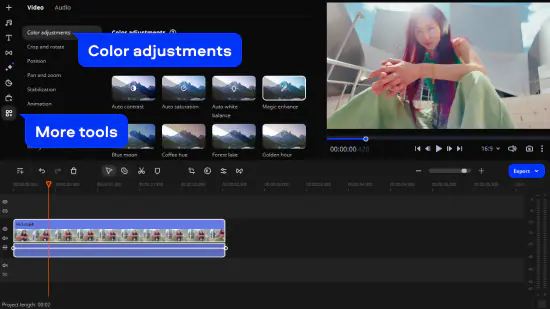
Using Movavi Video Editor’s color-grading presets, you can set your color adjustment and forget it. If you want the software to use its powerful algorithms to automatically select the right color adjustments for you, all you have to do is select your presets. To do this, open the More tools tab. In the Color adjustments menu, you’ll see all available presets, including Auto contrast, Auto saturation, Auto white balance, or Magic enhance. You can preview a preset by simply clicking on it. To apply a preset to your video, drag and drop it onto your video on the Timeline.
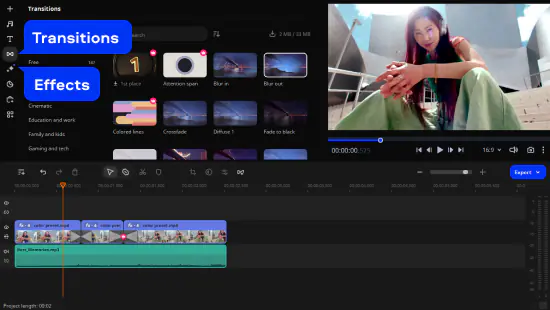
If your video is ready to go other than color adjustments, you can skip to step five. Otherwise, take advantage of Movavi Video Editor’s many features and tools to boost your video-editing skills. Along with color-grading presets, you can also add filters for a cool, uniform look throughout your video. Transitions help smooth out multi-clip videos. Make your video more accessible with captioning tools. Optimize your video’s aspect ratio for social media and other platforms. And so much more! And, if you’re not sure how to do something, be sure to check out Movavi’s extensive library of tutorials and helpful videos.
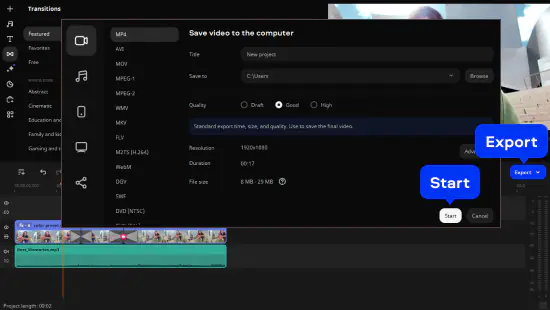
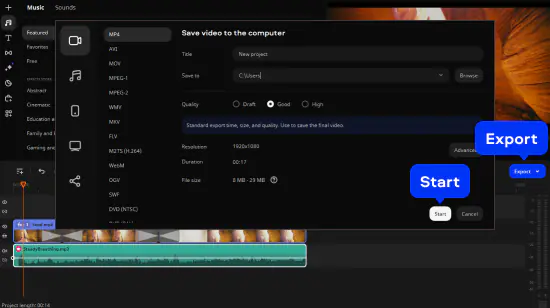
When you’re done color grading and editing your video, all that’s left is to save and/or share it. You can save your video by clicking on the Export button. You’ll then be guided through quick steps to convert your file if you want to change formats and make any other adjustments before saving it to your computer. This is also where you can share directly to social media or store your video in the cloud. Finally, hit the Start button.
In the last section, we mentioned a few color grading presets, but what do those do? Let’s take a closer look at each of them:
Auto contrast
In video, contrast refers to the sharpness of your shots. The word contrast means difference, so you can think of this setting as the difference between light and dark colors. A higher difference (or contrast) will result in sharper, starker looking visuals. A lower contrast will give you a softer look to your video and may hide some imperfections. The Auto contrast preset will set your video’s contrast to appear as lifelike as possible.
Auto saturation
In color theory, saturation describes a color’s brilliance when compared with gray. Lowering contrast gives a more muted look with more uniform colors, closer to grayscale. Increasing saturation will make your video pop with brighter, more vibrant colors. If you have two shots that were taken at different times of the day, you may be able to make them look more uniform by adjusting contrast. Auto saturation will help you with this.
Auto white balance
We talked about white balance earlier, but we didn’t really dive into what it is. Because camera lenses aren’t perfect light receptors, and because some light sources have color of their own, the whites in your video may appear yellow, orange, blue, or even green. This can impact the full range of colors in your video. Likewise, if you shoot in two locations with two different light sources, you might end up with two raw clips that have very different color grading. Fortunately, with the Auto white balance preset, you can automatically fix this issue in post-production. This preset will automatically detect white objects in your video and correct all colors to help give the video a more natural, accurate look.
But what if you want to play with color grading? Like we said earlier, color grading isn’t just about color correction. It can be used as an artistic tool to help you achieve your specific vision for your video project. With that in mind, let’s walk through how you can manually change the color grading in your videos to enhance them and make something really unique.
First, download the installation file. Once the download completes, select the installation file and follow the prompts to install the program on your computer.
When you’ve finished installing Movavi Video Editor, launch the program to get started. The next step is to upload your video to the program to start color grading and editing. To do this, either click the Add Files button or drag and drop your video file into the program interface. When you’re done, drag the video into the Timeline to start editing.
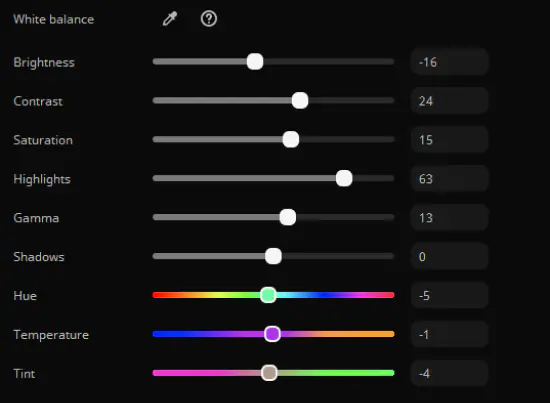
Manual color grading just means that you’ll adjust and set each of the color adjustment settings manually instead of relying on presets. To do this, open the More tools tab and select the Color adjustments menu. Next, click Manual mode.
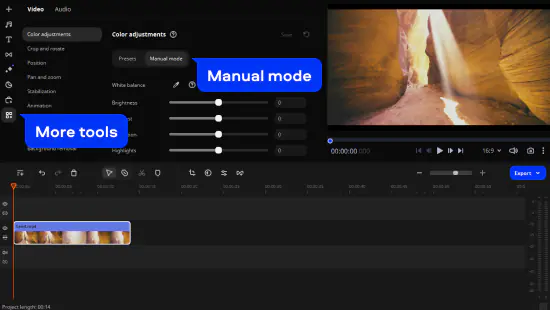
From here, you can use a color dropper tool to change the white balance, and you can use sliders to adjust contrast, brightness, saturation, highlights, shadows, hue, color temperature, and tint. Simply move the corresponding sliders to achieve the desired look.
When you have your video’s color grading set where you want it, take a look at your whole video clip and see if you want to make any other edits. You can make your video shorter and punchier by trimming it and adding transitions. If you want to make it more accessible, you can add captions and titles. For a smoother, more professional look, you can eliminate camera shake. Take a look through all of Movavi Video Editor’s features and tools to see if there are any other changes you want to make before you finish up.
Finally, when you’re happy with your video, click on the Export button. This will open a new dialog box where you can choose your preferred file format and a few other settings. When you’ve made your selections, choose where you want to save your file on your computer and click on Start. You can also share directly to YouTube or save your video to the cloud from here.
Now that you have a better idea of what color grading is and how to use it, you should have everything you need to make your next video project even better. Whether you choose to use presets or manually adjust your video’s colors, Movavi Video Editor makes it easy to create the perfect mood and look. Try it out today and see where your creativity can take you!
Create awesome videos easily
*The free version of Movavi Video Editor may have the following restrictions depending on the build: watermark on exported clips, 60-second video or 1/2 audio length limit, and/or some advanced features unavailable when exporting videos.

Color correction is a process in video and photo editing to make an image or video look the way the scene would look to the human eye. Because camera lenses are imperfect, raw footage is often over-saturated, washed out, too warm, or too cool. By correcting the colors in the footage, you can make your video look closer to reality. The first step in color correction is usually white balance adjustment. Because no light source is purely white, the white objects in your video might have a yellow or orange tint. This can throw off all of the colors in the video, but adjusting white balance can help bring everything in the scene back to its true color. From there, you can adjust saturation to tone down or pump up the color. There are other factors involved in color correction, but the main goal is to get your video’s colors as close to real-world images as possible.
If you’re working with a powerful video editor like Movavi Video Editor, the best process for color grading is often to automate the process. You can use presets, including auto contrast, auto saturation, and auto white balance, to let the video editor take care of all of your color adjustments throughout your video. If you want to go beyond color correction to color grading, you can also manually adjust color settings to get uniform colors that fit the mood and brand of your video.
Color correction and color grading are very closely related, but there is a difference. Your goal with color correction is to get your video’s colors to appear as close to reality as possible. Your goal with color grading is to take color correction a step farther. This might mean adjusting your colors to get a warmer tone throughout your video. It might also mean toning down all of your colors to get a washed out look that’s closer to grayscale. Most pro video creators start with color correction as their baseline so that they can take their videos to the next level with a few color-grading adjustments. With the right video-editing software, you can play with both color correction and color grading on all of your videos.


1.5M+ users already subscribed to our newsletter