Movavi Video Editor is built to be simple and fast by design, so color correcting and grading your clip doesn't mean digging through nested menus or confusing color wheels:

How to Color Grade Video
Whether you're filming a vibrant travel vlog, a beauty tutorial, or a quick cooking recipe, color sets the entire vibe of your video. Cluttered editing tools often frustrate bloggers and YouTubers, but Movavi Video Editor solves this with an intuitive drag-and-drop workflow, helping lifestyle creators and entertainers get high-quality, polished results from their very first try.
The secret to a professional aesthetic is simple: always correct before you grade. Movavi keeps both steps in one easily accessible Filters panel, letting you fix exposure first so skin tones look flawless in fashion tips and items look perfectly accurate in unboxings before you apply a stylistic LUT.

Edited by
33,817
The secret to a cohesive video style is simple: always correct before you grade. However, pushing contrast and exposure during this process can sometimes reveal unwanted digital grain in your footage. That's where one-click AI video noise removal comes in, cleaning up your clip to give you a flawless canvas before you even touch a color slider.
Once the colors are dialed in, the creative possibilities in Movavi Video Editor open up even further. Thanks to hover previews, you can instantly test hundreds of built-in drag-and-drop effects and customizable video templates directly on your footage, bringing any cinematic vibe to life without tedious guesswork.
Before jumping into those creative edits, here is everything you need to know about color grading your videos to get that perfect baseline.
Quick Vocabulary: Hue, Saturation, and Luminance
Three words show up in almost every color discussion, and they're worth pinning down before you touch a slider. Hue is the color itself – red, green, blue, wherever it sits on the color wheel. Saturation measures how intense that color is, from washed-out gray to fully vivid. And luminance is brightness on its own, separate from color, which is why two very different hues can read as equally "dark" on screen. Most footage runs on an RGB model under the hood, mixing red, green, and blue channels – which is also why a bad white balance usually shows up as too much red or too much green in skin specifically, rather than a random color shift.
What’s the difference between color correction and color grading?
Color correction is technical – it gets footage from "off" to "accurate." Grading, by contrast, is creative: it takes that accurate footage and pushes it toward a look. A skincare review needs correction so the product's actual shade shows up on screen. A travel montage might get graded warmer to match a golden-hour feel, on top of that same correction pass.
Both steps use the same panel in Movavi Video Editor, so in practice you're rarely switching tools – just switching goals partway through.
What you need before you start color grading video
Grading fixes a lot, but it can't invent detail that was never captured. A quick check before you touch a single slider:
- Shoot in consistent light where possible – mixing daylight and warm indoor bulbs in one scene means two different corrections later.
- Keep skin and product shots reasonably well lit. Grading can rescue mild underexposure; it can't pull detail out of a shot that's mostly black.
- Review the whole clip at full brightness on a real screen, not a dim laptop, before deciding a color looks "off."
None of that is a Movavi requirement – it's just true of color work generally, on any video editor. Check your grade on more than one screen before you publish, too. A phone screen tends to run brighter and more saturated than a laptop, and most bloggers and YouTubers know their audience is watching on a phone, so a grade that looks correct on a color-calibrated monitor can look oversaturated by the time it's in someone's hand.
Color Grading Video in Movavi Video Editor: Step-by-Step
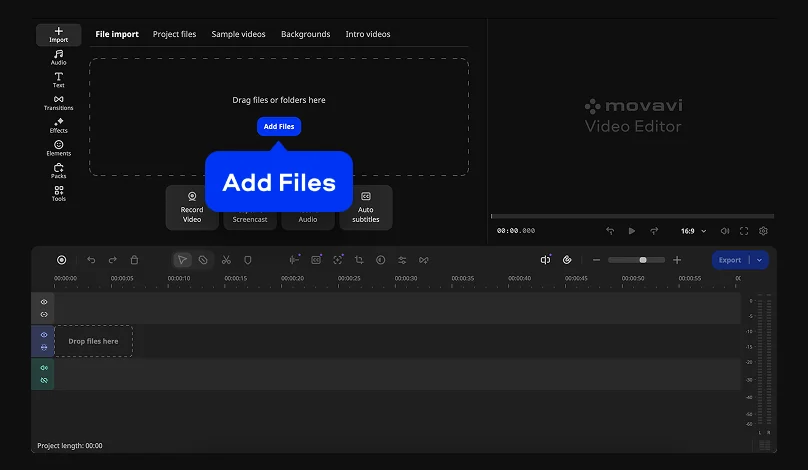
Step 1. Add your video
Click Add Files or drag the clip in, then drag it down onto the Timeline.
Step 2. Correct and fine-tune your colors
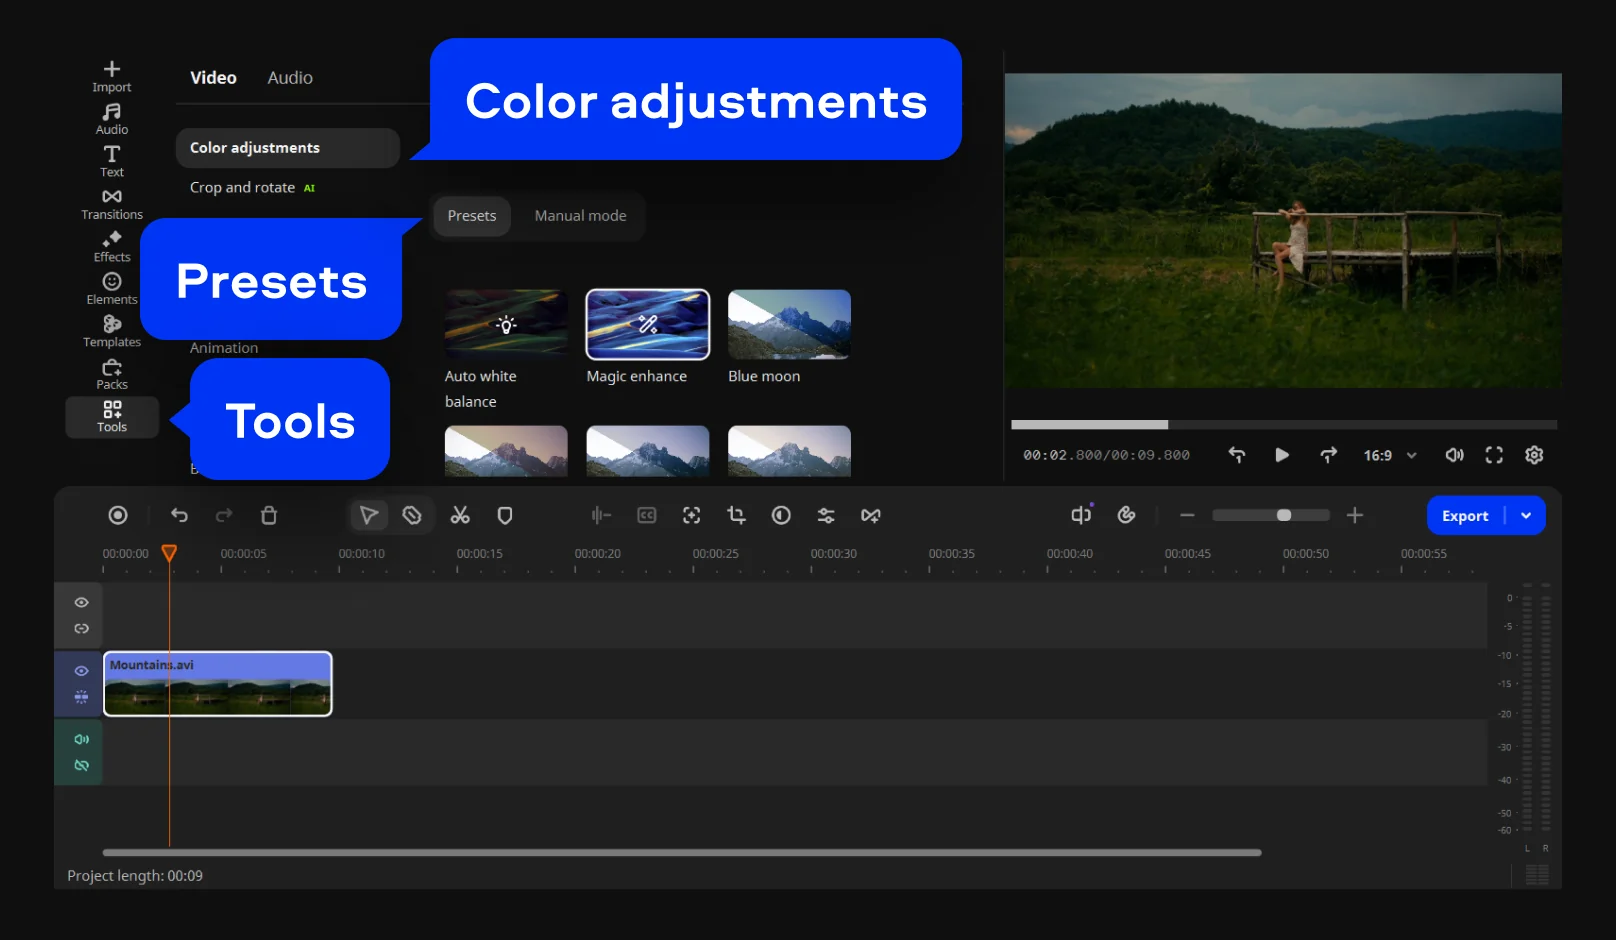
Select the clip on your timeline, open the Tools menu, and click Color Adjustments. Open the Presets tab and try Magic Enhance first – this automatic, one-click preset quickly balances exposure, contrast, and color to give you a solid baseline.
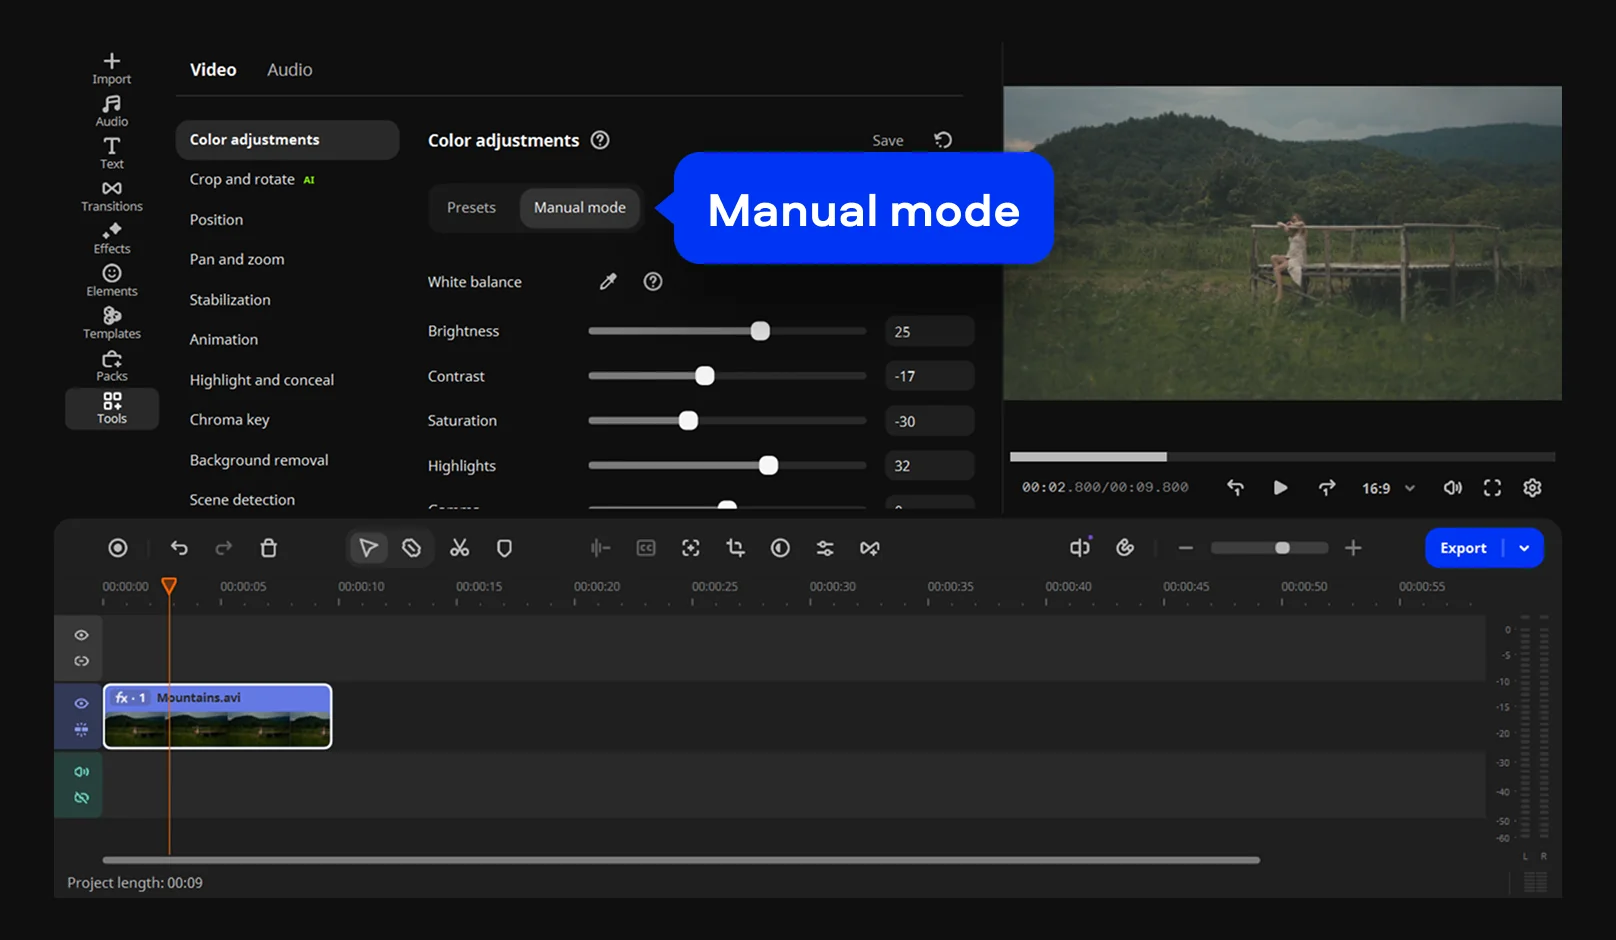
For more control, switch to Manual mode to fine-tune your footage using specific sliders: fix unwanted color casts with the White Balance eyedropper, adjust Brightness & Contrast to make your subject pop, recover details in bright skies or dark areas using Highlights & Shadows, tweak Saturation for vibrancy, and slide Temperature & Tint to correct green/magenta hues or warm up the scene.
Step 4. Apply a cinematic look (LUTs)
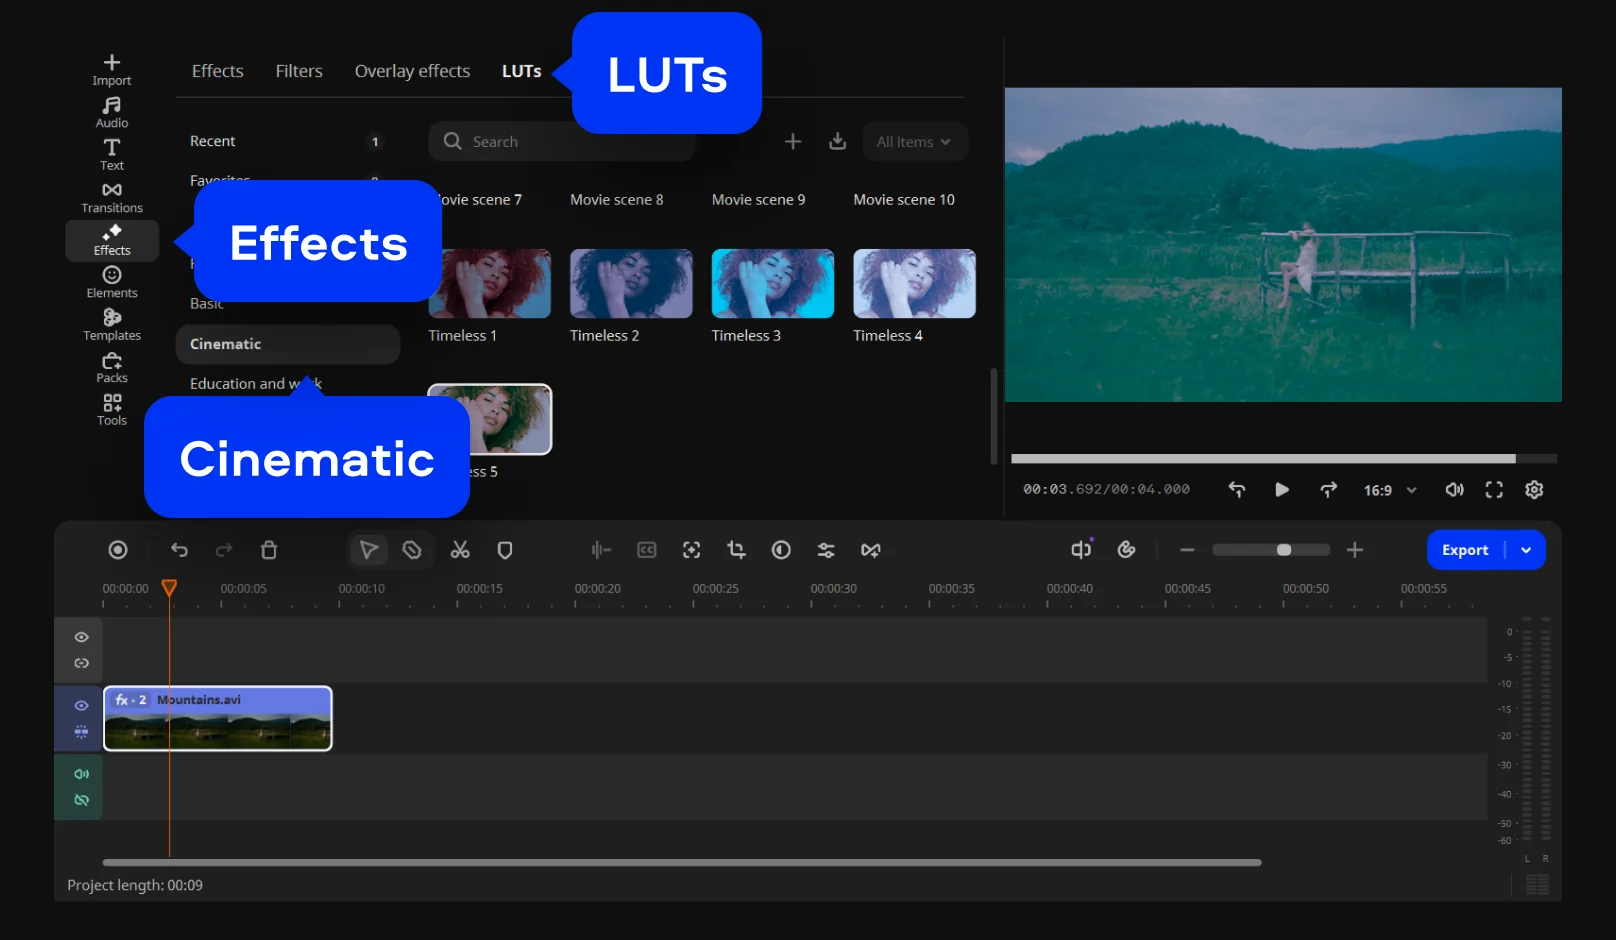
Once your base correction is locked in, it's time for the creative grade. Click the Effects icon on the far-left panel, then open the LUTs tab at the top. Select one of the pre-built cinematic color profiles from categories like Cinematic or Featured to instantly give your footage a specific artistic style, or click the plus icon to import your own custom .cube files.
Step 5. Preview and export
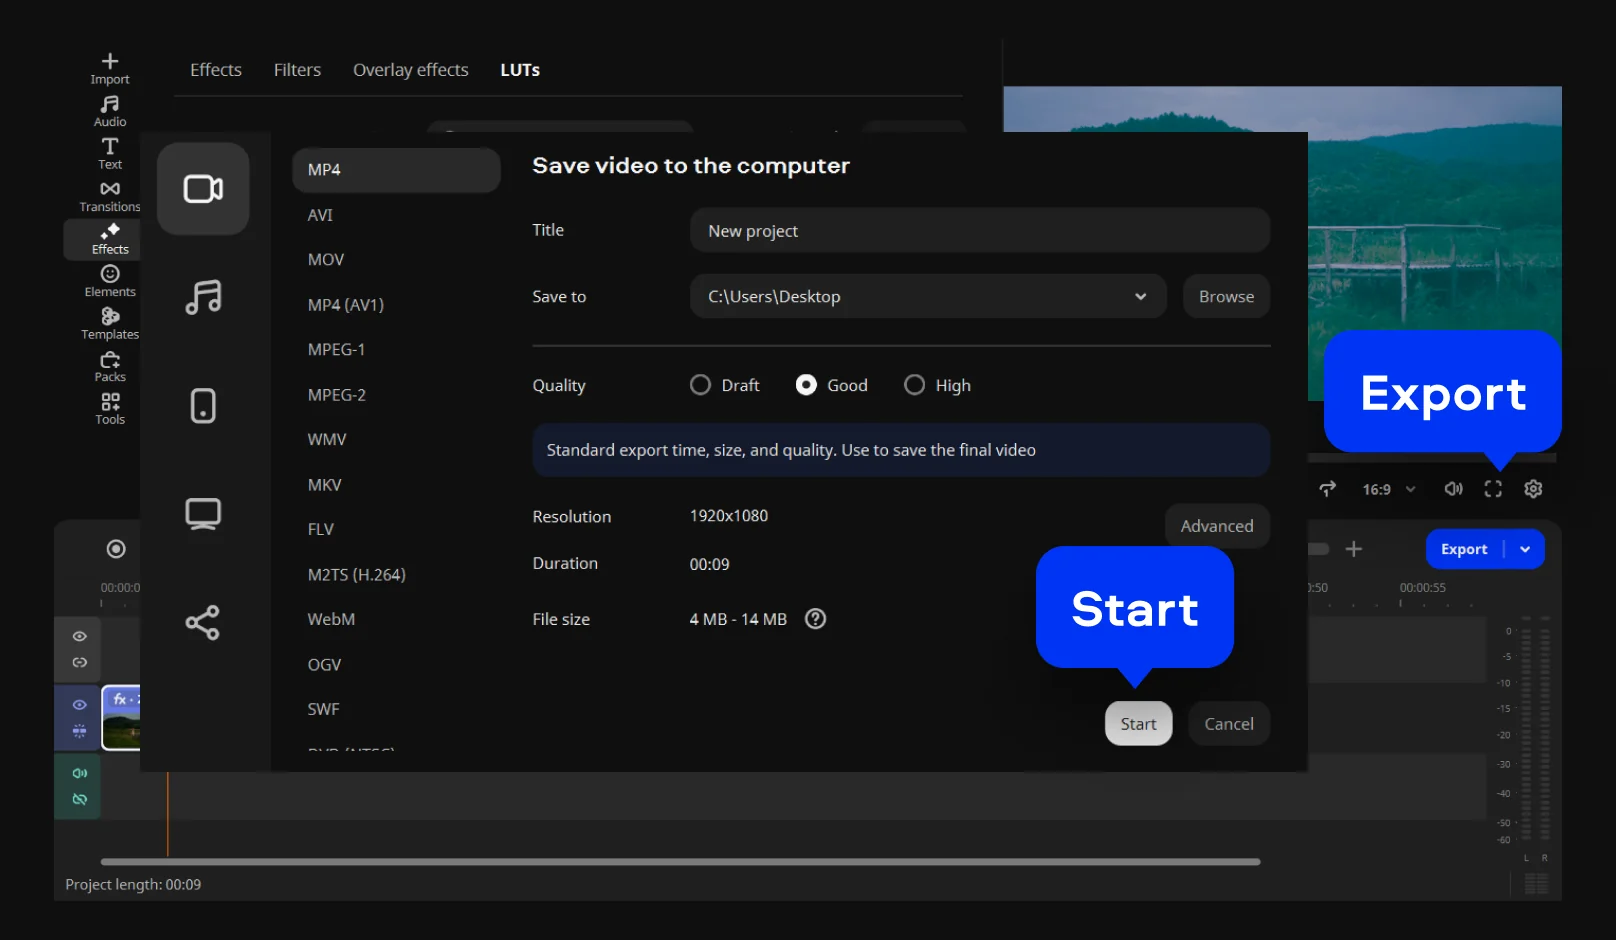
Check the result in the preview window first to confirm your skin tones and overall aesthetic are exactly how you want them. Once it looks right, hit Export, choose a format or a preset built for a specific social platform, and save.
Color correction is one of the most-used tools across Movavi's 70M+ users in 190+ countries – reason enough that it sits in the main Filters panel instead of a separate module, and gets refined along with the rest of the editor across Movavi's 25+ updates a year.
Getting True-to-Life Skin Tones
Skin is the fastest way to tell if a grade has gone wrong – viewers notice an unnatural face before they notice almost anything else in a frame. For beauty, skincare, and lifestyle videos, treat skin tone as the anchor and build everything else around it.
Start with Color Balance rather than a global filter. A slight push toward warm usually reads as healthier skin; a push toward orange reads as a bad orange. Bring Saturation down a touch before pushing it up – oversaturated skin looks sunburned on most screens, not glowing. Then check the shot against a neutral reference in frame if you have one, like a white product box or a plain wall, since it's much easier to judge "is this warm or just wrong" against something you know should be gray.
Different skin tones respond differently to the same push, too. A warm shift that reads as flattering on lighter skin can look muddy on deeper skin – ease off the saturation and reduce the color balance shift slightly, and that muddiness usually clears up faster than adding more warmth does. If you're filming more than one person, check Contrast and Saturation against each face individually instead of trusting one setting to cover everyone in frame.
If you're shooting the same setup across multiple videos – same ring light, same room, same time of day – saved custom preset from becomes the fastest part of the whole edit. Apply it, check the face against the last video, done.
Getting accurate product colors
Unboxings and reviews live or die on one detail: does the product on screen match the product someone will actually receive. A slightly warm grade that flatters skin can just as easily make a white sneaker look cream and a silver gadget look gold.
The fix is to correct product shots separately from talking-head shots when the lighting differs, rather than applying one blanket grade to the whole video. Batch-apply the correction to just the product clips, check color balance against the packaging or a reference swatch if you have one, and hold saturation close to neutral – a product review earns more trust from an accurate color than from a punchy one.
Stylized looks: LUTs, presets, and the day-for-night effect
Once correction is solid, grading is where a video gets a personality. LUTs are the fastest route – drop one from the LUTs category onto a clip, and every pixel remaps to that look in one motion. Presets work the same way for the manual controls: one click applies a saved combination of tone, contrast, and saturation.
Filmmakers have a classic move worth knowing even outside a film set: day-for-night, where daylight footage gets cooled down, darkened slightly in exposure, and pushed blue until it reads as dusk or night. The same principle scales down to a vlog – a quick sunset-style push (warmer tone, slightly lower exposure, a touch more contrast) turns an ordinary afternoon clip into something that feels like golden hour, using the same manual sliders or a LUT built for that look.
When you need color wheels: Movavi vs. professional grading suites
Full post-production color suites like DaVinci Resolve or Lightworks split an image into shadows, midtones, and highlights, and hand each range its own color wheel – so a colorist can push warmth into skin while keeping the background cool, all in the same shot. That level of control is genuinely useful for feature films and high-end commercial work, where someone's job is color grading specifically.
Most bloggers and YouTubers don't need three color wheels and a calibrated monitor to get a video looking right – they need skin tones that read true and a product that matches its packaging, fast, without a separate color pass eating an afternoon. Movavi's color correcting features cover that ground with Color Balance, Contrast, Saturation, and Exposure controls plus LUTs and presets for style, all inside the same editor you're already cutting in. If a project later calls for wheel-by-wheel control over shadows and highlights, that's the point where a dedicated grading tool earns its place – not before.
Do you need to pay to color grade in Movavi Video Editor?
The free download is enough to test whether a preset or manual grade gets you the look you're after. Once a video is ready to publish, the full version removes the watermark and the length cap, and it's also where Movavi Effects unlocks 10,000+ additional effects and 1,500+ music tracks if a project needs more than the built-in library.
Movavi Video Editor
Create awesome videos easily

Frequently asked questions
What's the easiest way to color grade a video as a beginner?
What's the easiest way to color grade a video as a beginner?
Start with a ready-made preset in the Filters panel, then fine-tune Contrast and Saturation by eye. Presets give a consistent baseline; manual tweaks fix whatever's specific to your footage. Most beginners get a usable result faster this way than by trying to match a color wheel setup meant for a trained colorist.
Do I need LUTs to color grade video?
Do I need LUTs to color grade video?
No. LUTs are a shortcut for a specific look, not a requirement. Manual color correction and grading with Color Balance, Contrast, and Saturation gets true-to-life results on their own; LUTs just speed up getting to a stylized look.
What should a color grading tutorial actually teach?
What should a color grading tutorial actually teach?
Order of operations, mostly: correct exposure and color balance before applying any creative look, keep skin tones and product colors as the reference point, and apply the same settings across a whole scene so cuts don't visibly jump in color.
Why do my skin tones look orange or green after grading?
Why do my skin tones look orange or green after grading?
Usually a Color Balance push that went too far, or a LUT applied before the base exposure and white balance were corrected. Pull back saturation, recheck color balance against a neutral object in frame, and correct before you grade.
Is Movavi Video Editor good for color correction and grading?
Is Movavi Video Editor good for color correction and grading?
It covers both from the same panel – Brightness, Contrast, Color Balance, Saturation, and Exposure for correction, plus presets and LUTs for grading – which is the range most bloggers, YouTubers, and everyday creators need without learning a second, dedicated grading application.
Do I need a colorist or a tool like DaVinci Resolve for a YouTube video?
Do I need a colorist or a tool like DaVinci Resolve for a YouTube video?
Only if the project genuinely needs wheel-by-wheel control over shadows, midtones, and highlights – a feature film, a client commercial with strict brand colors, that kind of thing. A weekly vlog or a product review is almost always faster and just as accurate handled inside the editor you're already cutting in.

Have questions?
If you can’t find the answer to your question, please feel free to contact our Support Team.
Join us for discounts, editing tips, and content ideas


1.5M+ users already subscribed to our newsletter