
Step 1. Download and install the program
Download the installer and launch it. Follow the instructions on the screen to complete the installation, and then open the program.
How to Make Objects Move in a Video
Try Movavi Video Editor:
Intuitive tools for quick and easy video editing
AI: background removal, motion tracking, noise removal
Drag-and-drop filters, titles, transitions, overlays
Adding images and videos to moving objects in footage is a great way to attract viewers' attention and make your video more interesting. Whether you're a beginner or a seasoned content creator, you must have sought skills to create exceptional videos, and learning how to add moving objects to a video is useful for making your content stand out.
Movavi Video Editor’s functionality isn’t limited to motion tracking. It’s a useful tool to create killer videos on the fly, whether it’s a stunning vlog episode or short clip, compelling videos for business purposes, family movies to impress your loved ones, and more. Use AI-powered features to effectively enhance your videos, express yourself with tons of built-in effects, and make the sound crispy clear to create content that’ll win hearts.
Here’s how to make objects move in a video with Movavi Video Editor:
Step 1. Download and install the program
Download the installer and launch it. Follow the instructions on the screen to complete the installation, and then open the program.
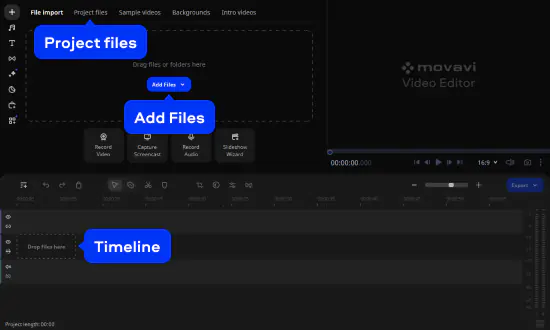
Step 2. Add video footage and images
Now it’s time to add footage and pictures to the program. Click the Add Files button, choose the footage on which you want to overlay a picture or a video, and click Open. Drag and drop your file from the Project files tab to the Timeline.
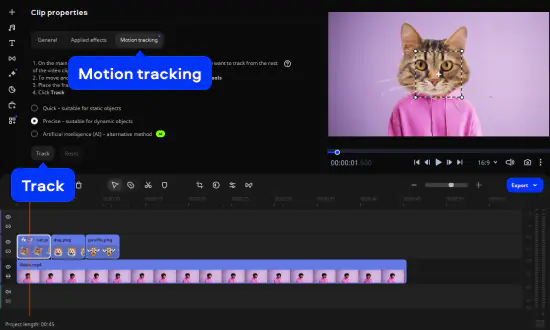
Step 3. Add motion tracking to the video
Add the images to the timeline above the main clip. Doble-click one of the images and choose Motion tracking. If you are wondering how to create a moving object effect for videos, there are 3 types of motion tracking: Quick – less accurate but fast, Precise – more accurate but slower, and Artificial intelligence – an experimental feature that combines accuracy and speed. Select the preferred method and drag the frame over the object you want to track and replace with an image. Click the Track button. Repeat the process for all images.
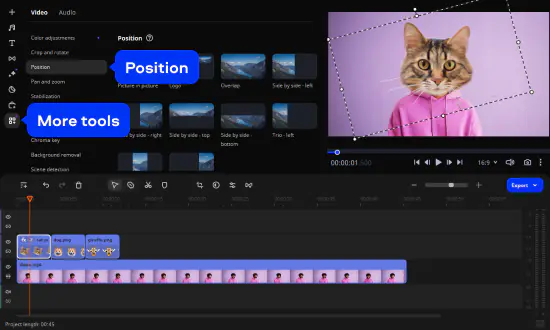
Then you can change the size of the picture and rotate it by selecting the image on the timeline, going to the More tools tab, and using the Position tool.
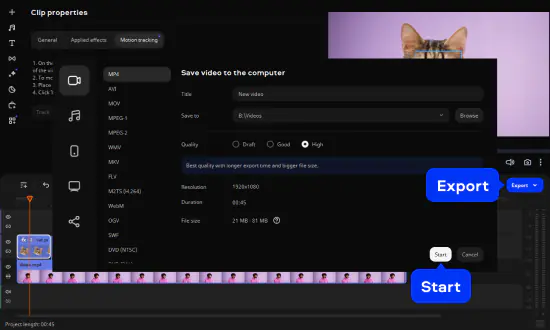
Step 4. Save the result
After you finish editing the video, click the Export button. In the window that opens, choose the name, quality, and format of the output file. Finally, select where the output file will be saved and click Save.
Now you know how to make objects appear to move in the video with Movavi’s program. If you want to achieve the same results, just download the free trial version, install it now, and experience for yourself the smooth and intuitive editing process that Movavi Video Editor offers.
Сreate awesome videos easily
*The free version of Movavi Video Editor may have the following restrictions depending on the build: watermark on exported clips, 60-second video or 1/2 audio length limit, and/or some advanced features unavailable when exporting videos.

Movavi Effects
A huge library of creative effects and background music to lift your videos from wow to wowzers


1.5M+ users already subscribed to our newsletter