
Step 1. Download and install Movavi Video Editor
Download the latest version of Movavi Video Editor and install it on your Windows or Mac device. The program will open automatically once the installation process is complete.
How to Track a Moving Object in a Video
Сreate awesome videos easily in Movavi Video Editor:
Easy-to-use motion tracking
Quick, precise, and AI-powered modes
Large array of highlighting tools
There’s hardly a video-editing program that doesn’t allow their users to apply motion tracking in video clips. But not all of these programs make the process simple and obvious to users. With Movavi Video Editor, you can track the motion of objects automatically by using its AI-powered tool. Today we’ll take a closer look at the way you can track an image or other clip to a moving object with no profound experience in video editing with Movavi Video Editor.
How to track a moving object in Movavi Video Editor
Step 1. Download and install Movavi Video Editor
Download the latest version of Movavi Video Editor and install it on your Windows or Mac device. The program will open automatically once the installation process is complete.
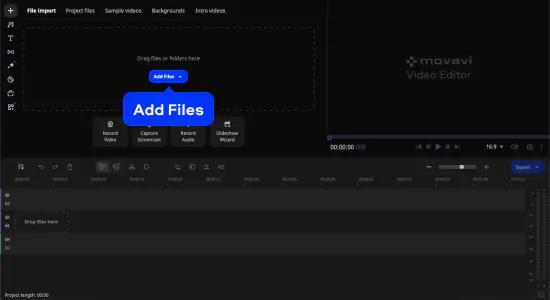
Step 2. Import your clips to the program
Add your videos to the program by clicking Add Files, or you just drag your footage into the program window. You’ll find the imported videos in the Project files section – drag them onto the Timeline. You can also import ready-to-use video clips from the Sample videos section.
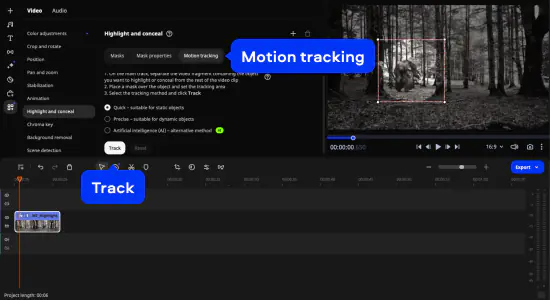
Step 3. Track a moving object with the highlighting tool
Before you use motion tracking, select one of the highlighting tools. Here in this example, we’re using Bright ellipse to track a mysterious creature in the woods. If you want to use the same effect, go to the More tools tab, then in the Highlight and conceal section select Bright ellipse and adjust its size and position.
If you want to use something different, check out the Elements tab for amazing themed stickers and overlays. The process is the same for any element/effect you choose. We’ll proceed with our ellipse.

Now here’s how to track a moving object in a video. While still in your ellipse’s settings window, go to the Motion tracking tab and select one of the three options available: Quick, Precise, or Artificial intelligence. We used the AI feature while creating this guide. Put the frame on the object you want to follow and click Track. You can see the result in the Preview window.
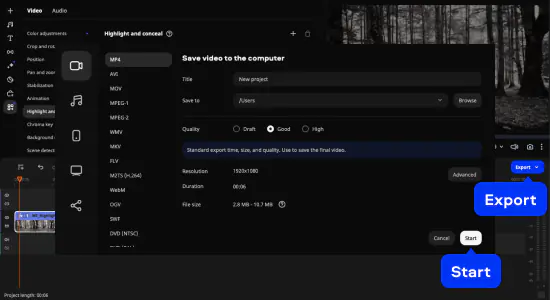
Step 4. Export your video
Once you’re happy with the result, click Export. In the window that appears, you can choose the output format and video quality. Click Start to finish the process.
Now you know how to do motion tracking in videos with Movavi Video Editor! Motion tracking can be challenging, but not with Movavi’s editor. Thanks to its functionality, you can create stunning videos in a snap:
Boost your videos with rad transitions, titles, and intros
Power up with AI: denoise sound and swap out backgrounds
Have a blast with 180+ filters: Glitch, Blur, VHS, and more
Amp up your videos with color correction and highlight effects
Save at high speed and get ready to collect those likes
Find more stunning effects, stickers, and overlays to use for motion tracking with Movavi Effects!
Highlighting a moving object is not the only way you can track it. In our Movavi Effects, you’ll find themed stickers, effects, overlays, and other elements that will bring your video editing to the next level.
Also read our step-by-step guide to tracking a moving object with a sticker!
Motion tracking is a powerful video editing technique that allows you to attach objects or text to moving elements in your videos. Movavi Video Editor is one of the best software options for motion tracking, offering easy-to-use tools and precise tracking capabilities for both beginners and experienced editors. Motion tracking helps create impressive visual effects, adding a professional touch to your videos, making them more engaging, and attracting a wider audience.
Motion tracking is used in many creative video editing scenarios, including adding animated text to moving objects, creating eye-catching transitions, and even replacing the background with another image. Movavi Video Editor is a great choice for these tasks, offering a wide range of creative features, including the ability to track objects, apply various effects, and create unique visual elements to make your videos stand out.
Motion tracking is a valuable tool for enhancing your video editing workflow. Using Movavi Video Editor for motion tracking can offer numerous benefits, including generating dynamic visuals, creating visually appealing effects, and making your videos more engaging. These features are particularly useful for video editors, filmmakers, and content creators who need to create high-quality professional videos.
While motion tracking can add a professional and creative touch to your videos, it can also be challenging. Choosing the right software is crucial to ensure precise tracking and successful results. Movavi Video Editor can help you overcome these challenges, offering user-friendly tools for motion tracking, making it suitable for both experienced editors and beginners.
If you are looking for reliable and user-friendly software for motion tracking, Movavi Video Editor is a great option. Movavi Video Editor offers a range of features for creating high-quality videos with professional-looking effects. This software is ideal for various audiences, including individuals, businesses, and content creators, who want to enhance their video content for a more engaging and professional outcome.


1.5M+ users already subscribed to our newsletter