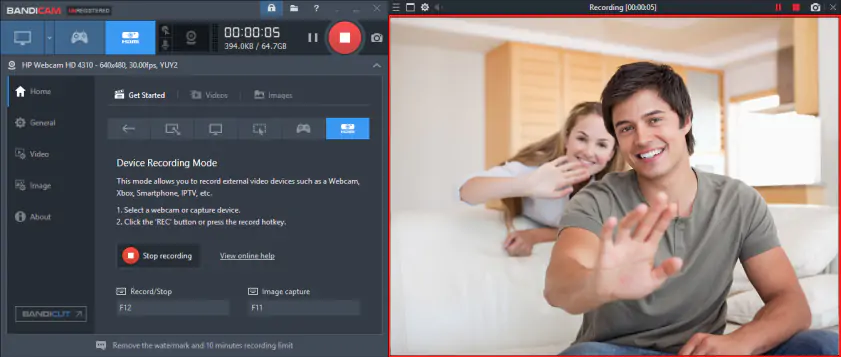
7 Best Free Screen Recorders for Windows 7

Download Movavi Screen Recorder to record your screen on Windows 7!

  • Start recording in a couple of clicks

  • Record webcam and screen simultaneously or separately

  • Save your recordings in high quality

Edited by
Ben Jacklin
66,156

Key takeaways

  • Are you still on Windows 7 and need a good screen recorder that runs faultlessly? Your options are narrower, but still quite sufficient. I tried a bunch of products, and Movavi Screen Recorder won my heart with its immaculate performance, clarity, and polish.
  • Each software on the list has its own vibe. Bandicam handles gaming without frame drops. EaseUS RecExperts is better for meetings. Icecream Screen Recorder feels like an old-school favorite that still gets the job done.
  • Online recorders like Apowersoft or Screencapture.com are handy for quick captures or when you don’t want to lumber up your oldie but goodie PC. But they do rely on browser stability and internet speed! These may not be the best choice for really long, high-quality, or critical recordings.
  • When picking a screen recorder for PC Windows 7, test how well it syncs audio with video and whether it still supports 32-bit systems, because many newer apps quietly dropped that.
  • A quick tip: before hitting Record, close background apps, check your mic levels, pick the right frame rate. These small tweaks can turn an average recording into something clear and watchable.

Want to record your computer screen on Windows 7? You’re not alone. Thousands still cling to the classic OS that somehow refuses to die. I recently spent days testing a dozen screen recorders on an old Windows 7 laptop that still wheezes like it’s 2010, and guess what? Some tools still run surprisingly well. From full-fledged desktop recorders to quick online captures, each has its own charm (and quirks). Below, I’ve rounded up the top 7 methods that actually work – tried, tested, and occasionally cursed at – with Movavi Screen Recorder easily standing out for stability, clarity, and speed. Let’s dive into what’s worth your time and what’s better left in the recycle bin.

My top picks

Best overall – Movavi Screen Recorder
If you want a clean, fast, and frustration-free way to capture your screen, Movavi just delivers perfect execution. It’s smooth, dependable, and feels ultra modern – like the tool Windows 7 never had but always needed.

Best for beginners – EaseUS RecExperts
A solid pick for anyone who wants to hit Record and just go. No fuss, no manuals, just clear menus and solid output.

Best for long sessions – Bandicam
When you’re recording gaming marathons or tutorials, Bandicam keeps things lightweight yet crisp. It’s built to go the distance without eating your RAM alive.

Best for quick clips – Icecream Screen Recorder
Perfect for short captures or quick how-tos. It’s got that easygoing aura: record, trim, save, done.

Best online option – Screencapture.com
Online-hosted and refreshingly simple. Ideal for anyone who doesn’t want to install extra software but still needs a polished final result.

Comparison table: Best screen recorders for Windows 7

Software

Platform

Best for

Download

Desktop

All-around performance and HD quality captures

Desktop

Recording tutorials and streaming sessions

Movavi Screen Recorder stands out because of its lightweight design. It captures video without overloading your CPU, which is ideal for older systems like Windows 7.

disclaimer_person

Here’s what Movavi’s team does to provide you with verified information:

  • When selecting products to include in our reviews, we research both demand and popularity.

  • All products mentioned in this article have been tested by Movavi Content Team.

  • When testing, we aim to highlight the best features of a product and what it’s best suited for.

  • We study user reviews from popular review platforms and make use of this information when writing our product reviews.

  • We collect feedback from our users and analyze their opinions of Movavi software as well as products from other companies.

How to record your screen with desktop Windows 7 screen recorders

Desktop recorders are software programs that you download to your computer and run natively as you would any other application. These tools for screen recording on Windows 7 tend to be fast and reliable because they are not limited to a network connection. However, they do not work well in situations where you cannot install software on the computer, such as a work computer or other machine that doesn't belong to you.

  • Why I picked it

    it’s reliable, lightweight, and doesn’t choke my old Windows 7 laptop. Movavi Screen Recorder feels built for people who still work (and create) on classic systems

Today’s list of top screen recording methods on older Windows machines begins with Movavi Screen Recorder. It is a super-easy, one-click screen recorder for PC Windows 7. It handles everything from webinars to live streams and online calls with no lag, even on older machines. The interface is admirable and self-explanatory, too. You can adjust your settings, press REC, and you’re set.

When I tested Movavi Screen Recorder, it ran smoothly as silk on my Windows 7 PC. No lag, no crashes, just clean captures. The interface is crisp, and the learning curve is practically flat. One click and I was recording a full-screen demo, trimming edges, and saving the clip in MP4.

What really sold me is how effortlessly it records both mic and system sound – perfect for walkthroughs or narrated tutorials. I’ve used other screen recorder for Windows 7 tools that felt clunky, but this one just works. The scheduler feature is also a gem: I can set a capture for an online event, walk away, and come back to a perfectly cut video.

Movavi frequently rolls out updates and improvements for its screen recorder product to make creating picture-in-picture videos even easier.

Ratings

4.5/5

Pros:

  • Totally beginner-friendly even for complete rookies

  • Capture button clicks and cursor movement for easy-to-understand guides and explainers

  • Save everything from your screen in high resolution

  • Draw on your video while recording and add shapes, lines, and arrows

  • Create noise-free soundtracks – record system sound and mic audio

  • Enjoy seamless work on Windows 7 computers

Cons:

  • Unlock all the functionality with a subscription

How to screen record on Windows 7

Here’s how to record your screen on Windows 7 using Movavi Screen Recorder:

  1. Download the software and run the installation file. Instructions will appear telling you how to install the program. After the installation is complete, the program will open automatically. 
  2. Adjust the capture area to cover the part of the monitor you want to record. To do that, hit the Screen recording icon on the sidebar and select the area you will be recording.
  3. Click the REC button to start recording your computer screen. When you are done recording, click Stop. In the window that pops up when you stop recording, you'll be able to perform basic editing tasks on the recorded video, such as trimming segments out of the final product. You can then export the file to disk.
  • Why I picked it

    it’s sleek, stable, and refreshingly simple. EaseUS RecExperts just works, even on aging Windows 7 setups. And it does pack modern features to screen-record with fun, not stress

This title is a worthy contestant for the best free screen recorder for PC Windows 7. EaseUS RecExperts is a lightweight yet capable screen recorder for Windows that captures anything on your display: apps, games, webcam, or audio. It contains flexible recording modes, quick annotations, noise removal, and simple editing facilities. You can even schedule recordings or share results directly to YouTube or cloud drives, all in an uncluttered, novice-friendly interface.

As for me, EaseUS RecExperts feels like the kind of screen recorder for PC Windows 7 you can trust. No fuss, no hard learning lesson. You open it, hit record, and it starts capturing instantly. I’ve used it to grab online webinars, a few product demos, and even gameplay clips, and it didn’t choke once on my 64-bit Windows 7 laptop. The audio and video stay perfectly in sync, and you can easily toggle between webcam and screen views.

What makes it stand out is how well it’s optimized for older hardware. The lightweight build means it won’t drain your CPU while recording. You can record system audio, mic input, or both at once, trim the clips, and even auto-stop after a set time. There’s also a scheduler which is handy for catching a live stream when you’re away. The software also carries a quick-share option and smoother 60-FPS capture on both Windows and Mac.

If you’re wondering how to record screen on Windows 7, this tool is as straightforward as it gets. It runs on both 32-bit and 64-bit versions, offers a free download. It really feels like a modern app in an old system’s body: polished, fast, completely intuitive.

How to record your screen on Windows 7 with EaseUS RecExperts

  1. Download and install the software from EaseUS RecExperts.
  2. Launch it and select your recording area – full screen or custom window.
  3. Choose your audio source (system sound, microphone, or both).
  4. Hit REC to start capturing.
  5. When you’re done, stop recording and use the built-in editor to trim or export your clip.

Ratings

Pros:

  • Supports 32-bit and 64-bit Windows 7

  • Lightweight, minimal CPU usage

  • Schedules automatic recordings

  • Captures webcam and audio simultaneously

  • Built-in trimming and annotation tools

Cons:

  • Free version limits recording time

  • Occasional lag with very high resolutions

  • Watermark in free mode

  • Why I picked it

    Bandicam feels like the no-nonsense, powerhouse option for anyone still running Windows 7. It’s lightweight, steady, and quite dexterous. Ideal for older computers that still deserve high-quality recording

Another much-talked-about software to edit media files, Bandicam is a quintessential screen recorder for PC Windows 7. From gameplay to app demos, it captures everything, and with a surprisingly small performance hit. On my fusty Windows 7 rig, it orchestrated 1080p capture masterfully, even when multitasking. Bandicam has been improving its product throughout 2025. With the latest revamps, you can blur distractions, let auto-area magically frame your shot, and pull audio from just one window.

This screen recorder for Windows 7 relics supports both 32-bit and 64-bit systems. Also, it incorporates hardware acceleration (Nvidia NVENC, Intel Quick Sync, AMD VCE) to keep CPU temps low while maintaining crisp visuals. You can draw on the screen in real time, show keystrokes, and even use a chroma key effect for webcam overlays. That’s so handy if you’re filming tutorials or “Let’s Play” videos!

Files compress beautifully without losing detail, and you can upload straight to YouTube – no extra encoding needed. It’s not entirely free, but the free download version lets you test all the good stuff before paying. If you’ve ever wondered how to record screen on Windows 7 without lag or blurry output, Bandicam delivers that sweet spot between performance and quality.

How to record your screen on Windows 7 with Bandicam

  1. Download and install Bandicam (look for a version compatible with Windows 7 / 32-bit or 64-bit as needed).
  2. Launch Bandicam. Choose Screen Recording Mode if you’re capturing your desktop or specific app, or Game Recording Mode if capturing DirectX/OpenGL content.
  3. Select the capture area: full screen, window, or custom rectangle. You can draw or highlight during recording using the built-in drawing tools.
  4. Set audio sources (choose system sound, microphone, or both) and if desired, enable webcam overlay for picture-in-picture.
  5. Hit the REC button to start. While recording, you’ll see a small FPS or indicator; minimize or hide the control bar if you prefer.
  6. When done, click Stop. Then export the recording: you can save as MP4 or AVI, or upload directly to online platforms if supported.
  7. (Optional) Use scheduled recording. Set a start time and duration in advance so Bandicam will begin capturing automatically.
  8. Save the file, review it for quality, trim if needed, and you’re ready to share.

Ratings

Pros:

  • Super light on system resources; runs smoothly even on older Windows PCs

  • Captures high-quality video (even 4K) with hardware acceleration support for Intel/NVIDIA/AMD

  • Built-in real-time tools (drawing, mouse clicks, webcam overlay) make it great for tutorials or game capture

Cons:

  • The free version adds a watermark and limits recording time to 10 minutes

  • Editing features are minimal; if you need full video post-production, you’ll likely need another tool

  • Mac or Linux users are out of luck; Bandicam is Windows-only

  • Why I picked it

    it’s a downloadable software that is not heavy on your disk space. It’s quick to launch and doesn’t choke your old Windows 7 device. Icecream Screen Recorder makes everyday screen capturing smooth. Ideal for brief tutorials, webinars, or even last-minute app demos

If you’re after a screen recorder for PC Windows 7 that’s simple but capable, Icecream Screen Recorder nails the balance. It captures exactly what is on a desktop, whether that’s a full display, a specific window, or a custom region. It records both system and mic audio and integrates webcam footage if you want your face on screen. Also, the software gives you instant annotation tools (arrows, text, shapes) while you’re in the moment. 

Post-capture, you can trim your clip, adjust play speed, add a custom watermark, then upload straight to YouTube, Google Drive, or Dropbox (or share via link). Though the free download version covers many basics, the Pro plan unlocks advanced settings for expert users. 

The interface feels modern yet not geeky. The latest build improved stability, fixed crashes. And the product overall seems well-maintained and up-to-date by its team. It records in HD, supports annotations, and lets you trim videos on the fly. 

I tested it while showing a client how to use a legacy app: switched between full-screen and selected area mode, added quick arrows and text, and uploaded the clip straight to Drive. This free screen recorder for PC Windows 7 even handles 32-bit setups decently. 

The “Draw while recording” feature feels particularly useful when you need to highlight stuff mid-session. Despite its name, there’s nothing frosty about how smoothly it runs on older systems. And yes, there’s a free download version that’s good enough before you even think about the PRO upgrade. If you’re wondering how to record screen on Windows 7, this one just gets it done.

How to record screen on Windows 7 with Icecream Screen Recorder:

  1. Head to icecreamapps.com and hit Free Download.
  2. Launch the app and choose Capture Video.
  3. Select the recording area: full screen, a window, or custom size.
  4. Hit the Rec button (or F6) to start capturing.
  5. Use on-screen tools to draw, add text, or highlight.
  6. Press Stop, preview, trim, and save.
  7. Export or upload directly to YouTube, Dropbox, whatever works.

Ratings

4.0/5

Pros:

  • Clean interface, no clutter

  • Solid performance even on older PCs

  • Built-in annotation and trimming tools to edit videos

  • Exports directly to YouTube and the cloud

Cons:

  • Watermark in the free version

  • Limited recording length unless upgraded

Quick summary: Best screen recorders for Windows 7

  1. Movavi Screen Recorder

    Best for screen recording with subsequent editing

  2. Apowersoft

    Best for quick and free online use

  3. Bandicam

    Best for gamers for pro-looking videos

  • Why I picked it

    ScreenRec is that rare free screen recorder for PC Windows 7 that actually feels polished. No watermark, no time cap, and no setup headaches

Another simple yet powerful screen recorder for Windows 7 (32-bit and 64-bit). ScreenRec captures your display, webcam, and audio all at once. This utility is built for speed and simplicity where recording starts in one click, and sharing happens instantly through a private link. 

The latest version (v5.0.13, July 2025) fixes previous crash issues and adds cursor highlighting, making it even smoother for tutorials or walkthroughs. It’s fully compatible with Windows 7 (Vista, XP – incredible!), with both online and offline installers available for free download from the official website. It also has screen-recording software for Linux and Mac operating systems.

I used it while testing how to record screen on Windows 7 for a quick explainer video. Within a minute, I had my desktop, voice, and webcam in sync, all captured in crisp 1080p. The recording was uploaded to the cloud automatically, saving me from the usual file-transfer chaos. It’s especially handy for quick client demos or tutorial clips: no fluff, no heavy setup, no lag.

How to record screen on Windows 7 with ScreenRec:

  1. Head to screenrec.com and grab the free screen recorder for PC Windows 7 (pick 32-bit or 64-bit).
  2. Install and launch it; no login needed.
  3. Hit Alt + S to start; drag to select the screen area or record full screen.
  4. Turn on your mic or webcam if needed.
  5. Click the red Record button and do your thing.
  6. When done, press Alt + S again. Your video is saved automatically, and a shareable link pops up instantly.

Ratings

4.7/5

Pros:

  • Fast, no-lag recording

  • Instant cloud upload and link sharing

  • No watermark or time limit

  • Works great even on older PCs

  • Cross-platform screen recorder

Cons:

  • No built-in video editor

  • Requires internet for cloud uploads

How to record your screen on Windows 7 with online recorders

  • Why I picked it

    sometimes you just need to record and get on with your day, no installs, no tech drama, no second-guessing

Screencapture.com is one of those rare online tools that just gets it right. It runs straight from your browser, sparing you from downloads or endless setup screens. Isn’t it just perfect if you’re working on a school laptop or a locked-down office PC? 

It records your screen, webcam, and audio (system + mic) in HD, all with just a couple of clicks. Teachers and students love it for remote learning, while business users utilize it to record quick presentations or demo videos. 

Sure, the free version adds a watermark, but that’s a fair trade for how quick and clean it works. You can fire it up in your Google Chrome, Opera, and a handful of other popular web crawlers.

Last month, I had to help my nephew prep a digital presentation from home on his old Windows 7 laptop. Screencapture.com was a lifesaver: no downloads (which I hate), no fuss. We just opened the site, shared the screen, and recorded the slides with his voiceover. The result? A crisp HD recording ready to send to his teacher in under ten minutes. It even caught his webcam reactions, which the teacher loved.

How to record on Windows 7 with Screencapture.com:

  1. Open Screencapture.com in your browser.
  2. Choose whether you want to capture the screen, webcam, or both.
  3. Allow access to your mic and webcam (if needed).
  4. Pick what to record – the full screen, a window, or a specific tab.
  5. Hit Start Recording and do your thing.
  6. When you’re done, press Stop, and save or download the clip right away.

Pros:

  • Runs right in your browser; zero downloads

  • Records with system and mic audio

  • Includes webcam overlay for presentations

  • Super-fast saving and sharing

Cons:

  • Watermark in the free version

If you're capturing a video with sound on Windows 7, double-check your audio settings. Tools like Screen Capture or OBS Studio allow you to record both system audio and microphone input so that you don’t miss a single detail.

7. Apowersoft Online Recorder

  • Why I picked it

    fast, browser-based recording with fine editing options that does exactly what it promises

When discussing top methods for screen-recording on obsolete computers, this little tool is hard to ignore. Apowersoft lets you record your screen on Windows 7 directly from your browser. Pure online job!

You do need to install a small helper app so that the recorder can access your system and select specific areas of the screen. Once that’s set up, all recording is controlled through the website. After finishing, you can either save the video to your computer or upload it to cloud storage and popular video platforms.

So, what are its services? It works well for capturing webinars, recording software tutorials, saving online meetings, and other desktop activities. Actually, you can use Apowersoft Free Online Screen Recorder to seize anything happening on your monitor: system audio, microphone, and even webcam overlays. It runs directly online, which is great if you don’t want to install heavy software on your oldy-moldy Windows 7 PC.

I launched Apowersoft to record a full-length webinar while highlighting parts of the interface and narrating over it. The software handled the sync between my voice and screen perfectly. You can also trim videos, add AI-generated subtitles, convert clips to GIFs, or tweak speed before sharing.

How to record screen on Windows 7

  1. Go to Apowersoft Free Online Screen Recorder and click Start Recording.
  2. Launch the small launcher if prompted.
  3. Choose your recording area: full screen, a window, or a Chrome tab.
  4. Select audio sources: system sound, mic, or both.
  5. Hit the red Record button and perform your tasks on-screen.
  6. Press Stop when done. Preview, trim, or add subtitles if needed.
    Save the video locally or upload it to the cloud for sharing.

Ratings

4.0/5

Pros:

  • Full-screen or custom area capture

  • Works with webcams

  • AI subtitles included

  • Fast cloud sharing

Cons:

  • Requires launcher for first-time use

  • Limited advanced editing

Keyboard shortcuts are your best friend! While Windows 7 doesn’t offer many by default, third-party tools often allow you to customize shortcuts for different types of screen captures, speeding up your workflow.

How to choose the best screen recorder for Windows 7

Choosing the right screen recorder for Windows 7 comes down to what you actually need – not just flashy features. If you want something that just works, looks clean, and keeps quality top-tier, start with Movavi Screen Recorder. It’s hands-down the best all-rounder for recording tutorials, calls, or gameplay without fuss.

For quick browser-based captures, Apowersoft Free Online Screen Recorder is a smart pick. No installs, no clutter, just record and share.

If you’re into detailed editing or want flexible capture settings, EaseUS RecExperts and Bandicam both deliver: the first one for its clean workflow, the latter for power users who love tweaking frame rates and compression settings.

Prefer something light with annotation tools for walkthroughs or lessons? Icecream Screen Recorder fits right in. If sharing is your biggest priority, ScreenRec makes it effortless with instant links and cloud sync.

No matter what your inclination, each of these tools can take crisp, clear footage on Windows 7, so the real question is: do you want simple and quick, or customizable and powerful? Either way, this list has you covered.

Movavi Screen Recorder

The perfect way to record anything from your screen

Disclaimer: Please be aware that Movavi Screen Recorder does not allow capture of copy-protected video and audio streams.

Movavi Screen Recorder

Frequently asked questions

How do I record my screen on Windows 7 for free?

You can record your PC or laptop screen with Movavi Screen Recorder. This software allows for free screen video capture on Windows 7.

  1. Download and install the app.
    Download Movavi Screen Recorder
  2. Launch the recorder and click Screen recording on the sidebar. 
  3. Adjust the capture frame and activate webcam and sound recording if needed.
  4. Record your screen.
  5. Trim the recording and save the result.

Which is the best screen recorder for Windows 7?

Movavi Screen Recorder is one of the best screen capturing programs for Windows 7. Here are some other options for you to check out:

  • OBS Studio – best for screencasts and broadcasting game streams to platforms like YouTube and Twitch.
  • Screencastify – best for quickly creating troubleshooting and how-to videos, recording product demos, etc.
  • Screencapture.com – best for teachers, students studying at home, presentations, creating tutorials.

Does Windows 7 have a screen recorder? 

Windows 7 has no built-in screen recorder tool. If your computer uses Windows 7, consider installing and using one of the many screen recording apps available. Many of them are free or have a free trial, like Movavi Screen Recorder. 

What is the best sound recorder for Windows 7?

Here are some of the best audio recorders you can use on Windows 7:

  • Movavi Screen Recorder – best for novice and expert users, advanced editing, record live streams.
  • Audacity – best for audio recording and editing.
  • Ardour – best for recording audio and making music.
  • Screencapture.com – best for teachers, students studying at home, presentations, creating tutorials.
  • Apowersoft Online Audio Recorder – best for recording the screen and audio at the same time, including narration and voiceover.

How do I record gameplay on Windows 7? 

To record gameplay, try Gecata by Movavi:

  1. Download and launch the app.
    Download Gecata by Movavi
  2. Make sure that the capture mode is set to Game. If you want to record webcam and microphone, turn on the corresponding options. 
  3. Start recording and then hit Stop to finish.

Does Windows 7 have a screen capture?

Windows 7 lacks a screen recording tool, but does allow users to take still images of their computer screen. To capture your entire computer screen, press the PrintScreen (or PrtScr) button. If you want to capture only a specific part of your screen, hold the Alt key while pressing PrintScreen.

How do I record my screen with sound on Windows 7?

  1. Download and install Movavi Screen Recorder.
  2. Launch the program, click Screen recording and select the part of the screen you want to capture.
  3. Make sure the System audio icon is active.
  4. Click REC to start recording. When you are finished, click Stop.
  5. In the window that opens, trim the recording if needed. Then Hit the Export button.
  6. In the dialog box that appears, name the file and choose the output format. Click Save.

How do I record my screen with OBS on Windows 7?

  1. Create a scene by clicking the + icon in the section of the OBS window marked Scenes
  2. Give the scene a name and then move over to the section marked Sources. Click the + icon there to add a source. 
  3. Select Display Capture to capture your screen. Now, you can press the Alt key and drag the mouse to crop the capture area. 
  4. Once everything is ready, press the Start Recording button.

Does Windows 7 support screen recording?

While Windows 7 lacks any built-in screen recorder, it supports plenty of third-party screen recorders. One great option is Movavi Screen Recorder.

What is the screen recorder key in Windows 7?

There’s no key binding for screen recording on Windows 7, because this OS doesn’t have a built-in screen recorder. However, you can use any third-party screen recording software, desktop or online. We recommend using Movavi Screen Recorder. This feature-rich app has both recording and screenshotting functionality wrapped in a user-friendly interface.

Have questions?

Have questions?

If you can’t find the answer to your question, please feel free to contact our Support Team.

Join us for discounts, editing tips, and content ideas

1.5M+ users already subscribed to our newsletter

By signing up, I agree to receive marketing emails from Movavi and agree to Movavi's Privacy Policy.