Most of the time, what actually needs fixing isn't the resolution – it's everything sitting on top of it: the grain, the color, the shake, and the background hum. Fixing all of this might sound intimidating, but it doesn't have to be complicated. Movavi Video Editor is aimed at beginners and everyday content creators – including those who already know their way around editing but prefer a simpler, faster workflow over complex professional software. Here is how to clean up your footage fast:

Video Quality Enhancer
Poor lighting, shaky handheld footage, washed-out colors, and background noise are the real struggles every creator faces. Whether it's an unboxing filmed under bad ceiling light, a travel vlog shot handheld off a phone, or a beauty tutorial with washed-out skin tones, these flaws can make even high-resolution video feel low quality.
Movavi Video Editor was built exactly to solve these issues. It is an intuitive video editor designed for beginners and everyday creators, featuring built-in AI tools that instantly enhance your content without the steep learning curve. Used by more than 70 million people worldwide, it offers a simpler, faster workflow over complex professional software.

Edited by
31,414
In reality, "how to enhance video quality" is really two different questions wearing one search term: are you trying to fix the details inside the frame, or increase its physical size?
For bloggers and YouTubers, mixing these two up is the fastest way to end up disappointed. Chasing a massive 4K resolution often backfires because YouTube, TikTok, and Instagram re-compress every upload anyway – meaning a clean, stable 1080p file will almost always beat a noisy, shaky 4K one.
To help you figure out exactly which of these issues is affecting your footage, let's break down the specific components of a video below.
What enhancing video quality actually means
Video quality isn't one thing. Both the term video quality enhancer and general video enhancement usually mean fixing one or two of these factors, not all of them at once:
- Resolution – how many pixels make up the frame: 480p, 720p, 1080p, 4K, or 8K
- Noise – grain and speckling, especially from low light or an older sensor
- Color and lighting – flat, dull, or unevenly lit footage
- Sharpness – how crisp edges and small details look
- Frame rate – how smooth motion looks, from a cinematic 24fps to a fluid 60fps
- Stability – whether the camera stayed steady while recording
A vlog shot handheld at dusk can suffer from three or four of these at once: it's noisy, a little shaky, underlit, and maybe recorded at a lower resolution than you'd pick today. Upscaling that clip without touching the noise or the shake just hands you a bigger, still-noisy, still-shaky video. Denoising, color correction, and stabilization come first. Resolution comes second, and only when the file genuinely needs to be a specific size for where it's headed.
The same logic applies to content that doesn't look "damaged" at first glance. A tarot or astrology video filmed near a window can wash out under midday sun without ever looking technically broken, and a fitness clip shot outdoors on a bright day might have plenty of light but flat, lifeless color that needs punching up rather than fixing.
That's why we'll walk through resolution and everything else separately. Different problems, often different programs.
AI Video Upscaling: What It Actually Does
Resolution upscaling is the process of increasing a video's pixel count after it's already been shot, turning a 720p file into 4K without reshooting anything. That's the basic idea people mean when they say upscale video. Old-school upscaling, the kind built into media players for decades, just stretches existing pixels, which is why it looks soft and blocky. AI video upscaling works differently: a machine learning model trained on huge amounts of video guesses at the texture and detail that should exist between the pixels already there, then fills it in. It behaves more like an informed reconstruction than a simple stretch.
That's the whole idea behind an AI video upscaler, or any AI video enhancer more broadly. A dedicated desktop program, a plugin for a professional suite, and an online video enhancer running in a browser all work on the same principle underneath. Artificial intelligence doesn't invent new footage out of nowhere; it makes an educated guess, frame by frame, based on patterns it has already learned. AI-based tools now handle detail reconstruction that used to require manual restoration work frame by frame. The more visual information the source file already has, the better that guess turns out.
Movavi's own version of this lives in Movavi Video Converter, a separate program from Movavi Video Editor built specifically for resizing, compressing, and converting files. Its AI upscaling tool can increase a video's resolution by up to 8 times the original, useful for pulling an old 480p or 720p clip up to something that doesn't look stretched on a modern 4K screen. The exact steps for using it deserve their own guide, since it's a different program with a workflow of its own, separate from the editing tools below.
Here's a quick reference for which resolution actually matters for your situation:
If you're uploading to YouTube or TikTok, 1080p already covers almost every viewer's screen. Chasing 8K for a video headed straight to a phone feed usually just means a bigger file to upload, not a visibly better one.
Frame rate is a separate axis entirely, and it's easy to confuse with resolution. If you want smooth slow motion rather than the choppy look of just slowing footage down, that typically calls for frame interpolation: generating new in-between frames instead of stretching the ones you have. Movavi Video Editor's dedicated slow-motion tool handles the creative side of that without extra software, alongside general speed control from 0.01x up to 100x for time-lapses in the other direction.
How to enhance video quality with movavi video editor
Step 1. Import and arrange your clips
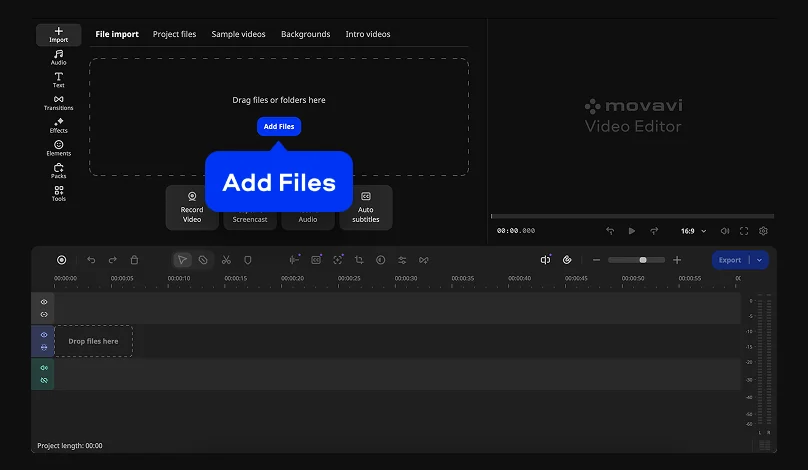
Click Add Files or simply drag your videos, images, and audio directly into the Import area, then drop them onto the Timeline. Reorder your clips to establish the basic flow of your video before you start refining the details.
Step 2. Enhance the footage and fix flaws
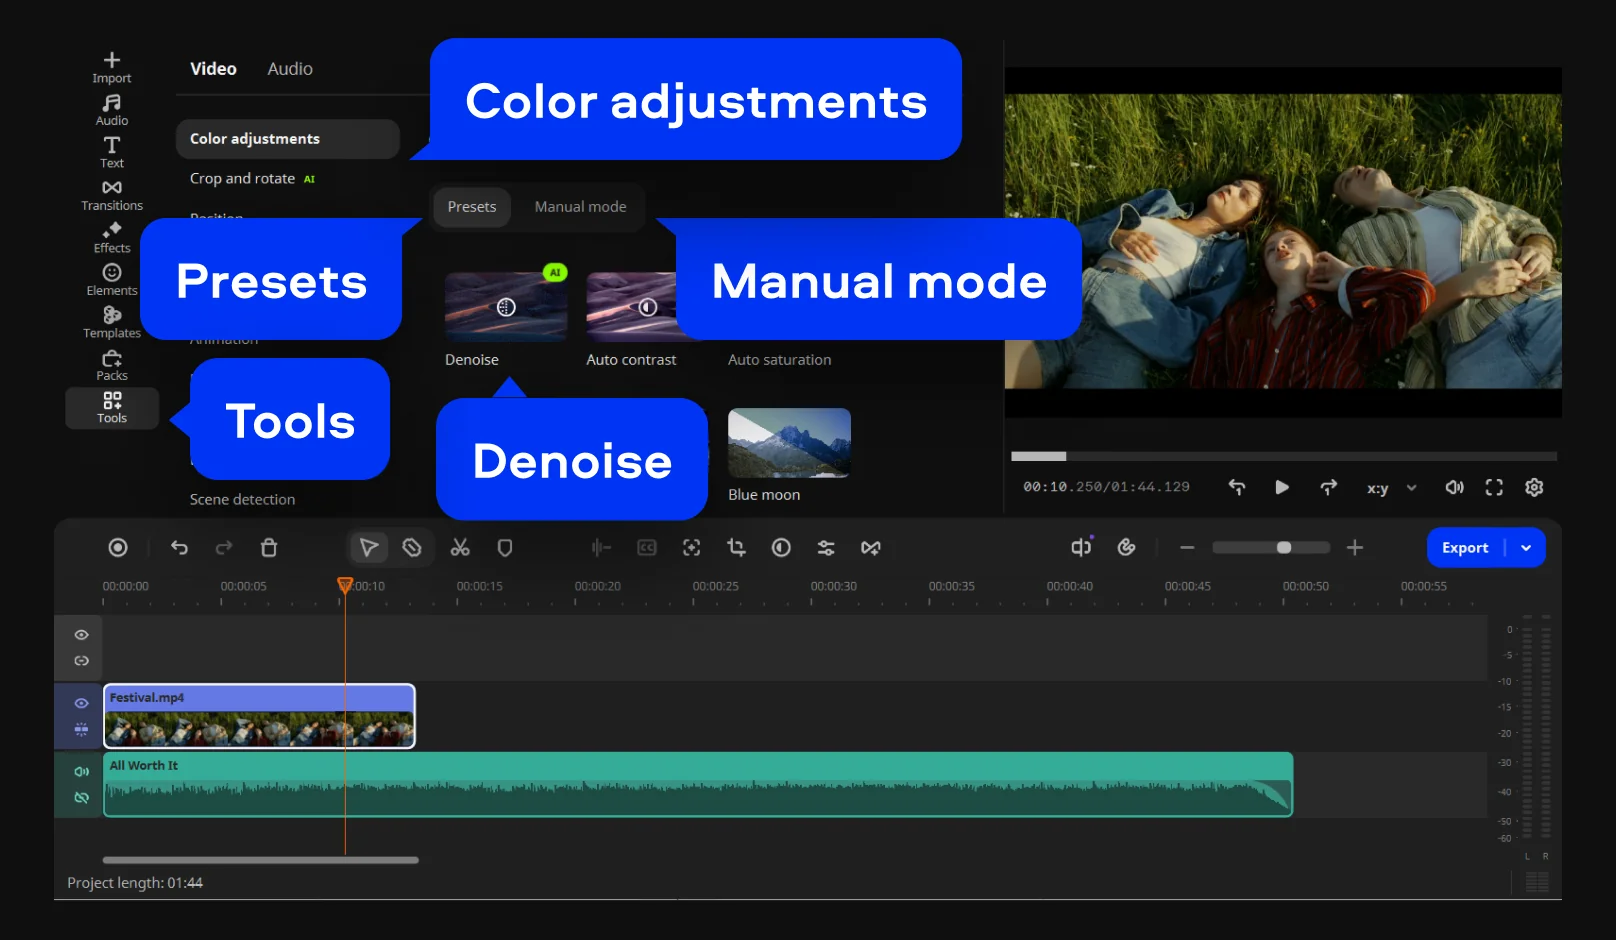
Open the Tools tab to access Movavi’s built-in enhancement features.
- Clean up and grade the picture: Go to Color adjustments to drag Denoise onto your clip to clear up grainy footage, then pick a ready-made preset (or tweak contrast and saturation manually) to fix flat lighting.
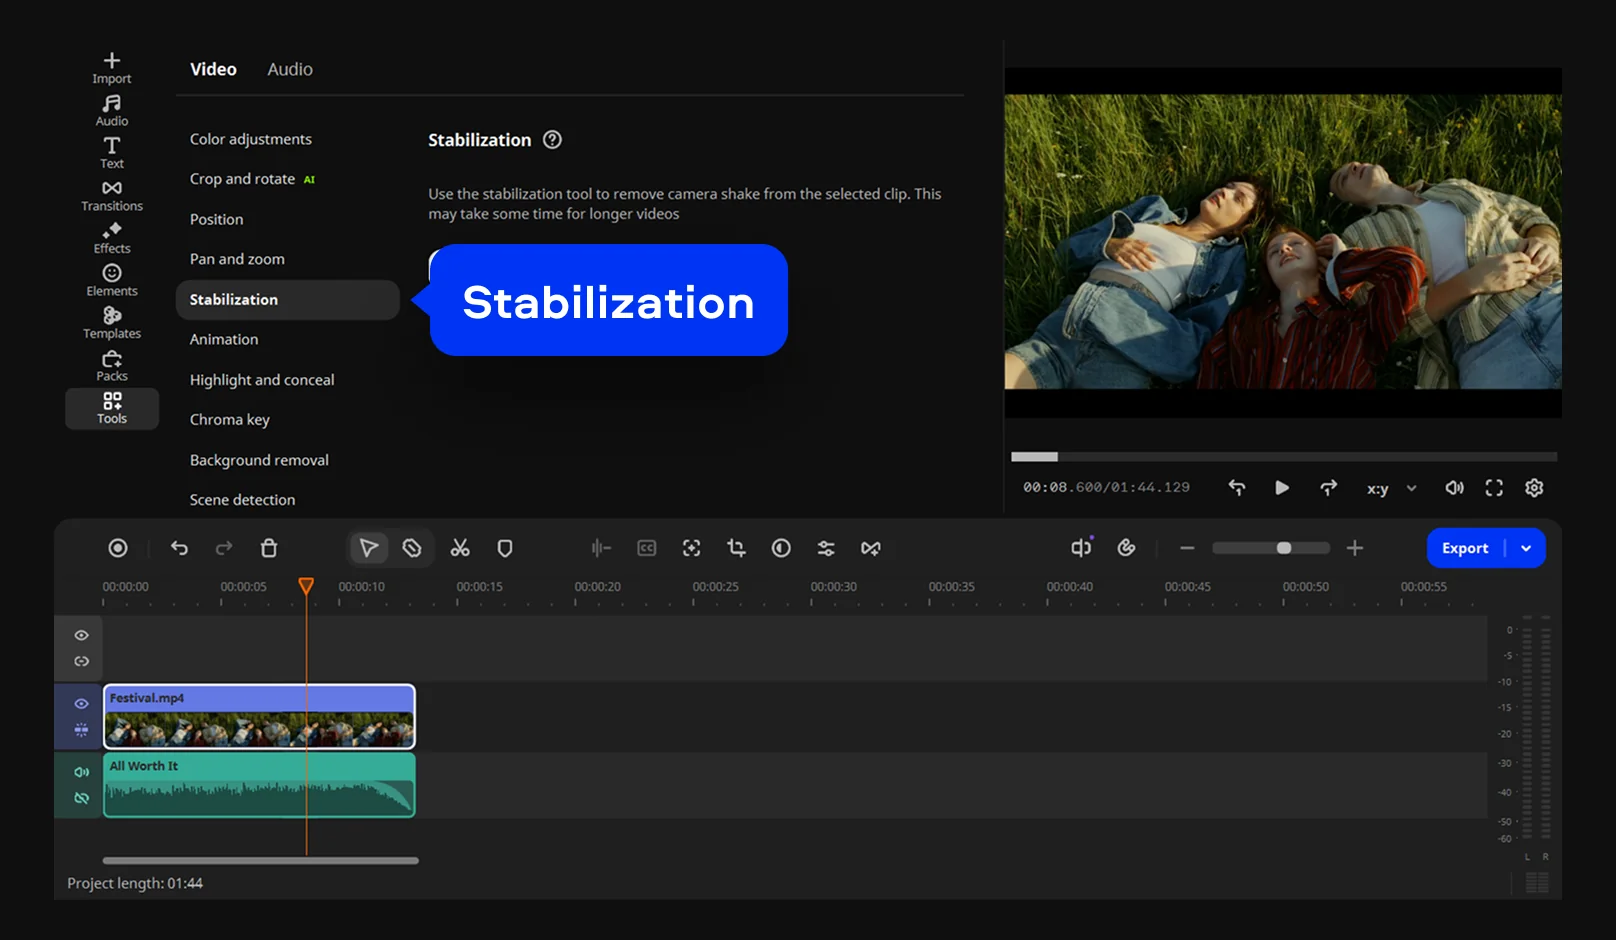
- Steady and reframe: If your handheld vlog is wobbly, steady it using the Stabilization tool.
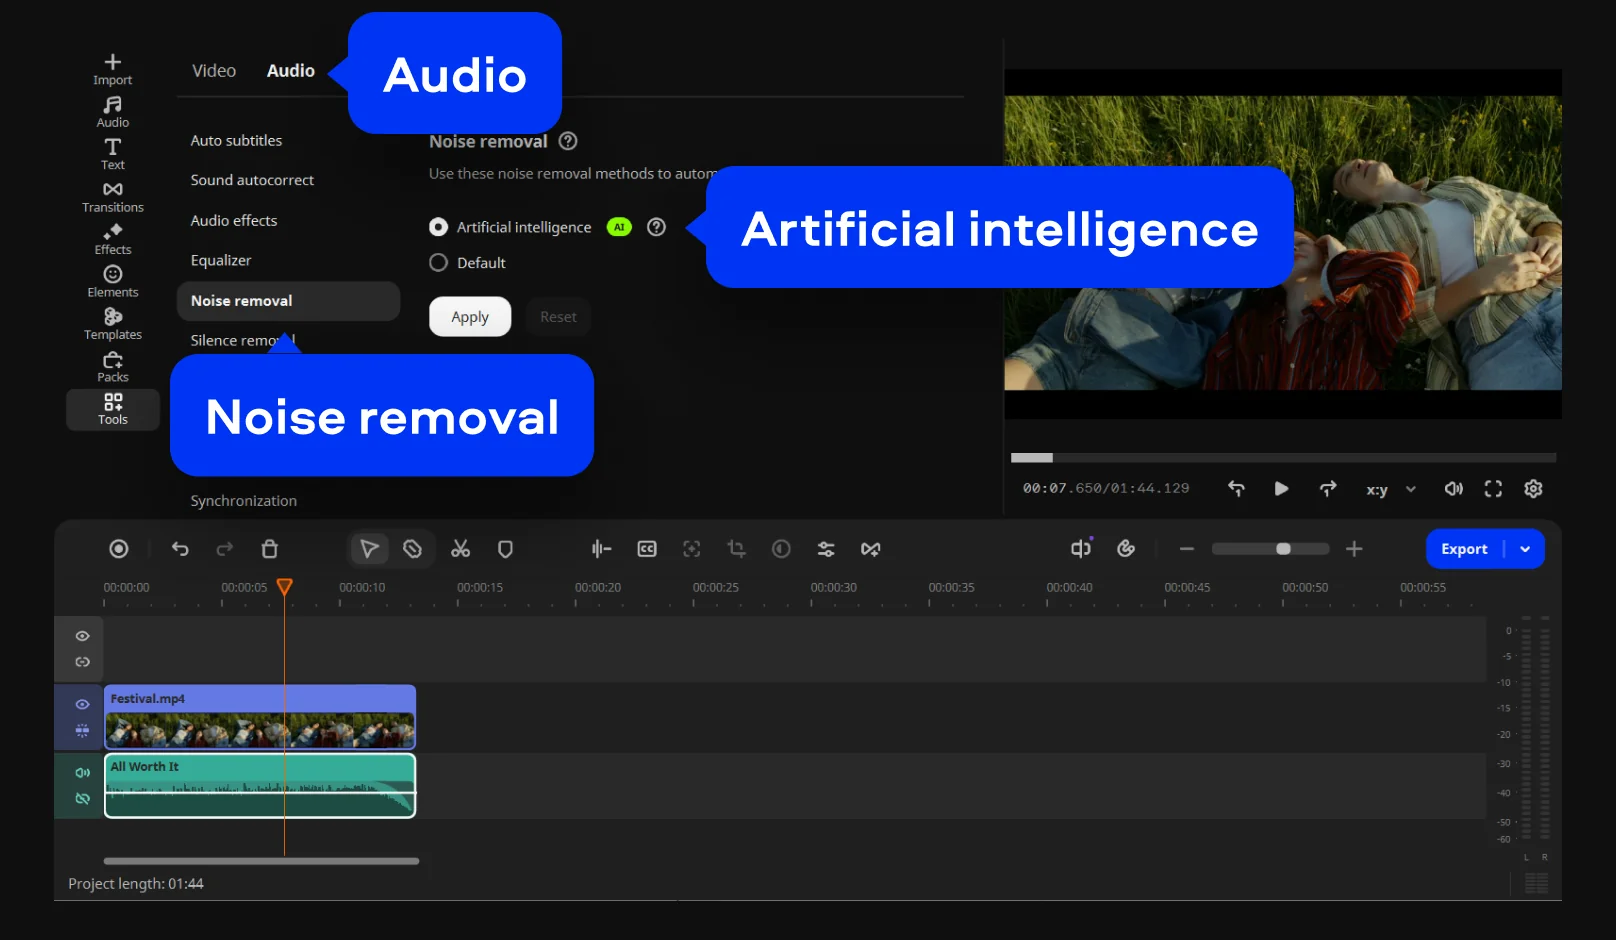
- Clean up the sound: Under the Audio tab, open Noise removal and use the Artificial intelligence option to automatically clear up unwanted background sounds like wind, traffic, or fan hums while keeping your voice crisp.
These one-click AI tools aren't a buzzword bolted onto the software; each one is built to save actual editing time.
Step 3. Export the video
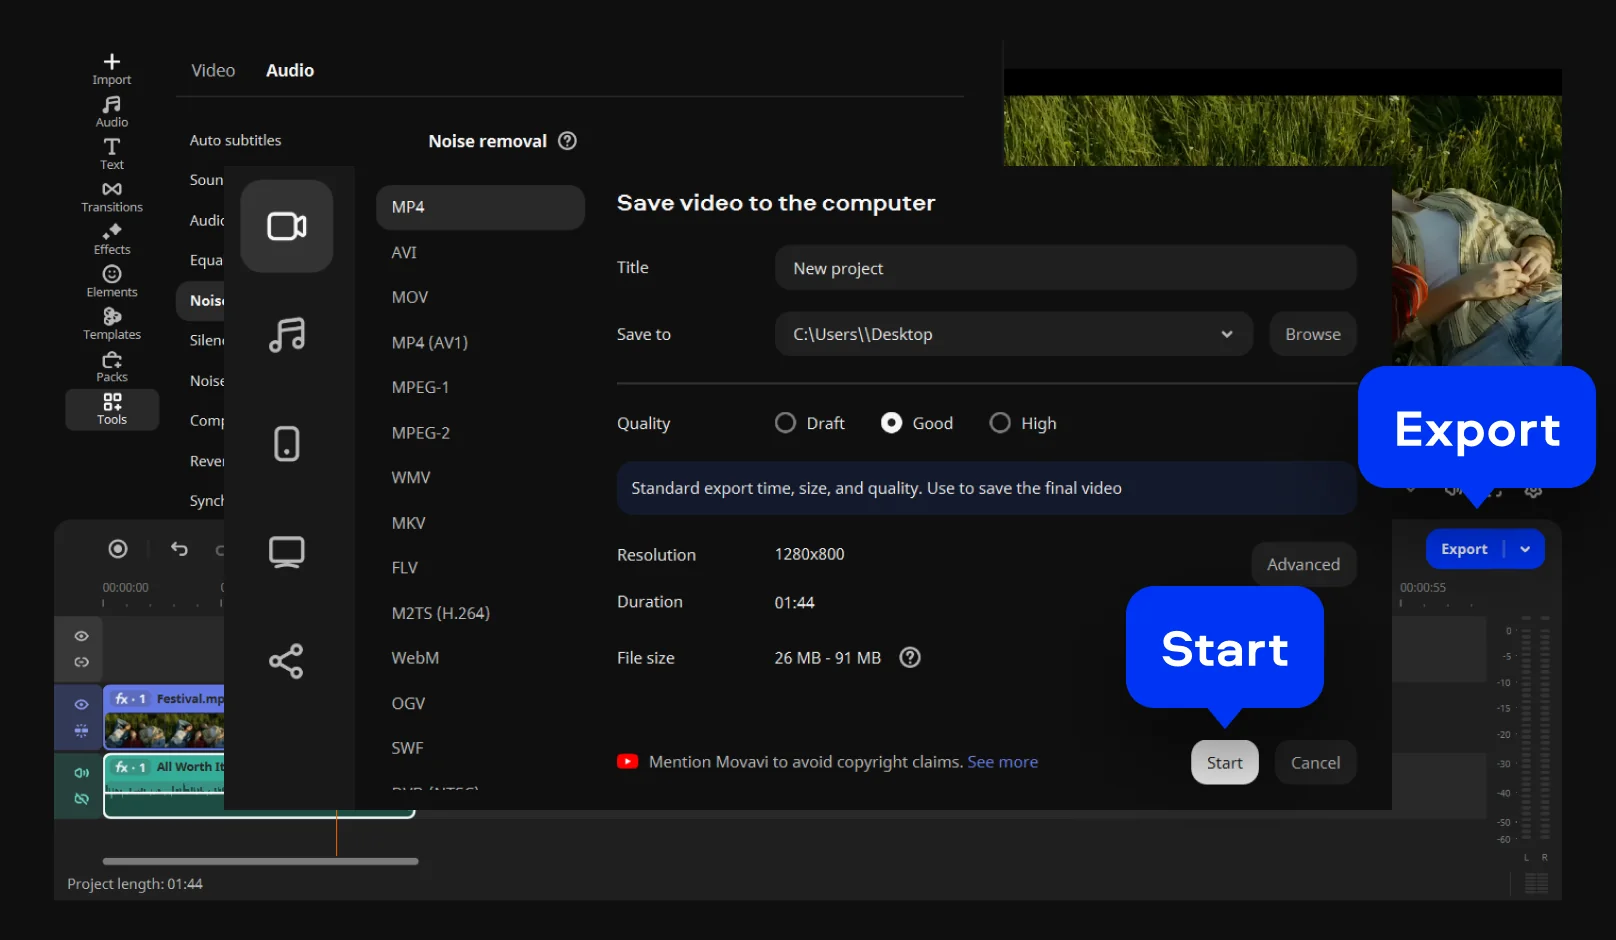
Click Export, pick your desired format (like MP4), and choose your resolution. Remember to match your export to your platform: 1080p is the best choice for YouTube, TikTok, and Instagram to ensure a fast upload without getting overly compressed, while 4K is ideal if the video is heading to a large TV or monitor. Set your save location, press Start, and your polished video is ready to share.
Match video quality to where it’s going
A clean, denoised, color-corrected clip can still look wrong if it's exported at the wrong size for its destination, so the platform matters as much as the fix itself.
YouTube re-compresses every upload regardless of the resolution you send it, which is why a well-cleaned 1080p file usually beats a noisy, shaky 4K one. TikTok and Instagram do the same, and both platforms are watched almost entirely on phone screens, where the gap between 1080p and 4K is barely visible anyway. A content creator uploading weekly gains more from consistent color and steady framing across every video than from chasing a resolution number that gets compressed away on arrival.
4K earns its keep in narrower situations: footage meant for a TV, a big monitor, or a portfolio reel where someone might view it full-screen up close. For everything else, matching the platform first and the resolution second keeps file sizes reasonable and upload times short.
Movavi Video Editor
Create awesome videos easily

Frequently asked questions
How do I improve video quality on YouTube without re-filming?
How do I improve video quality on YouTube without re-filming?
Fix noise, color, and stability first with a video editor, then export at 1080p unless your original footage was actually recorded in 4K. YouTube compresses every upload regardless of resolution, so cleaning up the source footage usually matters more than the export size.
Is 1080p or 4K better for social media?
Is 1080p or 4K better for social media?
For TikTok, Instagram, and most of YouTube, 1080p is still the safer default. It uploads faster and looks identical to most viewers on a phone screen. 4K makes more sense for content headed to a TV or a larger monitor.
Can beginners actually do this, or does it require editing experience?
Can beginners actually do this, or does it require editing experience?
Movavi Video Editor is built for beginners and everyday creators specifically, with one-click AI tools instead of manual sliders for every fix. None of the steps above require prior editing experience.
What's the difference between video editing and enhancing video quality?
What's the difference between video editing and enhancing video quality?
Video editing covers cuts, effects, titles, and structure. Enhancing video quality is a narrower set of fixes, noise, color, stability, and resolution, that can happen inside a video editor or as a separate pass before or after the edit.
Does AI upscaling fix shaky or noisy footage?
Does AI upscaling fix shaky or noisy footage?
No. Resolution upscaling only changes pixel count. It won't remove grain, fix color, or steady a shaky shot. Those need to be handled separately, ideally before upscaling rather than after.
How do I keep video quality high when uploading to TikTok or Instagram?
How do I keep video quality high when uploading to TikTok or Instagram?
Export at 1080p rather than stretching to 4K, since both platforms compress uploads down regardless. Steady framing and clean color hold up through that compression far better than raw resolution does.

Have questions?
If you can’t find the answer to your question, please feel free to contact our Support Team.
Join us for discounts, editing tips, and content ideas


1.5M+ users already subscribed to our newsletter