
Step 1. Install Movavi Photo Editor
First, download the distribution file and install the photo colorizer. Start the program.
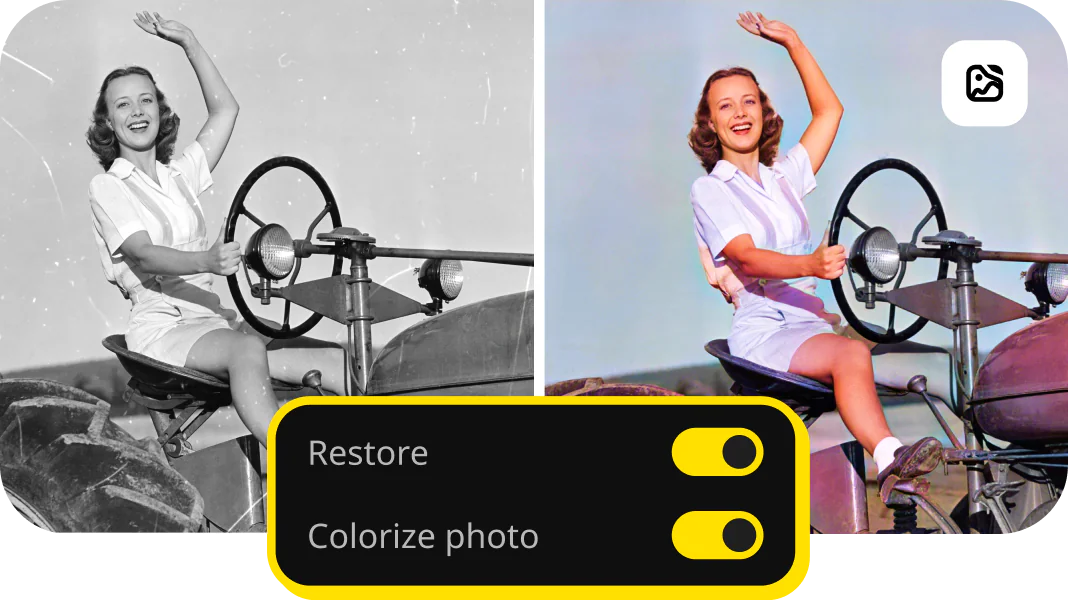
How to colorize photos
There was a time when color photography was a luxury only a few could afford. Now, almost everyone has a phone camera for capturing stunning color shots. Still, many of us have old black-and-white photos, like wedding pictures, family portraits, or historic images. Ever wanted to see those in color? With today's technology, it's easy! Keep reading to learn how to colorize old photos with just a few clicks.
Try using Movavi Photo Editor to turn your black-and-white photos into color. Give new life to old photos. Effortlessly hide crease lines, scratches, and stains. Reduce image noise in scans. Add color to black-and-white photos and revive memories in a flash.
Discover how to colorize a black-and-white photo with Movavi Photo Editor by following the steps below.
Step 1. Install Movavi Photo Editor
First, download the distribution file and install the photo colorizer. Start the program.
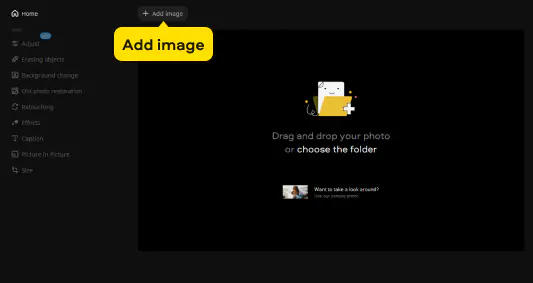
Step 2. Add a photo
Click the Add image button and and choose the photo you want to colorize or just drag and drop the picture into the program's working area.
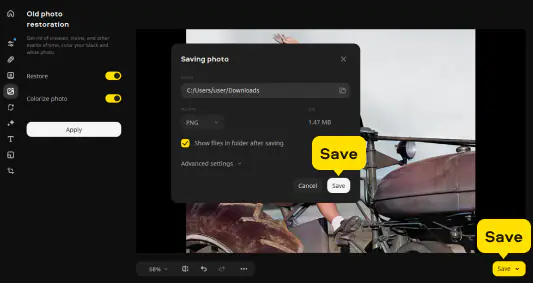
Step 3. Colorize the photo
Go to the Old photo restoration tab. Switch on the Restore option and click Apply. If you want to colorize your black-and-white photo, select Colorize photo and click Apply again.

Step 4. Save the colorized image
Click the Save button in the lower-right corner to export your edited photo. Pick your preferred format and click Save to begin the export process. Once it's done, the destination folder will open automatically.
Your smart and simple photo editor for creating wow pictures
*The trial version of Movavi Photo Editor has the following restrictions: you can save up to 10 images with added watermark, screenshots are disabled.
To colorize black and white photos, you'll want to use Movavi Photo Editor. It boasts a user-friendly interface and powerful AI colorization tools, letting you effortlessly transform your monochrome images into vibrant masterpieces. This is a great choice for anyone who wants to bring their old photos to life, whether you're a casual photographer or a professional graphic designer.
You can easily colorize a black and white photo using Movavi Photo Editor. With its intuitive tools and advanced AI colorization capabilities, you can transform your old photos into stunning color images in just a few clicks. Ideal for individuals and professionals alike, Movavi Photo Editor lets you restore faded memories and breathe new life into your black and white pictures.
One of the best methods for colorizing black and white photos is using Movavi Photo Editor. This powerful software uses AI to intelligently colorize your images, preserving the details and creating realistic results. It's a great option for anyone, from hobbyists to professional photo editors, who want to enhance their photos with a touch of color.
You can easily turn a black and white photo into color with Movavi Photo Editor, thanks to its advanced AI colorization tools. The software analyzes the image and intelligently applies color to create a vibrant and realistic result. It's perfect for photographers, graphic designers, and individuals who want to give their old photos a new lease on life.


1.5M+ users already subscribed to our newsletter