Wondershare Filmora Review

Edited by Paula Beaton
20 885

Try Movavi Video Editor!

  • Edit and enhance videos easily
  • Add stylish transitions, titles, and filters
  • Stabilize and reverse video, equalize sound, and more

Make videos. Create. Inspire.

By clicking the download button, you're downloading a free version of the program.*

In this Wondershare Filmora review, we’ll take a look at Filmora Wondershare and see how it compares to one of its main rivals, Movavi Video Editor. We’ll also look at the pros and cons of the software, its system requirements, and much more. Keep reading for our full Filmora video editor review.

Pros

Cons

Intuitive, modern interface

No motion tracking

Lots of overlays, transitions, and effects

Interface is not touch-friendly

Affordable

Only one clip at a time in Cutter and Action Cam modes

Simple to use

No search tool for transitions or effects

Generally snappy performance

No DVD menu

Available for Mac and Windows

No chapter authoring

At Movavi, we’re committed to providing you with verified information only. Here’s what we do to ensure this:

  • When selecting products to include in our reviews, we research both demand and popularity.

  • All products mentioned in this article have been tested by Movavi Content Team.

  • When testing, we compare key parameters, including video and audio trimming, visual effects, stabilization, video quality adjustments, saving and sharing videos, and other significant features.

  • We study user reviews from popular review platforms and make use of this information when writing our product reviews.

  • We collect feedback from our users and analyze their opinions of Movavi software as well as products from other companies.

Want to find out more about Wondershare Filmora? It’s worth checking out Filmora reviews online.

We’d recommend checking out the Capterra Filmora review before deciding if the software is right for you.

Capterra rating: 4.5/5, 312 reviews

Filmora system requirements

Before purchasing Wondershare Filmora, or any video editing software, it’s vital to check that your computer meets the system requirements. If you don’t do this, you could end up with software that doesn’t run on your Windows PC or Mac. As well as Windows and Mac, Wondershare Filmora editing software runs on iPhone, iPad, Apple TV, Apple TV 4K, iPod, Android devices, PSP, and PlayStation. Below you’ll find all the system requirements for Filmora from Wondershare.

You can also check out the Filmora system requirements and find out more about Wondershare Filmora video editor on the Filmora website.

Requirement

Filmora for Windows

Filmora for Mac

OS

Windows 7, 8.1, 10 (64 bit)

Catalina, Mojave, High Sierra, Sierra, El Capitan

RAM

4 GB (8 GB for HD and 4K videos)

8 GB (16 GB for HD and 4K videos)

Processor

Intel i3 or better multicore processor with 2GHz or above (for HD and 4K videos Intel 6th Gen or newer recommended)

Intel i5 or better multicore processor with 2GHz or above (for HD and 4K videos Intel 6th Gen or newer recommended)

Filmora price

Wondershare Filmora has a free trial that offers all the same functions as the paid version, but you can only try the software for ten exports, and it applies a watermark to your output files. This watermark is removed once you purchase a paid plan and activate the software.

You can choose from three plans: Annual, Perpetual, or Bundle Subscription. The Annual Plan costs $49.99 per year and gives you senior tech support, one year of updates, no watermarks on your videos, and unlimited assets download and preview. The Perpetual plan costs $79.99 as a one-off payment and gives you lifetime access to Filmora X as well as everything in the Annual Plan. The Subscription Bundle costs $109.99 per year and gives you one year of Filmstock Standard subscription and Filmora Video Editor subscription bundled with your Filmora plan, as well as access to all the software’s features, no watermarks, senior tech support, new effects added every month, and one year of unlimited downloads from the Filmstock Standard Library.

Filmora 9 vs. Filmora Pro and FilmoraGo

Filmora 9 is the latest version of Filmora, with a simple-to-use interface, easy customization options, and paid and free versions. Filmora Pro, on the other hand, has much more advanced editing features, designed for professional workflows. With Filmora Pro, you get all the features of Filmora 9 and many more, an advanced user interface, and a more expensive subscription.

Filmora 9 will suit the needs of most home users, while Filmora Pro is designed for those looking for more advanced features and has both paid and free versions.

There is also FilmoraGo, which is an app available for iOS and Android devices. FilmoraGo lets you work with a single layer of video but it does support picture-in-picture (PiP) editing. You can use the free version of FilmoraGo or upgrade to the paid Pro version, or you can buy upgrades from the store such as removing the video watermark or unlocking the 1080p export feature.

Features

Filmora Wondershare video editor is packed with features for both home and business use. We’ll take you through some of those features here:

Customizable interface

When you start using Wondershare Filmora, you have the option to set up your interface the way you’d like. You can choose between a dark or light interface, which will be set up to match your system settings. You can also switch between black and light-gray window borders. You’ll see three panels on your screen: source content, video preview, and the timeline. You can adjust the size of each panel and also choose between various aspect ratios including Widescreen, Portrait, Standard, Instagram (1 × 1), or Cinema. It’s also possible to make the timeline bigger or smaller.

Transitions

Wondershare Filmora offers over 100 transitions to choose from, organized into ten categories: Basic, Speed Blur, Warp, Ripple and Dissolve, 3D, Slideshow, Lifestyle, Plain Shape, Filmstock, and Linear. You can search for your favorite transitions by name and save them as favorites for easy access later. It’s easy to add transitions to your video – just drag the transition into place on your timeline with the mouse until it snaps between clips. You can also adjust the amount of time it spans by dragging its edges.

Motion tracking

Filmora’s motion tracking tool is fairly simple to use. It doesn’t have lots of complicated settings, which is good news for those new to using this type of tool. Simply draw a box around the object to track and then click Start Tracking. You can choose from various mosaic blurs or choose a file of your own to follow the track.

Text and title effects

Adding text and title effects to your videos is easy with Wondershare Filmora. There are more than 200 title and text templates, including animated templates. You can edit each template to suit your needs in the video preview window or use the Advanced Text Editor to change the font and animation for your text – you can even fill in your text using a photo or overlay various shapes and objects onto your video.

Audio and music

With Filmora Wondershare, you can easily add music or audio track to your creations. There are over 172 music tracks and an audio mixer that allows you to adjust each track individually. It’s easy to record a voiceover, too and there’s a handy Denoise checkbox for background noise removal.

Speed adjustment

You can adjust the speed of your videos using Filmora video editor and choose from a range of settings, including Slow, Fast, Normal, or Reverse. There’s even a freeze frame option. You can see the time change you’ve selected written at the top of the clip, so you know exactly what you’re working with.

Performance

Wondershare Filmora is generally snappy but some users have reported occasional lag or times when the program stops responding or exports fail. In the review by PC Mag, render time was tested using a movie of just under five minutes’ duration. Filmora took 1 minute 16 seconds to render this, faster than Adobe® Premiere® Elements.

Fillmora’s performance will of course depend on your system specifications and performance and may vary depending on a variety of factors, including whether you’re downloading files or running any other software on your computer simultaneously. For the best performance, we would always recommend closing down any other programs.

Filmora alternative

Movavi Video Editor is a video editor for Windows and Mac that’s easy to use, even for beginners – and it’s an excellent Filmora alternative. With a simple interface and speedy response time, it supports the most common video file formats, including MP4, MOV, WMV, AVI, and more.

Movavi Video Editor has a wide range of editing tools and features to choose from, including Chroma Key, Keyframe editing, Motion tracking, and a large library of filters, effects, titles, and text to add to your creations. There’s even a handy Montage Wizard, which creates movies automatically using your media and a chosen template. You can download the free version for a 7-day trial, with a watermark added to your output videos, or purchase the software for $79.95.

How to edit a video using Movavi Video Editor

Step 1. First, download and install the software to your Windows PC or Mac.

Step 2. Launch the software.

Step 3. Add your files by clicking the Add Files button and selecting your video. You can also drag and drop files onto the working area.

Step 4. You can now add filters by clicking the Filters tab. Just choose the filter you’d like and drag it onto the video. Changed your mind? It’s easy to remove a filter by clicking the star button, choosing the filter to delete, then hitting Remove.

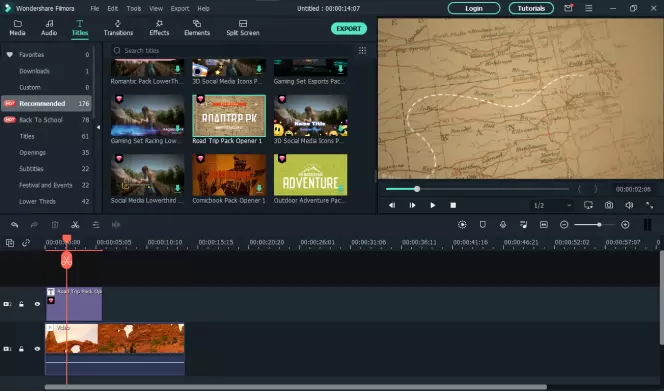
Step 5. You can also add animated transitions to your video. Click the button above the timeline that looks like mountains. In the dialogue box, choose your transition style and select the duration. You can also add transitions by opening the Transitions tab, selecting the transition you want, and dragging it onto the timeline.

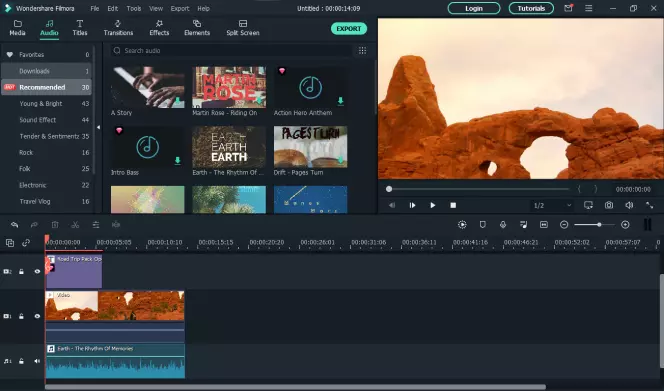
Step 6. Now it’s time to add music and/or subtitles. To add music, open the Import tab and click Add Files. Then select your music or audio file. You can also add music by dragging files onto the Audio Track. To add subtitles, click the Titles tab, choose your style, then drag it onto the Titles Track. You can edit the title and add text by double-clicking it, then hit Apply to save your changes.

Step 7. Don’t forget to save your work! Click Export, then choose from one of several options. Select Save Video File to save your file to your computer. You can also select the appropriate tab to save your file to an Apple or Android device. Click Upload Online to upload your file directly to Google Drive or YouTube. Then choose the video output format (or a video preset), specify your filename and folder, and hit Start.

Filmora vs. Movavi

  1. Ease of use
    Winner: Movavi
    Although both programs look quite similar, comparing Filmora vs. Movavi Video Editor shows a few differences. Movavi has a more simplistic layout than Filmora video editor, with larger buttons – and the most commonly used functions are always visible on the screen. Movavi Video Editor also offers a wide range of preset effects and titles to make video editing easier for beginners.

  2. Preset effects
    Winner: Filmora
    Wondershare Filmora has a vast library of animation presets, and customizable audio and video effects, as well as multiple presets for split-screen editing, making it an excellent choice for those new to video editing.

  3. Editing tools
    Winner: Movavi
    Although the two editors have many features in common they also have some distinct and important differences. Movavi Video Editor lets you add animation to your clips, titles, and more – whereas you can’t do this with Filmora Wondershare. Movavi also excels when it comes to audio editing, with a tempo detection function that allows you to adjust the length of video clips to match audio, and a sound normalization feature too. Finally, Movavi has keyframe animation, which you don’t get with Filmora.

  4. Titles and text
    Winner: Tie
    Both Filmora video editor and Movavi allow you to change the font, size, color, spacing, and more of your text, creating customizable titles for your videos. Both also offer a range of preset titles to make title creation quick and easy.

  5. Input and output
    Winner: Tie
    Both programs support most video and audio input and output formats, including AVI, MP4, MOV, AAC, MP3, and many more. They also both support most devices, including iOS and Android devices, Windows computers, and Mac computers. Both programs also offer support for 4K videos.

  6. Usage
    Winner: Tie
    Movavi and Filmora are marketed at slightly different users, but when it comes down to usage, the two programs tie. Movavi is designed for beginners looking to create and edit videos as quickly and easily as possible. Filmora video editing, on the other hand, is aimed at beginner or intermediate-level editors looking for customization and fine-tuning options, those who are happy to learn a bit more about video production and editing.

  7. Workflow
    Winner: Movavi
    Although the workflow in Filmora from Wondershare is a little more established and clearer than Movavi, getting online support with step-by-step guides is easier with Movavi, which is helpful not only for beginners but for users with all levels of experience.

  8. Help and support
    Winner: Movavi
    When it comes to things going wrong with your software, Movavi offers support via live chat as well as email and forum support – there’s no live chat support with Filmora. Movavi also supports older operating systems like Windows XP and Vista as well as macOS 10.7 and 10.8, and has step-by-step instructions in the program for beginners, while Filmora doesn’t offer either of these things, unfortunately.

  9. Pricing
    Winner: Movavi
    Movavi Video Editor costs $69.95, while Filmora editing software’s basic package costs $79.99. Movavi therefore wins the pricing category – but don’t forget that there are different plans and pricing options available for both programs.

Wondershare Filmora vs. Movavi Video Editor: The takeaway

As you’ll see from our comparisons above, both Wondershare Filmora and Movavi Video Editor are popular programs packed with powerful features for video editing, but there are some major differences when you compare Movavi vs. Filmora. Whereas Movavi Video Editor boasts a clean interface with large, user-friendly buttons and step-by-step guides to help even beginners get started creating and editing videos, Filmora Wondershare takes a slightly more hands-off approach although there are Filmora tutorials. It’s still suitable for those without much video editing experience but doesn’t offer the same level of introduction and hand-holding as Movavi does.

The two programs also differ in terms of features, and which software is the best choice for you will depend on what features you need. Movavi offers features like keyframe animation, and excels at audio editing with tempo detection, sound normalization, whereas Filmora video editor doesn’t offer these features.

It’s worth mentioning support too. Filmora Wondershare doesn’t offer live chat support, so if you’re editing videos professionally and need timely help, Movavi Video Editor might be a better choice for you. With Wondershare Filmora, you’ll need to wait for support via email.

Despite these differences, both programs are an excellent choice, with Movavi Video Editor coming out just ahead for beginners. If you’re in the market for new video editing software and are considering picking up either of these video editing programs, we strongly recommend trying the free demos so that you can ensure you’re choosing the best software for your needs – and it’s also worth reading through a Filmora video editor review and similar reviews of Movavi to decide which is right for you.

Paula Beaton

Paula is a seasoned content creator, copywriter, and editor, with more than 8 years of experience writing for tech and travel brands such as Thomas Cook, Skyscanner, Eltima Software, and DigitalTrends.com, as well as many others. She studied fiction editing with Liminal Pages in 2016 and launched her fiction editing business the same year, working with publishers in the UK and US and authors from around the world across a range of genres, from sci-fi and fantasy to thrillers and crime fiction. Today she writes regularly for DigitalTrends.com and Skyscanner's blog. She's also passionate about film photography and enjoys gaming.

Get to know all the authors

Movavi Video Editor

Сreate awesome videos easily

*The free version of Movavi Video Editor may have the following restrictions depending on the build: watermark on exported clips, 60-second video or 1/2 audio length limit, and/or some advanced features unavailable when exporting videos.

Frequently asked questions

What is Wondershare Filmora?

Wondershare Filmora is a video editor that allows you to create and edit videos. Packed with features including over 100 transitions, speed adjustment, motion tracking, titles and effects, and more, you can create videos for home or professional use and even share them directly to social media from within the software. There’s a basic version of Filmora available, Filmora 9, as well as Filmora Pro.

Does Filmora have a watermark?

Wondershare Filmora free trial applies a watermark to all your video outputs, however once you upgrade to a paid plan for Filmora 9 or Filmora Pro, the watermark is removed and you can access all the features of the full software.

Is Filmora safe?

If you’re wondering “Is Filmora video editor safe?” then the answer is yes. This is software that you download and install onto your Windows PC or Mac, so you don’t need to be connected to the internet while you’re using it (unless you’re uploading videos to YouTube or social media). The software has received lots of positive reviews and we’d recommend checking out the Filmora video editor reviews and Filmora rating online if you’re feeling unsure. There haven’t been any reports of malware or unwanted programs bundled with the download, but we’d always recommend ensuring your antivirus software is running when performing a Filmora download or downloading any software, to be on the safe side.

Is Filmora legit?

Wondershare Filmora 9 and Filmora Pro have received hundreds of reviews on sites like Capterra, from satisfied users. The software has also been reviewed by sites like PC Mag. Filmora Wondershare is legit, and safe to download without the risk of malware, though as mentioned above we would always recommend ensuring your antivirus software is running when downloading and installing anything from the internet.

Is Filmora free?

If you’re wondering about the Filmora price, Wondershare Filmora free trial lets you enjoy all the same functions as the paid software. However, you can only try out the software for free for ten exports, and a watermark is applied to your output files. If you want to continue using Filmora, you’ll need to purchase a plan, and there are various plans to choose from depending on your budget and requirements.

How do I use Filmora?

If you’re wondering how to use Filmora, you can check out the Filmora tutorial on how to edit videos. Here’s a brief step-by-step guide to how to use the software to edit your creations:

  1. Download Filmora and install it on your Windows PC or Mac computer.

  2. Launch the software and select New Project.

  3. If you haven’t already upgraded to the full paid version of the software, you can do this by clicking Register once the video editor loads.

  4. Click File > Project Settings and select your aspect ratio. Here there are several different options to choose from, or you can customize your aspect ratio. You can also adjust the resolution and frame rate.

  5. In the editor’s top left corner, click Import > Import Media Files and find the files you want to edit on your hard drive. You can also download media directly from Facebook, Instagram, Flickr, etc.

  6. Files you add are stored in the Media tab. If you’re adding a lot of files and want to organize them, click on My Album > Add a New Folder and organize your files.

  7. To start editing, drag and drop files onto the timeline and drag them to rearrange. To preview the clips, hit Spacebar or click Play.

  8. Now you can add visual effects, transitions, music, filters, or overlays as well as adjust speed and color correction.

  9. Once you have finished editing your videos, click Export. From the Format menu, select the video file format and choose if you want to optimize the video for games consoles, smartphones, or tablets. You can also click Settings to adjust the resolution or pick an encoder.

  10. Select where you want to store the completed video on your computer and add a file name. Or you can choose to export video directly to YouTube or Vimeo. This is a fast process since Filmora renders and uploads video simultaneously.

How much does Filmora cost?

If you’re wondering “How much does Filmora cost?” then you’ll be pleased to know that there’s a free trial. You can use it for your first 10 exports, and access all the features of the full version, however your exports will have a watermark. You can upgrade to one of Filmora’s paid plans: the annual plan costs $49.99 per year. If you’d rather buy the software outright, the Perpetual plan costs $79.99 as a one-off payment for lifetime access. There’s also the option to buy a Subscription Bundle which gives you a year of Filmora Video Editor and a year of Filmstock Standard for $109.99. All these plans come with senior tech support and no watermarks on your video.

Filmora 9 vs. Filmora Pro: what are the differences?

If you’re wondering what the differences are for Filmora 9 vs. Filmora Pro, we’ll explain. The Filmora latest version is Filmora 9 and it features a simple interface and easy customization options for beginners. Filmora Pro is designed for professionals, with more advanced editing features. It gives you all Filmora 9’s features and more, but it does cost more. Unless you’re editing videos professionally, Filmora 9 will probably meet your needs.

Filmora won't open: what should I do?

It can be frustrating if Filmora won’t open. If you’ve signed up and paid for the full version of the software and Filmora is not opening, you can contact their tech support. They should be able to help you troubleshoot and resolve any issues.

Have questions?

Have questions?

If you can’t find the answer to your question, please feel free to contact our Support Team.

Join for how-to guides, speсial offers, and app tips!