
Step 1. Install Movavi Video Editor
First, download Movavi Video Editor Plus, then launch the file on your PC or Mac. Follow the on-screen instructions to complete the process, it’s just like downloading any other program onto your computer.

How to Make a Time-Lapse Video: 2 Easy Ways
Create time-lapses with Movavi Video Editor!
Alter speed of your videos
Reverse your clips in a few clicks
Easily edit and save the results
Making time-lapse videos is a fun way to capture not just a moment, but a duration of the past. Whether you’re looking to use a high-powered camera and create a picture time-lapse or prefer the more straight-forward video lapse process, we’ll show you how to make a time-lapse video using your preferred electronic device.

At Movavi, we’re committed to providing you with verified information only. Here’s what we do to ensure this:
When selecting products to include in our reviews, we research both demand and popularity.
All products mentioned in this article have been tested by Movavi Content Team.
When testing, we compare key parameters, including video and audio trimming, visual effects, stabilization, video quality adjustments, saving and sharing videos, and other significant features.
We study user reviews from popular review platforms and make use of this information when writing our product reviews.
We collect feedback from our users and analyze their opinions of Movavi software as well as products from other companies.
Special pick: Movavi Video Editor
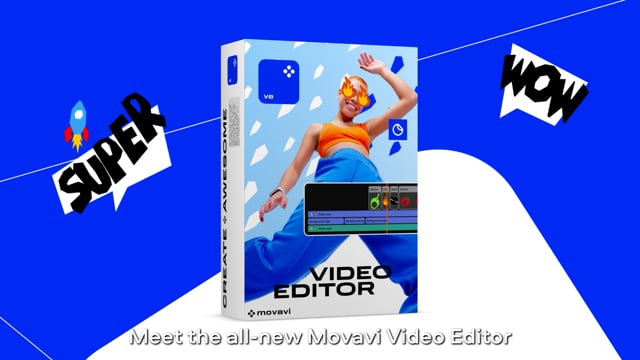
Our special pick for both video time-lapse and to turn photos into time-lapse video is Movavi Video Editor. Movavi’s powerful editing tool processes media files in popular formats, makes editing video and image files easy, and compresses time-lapse projects into high-quality, easily exportable projects.
Paired with a modern and intuitive interface as well as a free trial version, it's hard to go wrong with Movavi to make a timelapse video.
What is time-lapse recording exactly? Although you hear the term “time-lapse video” thrown around often, time-lapse recording, or time-lapse photography, is a hybrid of animation, still photography, and videography. Depending on your device, subject matter, and skill-level, there are different ways to create time-lapse video from both photos and sped-up video footage.
Shooting a time-lapse video either way requires preparation. Once you’ve determined what you want to record, then you need to ensure you have the right tools, as well as understand how to use those tools to create an aesthetic time-lapse shot.
Consider the tips below our “timelapse how to” guide. If you decide to skip over the other sections, at least make sure you read this tutorial about how to shoot time-lapse so you can shoot and produce yours like a pro.
1. Choose your subject
Some subjects commonly chosen for shooting a time-lapse video include sunrises, sunsets, storms, and other natural phenomena. Yet don’t let these popular time-lapse topics deter you from being creative.
Time affects everything, so let your imagination run wild.
Do you want to see how long it takes for a glass of water to naturally evaporate? How about literally watching grass grow in a time-lapse video?
Once you have a subject for your time-lapse shot, you can start assembling the right gear for the job.
Here’s a list to start you thinking about ideas for recording a video with time-lapse effects:
Sunrises or sunsets
Clouds moving across the horizon
City lights at night
Plants growing
Fruit ripening or decomposing
Construction (buildings, backyards, etc.)
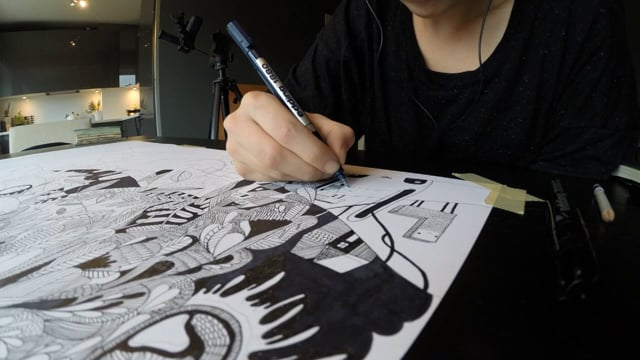
Drawing or other creative processes that require time
Opening of flower buds
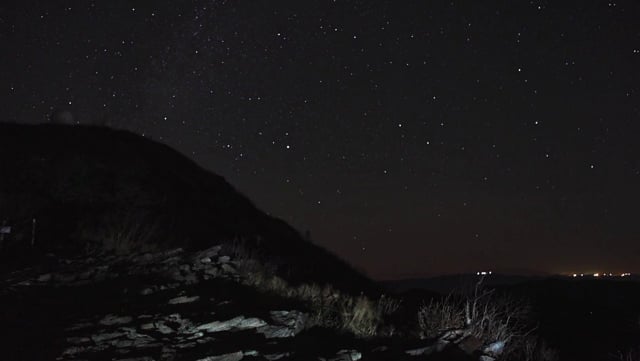
Clear, starry nights
Beautiful natural landscapes
Dust accumulating on a windowsill
Seasonal changes (trees, foliage, etc.)
Storm clouds and lightning storms
2. Gather your equipment
Have a subject or range of subjects in mind? Then it’s time to assess what equipment you may already have, and what you might want to purchase in order to achieve time-lapse shooting success.
Here’s a list of tech (hardware and software) that can help you make a time-lapse video. Each piece of hardware includes pros of using it, tips for taking the best shots, and software you can use together for the best results:
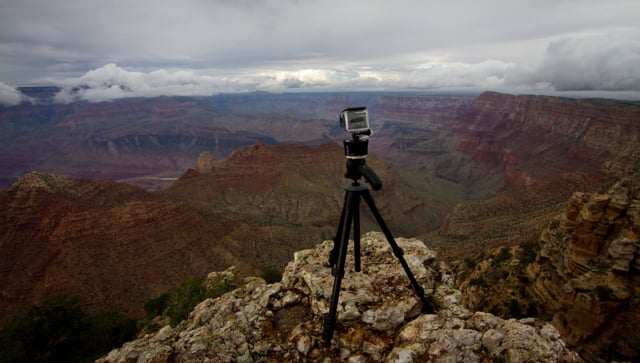
DSLR camera
DSLR cameras are your best bet if you’re serious about making a professional-grade time-lapse video. Being able to change lenses for different needs (like a lens with a fast aperture for night photography, or a wider lens for spectacular landscape time-lapses) provides flexibility, and DSLR cameras simply have more megapixels than smartphones.
Pros:
Can shoot high-resolution photos in RAW format
Adjustable settings, interchangeable lenses
Tips:
Buy an intervalometer (a device that presses the camera shutter at preset intervals)
Turn off autofocus and focus manually
Recommended shutter speed: 30-50
Recommended aperture: F4-F8

Smartphone
Smartphones have come a long way since the first generation of iPhones. The camera quality on these devices now far surpass earlier digital cameras, and because most people keep their phone on them at all times, creating a short time-lapse video on a casual day out is straightforward.
Not interested in separating from your phone for too long? Use an old smartphone you have lying around to create your time-lapse instead (just make sure it doesn’t run out of charge).
Pros:
Tips:
GoPro or other action cameras
GoPros are a fun way for people who love outdoor action to shoot video and take pictures.
Although shooting time-lapse photos frame-by-frame on a GoPro maxes out around 3 hours on a fully charged battery, GoPros are still a fun alternative to a DSLR camera and your phone because they’re so weather resilient and include some interesting additional features.
Pros:
Cheaper than buying a smartphone or a middle-to-high level DSLR camera
Compact and convenient
Waterproof
Tips:
Select Multi-shot mode
Use GoPro’s Time-lapse mode
Reduce the resolution to 7 megapixels (to save space)
3. Choosing a method
There are two main methods for creating a time-lapse video.
Shooting a video and speeding it up.
Creating a video from photos taken at intervals over a period of time.
Shoot a video and speed it up
Making a time-lapse video with this technique is straightforward: record a video over whatever period of time you want, open your video file in a video editing application, and then speed up the footage 3x or more.
Depending on how fast you want the objects in your video to be moving or how long you want your finished video to be, you can adjust the speed as desired.
With the right editing software you’ll be able to adjust resolutions, zoom in and out of certain sections, overlay music, and customize your time-lapse video in other interesting ways. You can also reverse videos online for free with no watermark to create unique effects in your time-lapse projects.
Create a video from photos
Considered the more complicated albeit more professional method of creating the time-lapse effect, you can take photos snapped over a duration of time and assemble a time-lapse video from hundreds (or thousands) of still images.
You may ask: “Why should I bother with taking so many photos when I can just record a video using the first method?” Well, there are at least three good reasons it may be worth your time (depending on how pro you’re trying to go):
Better quality. Your final result will look good even if made with consumer-grade equipment because of the high resolution of the photos. With video, your resolution will be lower.
Less of a drain on your memory card. Videos can be space hogs, especially if you’re shooting in 4K for a long time (3-5 hours). Still photos will require less space, and demand fewer computer resources for post-production.
Entertainment. There’s something novel and debatably arcane about stitching photos together to produce a time-lapse video. Why not give it a shot and see for yourself?

Tips before you start your time-lapse
Before you dive in, here’s a list of general recommendations for creating a good time-lapse video:
Use a stable tripod that won’t wobble.
Use large-capacity memory cards – you’ll need a lot of space.
Think about battery life beforehand if you’re preparing to shoot a long take.
Familiarize yourself with post-production software so you can turn your video or collection of stills into a fully realized time-lapse experience.
Not sure which app or software to use for post production? Check out Movavi Video Editor, which you can download and use for free on PC or Mac. Read on and we’ll walk you through how to use it to produce and finalize your first (or newest) time-lapse video.
Creating the time-lapse effect is easy with a video clip. All you need to do is speed it up, make a couple slight adjustments, and you’ll soon have your own time-lapse video.
Here’s how to create time-lapse using a video file within Movavi Video Editor in 5 easy steps:
Step 1. Install Movavi Video Editor
First, download Movavi Video Editor Plus, then launch the file on your PC or Mac. Follow the on-screen instructions to complete the process, it’s just like downloading any other program onto your computer.
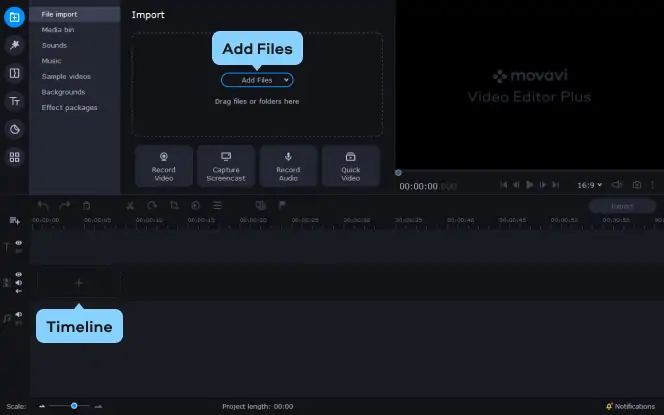
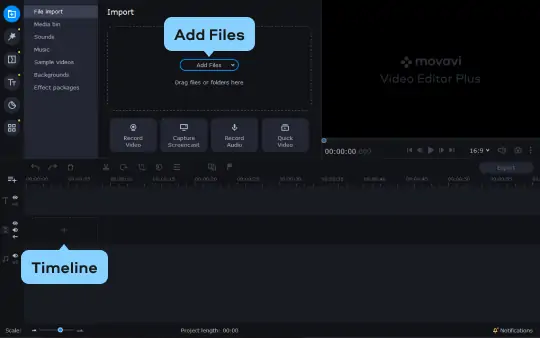
Step 2. Import your footage
Once you’re inside the software, select the File import tab, and then click Add Files.
Find the video file on your computer you’d like to turn into a time-lapse video, then click Open – the video will appear in the Media Bin.
You can then click on the video and drag it onto the timeline below.
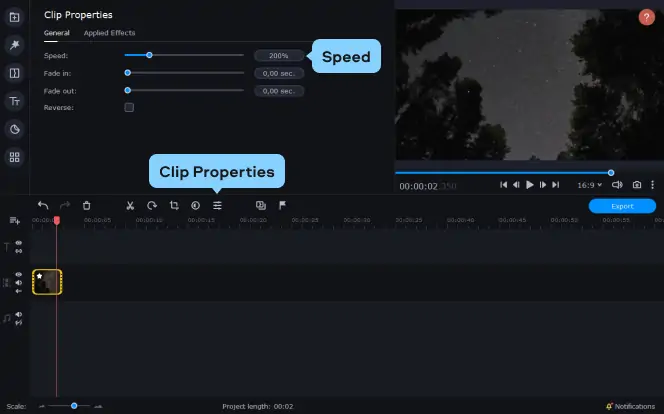
Step 3. Increase the speed of your video clip
To create a time-lapse effect, simply speed up the video. To do this, double-click the clip on the Timeline. In the Clip Properties, drag the Speed slider to the right to accelerate the video.
To preview your clip, right click your video on the timeline then click Play / Pause and check that it’s at the speed you want.
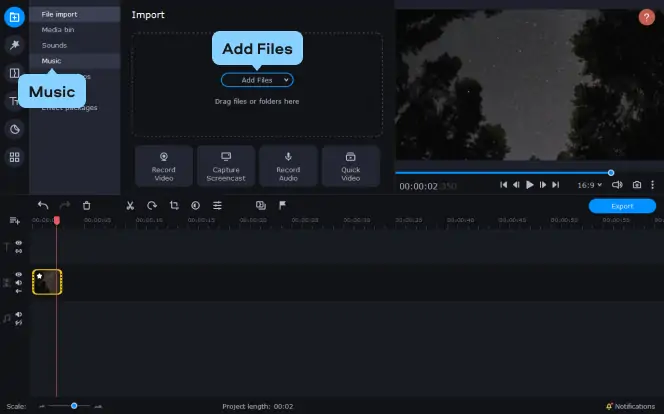
Step 4. Add music (optional)
For a little additional flair, add some music to your time-lapse video. You can either import your own audio files, or download a free one directly within the Movavi video editor.
To import a music track, go to the File import tab, click Add Files and choose your desired audio file. Or click the Music tab, download a track, and drag-and-drop it onto the timeline below your video.
To make sure your audio aligns with your video, click the music file on the timeline. Then drag the red cursor until it aligns with the video clip, and hit Command + B or Ctrl + B to split the music. Finally, select the music that runs after your video clip is over and delete it so that the audio and video perfectly align.
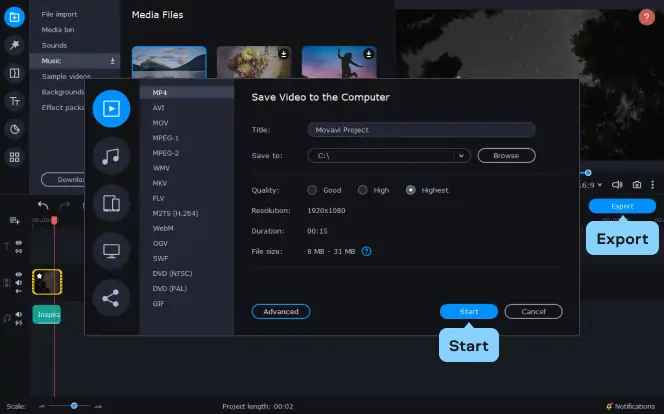
Step 5. Export your time-lapse video
When you’re happy with the result, click the Export button below your video preview window. In the new window that opens, enter the name of your time-lapse project, and select the quality, format, and output, and click Start. Your video will then export to the folder you selected on your computer.
That was a quick walk-through on how to make a time-lapse video by speeding up your footage. Below, you’ll find the guide to creating a time-lapse video using pictures.
*The free version of Movavi Video Editor may have the following restrictions depending on the build: watermark on exported clips, 60-second video or 1/2 audio length limit, and/or some advanced features unavailable when exporting videos.

Turning photos into a time-lapse video can lead to some stunning results.
If you have a powerful camera, you can create a time-lapse video by taking shots at predetermined intervals over a duration of time. While it’s not impossible to take these pictures manually, you’re best off using both a tripod, and an intervalometer if your device doesn’t have a setting that allows it to automatically snap photos.
Here’s a step-by-step look at how to create a time-lapse video by simply using high-resolution photos:
Step 1. Download and install Movavi Video Editor
The first step, as mentioned before, is to simply get video editor software running on your computer. And since it’s free, we encourage you to use Movavi Video Editor for your high-definition time-lapse video.
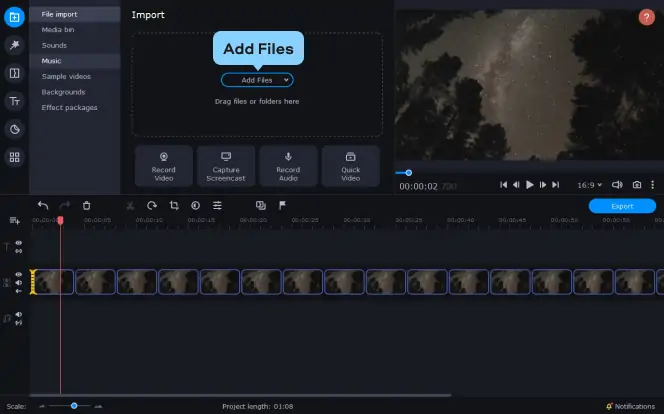
Step 2. Import your photos
With your image files ready, click Add Files in the File import tab, locate the folder with your photos, and upload them into the software. All of your image files will immediately appear in the Media Bin – you can then drag them onto the Timeline to begin.
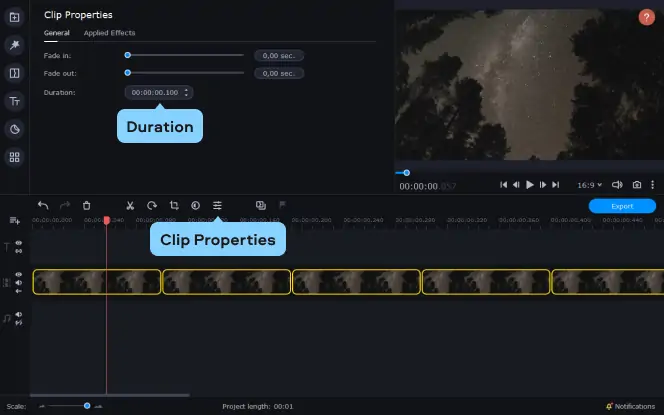
Step 3. Create the time-lapse
With all of your frames on the timeline, you can then click the Clip Properties icon (Command + A or Ctrl + A can be used to make sure all of your frames are selected).
In the Clip Properties tab, you’ll be able to then manually change the Duration of your frames to however long you want. We recommend moving your settings down to the shortest time interval to create the smoothest transition between images (it should read “00:00:00.010”).
Step 4. Add your preferred audio files (optional)
At this point you should be able to preview your high-quality time-lapse video, but what’s missing now is music.
Go to the File import tab, click Add Files and choose some appropriate audio for your nearly complete time-lapse video. The audio you’ve added should appear right below your video clip on the timeline.
You can then use the Command + B or Ctrl + B shortcut and cut off the audio file where necessary, or even add additional audio if your time-lapse is longer.
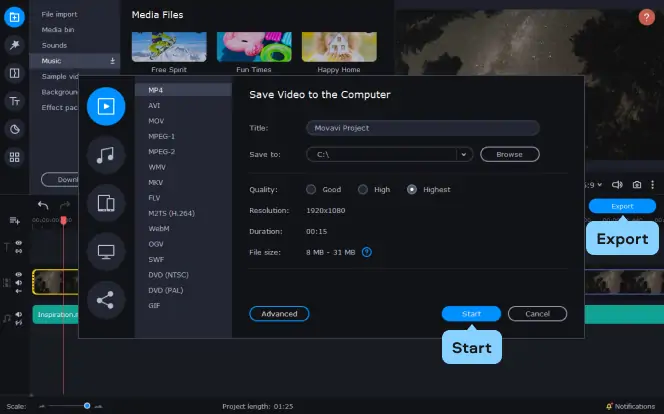
Step 5. Save your video to your computer
To finalize your project, click the big blue Export button, choose your preferred video format, and hit Start. Your project will now download directly to your computer, where you can access it and begin sharing it with friends and family.
One final note: Movavi Video Editor supports project exports to YouTube, Google Drive, and Vimeo. Simply click Export in the main menu to view these options.
Although making time-lapse with a powerful camera is your best bet if you’re looking for professional quality, smartphones can still get the job done (and you’re much more likely to have one handy).
Here’s a list of the best time-lapse applications for both iPhone and Android devices:
iPhone

Movavi App for iPhone boasts a 4.7 / 5 star rating with over 9,100+ reviews on the App Store, and for good reason. This free software can help you do more than just make time-lapse video – you can also use it to cut, merge, and crop video files, as well as add and adjust audio.
You can even easily add transitions to your time-lapse, and the app supports 10 different languages.
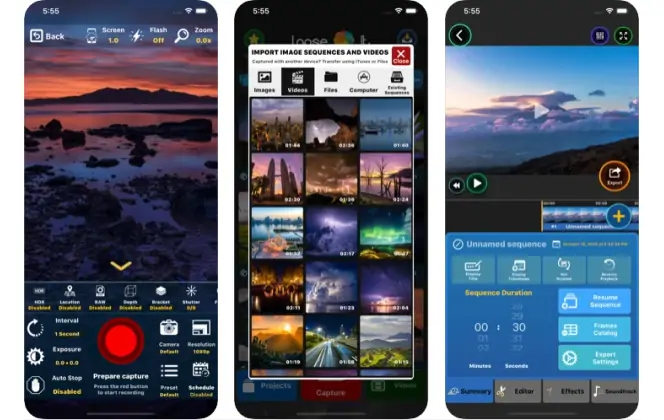
Lapse It is another powerful time-lapse app that’s capable of handling 4K, ultra high definition images and turning them into stunning time-lapse videos. Its subscription is a reasonable $4.99 per year, and also offers the option of taking stop-motion video as well.
Android
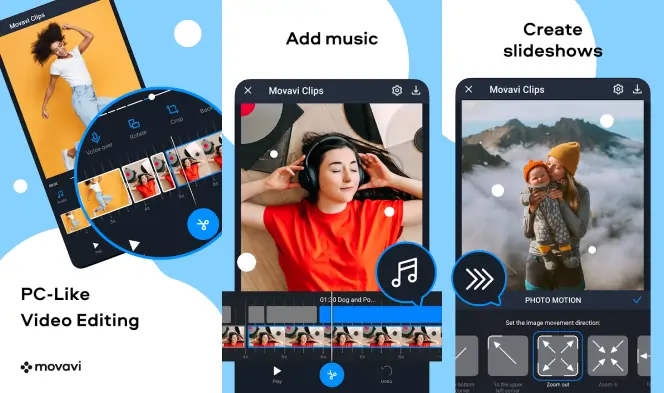
Movavi App for Android is simply the Android version of the same powerful video manipulation tool popular among iOS users. Change the aspect ratios of your videos, speed them up to create the time-lapse effect, and adjust audio and video settings with Clips’ clean and intuitive interface.
Framelapse is a frequently updated Android app that specializes in time-lapse production. It allows you to take photos at intervals you can adjust, lets you manipulate frame rates and zoom plus auto-zoom, and supports both the front and back camera of your Android phone.

Regardless of your smartphone or operating system, here’s a quick look into making time-lapse on your preferred mobile device:
For iPhone users
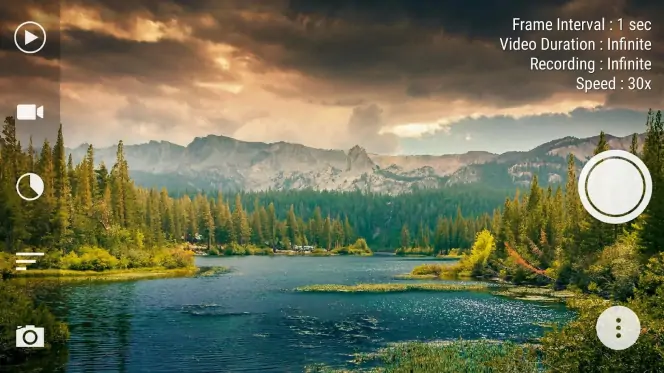
Current iterations of iPhones have time-lapse built into their cameras, so first check to see if your iPhone model supports time-lapse by going into the camera app.
Do you see Time-lapse in the shooting options above your shutter? If so:
Hit Time-lapse.
Press the red recording button to begin (make sure you have a stable surface, your video will turn out better).
Press the button once you’re done.
You then have a new time-lapse video to enjoy (albeit raw, without edits or audio additions).
If you’re running an older iPhone:
Download a time-lapse application in the App Store.
Follow any instructions laid out within the app to create a time-lapse video.
Give your phone time to record the shot.
Turn off the app once it’s been a long enough duration.
For Android users
If you’re using a newish Samsung, LG, or HTC device, you can take time-lapse videos directly from within your camera app. If you’re using one of these smartphones:
Locate the hyperlapse or time-lapse setting on your camera.
Adjust the speed (you should see some type of time icon).
Start the time-lapse video (preferably leaving your phone in a stable position, you probably don’t want to stand around holding your phone for hours at a time).
If you’re using a different Android smartphone, here’s how to quickly make a time-lapse video (note that the newer your device is, the better quality your video will be):
Download your preferred app from the Play Store.
Follow the instructions within the app on how to create your first time-lapse video.
Set your device someplace safe where you can leave it over an extended period.
Turn off the recording after the desired amount of time has elapsed.
Time-lapse videos are a fun way to highlight a different perspective of the world. Seeing the passing of a day in two minutes, or the movement of clouds on a billowy afternoon in mere seconds, are both experiences that simply weren’t possible in the past. Today, you can capture these moments with the phone in your pocket.
Whether you prefer the process of stitching together high-definition pictures and using a video editor to tie them all together or want to shoot hyper-lapse video on your Samsung Galaxy S9, there’s no right or wrong way to shoot time-lapse – it simply depends on you, your equipment, and your imagination.
Frequently asked questions
To make a time-lapse on your Android phone:
Decide what you want to shoot.
Turn on your Android device.
Check for a time-lapse or hyper-lapse setting in the camera app.
If you have this setting, use it and begin recording your video.
If you don’t have the setting, download a time-lapse video app from the Play Store.
Open the newly installed app (we recommend Movavi Clips).
Record your time-lapse video over a period of time.
Edit your video (add sound, crop it, adjust as necessary).
Save your time-lapse video to your phone.
Creating a time-lapse video on an iPhone can be done directly within the iOS camera app.
First, decide on the subject matter of your time-lapse.
Turn on your iPhone.
In your camera options scroller, find time-lapse.
Adjust the settings if you want (but the presets work just fine).
Begin recording your time-lapse.
Open your video file in a mobile or desktop video editor to make final adjustments.
Export your newly edited time-lapse video.
Yes, you can edit a time-lapse video. In fact, editing a time-lapse video is the best way for you to create an entire experience that’s worth showing off to your friends and family.
For instance, you can use Movavi Clips on your phone to adjust your time-lapse – modifying things like its speed, which parts of the video to highlight, zooming in and out, adding audio, including stickers, and adding special effects.
And if you’re using a laptop, powerful video editing software like Movavi Video Editor gives you further flexibility to manipulate things like color filters, lens flares, objects, titles, and more. Turning a simple time-lapse clip of images or video into a full audio-visual experience is very possible with a bit of extra effort.


1.5M+ users already subscribed to our newsletter