Reduce Video Size Online For Free Without Losing Quality

Add your file, choose the bitrate, and click Compress.

Compress to

How to reduce video file size

Edited by EJ Tech
50,410

Key takeaways

  • This article walks you through both desktop and online tools I personally tested to reduce video size and shrink video without losing quality.
  • You’ll meet heavy-duty apps like Movavi and HandBrake, and nimble web compressors like Kapwing, VEED, and Clideo.
  • Desktop tools give you full control (bitrate, codec, resolution) but online compressors win in convenience.
  • In general: free/open tools may lack polish or batch features, while paid ones offer smoother UX and more compression power.
  • Tip: always test a small segment before committing the full conversion, check if the compressed video file size is acceptable before proceeding with the whole file.

Not that long ago, a 20 GB hard drive felt massive. Now we’re tossing around terabytes like it’s pocket change. The funny part? No matter how much storage we get, it never feels like enough. Movies in Full HD or 4K balloon into giant files, eating up space faster than you can say “low disk warning.” And if you’ve ever tried moving one of those chunky files onto your phone or tablet, you know the pain. That’s where a good video compressor comes in.


I actually spent the past week running my own test drive of different apps and online tools to figure out how to reduce video file size without losing quality. Some handled massive MKV files like champs, others stumbled even on small MP4s. In the end, I’ve pulled together a list of the best programs to shrink video, decrease those MBs and GBs, and make your clips way easier to share, stream, and store.

My Top Picks

Here are the top video-shrinking tools I tested myself, yes, I sat down, pushed hundreds of megabytes of files through each, and picked favorites for different use cases. Some tools are beasts for batch jobs, others are perfect when you just want one clip compressed on the whim of a caffeine high. Below you’ll see which ones stand out by category—click through to the detailed writeups to see how they fared in my tests.

  • Best overall: Movavi Video Converter — solid balance of ease, speed, and control.
  • Best free / open source: HandBrake — deep settings, no cost, trustworthy.
  • Best for quick online use: Kapwing — when you want to compress video without leaving your browser.
  • Best for device presets / mobile export: Freemake Video Converter — great for formats tailored to phones and tablets.

Comparison Table: Reduce Video File Size

Program

Best for

Download

Best overall: balance of quality, speed, and features

Deep control and open-source users

Lightweight converter + player combo

Top 7 methods to reduce the video size through downloading and online

  • Why I picked it

    Movavi Video Converter crushes big video files without killing quality. Fast, clean, and intuitive, it just works.

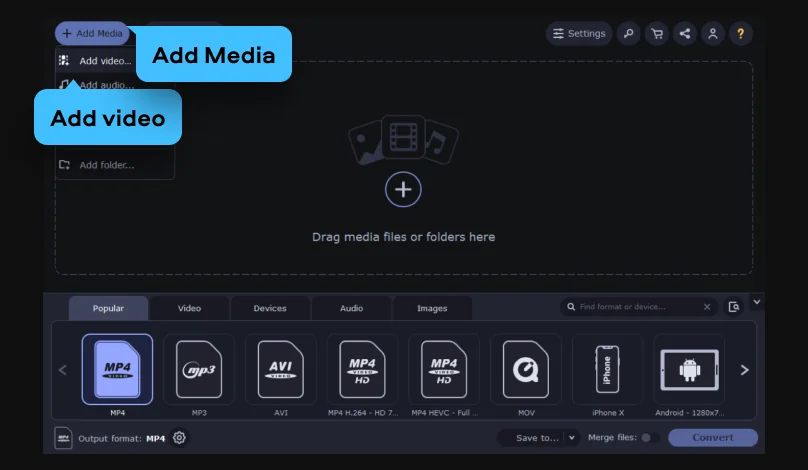
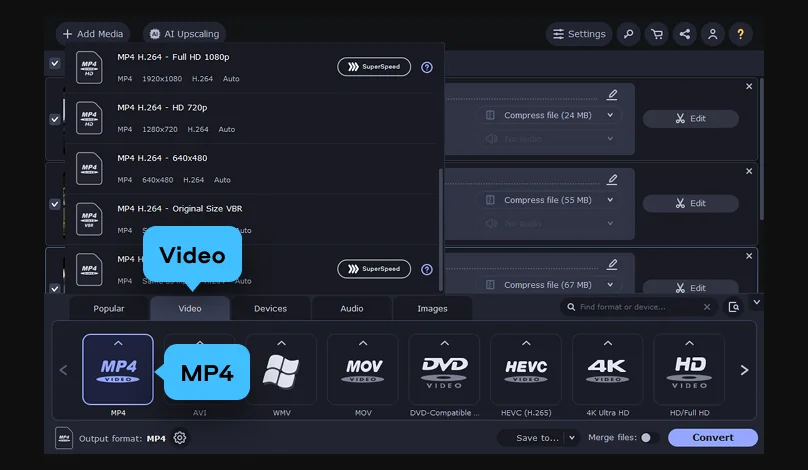
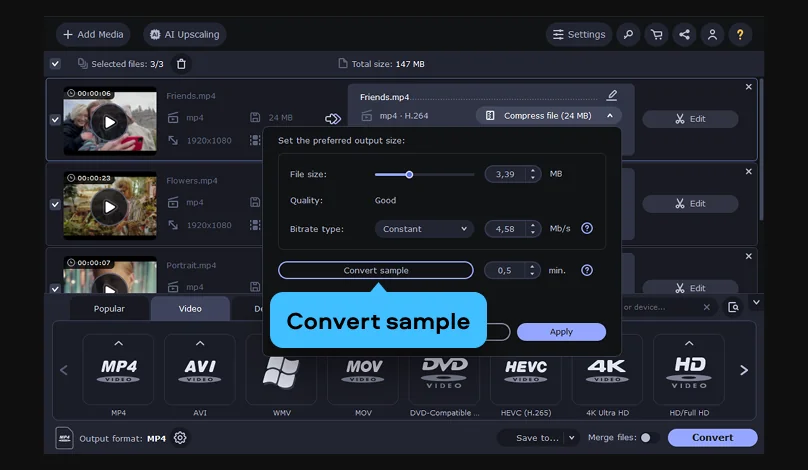
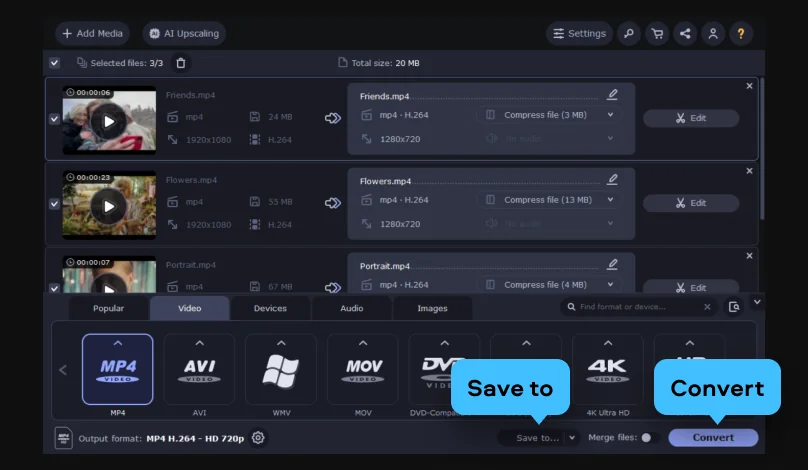
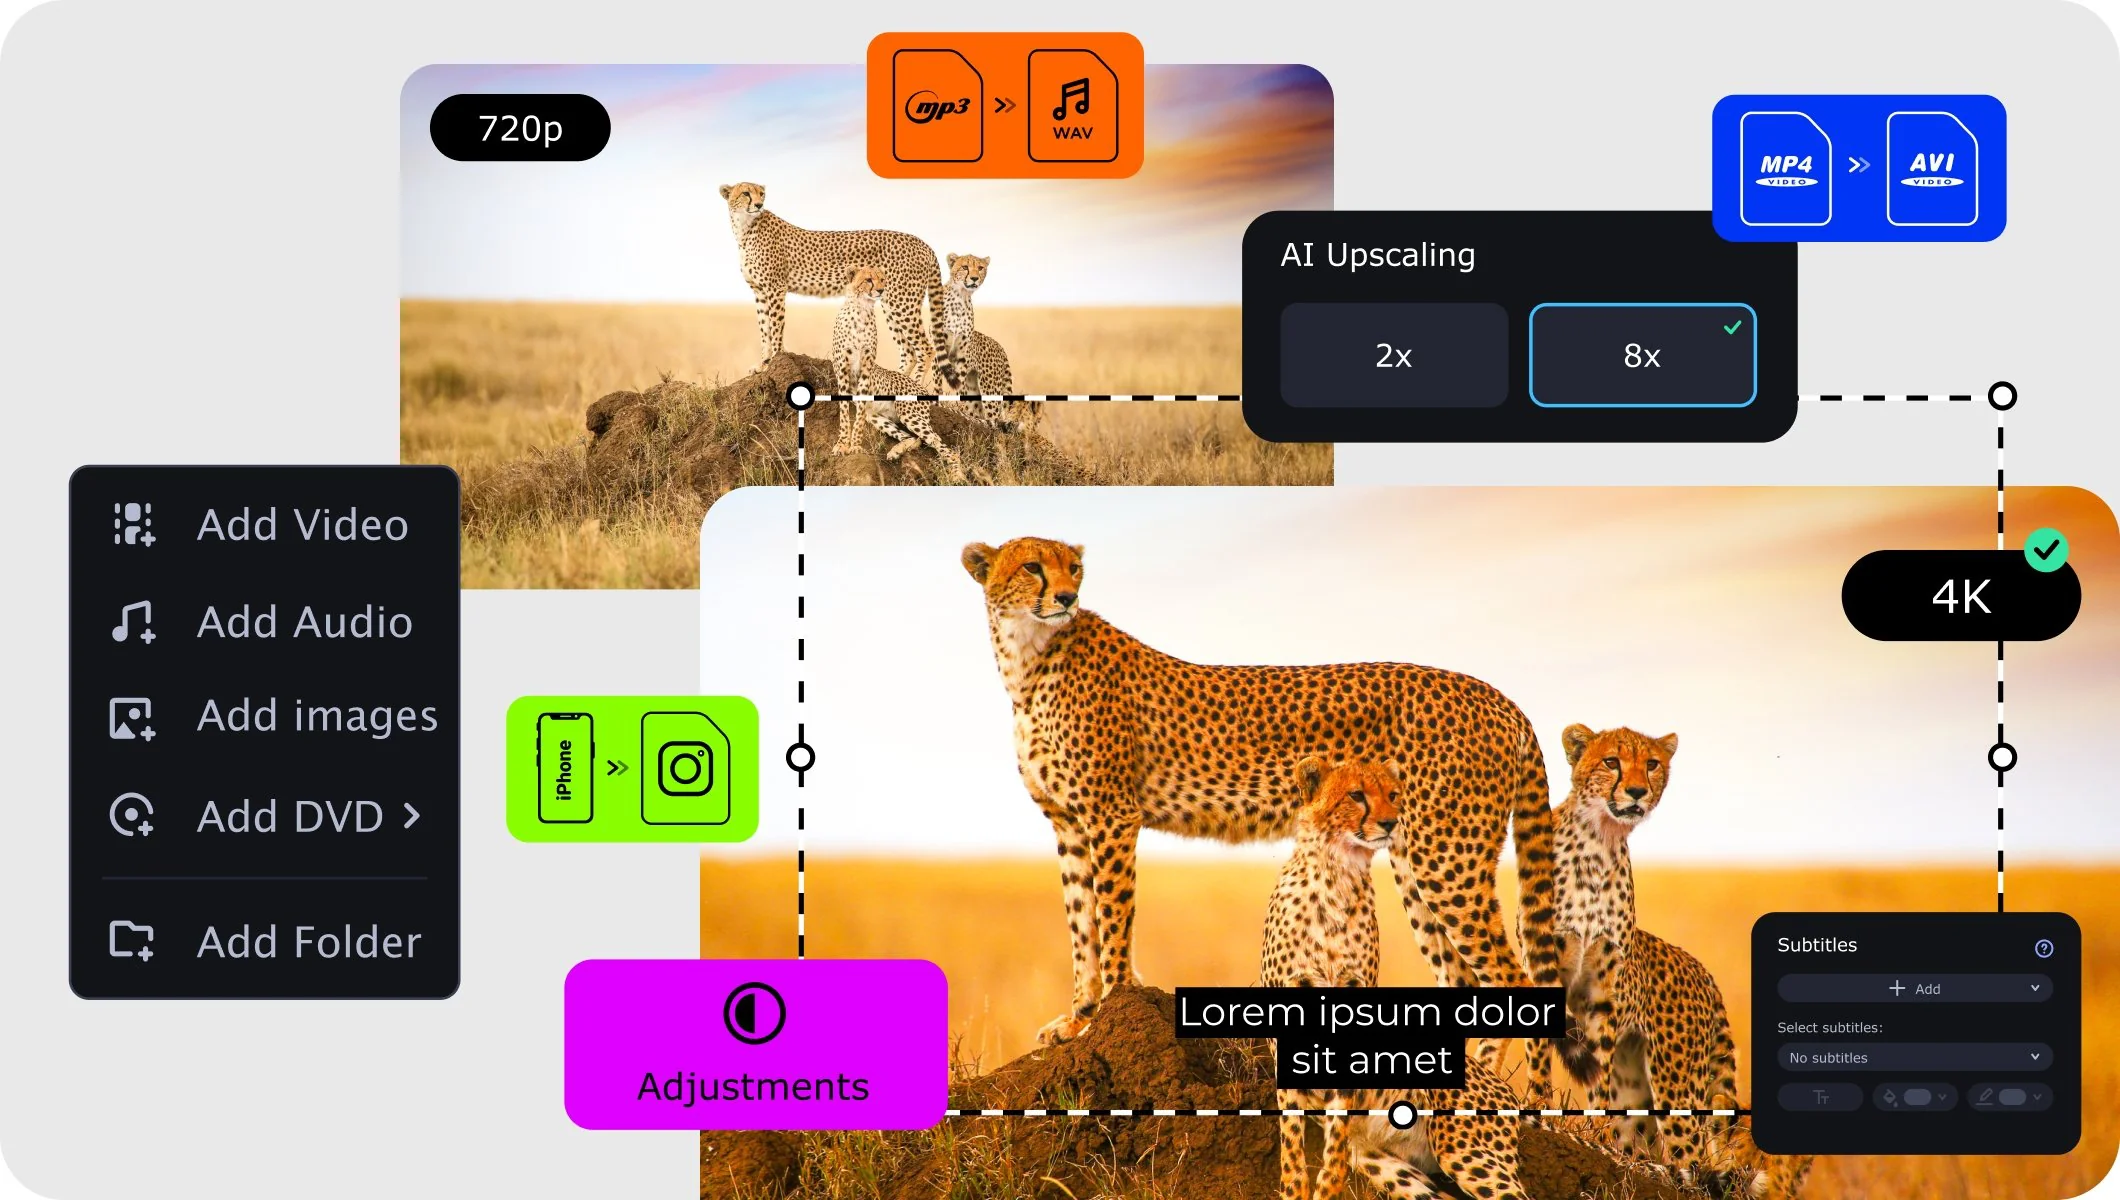
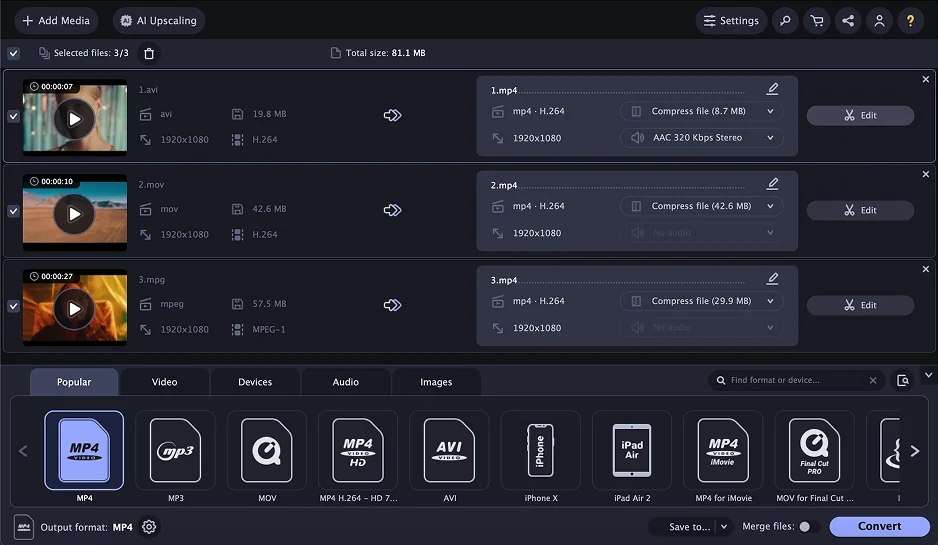
Movavi Video Converter is a solid tool for anyone who wants to reduce video size, compress video, or convert between formats like MP4, MKV, MOV, AVI, and more. The latest version brings improved compression with modern codecs like H.264, letting you shrink video without noticeable quality loss. It’s perfect for batch processing multiple videos, adjusting bitrate, or prepping files for devices.

From my experience, it handles everything I throw at it: long 4K clips, huge MOVs, you name it. Drag, drop, tweak a few settings, and bam – the file’s smaller, quality intact. Even exporting for mobile is painless thanks to the ready-made device presets. It feels like the developers really thought about how people actually use video files today.

Ratings

Pros:

  • Lightning-fast conversion and batch processing

  • High-quality compression, even for 4K

  • Intuitive interface, easy for beginners

  • Supports popular video formats and device presets

Cons:

  • Free trial limits features

  • Paid license required for full functionality

  • No online video download built in

Step 1. Install Movavi Video Converter on your computer

As soon as you launch the downloaded file, the installation window will open. Follow the on-screen instructions to install the software on your PC or Mac.

Step 2. Add video files to the program

Click the Add Media button and then Add video in the upper left corner of the program interface. Choose one or more video files and click Open.

Step 3. Choose your preset and specify video settings

Click the Video tab, then choose your desired video format from the list. It’s probably best to choose one of the more popular video formats, such as MP4 since this is widely supported on both computers and mobile devices. If you want to change the video parameters as well as the format, click the Cogwheel button below the ribbon of presets and specify the desired settings: video and audio codecs, resolution, aspect ratio, frame rate, etc. If you need to really minimize the video size, use one of the latest video codecs like H.264 since these provide higher video quality for smaller file sizes.

If you want the output video to play on a mobile device, select the Devices tab, find your device on the list, and choose the appropriate preset. The converted video will be assigned the optimal parameters for viewing on that device.

Step 4. Set the size and quality for the output video file

The size and quality of the output video are determined by the bitrate value: the higher the bitrate, the better the quality and the larger the video file size. If you want to reduce the movie file size, you need to decrease the bitrate. Click Compress file to open the size adjustment window. Drag the File size slider to the desired output file size. Click Convert sample to quickly check the quality of your file after conversion.

Step 5. Choose the output folder and start the conversion

By default, all converted files are saved to the Movavi Library folder on your hard drive. If you want to specify another folder, click the Save to button, create a new folder or choose an existing one, and click OK.

To start the video conversion process, click the Convert button in the lower right corner of the program window. After the conversion is complete, the folder containing the converted video will open automatically (unless you disable this option in the program settings).

Desktop video compressors

If you want full control and muscle when you reduce video size, desktop software is where it’s at. With tools installed on your machine, you can tweak bitrate, resolution, codec settings, whatever, to compress video down, shrink video files from GBs to MBs, and still keep things sharp. These apps let you reduce video file size without losing quality by letting you mess with every knob (frame rate, keyframes, audio bit rates). When your drive’s screaming “run out of space” or you’ve got a stack of raw footage to convert, desktop tools give you power and precision that online compressors usually can’t match.

  • Why I picked it

    HandBrake is my go-to for squeezing giant video files down without killing quality. Open-source, reliable, and surprisingly fast

HandBrake is a free, open-source video converter and compressor for desktop, perfect for reducing video size, shrinking movies, or converting files between MP4, MKV, MOV, and more. Its latest updates focus on improved video encoding with x264 and x265 codecs, auto-cropping black bars, and flexible resizing options. You can batch process files, fine-tune bitrate, and even preview changes in real time.

Personally, I’ve pushed HandBrake through massive 4K clips and old DVD rips. The UI may look plain to a veteran user, but once you dig in, it’s a solid platform. I especially dig the custom presets – I can knock down file size for mobile or web uploads in a few clicks. Auto-crop black bars saved me hours of manual editing, too.

1. Install HandBrake

Download from the HandBrake official site. Run the installer and follow prompts for Windows, Mac, or Linux.

2. Load a video

Click Open Source and pick your file.

3. Choose a preset or custom settings

Select from device-specific presets or tweak manually in Video and Picture Settings.

4. Resize video

Go to Picture Settings. Adjust Width and Height. Use Modulus (default 2) to ensure compatibility. Leave Anamorphic on “loose” for most cases.

5. Adjust quality/compression

Lower bitrate or use the constant quality slider to shrink file size without losing quality.

6. Crop black bars (optional)

HandBrake auto-crops by default. Check Custom if adjustments are needed.

7. Preview changes

Click Preview to see real-time results before encoding.

8. Start encoding

Click Start Encode and wait for compression to finish.

Ratings

Pros:

  • Free and open-source

  • Powerful compression with x264/x265

  • Batch processing and preview feature

  • Flexible presets for devices and web

Cons:

  • Interface feels dated

  • Some advanced settings can be confusing for beginners

  • No built-in support for downloading online videos

3. VLC

  • Why I picked it

    VLC is solid, free, and insanely versatile. Plays almost anything. Quick, no fuss, and it actually works across platforms.

VLC Media Player is the true all-rounder among desktop video tools. You can play, stream, convert, and compress video files in formats like MP4, MKV, MOV, and AVI. The latest updates have focused on hardware acceleration, stability, and security patches, letting you compress video and reduce file size without worrying about glitches. Batch conversion is possible, though a bit manual, and you can tweak bitrate, resolution, and codec settings to shrink video files efficiently.

When I use VLC to reduce video file size, I lean on its Convert/Save function. It’s not fancy, but it gets the job done. Adjusting codec, resolution, and bitrate lets me compress videos quickly, especially for sharing online or storing on limited drives.

I’ve done huge MKVs and old MOVs, VLC keeps the quality surprisingly decent. Its open-source nature makes it super reliable, even if the interface looks dated.

1. Install VLC

Download from the official website. Install following the prompts for Windows, Mac, or Linux.

2. Choose output format

Go to Media > Convert/Save. Click Add to select your video file. Click Convert/Save at the bottom. Pick the profile (MP4 recommended for general use). Optionally, click the wrench icon to adjust codec, resolution, and bitrate.

3. Start compression

Browse for a folder and name your output file. Hit Start. VLC will process and save the compressed file.

Ratings

Pros:

  • Free and open-source

  • Cross-platform and lightweight

  • Supports nearly all video/audio formats

  • Convert and compress video without extra software

Cons:

  • UI feels outdated

  • Compression options aren’t as beginner-friendly as some other products

  • No batch presets out of the box

  • Why I picked it

    Freemake Video Converter is surprisingly easy to use and totally free. Handles tons of formats and doesn’t make you jump through hoops.

Freemake Video Converter lets you compress video, reduce movie size, and convert between over 500 formats, including MP4, MKV, MOV, AVI, and more. It supports modern codecs like H.264, H.265 (HEVC), MPEG4, and AV1, making it practical for shrinking videos without a noticeable quality hit. The latest version 5.0.0 improves HD and 4K handling, batch conversion, and direct export to devices or iTunes. You can even pull online videos from platforms like Vimeo, Dailymotion, and Facebook, and convert them straight to MP4 or MP3.

I’ve used Freemake for random big files, long MOVs, HD clips, all sorts of mess. Dragging multiple files in, picking a device preset, hitting Convert, and done. It’s fast enough for day-to-day tasks, though the interface feels a bit dated. Still, it gets the job done if you need to shrink video or convert for old gadgets.

1. Install Freemake Video Converter

Download the installation file from the Freemake website. Follow the prompts to install on Windows.

2. Add video files

Click Video and select one or multiple videos.

3. Choose an output format

Pick MP4, MKV, MOV, AVI, or a device preset. Optional: click the gear icon to tweak codec, resolution, or bitrate.

4. Adjust compression settings

Lower resolution or bitrate to shrink the file. Check estimated output size if needed.

5. Start conversion
Hit Convert. Wait for the process; progress is shown in real time.

Pros:

  • Free, no trial limits

  • Supports over 500 formats

  • Batch conversion and device presets

  • Can convert online videos directly

Cons:

  • Interface looks old-school

  • Watermark appears on some output unless paid version

  • Less precise control over compression than some other top products

Online video compressors

Sometimes you just want a fast, no-install fix to shrink video. That’s where web tools jump in. They let you compress video in your browser: drag, drop, shrink, download. You don’t need gigabytes of install space, and you can access them from anywhere. They’re perfect for quick jobs: reduce movie size for email, social upload, or client preview. Of course, you’ll sacrifice some depth of control, but for many cases, they get you to “smaller size” fast and conveniently.

5. VEED

  • Why I picked it

    VEED is simple, browser-based, and actually fast. No installs, just drag, drop, and shrink — perfect for quick jobs.

VEED’s online video compressor lets you reduce video size, shrink files, and compress movies without losing quality. It handles MP4, MOV, MKV, and more, with easy controls for resolution and bitrate. The latest updates added improved compression algorithms and faster processing, plus direct export to social platforms. Batch uploads aren’t supported yet, but for a single file, it’s smooth and reliable.

I’ve decided to test VEED for random clips when I didn’t want to fire up desktop apps. Dragging files in, picking a target size, and hitting compress takes seconds. Surprisingly, quality stays intact for social uploads and emails. It’s great for quick, no-fuss compression.

1. Upload your video

Open the website and Drag & drop or click Upload Your Video.

2. Adjust compression settings

Choose resolution (720p, 1080p, etc.) or enter a target file size. Optionally tweak bitrate for smaller size.

3. Compress video

Click Compress Video and wait. Once ready, hit Download and save locally.

Pros:

  • No installation required

  • Fast and easy interface

  • Supports MP4, MOV, MKV

  • Maintains quality at reduced sizes

Cons:

  • No batch compression

  • Limited advanced codec options

  • Relies on internet speed

  • Why I picked it

    Clideo is pure convenience. Browser-based, fast, and handles almost any format you throw at it.

Clideo’s online video compressor lets you reduce video size, shrink files, and compress movies without complicated setups. It supports MP4, MOV, AVI, WMV, and more. The latest tweaks focus on faster compression and improved quality retention, plus a live preview so you see the output before downloading. Security’s solid — files go through encrypted channels, so your clips stay private. It’s fully online, works on mobile, and you don’t even need an account for basic compression.

I’ve run random files through Clideo: long Instagram clips, email-sized videos, even a shaky GoPro clip. Drop it in, pick the preset, hit compress, and a few clicks later, the file’s done. Quality holds up surprisingly well, though batch processing is missing.

1. Upload your video

Drag & drop or select from your device or cloud.

2. Choose a preset

Select one of the compression options: Original, Basic, Strong, or Superb.

3. Download the result

Check quality before saving. Hit Download and save locally.

Pros:

  • Fully online, no installation

  • Mobile-friendly

  • Supports multiple formats

  • Live preview before download

Cons:

  • No batch compression

  • Larger files require premium

  • Fewer codec controls than desktop software

7. ­Kapwing

  • Why I picked it

    Kapwing is effortless. Hosted on the web, quick, and surprisingly robust for its simplicity.

Kapwing’s video compressor is a browser-based tool that makes shrinking videos painless. It handles MP4, MOV, AVI, WebM, and even links from YouTube or TikTok. The most recent updates improved compression speed and quality retention while allowing resolution adjustments. You can preview before download, convert formats, and even tweak bitrates to get just the size you want. Beyond compression, Kapwing offers over 100 editing tools: crop, trim, add subtitles, or overlay text—making it a one-stop online editor.

I’ve tossed in everything from Instagram clips to raw camera files. Drag, drop, select compression, export, and boom—done. The quality stays sharp for social media, emails, or quick shares.

  1. Open Kapwing Video Compressor.
  2. Upload video via drag-and-drop or paste a link.
  3. Adjust resolution and compression slider for desired size.
  4. Preview compressed video to check quality.
  5. Click Export, then download the final file.

Pros:

  • Fully online, no installation

  • Supports multiple formats and links

  • Preview before download

  • Integrates editing tools

Cons:

  • No batch compression

  • Requires internet connection

  • Advanced codec control limited

How to choose the best video compressor

Choosing a solid video compressor is all about trade-offs: speed vs detail, features vs complexity, online vs desktop, and how much control you want over codecs, bitrate, and resolution. If you need to learn how to reduce video size fast for social media or email, a web-based tool might get you there in a snap. If you're working with long HQ footage or a whole folder of videos, a desktop app with hands-on settings is your friend.

Here’s my take (after testing all these tools myself):

  • Use Movavi Video Converter when you want a reliable, full-feature desktop compressor that balances power with ease, and still saves precious MB, so your hard drive doesn't groan under huge video files.
  • Go with HandBrake if you want free, open-source control over every little encoding setting.
  • Choose Kapwing or VEED when you're out of your studio and just need to compress one video quickly in browser.
  • Pick Freemake when you like device presets built in.
  • Use VLC when you want a lightweight player-converter combo.
  • Turn to Clideo for a secure, no-fuss single file job in the cloud.

The key is: don’t just chase the “best.” Gravitate toward what fits your workflow, your file sizes, and how much control you actually want.


Movavi Video Converter

The ideal way to get your media in the format you need!

Movavi Video Converter

Frequently asked questions

How can I reduce the file size of a video?

Follow these steps to shrink your video:

  1. Install Movavi Video Converter on your PC or Mac.
    Download Movavi Video Converter for Windows
    Download Movavi Video Converter for macOS
  2. To add your video, click Add Media and then select Add video.
  3. Open the Video tab and pick a format.
  4. To adjust the size, click Compress file and drag the File size slider to reduce it.
  5. Click Save to to choose the output folder and then hit Convert.

What are the smallest video formats available?

HEVC (H.265), VP9, and AV1 offer great compression while keeping quality. MP4 (H.264) is a popular choice for a balance between size and compatibility. But if your videos are still too large, Movavi Video Converter can help optimize them for different devices without sacrificing the quality.

Why are video files so large?

High resolution, frame rate, uncompressed audio, too many details, and bitrate all contribute to large file sizes. To save space without losing quality, Movavi Video Converter compresses files efficiently using smart settings and modern codecs for optimal results.

Have questions?

Have questions?

If you can’t find the answer to your question, please feel free to contact our Support Team.

Join us for discounts, editing tips, and content ideas

1.5M+ users already subscribed to our newsletter

By signing up, I agree to receive marketing emails from Movavi and agree to Movavi's Privacy Policy.