Best Video Editor for YouTube: The Complete Guide for Creators

Movavi Video Editor
  • Trim, cut, crop, and rotate videos
  • Add titles, stickers, and transitions
  • Apply visual effects

By clicking the download button, you're downloading a trial version of the program.*

Edited by
Ben Jacklin
5,011

The best video editor for YouTube is the one you can open tonight and finish a video in. The interface of Movavi Video Editor was tested for intuitiveness, and most tools work in a single click, so your evening goes into the video instead of the menus.

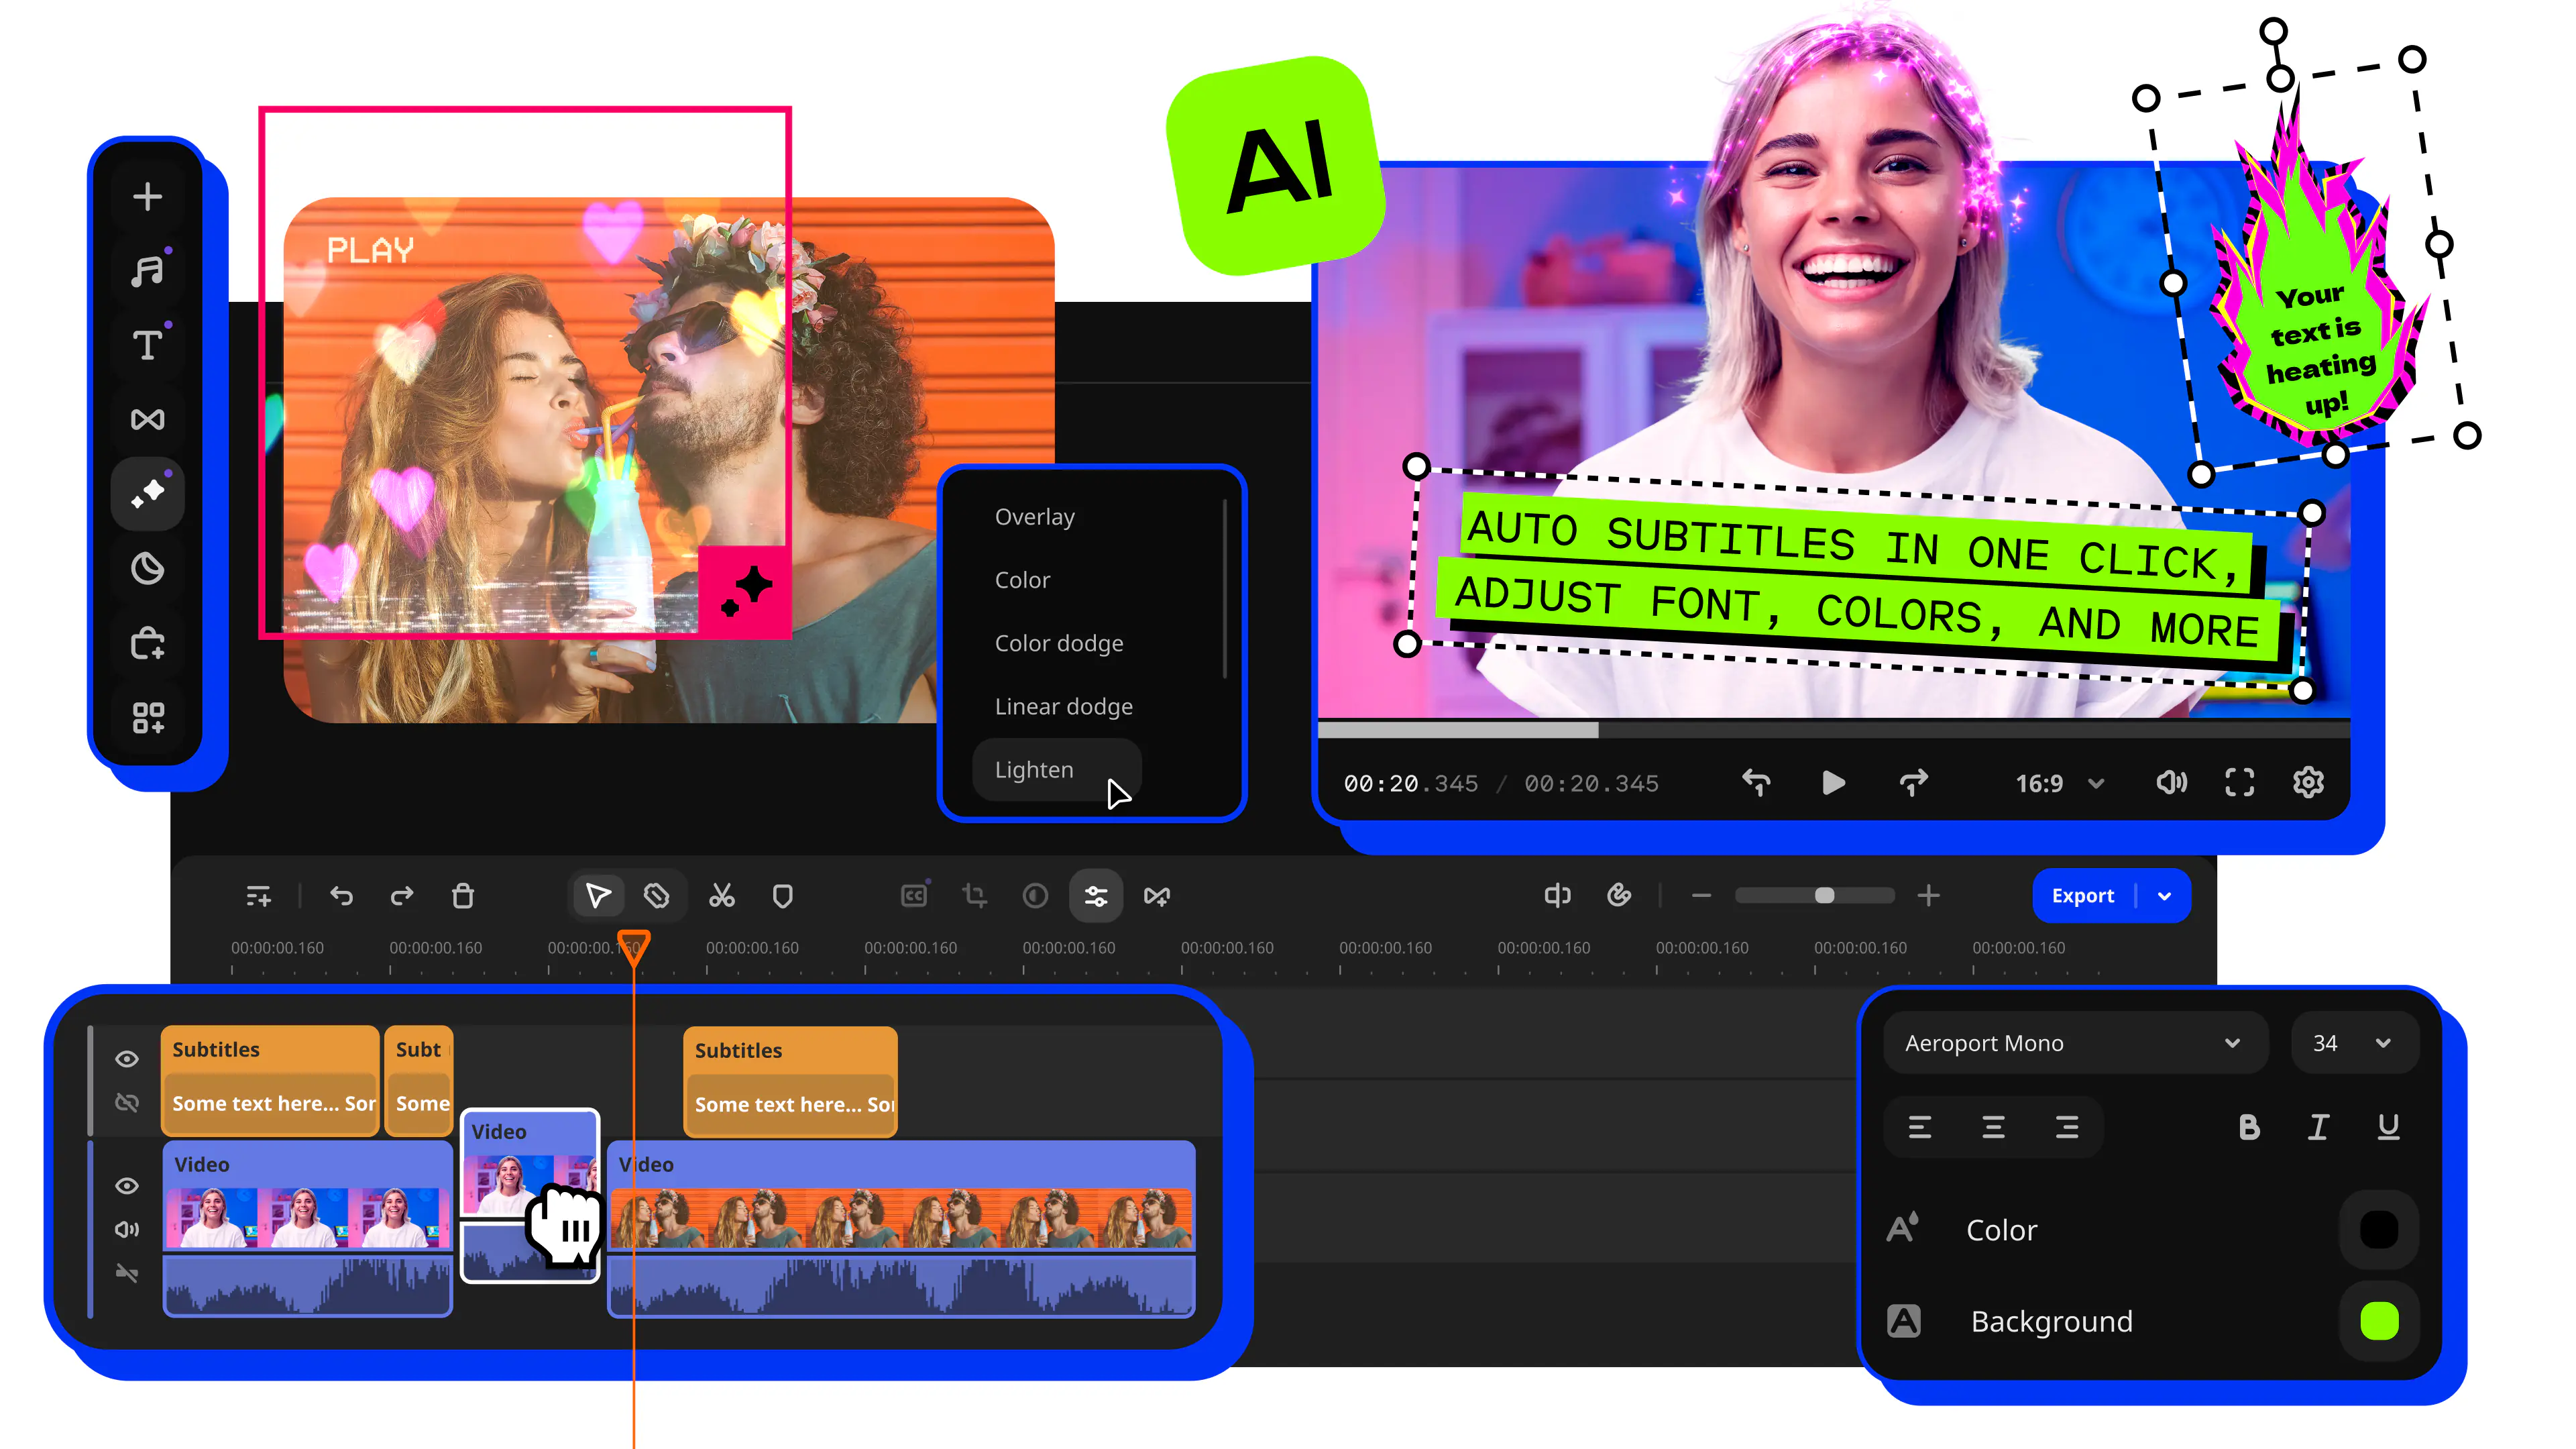
Movavi Video Editor is an intuitive video editor with customizable video templates, one-click AI tools, and hundreds of drag-and-drop effects. It’s a desktop app for Windows and macOS. That mix matters when your channel needs a fresh intro this week, subtitles on every upload, and a vertical cut for YouTube Shorts.

Movavi Video Templates is a multi-style library of customizable, pro-looking, modular templates for any kind of video. Each template is a ready-made project built from Blocks, short segments of the video where you drop in your own clips, photos, and text. Editing, music, transitions, and text arrive pre-set, so your first cut already has pacing and polish.

This guide is for you if you film daily routines, unboxings, or travel vlogs; if you cut game reviews and highlight videos; or if you’re a student making tutorials and explainers for YouTube. The six quick guides cover a YouTube intro and outro, vlogs, gaming videos, subtitles, Shorts, and export.

What a YouTube video editor needs

A video editor for YouTube needs five things: a device it runs on, a short learning curve, clean picture and sound, exports YouTube accepts, and a price that fits a growing channel. Here is how Movavi Video Editor handles each one.

Device type

Long vlogs and gameplay recordings are big files, so many YouTube creators edit on a desktop. Movavi Video Editor has no web version or cloud integration, which keeps your projects on your own computer. It also leaves out the advanced, detailed controls a professional workflow calls for, and the interface layout can’t be customized. That fits creators who want quick edits over frame-by-frame craft.

Learning curve

A video editor for beginners should let you finish a video on day one. Hovering over a clip, effect, or transition shows an instant preview before you apply anything, and titles, transitions, and presets drop straight onto the timeline. Moving the cursor along the track shows exact frames, so cuts land where you want them. For a long vlog or gameplay file, pre-timeline trimming pulls a short segment out of the source before it even reaches the project, which keeps the timeline tidy from the first minute.

Picture and sound

Color correction comes as ready-made presets, with manual controls for tone, contrast, and saturation when you want to fine-tune. AI video denoise clears grain and low-light artifacts while keeping faces, textures, and edges sharp, which is useful for low-light clips and older phone footage.

On the audio side, AI audio noise removal clears traffic, wind, and steady hums in one click and keeps the voice. Volume normalization evens out loud and quiet clips. Sound autocorrect offers presets named Enhanced voice recording, Noisy place, and Recording studio.

Effects and music

Hundreds of built-in drag-and-drop effects cover transitions with adjustable duration, titles with flexible text and formatting, filters, overlays, and stickers. Copyright-free music and sounds set the background mood. The Movavi Effects subscription goes further with 10,000+ effects and 1,500+ music tracks across themes such as blogs, business, family, and holidays.

AI tools that save editing time

Video editing software for YouTube earns its place when it removes the slow jobs. Here that means auto subtitles, AI audio noise removal, silence removal, auto-tracked cropping with subject tracking, and AI motion tracking, each handled in one click. All of them come with the full version, and there is no AI credit system, so you never count credits or pay extra to use them.

Export settings

YouTube Help’s upload encoding page recommends MP4 as the container, H.264 as the video codec, and AAC-LC audio at 48 kHz. It also says to upload at the frame rate you recorded, and it lists 16:9 as the standard aspect ratio. Vertical and square uploads adapt in the player. Interlaced footage should be deinterlaced before you upload, and YouTube converts full color range to limited range.

What YouTube asks for

What Movavi Video Editor offers

MP4 container

MP4 among the supported video formats

H.264 video codec

H.264 codec settings, including two-pass encoding

AAC-LC or Opus audio

AAC among the supported audio formats

Vertical and square uploads adapt in the player

Auto-tracked cropping converts horizontal footage to vertical

Upload from your computer

Export and upload straight to YouTube, with title, description, privacy, and tag settings

Who it fits

As video editing software for YouTube, Movavi Video Editor is aimed at beginners and everyday creators, including people who already know their way around editing but prefer a simpler, faster workflow. On YouTube that covers vloggers and lifestyle creators, tech bloggers and gamers, and students or teachers making lessons and tutorials.

Plans and pricing

You can start free and add only what your channel needs. Movavi Video Editor Free is the download from the official site: you can test the essential tools and automated features in the app, while exports of paid features are blocked. Movavi Video Editor Lite adds core editing tools, auto subtitles, auto crop, silence removal, and all built-in effects, with a small watermark on exports.

The full version of Movavi Video Editor includes every feature, the one-click AI tools among them, with no watermark or export limits. Two add-ons sit on top: the Movavi Effects subscription and the Movavi Templates subscription, each bought separately. Several templates come with the full version at no extra charge, and the subscription opens the entire collection.

Watch first: Movavi Ideas tutorials

If you learn faster by watching, start with Movavi Ideas. It’s a tutorial hub of simple, eye-catching editing ideas, published weekly and free to access. Each idea comes with a step-by-step tutorial that takes less than a minute to follow, and the themes run from vlogs and short vertical clips to holidays, family videos, and memes. Ideas are exclusive to Movavi users, and new ones keep arriving, so the hub tracks what is trending. Staring at an empty timeline? Pick an idea and follow along.

Six quick guides in Movavi Video Editor

Each guide starts from an empty timeline and takes three to five steps. Pick the ones your next upload needs, and do the export guide last.

Make a YouTube intro and outro

Your intro and outro are the two parts of every upload that rarely change, which makes them ideal for templates. Both arrive with pre-set editing, music, transitions, and text, and you can keep, swap, or remove any of it. Inside a Block you replace the placeholder with your own clip or photo, and you can reorder, add, or delete Blocks until the sequence matches your channel’s style. A short intro and a longer outro work equally well. Templates replace assembly work such as structure, pacing, and default text, while trimming and the AI tools stay separate steps you run afterward.

Step 1. Add your footage

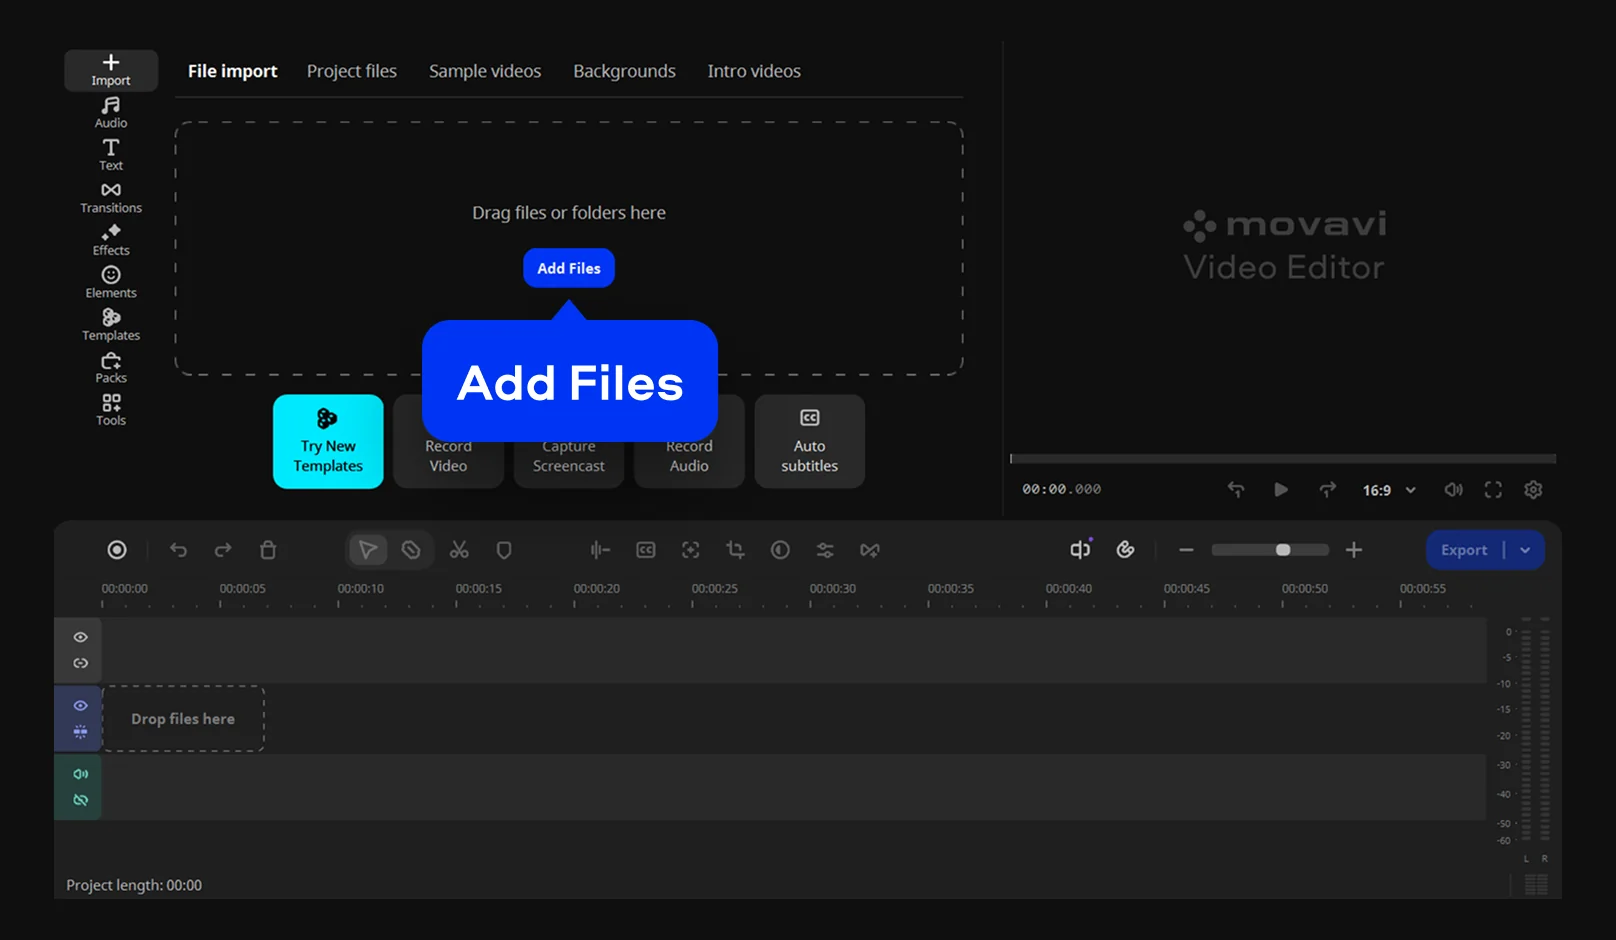
Click Add Files, then select the clips and photos you want in your intro and outro.

Step 2. Pick the intro template

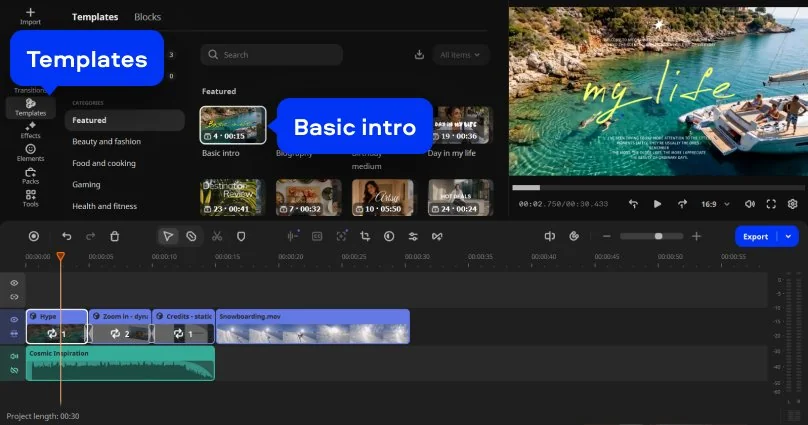
Open the Templates tab and choose Basic intro. Then drop the template onto the timeline.

Step 3. Pick the outro template

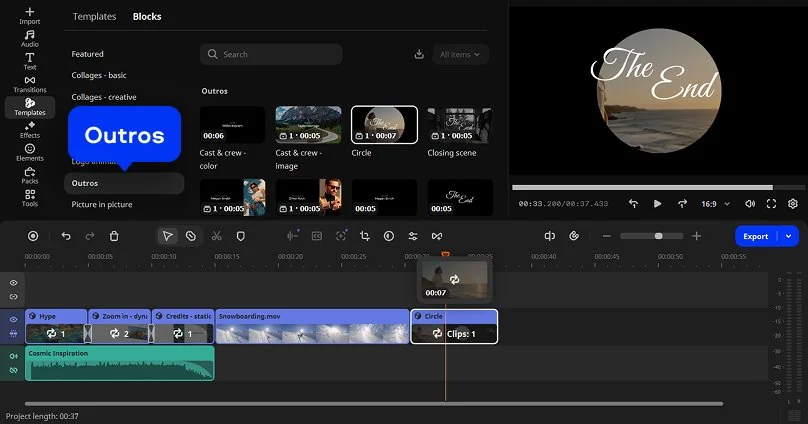
Choose a Block from the Outros category, then drop it at the end of the timeline.

Step 4. Fill the Blocks

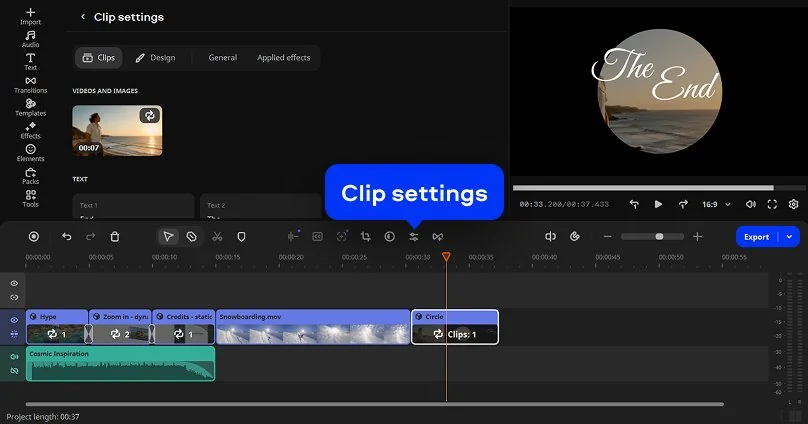
Double-click a Block on the timeline or click Clip settings and replace the placeholder with your own clip or photo. Next, reorder, add, or delete Blocks to match your channel’s style. Then double-click the Block with text you want to change, and retype the Block text.

Edit a vlog

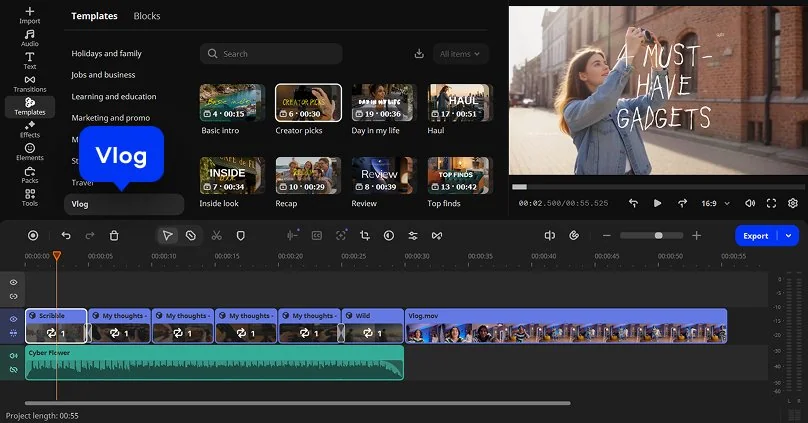
Daily-routine and travel vlogs share a pattern: many short clips, a title or two, and simple cuts between scenes. The Vlog category gives that pattern a ready structure. Music comes pre-set with the template, and you can keep it or replace it with a built-in copyright-free track. Two more templates are worth a look for vlogs: the Video Titles template and the Transition video template.

Step 1. Add your footage

Click Add Files, then select the clips from your day.

Step 2. Pick a Vlog template

Open the Templates tab and choose a template from the Vlog category. Then drop the template onto the timeline.

Step 3. Fill the Blocks

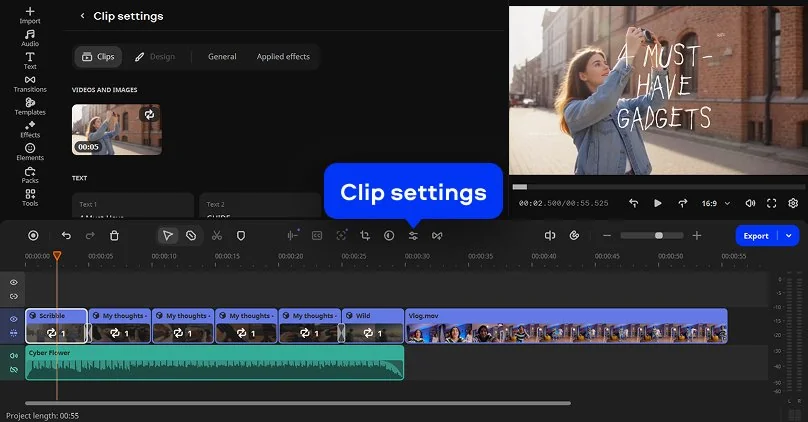
Double-click a Block on the timeline or click Clip settings and replace the placeholder with your own clip. Next, reorder, add, or delete Blocks to fit your story. Then double-click the Block with text you want to change, and retype the Block text.

Edit a gaming video

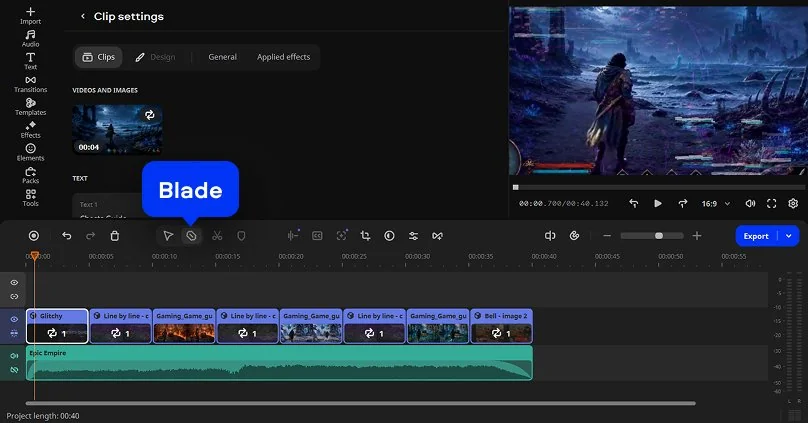
Game reviews and highlight edits live on pacing: cut the slow parts, keep the peak moments. The Gaming category supplies the structure. The Blade tool makes quick cuts, and the video speed control runs up to 100x, which turns a long stretch of play into a short time-lapse.

Step 1. Add your footage

Click Add Files, then select your gameplay recordings.

Step 2. Pick a Gaming template

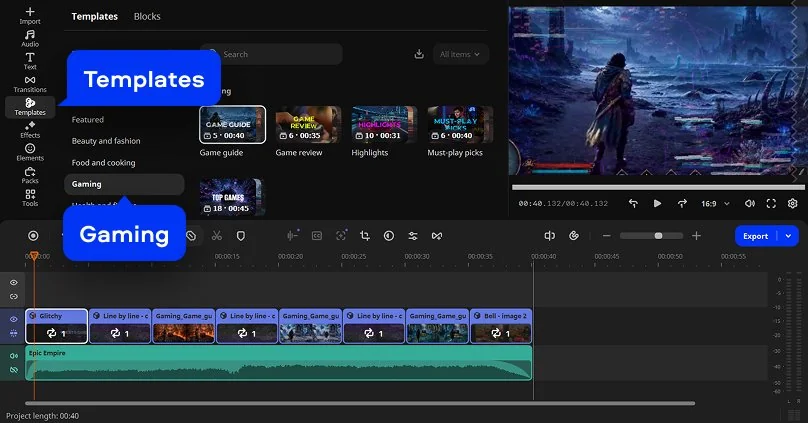
Open the Templates tab and choose a template from the Gaming category. Then drop the template onto the timeline.

Step 3. Fill the Blocks

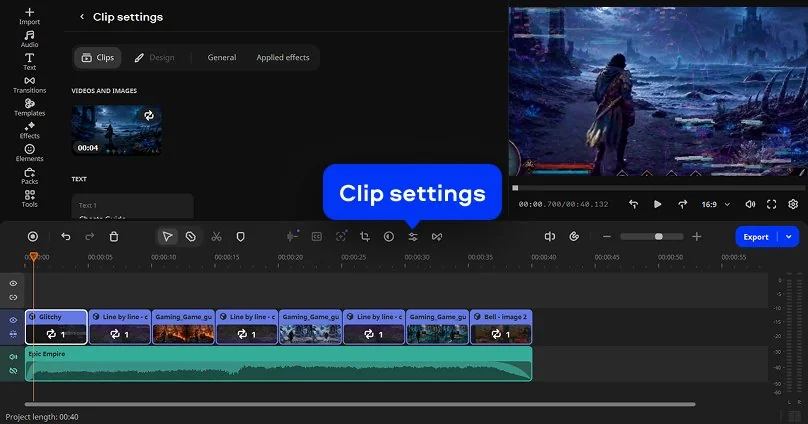
Double-click a Block on the timeline or click Clip settings and replace the placeholder with your best moment. Next, reorder the Blocks so the strongest moment lands first. Then double-click the Block with text you want to change, and retype the Block text.

Step 4. Trim the slow parts

Select the Blade tool. Cut each clip where the action starts and where it ends, then delete the slow parts between the cuts.

Add subtitles in one click

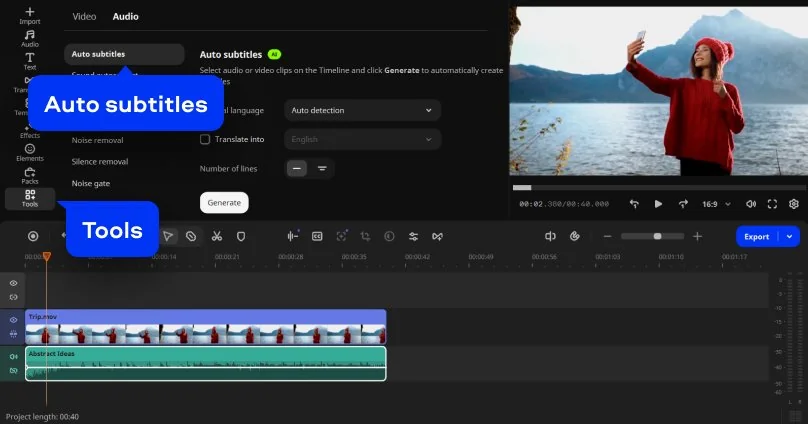
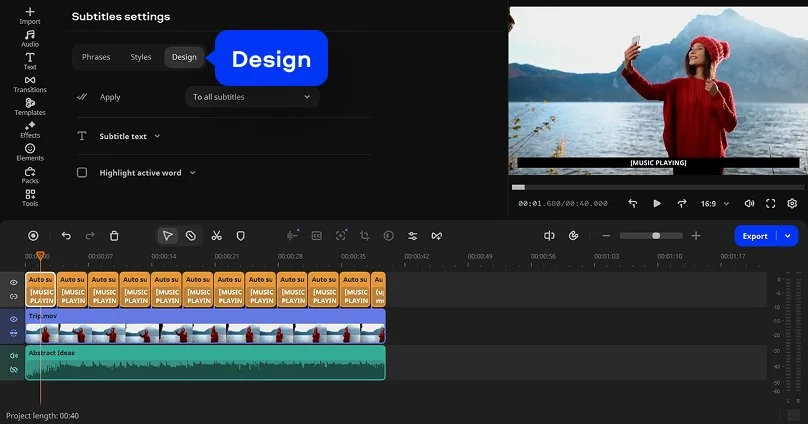
The auto subtitles tool turns speech into text and recognizes more than 100 languages. You choose from over 60 designs and font styles, set the position on screen, and the Active Word Highlighting feature follows the speech word by word, in sync with the audio. That makes videos easier to follow and matches what viewers now see on social media.

Step 1. Add your footage

Click Add Files, then select the video with speech.

Step 2. Generate the subtitles

Open the Tools menu and choose the Auto subtitles tool, then generate the subtitles.

Step 3. Style the subtitles

Pick a subtitle Design, then move the subtitles to the screen position you want.

Turn a horizontal video into Shorts

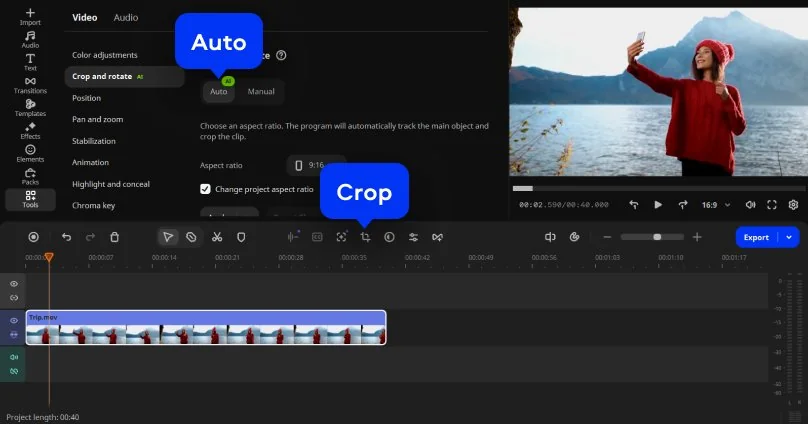
Auto-tracked cropping adjusts the frame on the fly and keeps the speaker or product centered while it converts horizontal footage into a vertical format. Creators use it to cut long videos into YouTube Shorts, Instagram Reels, or TikTok clips, and YouTube Help says the player adapts to vertical uploads on its own. Export the horizontal version first, then reframe a copy for Shorts.

Step 1. Add your footage

Click Add Files, then select the horizontal video.

Step 2. Reframe to vertical

Open the Crop tool and choose Auto mode. Then select the vertical aspect ratio.

Export for YouTube

Export for YouTube comes down to a few settings, and Movavi Video Editor can also upload straight to YouTube once the file is ready, so one trip through the export window covers both. Audio-only export is there too, in MP3 or FLAC. The H.264 codec settings add two-pass encoding for the cases where you want it.

Step 1. Open export

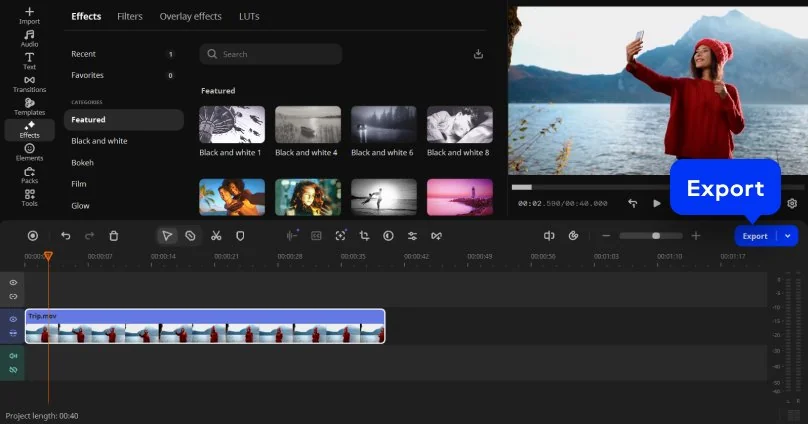
Click Export.

Step 2. Set the format and save

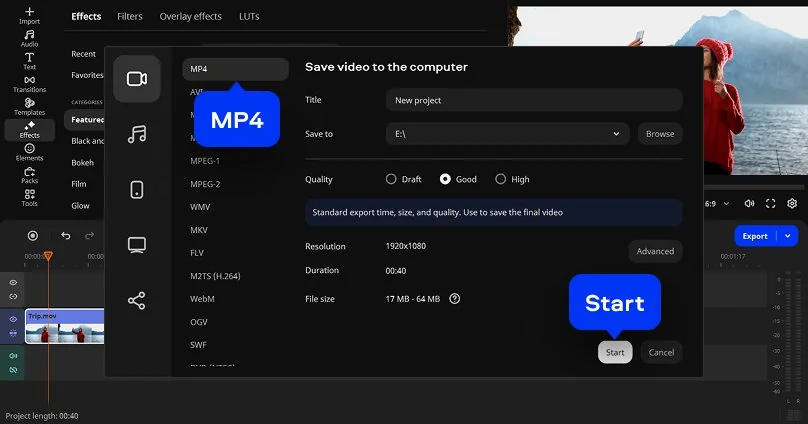
Choose MP4 as the format, then set the resolution and aspect ratio. Click Start to save the result.

Narrow how-to guides for each task

How different channels use Movavi Video Editor

Vlog channels

The task: turn a day of phone clips into one daily-routine video. Choose a template from the Vlog category, drop your clips into the Blocks, then run AI audio noise removal on the clips with street noise. The result is a vlog with a steady structure and a clean voice track, built from unboxing clips, a morning routine, or a travel day.

Review channels

The task: review a gadget you just unboxed. AI motion tracking locks a label or graphic to the product while you turn it in your hands. If you own a green screen, chroma key removes the color you pick, usually green or blue, so you can swap the backdrop. AI background removal covers videos with a person and needs no green screen at all. Either way, the gadget stays the star of the frame.

Tutorial channels

The task: record a spoken explainer. Silence removal cuts dead air automatically, and you can adjust the pause length and the volume threshold. Auto subtitles then keep the lesson clear with the sound off. Students building a project explainer and creators teaching a skill use the same two steps.

Gaming channels

The task: cut a game review from a long session. The Gaming category gives you the structure, quick cuts keep the pace, and the speed control compresses slow stretches. You end up with a review that jumps between the moments you picked, whether that is a boss fight or a clean final round.

Travel channels

The task: cut a trip into one video. Color correction presets give clips from different days a matching look, speed control turns long drives into time-lapses, and built-in copyright-free music sets the mood. Portable projects bundle every file, so you can finish the edit on another computer while you are still on the road. A Vlog category template then ties the travel days into one story.

Before you upload to YouTube: a 9-point checklist

  1. Intro: your channel name replaces every line of placeholder text in the intro Blocks, and the pre-set music either fits the mood or has been swapped for a track you chose.
  2. Outro: the outro template sits at the end of the timeline, with its placeholder media and text replaced.
  3. Subtitles: skim the lines in the Phrases panel and fix names, slang, and product terms.
  4. Sound: run AI audio noise removal on clips with background hum, then check that the voice sits above the music.
  5. Picture: apply the same color correction preset to clips from one scene so the look stays consistent.
  6. Thumbnail: pick a sharp frame or image that matches what the video delivers, and keep any text short.
  7. Shorts: for a vertical cut, run auto-tracked cropping on a copy of the project and check that the speaker stays centered.
  8. Format: export as MP4 at the frame rate you recorded, in 16:9 for landscape videos.
  9. Watermark: exports from Movavi Video Editor Free carry a mandatory watermark, so check the corner of the frame before you upload. The full version removes it.
Movavi Video Editor
Create awesome videos easily

*The free version of Movavi Video Editor may have the following restrictions depending on the build: watermark on exported clips, 60-second video or 1/2 audio length limit, and/or some advanced features unavailable when exporting videos.

Frequently asked questions

How to edit YouTube videos if you have never edited before?

Cut first and decorate second. Remove dead air before you add effects, since silence removal is a single click, and keep the first video short. Then add the structure from a template and export. Save as you go: autosave recovery restores your work if the program closes unexpectedly, and moved or missing media files are relinked automatically.

What export settings does YouTube recommend?

For 1080p at 24, 25, or 30 frames per second, YouTube Help lists a video bitrate of 8 Mbps. At 48, 50, or 60 frames per second, it lists 12 Mbps. SDR uploads should use the BT.709 color space, and audio should be stereo.

What are the limits of Movavi Video Editor Free?

Exports carry a 60-second length cap and a mandatory watermark. Codec support is limited, and there is no export in 4K. Upgrading to the full version removes every export restriction.

Can I edit subtitles after the tool generates them?

Yes. Edit them line by line in the Phrases panel, restyle one subtitle or the whole project, translate them into English, or export them as a standalone .SRT file.

Which file formats can I import?

Video imports include MP4, MOV, AVI, MKV, and WMV, so footage from most phones and cameras works. Audio files in MP3, WAV, and FLAC import and export, and images come in as JPEG, PNG, BMP, or static GIF.

Can I try effects before paying for the Movavi Effects subscription?

Yes. Every effect from the subscription previews on your own video for free, and you can even save the result with a watermark before you buy.

How do I keep my channel’s look consistent across videos?

Save what works. Custom color presets, title styles, and equalizer settings can be stored and reused, and template Blocks give every upload the same structure. Fast Track HD also works on temporary lower-size copies of HD footage while you edit, then swaps back to the originals on export, which keeps editing smooth on a busy channel.

Can I record my screen or webcam for a tutorial?

Webcam and microphone recording go straight into the project timeline. For screen capture with audio, Movavi Screen Recorder is the dedicated program, and Movavi Video Suite bundles Movavi Video Editor, Movavi Video Converter, and Movavi Screen Recorder in one package.

Do I need a green screen to change my background?

No. AI background removal detects and removes the background from any video with a person, and you can swap in a solid color or your own image. Chroma key and AI background removal are limited in Movavi Video Editor Lite.

Have questions?
If you can’t find the answer to your question, please feel free to contact our Support Team.
Join us for discounts, editing tips, and content ideas

1.5M+ users already subscribed to our newsletter

By signing up, I agree to receive marketing emails from Movavi and agree to Movavi's Privacy Policy.