How to Use an OBS Virtual Camera

  1. Download and install OBS.

  2. In the Sources box, select the source.

  3. Click Start Virtual Camera.


Need more options? Draw on recordings and highlight mouse clicks with Movavi Screen Recorder. Make your videos more engaging!

Edited by Ben Jacklin
78 514

Using an OBS studio virtual camera is a great way to get creative with your webcam feed when live streaming, video calling, or attending online meetings and conferences. If you're not sure how to use an OBS virtual camera, this guide will go over all you need to know.

Ways of using virtual camera

Step-by-step instructions

Windows virtual cam setup

1. Add sources… Read more

Mac virtual cam setup

1. Set up sources and scenes… Read more

Zoom

1. Configure the program… Read more

Our goal is to provide you with only verified information. To ensure this, Movavi Content Team does the following:

  • When selecting products to include in our reviews, we research both demand and popularity.

  • The team tests all the products mentioned in this article.

  • When testing, we compare the key characteristics of the products, which include selecting capture area, schedule recording, showing keystrokes and mouse, and other significant features.

  • We study user reviews from popular review platforms and make use of this information when writing our product reviews.

  • We collect feedback from our users and analyze their opinions of Movavi software as well as products from other companies.

Another great app you can use for recording video calls, meetings, and more is Movavi Screen Recorder. This app makes it easy to capture and record webinars, online calls, and other screen activities. It can also be used for making your own recordings for tutorials or video guides. Available for both Mac and Windows, Movavi Screen Recorder is easy to use and even has basic editing tools.

What is an OBS virtual camera?

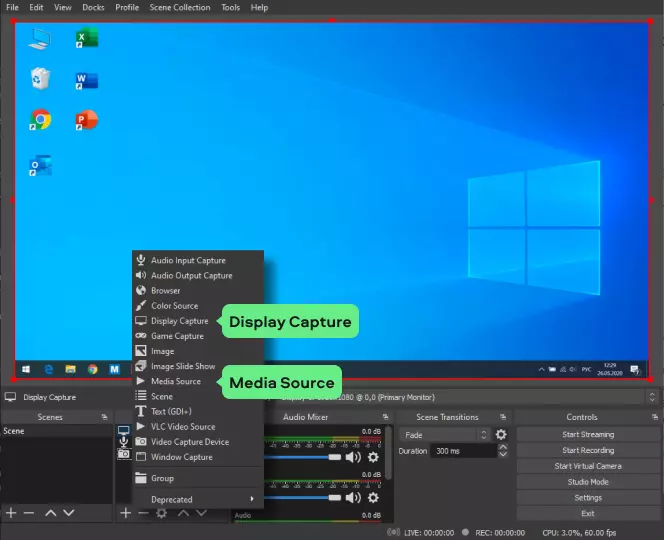
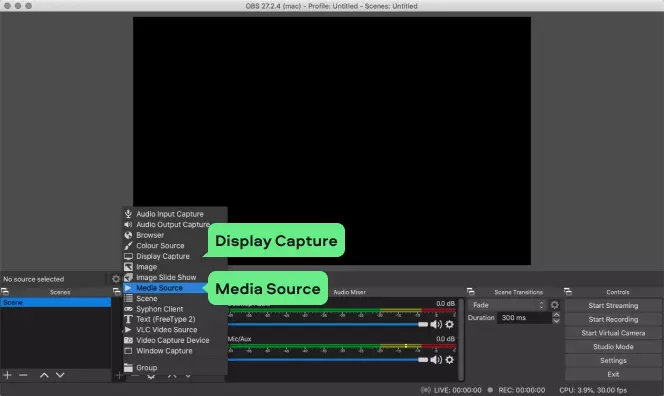
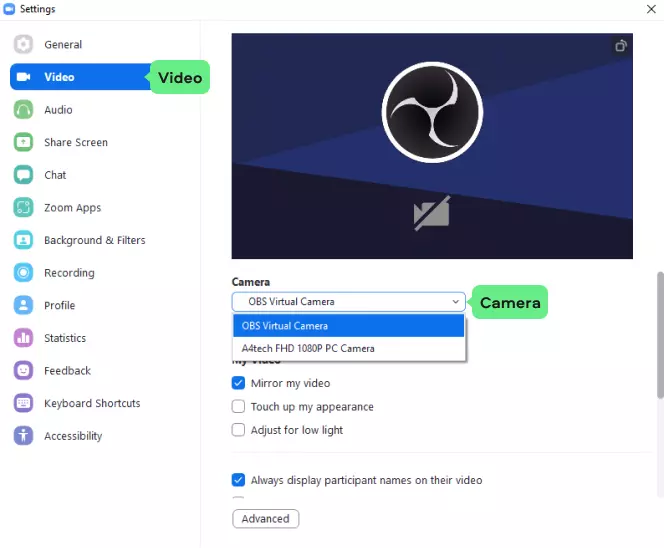
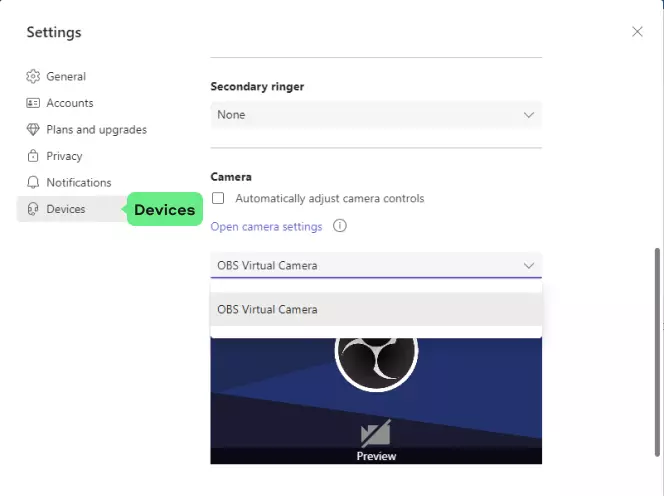
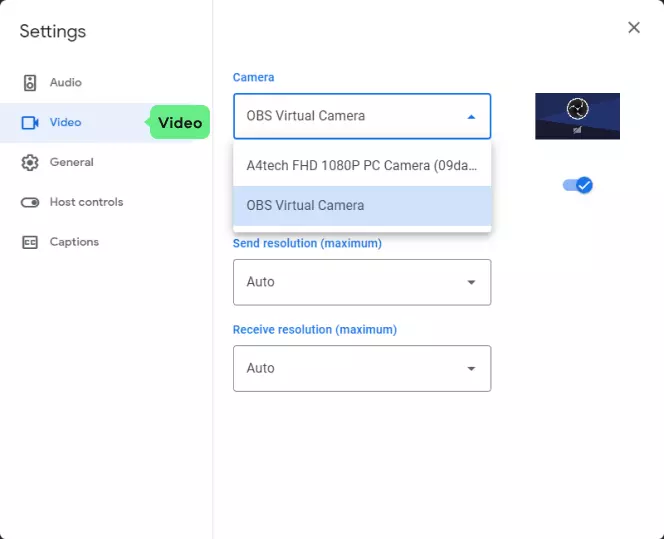
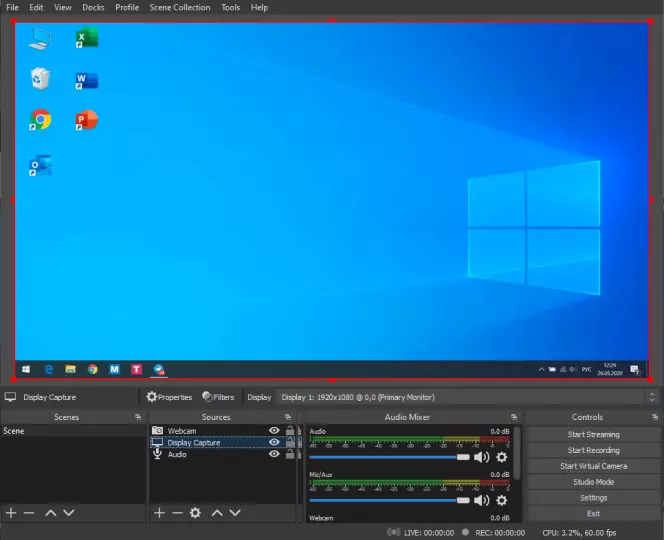
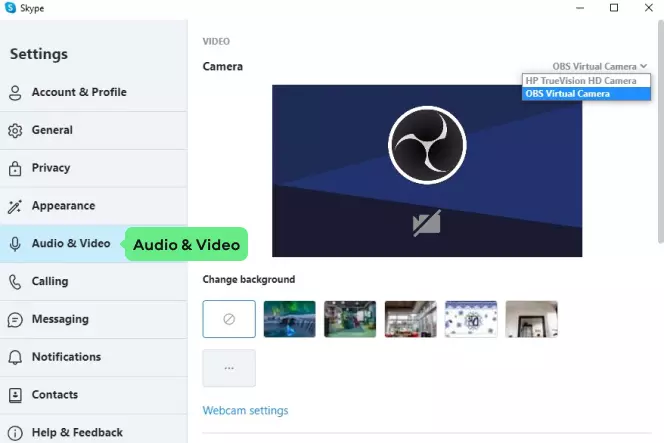
So, what is an OBS virtual camera? As the name suggests, the virtual camera in OBS is basically a virtual cam tool that can be used to replace your webcam feed in apps like Zoom, Skype, Google Meet, and more. It's part of OBS Studio, a video recording and editing program. The OBS virtual cam plugin lets you use various kinds of media, like images and videos, as the camera output in these kinds of apps.

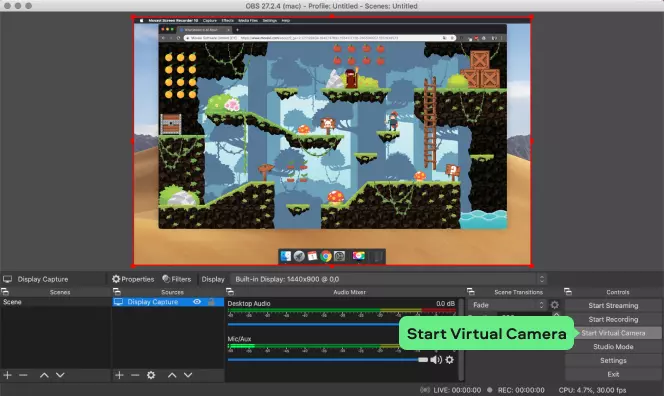
If you launch a Skype call with a friend using OBS virtual camera, for example, you can show them different content, like videos or even a live feed of your screen, instead of your usual webcam. It can also be used to display your webcam with special filters and enhancements. There are many different uses of the OBS virtual camera download.

How to set up a virtual camera in OBS on Windows

Step 1. Install or update the program

The first step of the process is to download and install OBS Studio on your Windows device. If you're not sure how to install OBS, you can simply find it on the official OBS Studio website and download it for free. If you already have OBS installed, open it up and click Help > Check for Updates to update to the latest version.

Download OBS Studio

Step 2. Add sources

The next step of the process is to add the sources you wish to use when using the virtual camera. OBS Studio allows you to add various sources to your virtual camera feed, like your current monitor display, a media source, or a connected webcam. To add sources, simply go to the Sources box in the bottom section of the screen and click the + icon. You can then choose sources like Display Capture or Media Source to add the various sources you want to show in your virtual cam.

Step 3. Start the virtual camera

Once your scenes and sources are prepared and ready to go in OBS Studio, it's time to start the virtual camera. To do this, simply go to the Controls dock in the lower right section of the screen and click on the button marked Start Virtual Camera.

How to set up an OBS virtual cam plugin on a Mac

Step 1. Get the latest version of OBS

There's no need to worry about installing a specific camera plugin to use the OBS virtual webcam on your Mac, as the virtual camera feature is built into the latest version of the software. So, to start the process, you just need to download and install the latest version of OBS Studio. You can download directly from the OBS site or open your already-installed app and click Help > Check for Updates.

Download OBS Studio

Step 2. Set up sources and scenes

The next step of how to set up the OBS virtual camera on Mac is to set up your various scenes and sources you wish to use later on in Zoom calls, Skype meetings, and so on. To do this, just go to the Sources box at the bottom and click + and then select a source you wish to add, like a Media Source or Display Capture.

Step 3. Launch the camera

Once the sources and settings have all been configured, you can activate the virtual camera. To do this, go to the Controls section in the bottom right of the OBS window and click Start Virtual Camera to enable the cam.

How to set up an OBS virtual camera in Zoom

Step 1. Download or update OBS Studio

Download OBS Studio from the official website and/or update it to the latest version on your device.

Download OBS Studio

Step 2. Open and configure the program

Open the program and start adding the sources and scenes you wish to show in your Zoom call.

Step 3. Start a Zoom meeting

Once your OBS is set up as you like, start a Zoom meeting and set up the virtual camera as your webcam feed. To do this, go to Settings in Zoom and then click Video. In the Camera drop-down menu, select OBS Virtual Camera.

Step 4. Sync with OBS

You'll now need to head back to OBS and click Start Virtual Camera in the bottom right to activate the virtual cam and sync with Zoom.

Step 5. Use the virtual camera to share media

The OBS virtual camera in Zoom should now be set up and ready to display whatever you want to your fellow Zoom callers. You can then use the OBS window to switch between sources and show off different content or media to your colleagues or friends.

How to set up an OBS virtual camera in Teams

Step 1. Download and install the program

Download OBS Studio from the official site and install it. If you already have it, use Help > Check for Updates to get the latest version.

Download OBS Studio

Step 2. Set up sources

Next, open the app and prepare the source(s) you want to display. For example, you can add Window Capture as a source to be able to share a specific window with people in Teams, like a Google Chrome browser window.

Step 3. Set up Teams

Open Microsoft Teams, head to Settings, then Devices, and select OBS Virtual Camera as the camera option you wish to use.

Step 4. Launch the cam

Next, go back to OBS and click on Start Virtual Camera in the bottom right.

Step 5. Start a call

Launch a meeting in Teams. All the meeting members will see your virtual camera feed instead of your webcam in the Teams meeting.

How to set up an OBS virtual camera in Google Meet

Step 1. Install OBS Studio

The first step is to get OBS Studio set up on your device. Go to the official OBS site and download the latest version of the program. Follow the installation instructions to set it up.

Download OBS Studio

Step 2. Set up the app

Next, you'll want to set up the various scenes and sources to show in your Google Meet calls. To do this, click the + icon in the Sources box and add each source individually. You can add Display Capture, for example, to capture the feed from a connected display.

Step 3. Open Google Meet

Next, go to Google Meet and head to the Settings menu. In the camera option, click on OBS Virtual Camera as your chosen camera. You should immediately see a static image showing your current OBS window.

Step 4. Launch the virtual camera

Return to OBS and click on the Start Virtual Camera button in the lower right Controls section. This will begin the process of showing whatever sources you have selected in your virtual camera feed.

Step 5. Start a call

Return to Google Meet, begin a call or meeting with your friends or colleagues, and they'll be able to see whatever you have selected for the virtual OBS webcam.

How to set up an OBS virtual camera in Skype

Step 1. Set up OBS

The first step is to get OBS set up on your chosen device. You can download OBS Studio directly from the official OBS site and install it on your Windows or Mac system. If you already have OBS installed, just open it up, click on Help, then click Check for Updates to get the latest version.

Download OBS Studio

Step 2. Make sure Skype is updated

You'll also need to have the latest version of Skype to avoid any errors or issues. You can download the latest version from the Skype site or just open Skype on your device and check for updates.

Download Skype

Step 3. Set up sources

Open OBS Studio and click on the + icon in the Sources box at the bottom. This is where you can add sources to show to your friends or family or other people on Skype. You can add various sources, like a Media Source, which lets you play a video file or show an image to people via your virtual camera feed.

Step 4. Set up the OBS camera

Next, go to Skype, click on Settings, then Calling, then Advanced, and click to Allow NDI Usage. Then go to Audio & Video in the settings menu and select OBS Virtual Camera from the Camera menu.

Step 5. Launch the camera and start a call

Next, you can go back to OBS and click on Start Virtual Camera in the bottom right to activate the cam. Then, all you have to do is start a call on Skype and the person you call will see whatever you have chosen to share with them via the virtual camera.

How to use an OBS virtual camera in Discord

Step 1. Download and install OBS Studio

Download the latest version of the program from its official website and follow the installation instructions.

Go to OBS Studio official website

Step 2. Set up the virtual camera

To set up the OBS virtual camera for Discord, go to the Sources box, which you will find at the bottom of your screen. Click the Plus sign within the box. In the list of options select Display Capture or Video Capture Device and choose your webcam. Finally, click Start Virtual Camera.

Step 3. Change Discord settings

Open User Settings. In the App Settings section click on Voice & Video. Scroll down to video settings and click on Camera list right under the video preview. Then select OBS Virtual Camera. Now, you should be able to see your virtual camera feed right in the video preview.

How to make your webcam look better in OBS Studio

Step 1. Add your webcam as a source

Open OBS Studio. Click on the + icon at the bottom of the window in the Sources box and add Video Capture Device. Click on Create New and name your device however you like. Then, select your webcam in the Device drop-down menu.

Step 2. Adjust the resolution and frame rate

Right-click on your webcam in the Sources menu at the bottom. Then click Properties. This will take you to a new menu where you can adjust a lot of different settings to enhance your webcam feed and image quality. To start, try adjusting the resolution and frame rate. To do this, click Custom under the Resolution/FPS type and then change each setting individually. You can adjust the resolution of your webcam to get the clearest image, as well as changing the frame rate to the highest your camera can support.

Step 3. Change additional video settings

You can then click on the Configure Video button to start adjusting other aspects of your webcam feed. This will take you to a settings menu where you can change things like exposure, zoom, and focus. Webcams often overexpose, so you may want to use the exposure slider to make the image look cleaner and more natural. You can use the zoom and pan effects to zoom in on yourself if needed. You can also manually adjust focus to keep a sharp image on your webcam. It's also possible to adjust things like brightness and contrast until you get an image you're happy with.

How to add filters to your webcam in OBS Studio

Step 1. Add webcam source

Open OBS and click on the + icon in the Sources box. Select Video Capture Device, click Create New, type in a name, and choose your webcam from the drop-down Device list. Then click OK to confirm.

Step 2. Add filters

Right-click on your webcam in the sources menu and select Filters.

You can then use the Effects Filters menu to activate either the Color Correction filter or LUT filter. The color correction filter lets you manually adjust the color settings of your image however you like. The LUT filter allows you to add a standard lookup table filter to your feed. You can find free LUT filters on the OBS forums. Use the Browse button to find the file you want to use and then use the slider to adjust its strength.

Troubleshooting

If there’s an issue of OBS virtual camera not working properly or not showing up at all, we recommend trying one of the solutions below:

  • Restart OBS. The simplest and most obvious solution is to restart the program or your computer. You can also try disabling an antivirus, since it can block the video feed.

  • Tweak the video settings. Under the Output tab of the Settings window you can change video format, FPS, and resolution.

  • Update or reinstall camera driver. Go to the official website of the camera manufacturer and download the latest version of a webcam driver.

  • Check OBS updates. Go to the Help tab at the menu bar and click Check For Updates. If the update is available, install it by clicking Update Now.

Summary

There are lots of ways you can use the OBS virtual camera to take your Zoom, Skype, and other online calling experiences to a new level. We hope that this guide has provided the tips and steps you need to make the most of this feature in your favorite online calling app.

Movavi Screen Recorder

The perfect way to record anything from your screen

Disclaimer: Please be aware that Movavi Screen Recorder does not allow capture of copy-protected video and audio streams.

Frequently asked questions

What is the OBS virtual camera for?

OBS virtual camera is designed to save your screen using apps that can share video via a webcam, like Skype, Zoom, Google Meet, etc. You can use it if the software you’re using to contact other people cannot share the screen.

How do I use a virtual camera on OBS?

  1. Download and install OBS to your device.

  2. Open the program and set up your sources.

  3. Click on Start Virtual Camera.

Can OBS output to Zoom?

Yes, here's how to use OBS with Zoom:

  1. Install OBS and set up the sources you want to share in a Zoom call.

  2. Open Zoom, go to Settings, then Video, and choose OBS Virtual Camera as your camera.

  3. Return to OBS and click Start Virtual Camera.

  4. Then start a Zoom call.

How do I make my webcam better on OBS?

  • Adjust resolution and frame rate via the Properties menu to make your webcam feed as sharp and detailed as possible.

  • Use the Configure Video menu to manually adjust things like focus, brightness, exposure, and zoom to get the best image.

  • Apply filters like a color correction or LUTs to make the colors of your webcam feed appear as natural and realistic as you can.

Can I use an OBS virtual camera with Discord?

Yes, you can use an OBS virtual camera in Discord as well as any other program that supports webcam feed. Just activate the virtual camera in OBS and select it as a video source in Discord video settings. For detailed instructions, follow the link below:

Have questions?

Have questions?

If you can’t find the answer to your question, please feel free to contact our Support Team.

Join for how-to guides, speсial offers, and app tips!