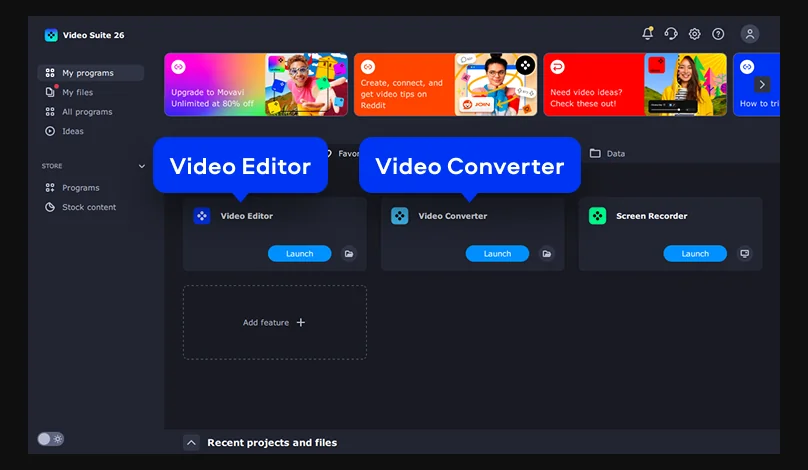
VOB Editor

Try Movavi Video Suite!

  • Create complete movies with music and effects
  • Convert and play back media files
  • Burn CDs, DVDs, and Blu-ray discs

By clicking the download button, you're downloading a trial version of the program.*

How to edit VOB files (merge/cut/split your DVDs)

Edited by Ben Jacklin
19,916
Several years ago, DVD was a leading technology that’s now a bit out of date. However, many people still have family archives, movies, and other data on DVDs. When burning DVDs, the video stream is placed in a VOB container, so video files acquire a .vob extension. This format is hard to work with, and many users prefer to make their job easier by transforming VOB files into a more appropriate file type. If you want to make a new cool video based on old recordings to bring new joy to friends and relatives, you’ll need a feature-rich VOB editor that’s capable of video conversion.Try Movavi’s software, and you’ll be able to edit VOB files on Mac, Windows 10, Windows 8, and Windows 7 as much as you like. Movavi Video Suite is a powerful tool that can serve as a VOB video editor, cutter, merger, converter, compressor, or anything you want to do in the field of multimedia processing. So, find out how to edit VOB files by following the guide below.

Step 1. Install and run Movavi Video Suite

Download Movavi Video Suite on your PC or Mac and double-click on the file. After installation is complete, launch the software. There are two main options you’ll need: Convert video to get your files converted into a more appropriate format and Edit video to change whatever you need to in the video itself.

Step 2. Convert your VOB files

The first thing to be done is to convert your files to a more convenient format. Choose Convert video at the very beginning, as you can see on the screenshot above. A new window will appear. Now click the Add Media button, select Add DVD, and Open DVD. Next, choose the directory containing your VOB files.

Once you’ve selected all the files you need, go to the Video tab, choose an appropriate preset group (e.g., MP4 or AVI), and specify the preset which suits your needs best, for example, MP4 H.264 – Original Size. The information in the lower-left corner will change according to your selection.

Click the Save to button to decide where to save the converted files. Now click Convert and wait for a short time (the processing time is shown at the very bottom of the window). It’s done! Close the converter window and return to the main Movavi Video Suite screen.

Step 3. Start editing your videos

Now it is time to edit your converted videos. Click Edit video on the main program screen and wait until the editor is loaded. Add your files to the project by clicking the Add Files button. Choose the videos from the folder in which you placed them. They will appear in the Media Bin. Drag and drop them on the Timeline to start editing.

It is almost impossible to describe all the program’s functions here because there are so many of them, so we are going to focus on the most important ones.

3.1. Merge/join/combine

Joining videos is simple – after you dropped your videos on the timeline, just arrange them in the desired order. When you export your file, all the videos on the timeline will be merged into one.

3.2. Cut/trim/split

The next function is a trimmer which can be used to delete parts of the video which you don’t want to keep. There is a red marker next to your video on the Timeline. Move the marker to the edge of the segment you want to cut out and click the Split button. Do the same with all unwanted segments, then choose the parts you don’t want to keep, and hit Delete.

3.3. Add transitions

Now if you watch your movie, you might see that sometimes scenes change too suddenly. To make your video flow better, use smooth fades. Go to the Transitions tab and drag the ones you like to the Timeline between segments. You can add the same transitions to all your clips or choose different ones.

3.4. Add music

You can also add a soundtrack to your footage in the same way as you added your video. Go to the Import tab, click File import, then Add Files. Now choose an audio file. It will appear on the Timeline below your video. Trim the track if need be, just as you did with the video. If you want your music to fade in and out, double-click on the track and move the relevant sliders (Fade in and Fade out) in the opened window.

Step 4. Add features

Let’s add some fun to the video. There are plenty of features to choose from. You can explore Movavi Video Suite on your own and you’re bound to find many interesting things. We’ve chosen just three of them to discuss here.

4.1. Add filters

The Filters tab offers a wealth of creative options: you can mirror your footage, make it look like an old movie, add a mosaic, or even use multiple filters on a single video segment. Just drag the filters onto your video, and they will be applied automatically. There are no limits except your imagination.

4.2. Add titles

You may also want to add titles to your video. It will be much easier for viewers to keep track of what’s happening if there are captions like ‘Sarah’s wedding’ or ‘Our 30th anniversary’. You can add text by clicking the Titles tab and choosing the appropriate title preset. Drag the one you like best to the Timeline. You can add your own text, then edit how it appears by double-clicking on it.

4.3. Add stickers

If you want to make your friends smile, try embellishing your footage with some stickers. Choose what you want from the Stickers tab and drag them onto your video. They will be shown in the Titles Track above the Video Track. You can set up the time and duration of their appearance by moving and changing the length of the respective rectangles.

Step 5. Save the result

When everything is ready, it’s time to save your creation. Click Export, then specify the desired format in the left of the window that appears and the file name and destination on the right. There’s also an opportunity to change some other settings like resolution, video codec, frame rate, etc. You can access these by clicking Advanced. After you’re done, hit Start. If you want to upload your new video to YouTube or Vimeo to share with friends and relatives via a direct link, just choose Upload Online, sign in to your account, and click Upload. And this is how to edit VOB files on Windows and Macintosh computers!

Frequently asked questions

❔ What is a VOB file?

✂️ How do I trim a VOB file?

🎬How do I combine VOB files?

🔄 Can I convert VOB files to MP4?

▶️ Can VLC play VOB files?

💻 How do I play a VOB file on my computer?

Have questions?

Have questions?

If you can’t find the answer to your question, please feel free to contact our Support Team.

Join for how-to guides, speсial offers, and app tips!