Step 1. Install the subtitle adder
Download the installation file for Mac or Windows, open it, and follow the instructions to install the software.

How to Add Subtitles to an MP4 Video on Windows or Mac
Here’s how to add subtitles to an MP4 video:
Download and install the converter.
Open videos and pick an MP4 preset.
Add SRT files and convert your files.

Did you know that according to statistics, around 50% of people watch videos with subtitles? Their reasons vary across the board – some prefer having subs on to improve comprehension, others use it while watching videos in noisy environments.
I count myself as part of the subtitle-using demographic. Many times, I’ve found myself having to manually add subtitles to videos because I just couldn’t enjoy the viewing experience without them. So here, I’m teaching you how to add an SRT file to MP4 using some of my favorite programs for desktop, as well as a few web-based options.
Comparison table: Recommended programs to add subtitles to MP4

Here’s what Movavi’s team does to provide you with verified information:
When selecting products to include in our reviews, we research both demand and popularity.
All the products covered in this article have been tested by our team.
When testing, we compare key characteristics, including supported input and output formats, quality loss when converting, and other significant features.
We study user reviews from popular review platforms and make use of this information when writing our product reviews.
We collect feedback from our users and analyze their opinions of Movavi software as well as products from other companies.
Why add subtitles to your MP4 video? Here are some situations in which they may become handy.
Watching movies with subtitles helps you learn new words faster. You can also see how names are spelled and improve writing and reading skills.
Dubbing films takes a lot of time, and some of them may not get an English dub at all. Use subtitles to understand what’s happening.
If you’re working on an online course, don’t forget to add subtitles to your videos. This way, it will be much easier for your audience to grasp the information.
How to add subtitles to an MP4 file in Movavi Video Converter
OS: Windows, macOS
Best for: adding subtitles and converting videos
If you want to combine a video with SRT subtitles, Movavi Video Converter is the tool you need! You can encode the translation permanently with it, so you can watch your favorite films and series on any device. Movavi Video Converter also converts files into different formats, joins separate videos, compresses media, and even changes the resolution of any video.
Step 1. Install the subtitle adder
Download the installation file for Mac or Windows, open it, and follow the instructions to install the software.
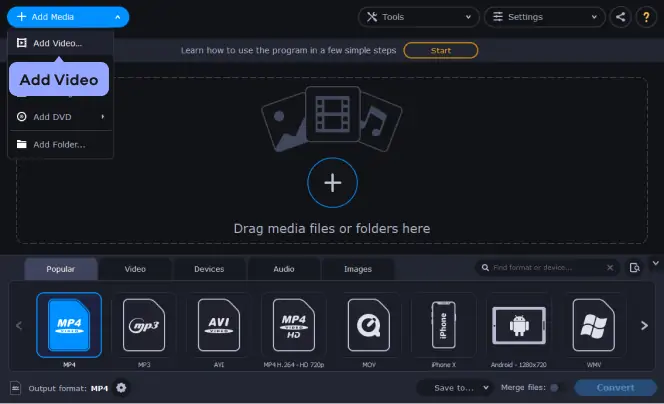
Step 2. Add your MP4 files
Click Add Media, then choose the Add video option. Select the videos you want to attach subtitles to. The files will be added to the program.
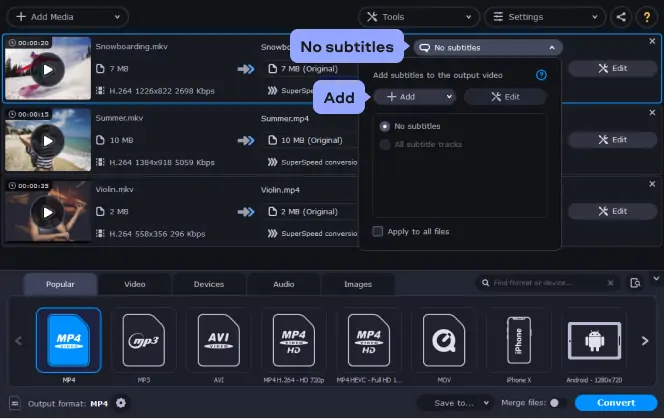
Step 3. Select the subtitles
Click the Edit button and open the Subtitles tab. In the pop-up window, click the Add button and select the subtitles you want to insert into your video. If the SRT file has the same name as the video and is located in the same folder, the program will suggest the subtitle track automatically, and it will appear in the list of subtitles.
If you want to find subtitles online, after clicking Add, choose Search online. In a new dialog box, just click Search. You will get a list of subtitles that match the metadata of your file. Select the subtitles that suit you best.
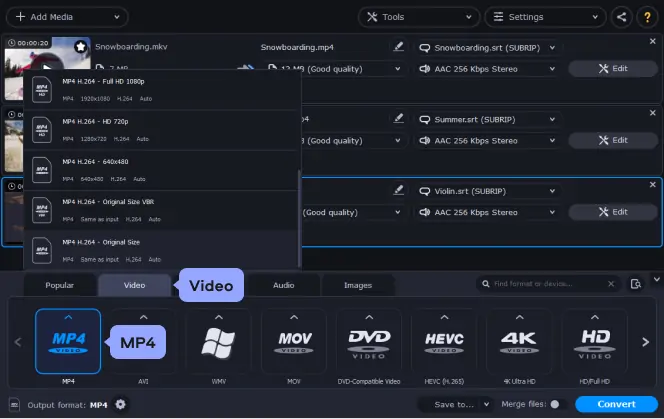
Step 4. Choose the preset for conversion
Open the Video tab and select the MP4 format. If you are satisfied with the resolution of your video, choose the MP4 H.264 - Original Size option. If not, you can choose any other resolution from the list that you feel would work better.
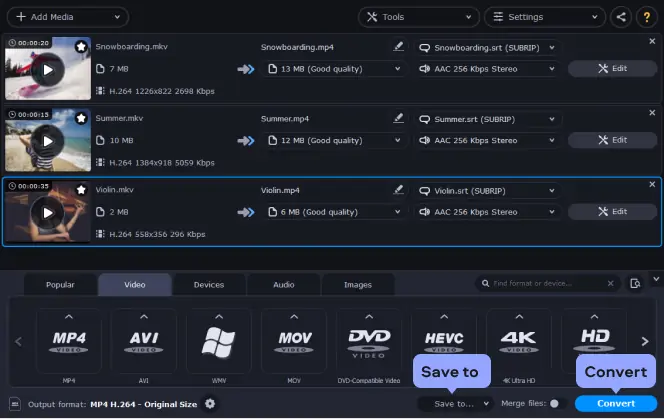
Step 5. Add SRT to the MP4 video
Select the target folder for your videos by clicking the Save to button at the bottom of the program window. By default, the subtitled videos will be saved in the Movavi Library folder. Hit Convert to add the SRT file to your video. The folder with the output files will open as soon as the processing is done. Now you can burn the hard-subbed video on a DVD or transfer it to any device.
Now you know how to add subtitles to MP4. You can follow the same simple steps to embed subtitles into videos in any other format (including AVI, MOV, WMV, or MPEG).
Convert videos to MP4 online
You can also convert your files with our powerful desktop app.
How to add subtitles to MP4 online
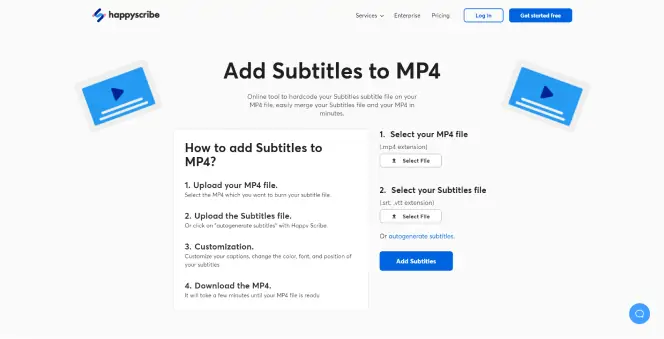
1. Happy Scribe
Best for: Customizing the appearance of subtitles
Happy Scribe is a free online program that allows you to attach SRT files to an MP4. It also provides options for customizing the color, font, and position of subtitles.
To add subtitles to an MP4 on Happy Scribe, go to Happy Scribe’s homepage.
Click Select File under Select Your MP4 File and find the MP4 file to which you want to add subtitles. Then, if you have an SRT file for the video, click Select File under Select Your Subtitles File. If you do not have an SRT file, click Autogenerate subtitles. Finally, click the Add Subtitles button.
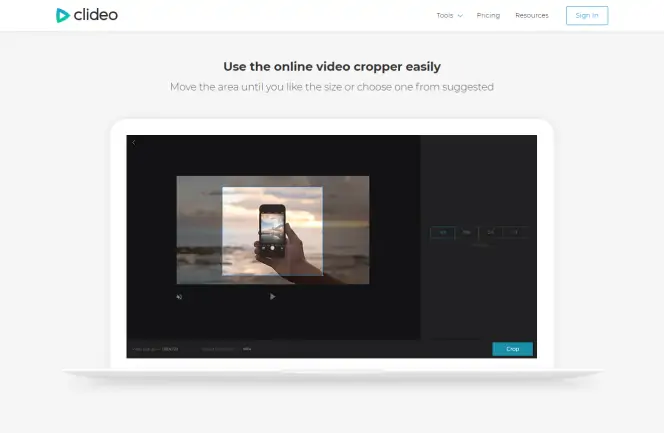
2. Clideo
Best for: Adding subtitles to a video from cloud storage
Clideo is a free online program that allows you to attach SRT files to an MP4 or enter them manually. Clideo can access video files directly from the popular cloud storage programs Google Drive and Dropbox.
To add SRT to an MP4 on Clideo, go to the Clideo homepage.
Click Choose File to find the MP4 on your computer. If you want to upload from Google Drive or Dropbox or use a URL, click the down arrow next to Choose File. To add subtitles manually, click Add Subtitle, type in the text, and set its timing. To add an SRT file, click Download SRT. Lastly, click Export. You can save the video file to your computer, Google Drive, or Dropbox.
How to add subtitles to MP4 in VLC
OS: macOS, Windows, iOS, Android
Best for: Adding subtitles to an MP4 on any OS
VLC is a popular multimedia player and editor that is compatible with any OS. VLC works with virtually every file format and can be used to add subtitles to MP4.
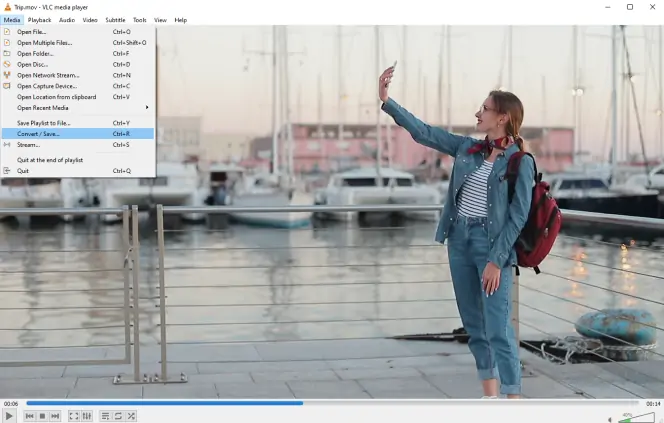
Here’s how to add subtitles in VLC:
Open your video file in VLC and let it begin to play.
From the menu bar, click Subtitle.
Click Add Subtitle File.
Find the SRT file you want to upload and click Open. That’s it! Now you know how to hardcode subtitles with VLC.

Subtitling tips
Here are tips on how to add SRT to MP4 on Mac or Windows.
Tip #1. Search for subtitles
Just about every film and TV show has a subtitle file created forth by a gracious sole. You only need to find it.
To do so, visit a subtitle website (such as Subscene and OpenSubtitles.org). Next, look for your show, download its SRT file, and embed the SRT into MP4.
There are also options where you're able to search and add subtitles to MP4 permanently or otherwise – on a single platform, as seen in Movavi Video Converter.
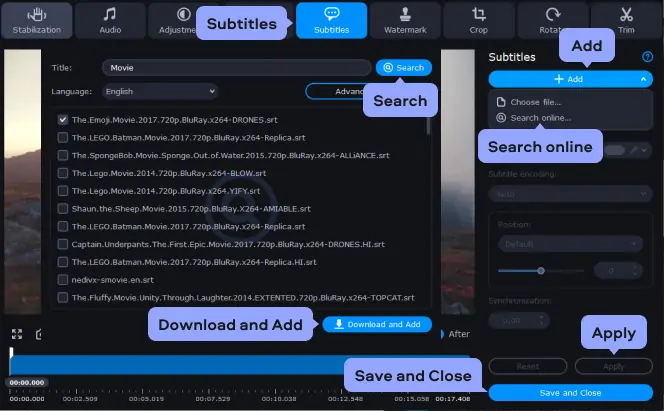
Search for subtitles in Movavi Video Converter
Do you have a thrilling, untranslated movie in a foreign language? And would love to watch it while listening to the original voices of cast members? Here's how to search its subtitles in Movavi Video Converter.
Add your video to the program.
In the menu bar, select Edit and open the Subtitles tab.
Click the Add button.
And since you don't have the subtitles for the thriller yet, choose Search online. If the file name appearing in the search field is different from the title of your thriller, clear the search field and rename the file.
Choose your preferred language of the subtitles and click Search.
The program will return a list of subtitles that matches your metadata. Select the SRT file that suits you best and hit Download and Add.
Hit Apply and then Save and Close.
Click Convert to merge SRT with MP4.
Tip #2. Edit an SRT file
Once you have added subtitles to MP4 on Mac, it's time to edit the time codes, texts, fonts, color, and whatnot.
To do so, right-click your SRT file and hit Open With; choose a text editor (such as WordPad, Notepad, Notepad++, or TextEditor) on your PC. Then, change the wording, times, and anything else as needed.
Edit an SRT file on Notepad++
Edit an SRT file on Notepad++
Assuming you have the Notepad++ application installed on your PC (if not, download it – it's free), here is how you'll go about editing.
Right-click your SRT file and hit Open on the pop-up menu. Hit the radio button next to Select a program, select Notepad++, and hit Open.
If you're not getting the characters in your preferred language, save the SRT file in Unicode mode. To do so, highlight the text, go to File, click Save As, select Unicode (in the encoding dropdown menu), and hit Save.
Ensure the SRT file is correct in that; it only has one line of each language per section.
On the top bar menu, select Macro and click Start Recording. Then, edit the phrases, text format, or the time a subtitle phrase is displayed. Once done editing a given section, click Stop Recording. Note, you can use commands such as CTRL + L to remove a line or use a mouse and keyboard to type in the changes manually.
Move the cursor to a section to be edited next, select Macro, click Playback (or hit CTRL + SHIFT + P). That action will repeat the same edits done in the previous section just once.
You can repeat step 5 until the end of the SRT file or or go to Macro, hit Run a Macro Multiple Times. A dialog box will appear prompting you to select what Macro to play, the times to play it, or to play it to the end of the SRT file. Select accordingly and hit Run.
Click File and hit Save to preserve your edits in SRT format.
Note, you can create numerous Macros (per editing task in a given section) while editing one SRT file, which requires you to save the Macros before creating the next. To do so, click Macro and select Save Current Recorded Macro. A dialog box will pop-up, which will prompt you to add the name and default key-combinations of the Macro. You can then access the saved macro from the Macro menu or Playlist.
To delete or edit an existing Macro, use a Shortcut Mapper – an interface available via the Macro > Modify Shortcut/Delete Macro menu entry.
Once done, you can add the SRT file to MP4.
Tip #3. Edit subtitles styles
Adding subtitles to MP4 videos is handy. However, subtitles may sometimes be in undesired color, size, or style, which can spoil the watching experience. You cannot enjoy a video in a foreign language if the subtitles/texts are too small for easy reading, now, can you?
Luckily, you can solve the irritancies with a subtitle editor, such as Movavi Video Converter – that not only allows you to edit subtitles but also to add them in the first place.
Let's see how to do the edits.
Edit subtitles styles in Movavi Video Converter
Here's how to get your desired subtitle styles in Movavi Video Converter.
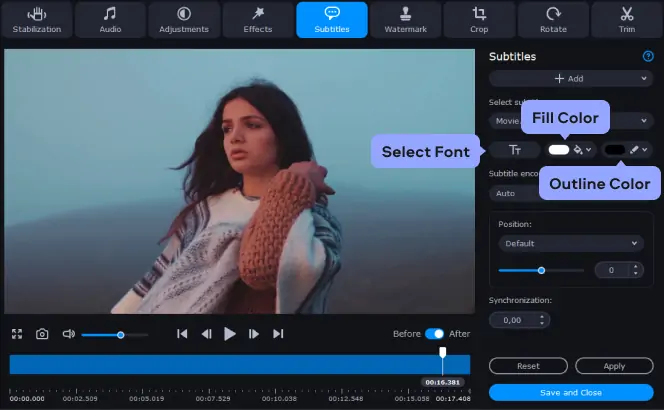
Upload your video with subtitles to the converter, click Edit, and go to the Subtitles tab.
To edit the text font, click the Select Font button. A dialogue box will appear, which will prompt you to select your preferred font in the Font column. Select the appropriate option to make the text italic or bold in the Font Style column. Pick the suitable value (to make the texts larger or smaller) in the Size column. Once done, click OK at the bottom of the dialogue box.
To adjust text colors, click the Fill Color button and hit on your preferred color. You can also click the Outline Color button and pick the desired option to change the color of the text outline.
Tip #4. Change the positions of subtitles on screen
If on loading an external SRT subtitles file, the subtitles appear on top of the MP4 video and not at the bottom – as you desired – do not panic.
You can change their position in the VLC player or other video players, right there and then.
Go to the Position section, open the dropdown list, and place the desired location – be it top, middle, or bottom; left or right.
Alternatively, you can change and specify the positions of the subtitles with Movavi Video Converter, as described below.
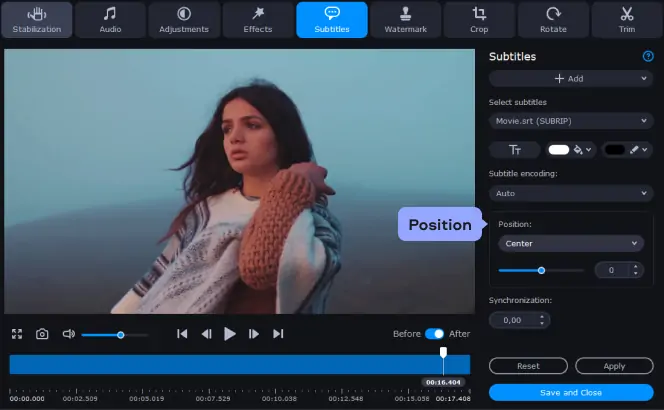
Change the positions of subtitles on screen with Movavi Video Converter
On the Subtitles tab, go to the Position section and open the drop-down list.
Position your subtitles in the top, middle, or bottom of the screen. While at it, you can move them to the right or left per your preference.
Tip #5. Synchronize subtitles with audio
If the subtitles are out of sync with the audio, they may appear early or later than expected. To fix this, change the synchronization settings on your audio player, accordingly. Once done, click Apply and hit done to exit the editing window.
You can also use a video editor to solve the synchronization problems as described below.
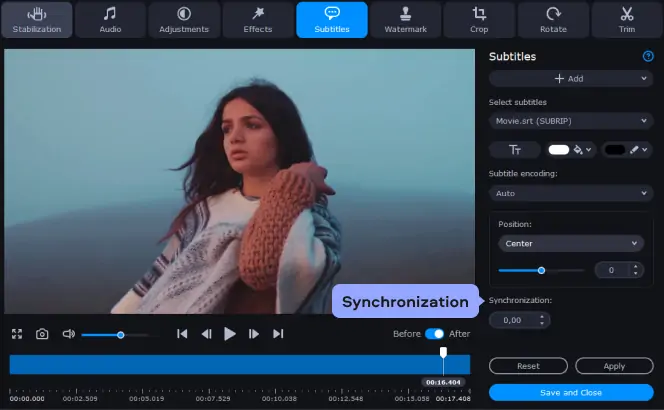
Synchronize subtitles with audio using Movavi Video Converter
On the Subtitles tab, use the Synchronization box to delay or advance subtitles by a specific amount of time – in seconds or milliseconds.
Positive values delay the subtitles, while negative values advance the subtitles.
For example: - 0.200 setting advances the subtitles by 200 milliseconds while 1.100 setting delays the subtitles by 1 second and 100 milliseconds.
Tip #6. Making subtitles yourself
Subtitles are made in several formats, with SRT files being the easiest of them all. Here, we discuss how to make an SRT file in a text editor to help attach subtitles to MP4.
There is free software such as Subtitle Workshop or Aegisub that enables you to type in and lock subtitles to specific time codes. Before we get started, bear in mind that making subtitles yourself is time-consuming. Dedicate some time to understand the interface, shortcuts, and commands of the software package of your choice.
Making subtitles in a text editor
You can create an SRT file with any text editor in existence – you need to install it in your gadget. For instance, Windows users can create a file using Notepad, while Mac users can use TextEdit.
The catch?
Format the text correctly to include:
[Number of the subtitles section]
[The beginning time of the subtitle display] – [The ending time of the subtitle display]
[Subtitle]
The timestamp should include: [hours]: [minutes]: [seconds], [milliseconds]
Note, you must follow the right format for the SRT files to work.
Once done, convert the SRT file to plain text and save it as an SRT file (i.e. change the .txt extension into .srt). To convert the SRT file into plain text, highlight the content, then go to Format (usually on the top bar) and hit Make Plain Text. With the changes saved, you can now add the SRT to MP4 on Mac.
In addition to text editors, you can create subtitles using YouTube and other Video Creators or MP4 subtitlers.
Key considerations when making subtitles
Regardless of the tool used, choose appropriate word speed, a balance between fast and slow reading. Strive to attain the 160 -180 words/minute – as that's the average reading pace of an adult.
Ensure the subtitles are not distractive. Here, take into account the position of the subtitles on the screen and their word count. Ideally, the subtitles should not block the view.
Add extra information, if need be. For example, you can add translations or describe the sound surrounding a scene to help people with hearing problems understand the actions. Bracket the extra information to separate from the main text.
And when it comes down to it, practice is a must.
Like any other skill, you have to practice to get better at making and adding subtitles to MP4. Thus, read tutorials on how to embed subtitles into MP4 and utilize free subtitling software packages or the free trials (in premium packages) to create and merge subtitles with MP4.
How to choose a program add subtitles to MP4
Adding subtitles to MP4 isn’t a complicated process, especially if you use the programs on this vetted list. I’ve personally tried a handful of programs for adding subs to MP4 videos and I’ve found that these five picks are by far the most intuitive and easy to use. Then again, it pays to choose a program that suits your specific preferences. If you want a software that handles subtitle files on top of performing basic video management and editing functions, Movavi Video Converter is a great all-around tool. Clideo is a reliable web-based option for users who don’t want to install any new programs into their computer. Clideo shines best as a subtitle translator tool for producing SRTs in different languages. If you need a high level of accuracy for subtitling videos with technical dialogue or where thick accents are involved, Happy Scribe might be your best bet. The program uses AI and provides the option for human transcription for audio that automatic tools might struggle with. And then of course, you can’t go wrong with VLC. A trusty program that’s installed on virtually every computer, VLC provides an easy add subtitle feature that you can hardcode onto your video with impressive ease.
Frequently asked questions
SRT (short for SubRip) is the subtitles format widely used to add a translation or additional information to videos. SRT files can contain only text data, without video or audio. However, you can format the subtitles text to change the style. Each phrase in the SRT file has its own timecode for when to appear and disappear.
If you have a separate file with subtitles, it’s most probably in SRT format. You can easily add an SRT to an MP4 video with Movavi Video Converter. Just download the program and follow the instructions below.
Download Movavi Video Converter for Mac
Install and launch Movavi Video Converter.
Import your MP4 video to the program by clicking Add Media, then Add Video.
To add your SRT file, click No subtitles, then Add. If you don’t have an SRT file, use Movavi Video Converter to search for one: after clicking Add, select Search online. In the dialog box that appears, click Search and select the appropriate option from the list.
In the Video tab, choose MP4 as the output video format, then select a resolution.
Hit Convert to add subtitles to your MP4 file.
To add subtitles to a video permanently, download and install Movavi Video Converter, then launch the program. First, add your video – click Add Media, then Add Video. Then import your SRT file: click No subtitles, then Add.
If you don’t have the appropriate subtitles, use Movavi Video Converter to search for them online. To do this, after clicking Add, select Search online. In the new dialog box, click Search. A list of subtitles will appear – just select one of the options.
Choose the output video format and resolution in the Video tab. To add hard-coded subtitles to your video, just click Convert.
Here's how to add subtitles in VLC permanently.
Open VLC and press CTRL + S on your keyboard to open the Stream Menu dialogue. Click the Add button and select your video.
Select the subtitles to be hardcoded. Here, tick the Use a Subtitle File box and hit Browse to find and import the SRT file into the player. Click on the Stream button at the bottom of the window to head to the next page. Click Next.
Create an output location. To do so, select File and hit the Add button. A File tab will open, which will prompt you to name the video. Add a relatable name with a .mp4 extension. Hit Next.
Now, tick the Activate Transcoding box. Then, hit the Wrench icon and open the Subtitles tab. Tick the Subtitles box and the Overlay Subtitles on the Video box. Click Save and hit Next.
Now that you've merged SRT with MP4, click Stream. VLC will play the hardcoded subtitles video at least twice before completing the transcoding process. Do not close the player yet.
Quit VLC media player the right way. Once the transcoding process is successful, click Media and select Quit on the top bar menu. Do not click Close, as that may fail to save the hardcoded video properly.
Want to know how to open an SRT file? You can open an SRT file as a text document using one of the text editors, e.g. Notepad, WordPad, Microsoft Word. To embed SRT into MP4, you’ll need to use special software, like Movavi Video Converter.
Hardcoding is the process of integrating subtitle files into the video file, permanently. When you hardcode subtitles, you can't turn them off.
Softcoding on its end is the process of adding a separate SRT file for the subtitles of a specified video file. The result is soft subs, which can be turned on or off – for example, subtitles on a DVD.
Softsub vs. hardsub: which option is better? It depends on whether you want to be able to edit your subtitles and turn them off when needed.
Hard subs are encoded into the video, which makes them a part of the video file. They are not editable.
Soft subs are similar to captions. Often, soft subs are included with the movie file, and in other cases, they are downloaded separately. They can be turned on, off, and edited, if necessary. And while some people find it hard to play soft subs, anyone with the CCCP application is good to go.
Here’s how to add subtitles to a video without any software:
Download the SRT file for the subtitles.
Choose an online subtitle converter. We suggest the following:
Fastreel
Happy Scribe
Clideo
Upload your video file and SRT file to the online program.
Follow the directions for downloading the file with subtitles attached.
To add subtitles to an MP4 with Windows Media Player:
Save your MP4 file and SRT file with the same name in the same folder. The names must match exactly.
Right-click on the MP4 and choose Windows Media Player from the Open With menu.
Click Tools in the WMP toolbar, then Options.
Click on Security, then check the box next to Show local captions when available.
Click Okay.
To add subtitles to an MP4 without encoding, use one of the following programs:
Movavi Video Converter
Fastreel
Happy Scribe
Clideo
VLC
To add subtitles to an MP4 in Handbrake:
Open the MP4 in Handbrake and click the Subtitles tab.
Click Add External SRT and find the correct subtitles file.
Click Start.
How to convert MPEG video to MP3 format
How to convert MXF to MOV and other popular formats
How to change formats from MP4 to MP3
How to convert PAL to NTSC
What is an MP4 file?
How to Convert IFO File to MP4 on Windows & Mac
8 Best Ways to Convert MTS to MP4 [Windows & Mac]
How to Convert RMVB to MP4 with Ease [Windows & Mac]


1.5M+ users already subscribed to our newsletter