How to Clip on a PC: 5 Easy Ways

Try Movavi Screen Recorder!

  • Record various types of content

  • Capture time-sensitive content with the scheduled recording mode

  • Draw and add annotations while recording

Edited by Ben Jacklin
8 036

Great moments deserve to be showcased, and if you’re wondering how to clip on your PC, you’re in luck. Here are five of the best ways to capture clips on a PC.

Our goal is to provide you with only verified information. To ensure this, Movavi Content Team does the following:

  • When selecting products to include in our reviews, we research both demand and popularity.

  • The team tests all the products mentioned in this article.

  • When testing, we compare the key characteristics of the products, which include selecting capture area, schedule recording, showing keystrokes and mouse, and other significant features.

  • We study user reviews from popular review platforms and make use of this information when writing our product reviews.

  • We collect feedback from our users and analyze their opinions of Movavi software as well as products from other companies.

disclaimer_person

How to clip the last 30 seconds on a PC with Game Bar

Capture a screen without downloading extra software

Game Bar
Bestseller

Record and edit clips with ease

Movavi Screen Recorder

Clip gameplay on a PC

Gecata by Movavi

Editor’s rating:

4.5
/5

Best for: gamers who want quick access to tools that let them capture and share their gaming experiences

Game Bar is a built-in feature within Windows that’s designed to help enhance the PC gaming experience through a number of features, including broadcasting, performance metrics, and audio controls. It’s also one of the fastest ways if you’re interested in how to clip the last 30 seconds on a PC.

So, how do you clip on a PC? Just follow the steps below to learn how to record clips on a PC.

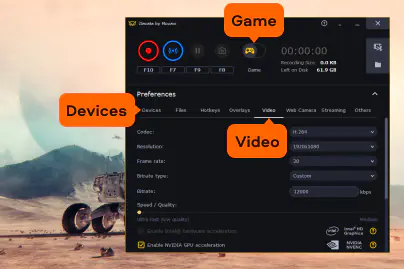
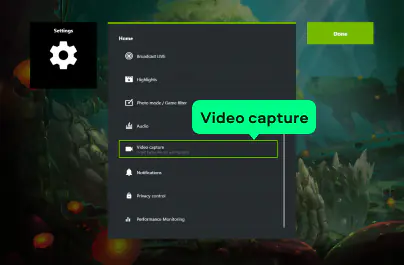
Step 1. Adjust the settings

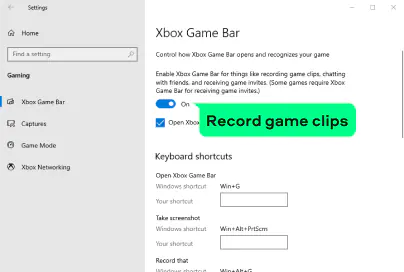
First, make sure that the game you want to record is up and running. Additionally, ensure that Game Bar is enabled. Press Windows + I to open Settings. Then go to Gaming. Click on Game Bar. Ensure that Record game clips, screenshots, and broadcast using Game Bar is toggled on.

Note that the quality, length, and other settings related to your recording can be adjusted in the Gaming settings under the Captures tab. If you find that Game Bar isn't recording or performing as expected, double-check these settings and ensure your PC meets the requirements for game recording.

Step 2. Capture the screen

To open Game Bar, press Windows + G simultaneously. This will bring up the Game Bar overlay on your screen.

In the Game Bar overlay, you'll see a series of icons. One of these will look like a circular camera. Click on this icon to start recording. Alternatively, you can press Windows + Alt + R to start and stop recording.

Step 3. Stop recording and access your video

After 30 seconds (or your desired recording length), click the same recording button again in the Game Bar overlay to stop the recording. Alternatively, you can use the Windows + Alt + R shortcut again.

Once you've stopped recording, a notification will pop up, letting you know where the clip has been saved (typically in the Videos > Captures folder on your PC). Click on the notification to directly view the clip or navigate to the folder to access all your recorded videos. Now you know how to record clips on your PC using Game Bar!

How to record clips on a PC using Movavi Screen Recorder

Best for: versatile screen recording, clipping, editing, and sharing on a PC

Movavi Screen Recorder is designed to be flexible for a variety of situations, including clipping something on a PC. In addition to recording your screen, whether it’s the last 5 minutes or the last 10 minutes, Movavi Screen Recorder also lets you draw directly on your recorded video, edit your clip, use your webcam as you’re recording, and much more, making it the perfect app to clip stuff on your PC. Read on to learn how to clip on Windows and macOS.

Features:

  • Capture anything from your screen, even keystrokes and mouse actions
  • Edit screenshots you’ve just taken – add text, arrows, or frames to highlight important elements
  • Record your screen with or without audio
  • Draw right on your screenshots and videos while recording live
  • Schedule to record at any time to watch later

Step 1. Install Movavi Screen Recorder

Download the installation file and follow the installation instructions. After the process is finished, open Movavi Screen Recorder by clicking its icon on your desktop.

Step 2. Adjust the recording settings

Click the Screen recording icon. Drag this crosshair over the area you want to record. For gameplay, this will likely be the full screen, but you can also select a custom area.

If you want to record system or microphone audio, make sure the respective icons on the control panel are highlighted.

Step 3. Clip videos on your PC

Click the REC button on the control panel or press F10 to begin recording. If you want to stop the recording, click the Stop button on the control panel or press F10 again.

After you finish the recording, Movavi Screen Recorder will allow you to preview your clip.

If satisfied, click the Export button, choose the desired format and location, and hit Save.

How to clip gameplay on a PC with Gecata by Movavi

Best for: recording, clipping, and sharing gameplay footage

Gecata by Movavi is a dedicated game-recording software designed to capture and share gameplay in Windows. It’s a fast and easy solution to clip gameplay on a PC, save clips, and share them via social media. The results are saved in high resolution for precise, high-quality editing. To learn how to clip on a PC, read the instructions below.

Step 1. Download and install the program

Download the installation file and follow the on-screen installation instructions. Open the program by clicking its icon on your desktop.

Step 2. Adjust the settings

Set the Capture mode to Game. In the Devices tab, you can choose to record game audio, microphone audio, or both. Ensure the correct icons are toggled on if you want to record them. In the Video tab, you can also adjust the video quality, frame rate, and other recording parameters as per your preference.

Step 3. Start recording

Launch the game you want to record. It’s usually best to have the game running in the full-screen mode for the best recording quality. To start recording, use the F10 hotkey.

Step 4. Access the clip

After recording, navigate back to the program interface. Click the Open the output folder button to view your recorded clips. This will direct you to the folder where your recordings are saved.

How to clip on Windows with OBS Studio

Best for: recording live streams on platforms like Twitch, YouTube, Facebook Live, and others

OBS Studio is an open-source software designed for both recording and live-streaming. It is often used to record multiple sources simultaneously, such as gameplay footage, webcam, and microphone audio. Unlike other software that lets you take clips or make recordings from your laptop, OBS Studio requires a little bit of setup beforehand.

If you’re wondering “How do I clip gameplay on a PC?” check out the instructions below.

Step 1. Install OBS Studio

Download and install OBS Studio on your PC.

Download OBS Studio

Step 2. Set up the sources

Under the Sources box in the bottom center of the main interface, click the + icon. Select Game Capture to capture gameplay. Name this source if you want and click OK.

In the Properties window, you can choose to capture any full-screen application or specify a particular game/window. Make your choice and click OK.

Step 3. Configure the recording settings

Click File in the top-left corner, then select Settings. Navigate to the Output tab on the left pane. Under Recording, set the video path (where your video files will be saved), quality, and other preferences.

In the same Settings window, go to the Video tab to set your base (canvas) resolution and output (scaled) resolution, as well as the frame rate. Click OK to save your settings.

Step 4. Start recording

Launch the game you want to record. Ideally, run the game in the full-screen mode for the best recording quality.

Switch back to OBS Studio. To start recording, click the Start Recording button in the bottom-right corner of the OBS interface. To finish recording, click the Stop Recording button in the same location.

Step 5. Access the clip

To view your recorded clip, navigate to the file path you set up earlier in the recording settings or click File > Show Recordings from the top menu of OBS Studio. This will directly open the folder containing your recordings.

How to clip videos on a PC with NVIDIA GeForce

Best for: graphic and video-intensive editing

NVIDIA GeForce, rather than being a specific software program, is a series of GPUs and graphic cards developed by NVIDIA. In order to help gamers, streamers and presenters maximize the quality of their streams and clips, NVIDIA has released the NVIDIA GeForce Experience application. It is designed to keep your GeForce graphics card updated as well as give you a host of features tailored to optimizing performance, including screen recording. NVIDIA GeForce works on Windows 10, Windows 11, Dell, Mac, and more, making it a flexible program if you’re looking for options to clip on a Mac or Windows PC. Follow the steps below to learn how to clip on a PC.

Step 1. Start the software and log in to your account

Launch the GeForce Experience application. Log in using your NVIDIA account. If you don't have one, you'll need to create it.

Step 2. Enable the in-game overlay

On the GeForce Experience main interface, click on the Gear icon. Look for the In-Game Overlay toggle and make sure it is turned on. Press Alt + Z to open the in-game overlay.

Click on the Gear icon within the overlay.

Step 3. Adjust the settings

Navigate to the Video capture option. Here, you can set the quality, resolution, and frame rate of your recordings.

Note: while you can set various recording lengths for the Instant Replay feature, for a manual recording, you'll have to manually start and stop the recording. That’s how to clip something on your PC of a specific length, like 30 seconds.

Step 4. Record the screen

Launch the game, program, or stream you want to record. Once in-game, press Alt + F9 to clip things on your PC.

By default, recordings are saved in the Videos folder in your user directory, under a sub-folder named Desktop (or the name of the game you recorded). You can also change the save location from the In-Game Overlay settings.

Hotkeys for clipping on a PC

If you want to know how to clip something on a PC in a quick and easy way, then use the hotkeys.

Game Bar

  • Open Game Bar: Windows + G

  • Start/stop recording: Windows + Alt + R

  • Open Windows settings: WindowsI

Movavi Screen Recorder

  • Start/stop recording: F10

  • Pause/resume recording: F9

  • Take a screenshot: F8

Gecata by Movavi

  • Start/stop recording: F10

  • Pause/resume recording: F9

  • Start streaming: F7

  • Take a screenshot: F8

OBS Studio

While OBS Studio doesn't have default hotkeys for recording set, you can easily set them up:


  1. Click File > Settings in the top menu.

  2. Navigate to the Hotkeys tab on the left.

  3. Assign your desired hotkeys for Start Recording and Stop Recording.

NVIDIA GeForce Experience

  • Open/close the in-game overlay: Alt + Z

  • Start/stop manual recording: Alt + F9

  • Toggle instant replay: Alt + F10 – this captures a predefined length of gameplay prior to pressing the hotkey. The duration can be set in the settings, useful if you want to capture the last 30 seconds of gameplay without always recording.

How to choose the best recording software

  • Determine your purpose. How will you primarily use the software? Will you be making screen clips for gaming, tutorials, or presentations? Knowing this can make it easier to narrow down your choices.

  • Check for compatibility. Although this article is primarily aimed at teaching users how to clip on a PC, make sure that the software you want to use is compatible with your operating system (Windows, macOS or Linux, for example) and meets the minimum system requirements for your computer.

  • Ease of use. You’ll want to look for a clipping software that has an intuitive and easy-to-use interface so that you can streamline your recording process.

  • Detailed recording features. Look for features like full-screen recording, selective area recording, webcam overlay, audio recording, and microphone input support to improve the quality and functionality of your screen captures.

  • Multiple HD recording formats. Choose the software that lets you take clips in high definition and provides you with greater flexibility when it comes to choosing your video format.

  • Superior editing capabilities. Make sure the software comes with basic editing tools so that you can trim, cut, add text or captions, and more to enhance your videos.

  • Minimize performance impact. Video streaming can be a resource-intensive process, make sure you choose a program that won’t hog all of those resources just to make a recording.

  • Real-time previews. Prioritize software that lets you get a real-time preview so that you can adjust settings as needed.

  • Reviews and ratings. Rely on user reviews and ratings to get valuable insights into how the software performs, how reliable it is, and what the overall user experience is like. 

  • Pricing. Compare the pricing plans of different programs to determine the right one for your needs and budget.

Summary

The bottom line when it comes to learning how to clip on a PC is that you carefully consider how you’ll primarily be using the software. Consider things like compatibility and ease of use, especially when it comes to capturing those split-second gaming wins with hotkey shortcuts. Look for essential features like high-definition output, full editing capabilities, and customizable settings while minimizing impact on performance.

Movavi Screen Recorder

The perfect way to record anything from your screen

Disclaimer: Please be aware that Movavi Screen Recorder does not allow capture of copy-protected video and audio streams.

Frequently asked questions

How do you take clips on a PC?

If you’re interested in learning how to clip on a PC, there are several programs that can help:

  • Game Bar

  • Movavi Screen Recorder

  • Gecata by Movavi

  • OBS Studio

  • NVIDIA GeForce Experience

How do you clip on Windows?

To learn how to clip on a PC, follow these steps:

  1. Download and install Movavi Screen Recorder.
    Download Movavi Screen Recorder for Windows
    Download Movavi Screen Recorder for macOS

  2. Select the capture area and adjust the recording settings.

  3. Press F10 to start your recording.

  4. Once you have your clip, press F10 again to stop the recording.

  5. A preview window will open where you can view and optionally edit or export your finished product.

How do you clip the last 30 seconds on a PC?

Here’s how to clip something on a PC using Game Bar. Open the Game Bar by pressing Windows + G. When you find a moment you want to capture, press Windows + Alt + G to record the last 30 seconds of it.

Have questions?

Have questions?

If you can’t find the answer to your question, please feel free to contact our Support Team.

Join for how-to guides, speсial offers, and app tips!