
Step 1. Install the Movavi app
Starting the process is as easy as downloading Movavi onto your device. Once you have the setup file, you’ll be guided through the installation process with prompts.

Software for the MKV that Removes the Audio Tracks form Videos
Here's how to remove music from a video:
Download and launch Movavi Video Editor.
Add media files to the program.
Select the audio track and click Delete.
Save the result.
Video can be part of your life for many reasons. Do you binge-watch episodes from your favorite series or record podcasts or songs of popular artists? Have you taken it one step further by editing your recordings? If you’re ever working with MKV files and need to remove or change default audio track files on one of them, this article is your ideal guide.MKV files stand for Matroska Video file, which is open source. The name is from the Russian word ‘matryoshka,’ referring to hollow wooden dolls. It’s apt since an MKV file can store much different information you may need for watching a video, including video, audio, subtitles, and images.You can play MKV files with many different programs, but when it comes to changing the audio on one of them, you’ll need some special guidance. Let’s help you with that.
Why would you remove the audio track from an MKV or edit an MKV file?
You may need the information on how to remove an audio track from MKV files more than you think. Have you ever found yourself in one of these scenarios?
Editing your own video footage
These days almost anyone can become a quality amateur videographer, thanks to your mobile phone containing high-end lenses and software. Unfortunately, getting clear audio is often a challenge. When images impress, but you pick up unwanted noise, removing the audio can help you solve the problem. You can add audio track files or clean up the audio track and replace it without lowering the quality of your video.
Editing ripped videos
If you copied your Blu-Ray videos so you can easily access them on your hard drive, there’s always a chance that the copying didn’t go 100% as planned. For example, you may simply want the movie’s soundtrack, but your copying software added two soundtracks, one of which includes commentary. When you use our guidelines, you’ll be able to take out the unwanted audio tracks from this dual audio setup, leaving you with only the audio you need.
Creating new videos from captured content
You may enjoy sharing gaming videos, podcasts, commentary on other people’s videos online. After creating, recording, or downloading content for this hobby comes the creative phase. Do you want to add your own commentary instead of using the original audio? Simply layering your own voice over the existing sounds can sound very cluttered, so rather, remove the audio track from MKV and edit a track that includes your voice layered over a softer version of the original sounds. Add the new track, and your content will sound much more professional.
Is it legal to alter MKV files?
While we want you to have fun with modern software and your videos, remember that you carry some responsibility in handling any recorded content. If it’s your own footage, it’s up to you how you want to change it. Also, if you want to know how to strip audio from a video file of content you’ve purchased and it’s meant for your own use without the intent of distributing and selling it, have your fun.However, be careful if you’re working with files that you ripped or obtained through other means than legal purchases. If you plan on selling content, you must ensure you’re not using footage that is covered by copyright. In many other circumstances, you need to consider fair use rights. Often, if you use someone else’s footage – a news story or a piece of a movie – to review or discuss it, you’re welcome to do it and share it with others. However, make sure the final product isn’t libelous or defamatory.Lastly, don’t fall into the trap of misconceptions. If you browse on Reddit and other platforms, you’ll see some people think that as long as you only use a limited section – a few seconds, for example – of a favorite song as background, you’re not crossing copyright boundaries. Unfortunately, whenever you use someone else’s creations for your own benefit, you may need to ask permission.
What do you need to remove an audio track from an MKV?
You’ll save yourself lots of frustration if you prepare appropriately before you sit down to edit and remove the track. Here’s everything you’ll need.
The MKV file – and other audio you want to add
Your MKV file contains all the information you need regarding the audio track you want to take out. So, you won’t need anything else from your source, such as a Blu-Ray disc – just this one file.If you want to delete the audio track from MKV files with the intent to edit and later replace that audio track, also has the new track on your computer.
Suitable hardware
The good news is that you can work on almost any device, as long as it can handle the MKV file and software you’ll use to extract the audio. So, whether you prefer PC or Mac, you’re sorted. You can actually try it with Android, Linux, and other operating systems. Yes, certain high-end tablets or a mobile phone may also work, but we suggest using a computer.
Appropriate software
You do need specialized software for the MKV to remove the audio track. You’ll find both free options like VLC or Handbrake and paid-for products. For the latter, Movavi Video Editor is the premium option that will give you much more features to work with.
How to remove an audio track from an MKV with Movavi Video Editor
Removing an audio track from MKV files is a special process, but if you’re using Movavi, many aspects become easy. This step-by-step plan explains all.
Step 1. Install the Movavi app
Starting the process is as easy as downloading Movavi onto your device. Once you have the setup file, you’ll be guided through the installation process with prompts.
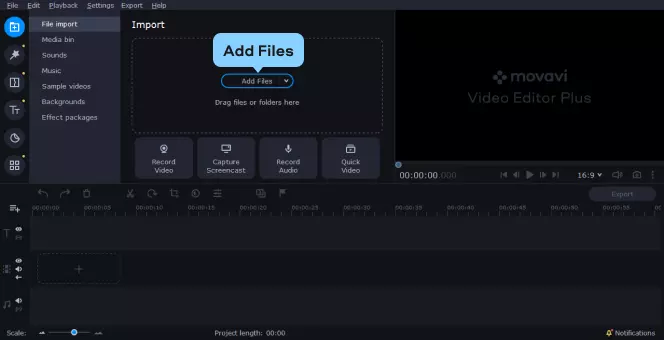
Step 2. Adding video
Once you open the installed program, you’ll see a dashboard with an Add Files option. Click on it and navigate to the MKV file you want to extract the audio from. Then, add this video to the project’s timeline.
Step 3. Removing the audio
On the dashboard’s timeline, you’ll see different tracks of the MKV file, such as the audio and video, displayed one below the other. Movavi has a shortcut to remove any of these items, so simply select the unwanted track and press Delete.

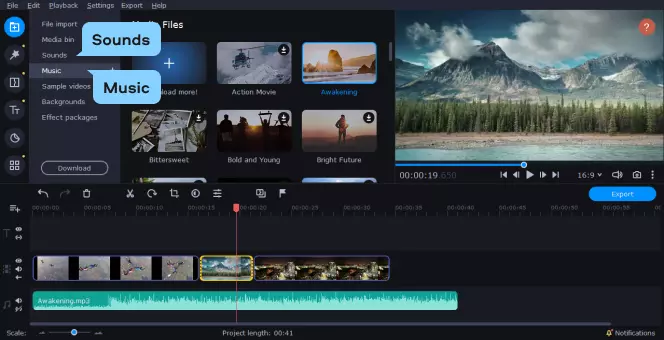
Step 4. Adding audio (optional)
This step is optional and will depend on your purpose for this editing. If you removed audio in order to replace it with something else, Movavi makes it easy to insert it. Use the Add Files option and navigate to the appropriate track on your computer. When selected, Movavi will add it to the timeline. Alternatively, you can use Movavi’s Sounds option, which offers a collection of built-in audio options.
If the new track is shorter than the video track, you can duplicate it or simply add another audio file. If it’s longer than the video, simply drag the right end of the track to the left side until both tracks – audio and video – are equal.
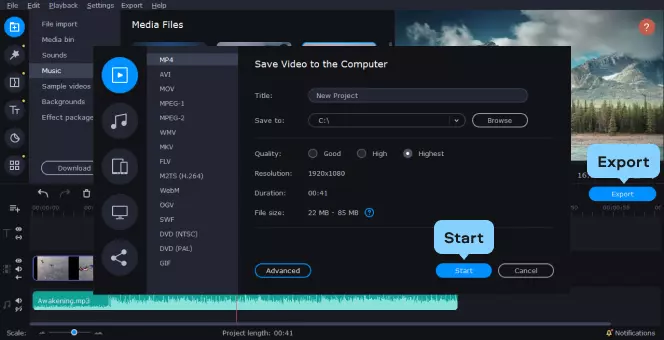
Step 5. Save your project
To save your work, you use the Export option. This will open up a window with multiple tabs, giving you a variety of formats to save your project in, such as MP4. Select your option, and then you can press Start.
You also have different options in terms of how the file will be used after saving. Do you simply want to save it to your hard drive? Or should it be prepared for online uploading, or perhaps you need it exported for use on your mobile device? Movavi has all these options built-in, automating many tasks and simplifying your workflow.
How to remove an audio track from an MKV with VLC
VLC is a product many people have on their computers because it plays so many different video formats, including WebM and AVI files. Apart from viewing videos, you can remove audio track from MKV without encoding with this software too. Note that there are slightly different methods for Mac and Windows, so we’ll cover both in short.
Removing an audio track from an MKV file on Windows
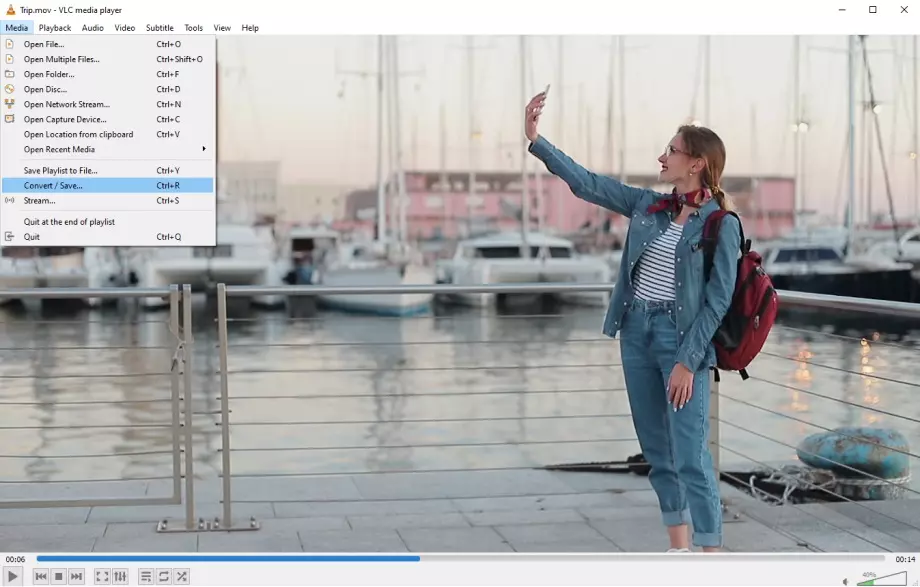
Step 1. Download and open VLC
Step 2. Adding media
Step 3. Start converting
Step 4. Selecting codec
Removing an audio track from an MKV file on Mac
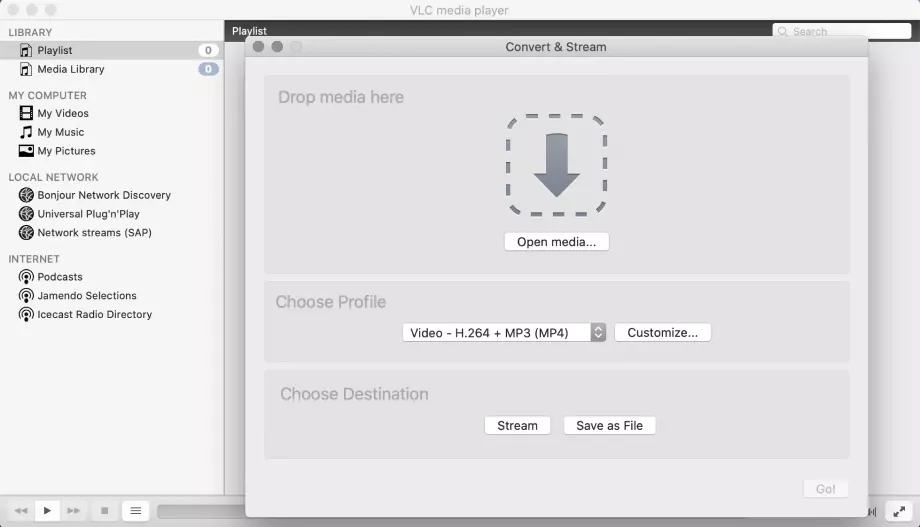
Step 1. Open the program
Step 2 Select destination
Step 3. Convert and customize
You can have fun with your video content and perfect that footage; simply make sure you act within the parameters of the law and fair usage. With these guidelines and an MKV file, it will be easier than ever!Of course, you will need resources like quality audio remover software to get it right. For the best results and the most user-friendly experience, we suggest you try Movavi Video Editor. It’s designed with users’ needs in mind, and it’s so versatile! Download and start playing with it now.

Тop 10 FREE AVI Editors for Windows 10/8/7 and Mac
19 Best Games Video Editors in 2026 – Edit Your Gameplay Videos Easily
Wondershare Filmora Free Alternatives | Top 19 Alternatives to Filmora
7 Best Auto Video Editors: Automatic Video Editing Is a Trend!
How to change video background? Try using Movavi Video Editor!
Video Overlays for YouTube and Presentations | How to Overlay Videos
How to Crop in After Effects | A Detailed Guide
How to Remove Audio from Video for Free


1.5M+ users already subscribed to our newsletter